bulb SAAB 9-5 2003 Owners Manual
[x] Cancel search | Manufacturer: SAAB, Model Year: 2003, Model line: 9-5, Model: SAAB 9-5 2003Pages: 288, PDF Size: 16.78 MB
Page 3 of 288
3
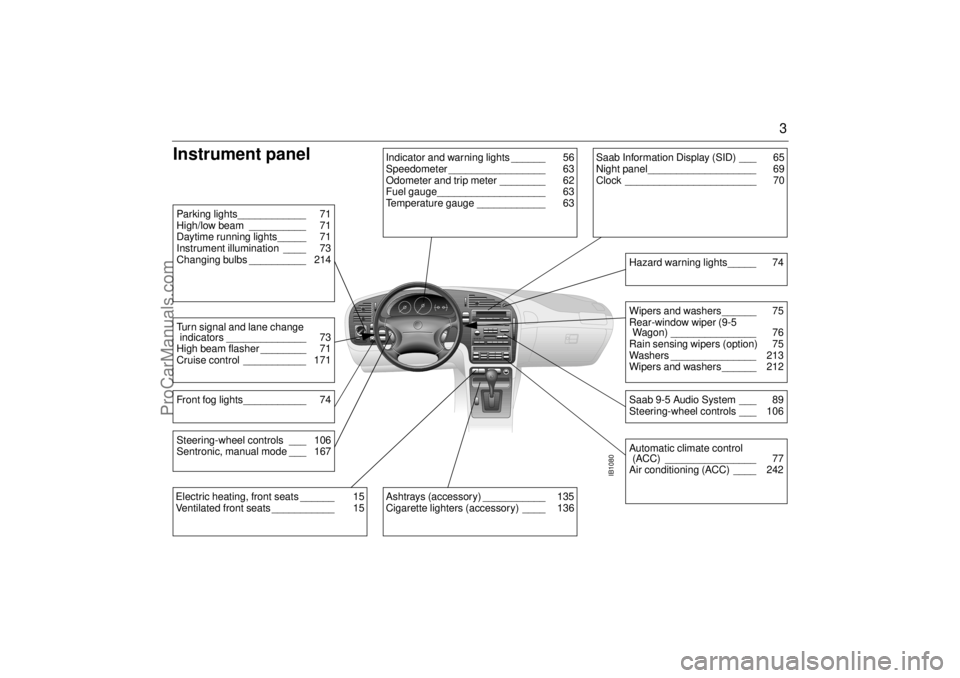
Instrument panel
IB1080
Indicator and warning lights ______ 56
Speedometer _________________ 63
Odometer and trip meter ________ 62
Fuel gauge___________________ 63
Temperature gauge ____________ 63
Parking lights____________ 71
High/low beam __________ 71
Daytime running lights_____ 71
Instrument illumination ____ 73
Changing bulbs __________ 214Turn signal and lane change
indicators ______________ 73
High beam flasher ________ 71
Cruise control ___________ 171Front fog lights___________ 74
Ashtrays (accessory) ___________ 135
Cigarette lighters (accessory) ____ 136
Saab Information Display (SID) ___ 65
Night panel___________________ 69
Clock _______________________ 70
Wipers and washers ______ 75
Rear-window wiper (9-5
Wagon) _______________ 76
Rain sensing wipers (option) 75
Washers _______________ 213
Wipers and washers ______ 212Saab 9-5 Audio System ___ 89
Steering-wheel controls ___ 106Hazard warning lights_____ 74Automatic climate control
(ACC) ________________ 77
Air conditioning (ACC) ____ 242
Electric heating, front seats ______ 15
Ventilated front seats ___________ 15Steering-wheel controls ___ 106
Sentronic, manual mode ___ 167
ProCarManuals.com
Page 4 of 288
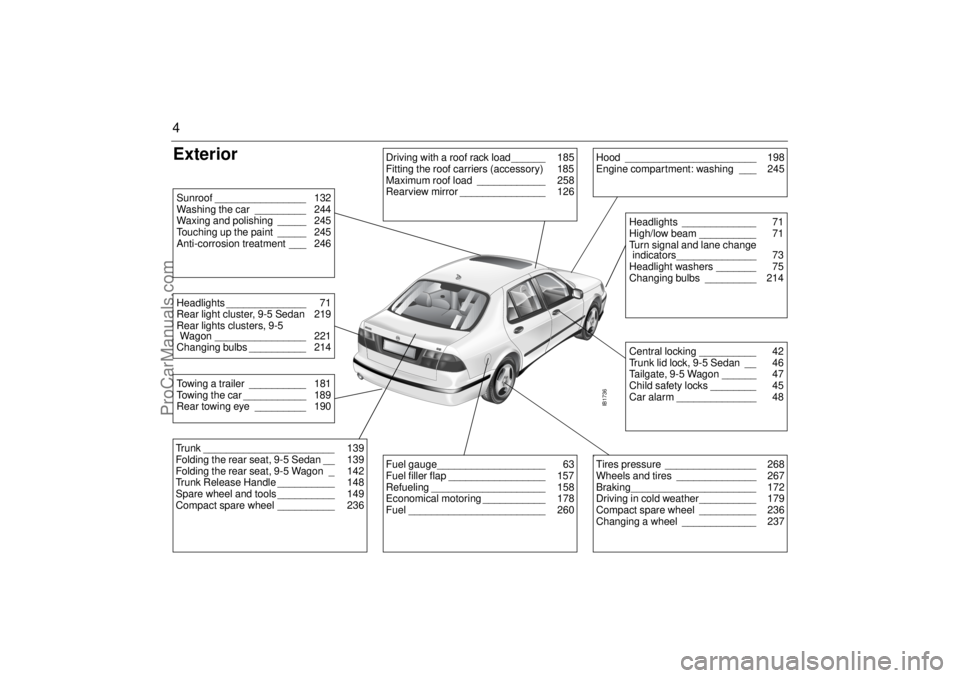
4Exterior
IB1736
Driving with a roof rack load______ 185
Fitting the roof carriers (accessory) 185
Maximum roof load ____________ 258
Rearview mirror _______________ 126
Hood _______________________ 198
Engine compartment: washing ___ 245
Central locking __________ 42
Trunk lid lock, 9-5 Sedan __ 46
Tailgate, 9-5 Wagon ______ 47
Child safety locks ________ 45
Car alarm ______________ 48Headlights _____________ 71
High/low beam __________ 71
Turn signal and lane change
indicators______________ 73
Headlight washers _______ 75
Changing bulbs _________ 214
Fuel gauge___________________ 63
Fuel filler flap _________________ 157
Refueling ____________________ 158
Economical motoring ___________ 178
Fuel ________________________ 260
b Tires pressure ________________ 268
Wheels and tires ______________ 267
Braking______________________ 172
Driving in cold weather__________ 179
Compact spare wheel __________ 236
Changing a wheel _____________ 237
Trunk _______________________ 139
Folding the rear seat, 9-5 Sedan __ 139
Folding the rear seat, 9-5 Wagon _ 142
Trunk Release Handle __________ 148
Spare wheel and tools __________ 149
Compact spare wheel __________ 236Towing a trailer __________ 181
Towing the car ___________ 189
Rear towing eye _________ 190Headlights ______________ 71
Rear light cluster, 9-5 Sedan 219
Rear lights clusters, 9-5
Wagon ________________ 221
Changing bulbs __________ 214Sunroof ________________ 132
Washing the car _________ 244
Waxing and polishing _____ 245
Touching up the paint _____ 245
Anti-corrosion treatment ___ 246
ProCarManuals.com
Page 149 of 288
149 Interior equipment and trunk
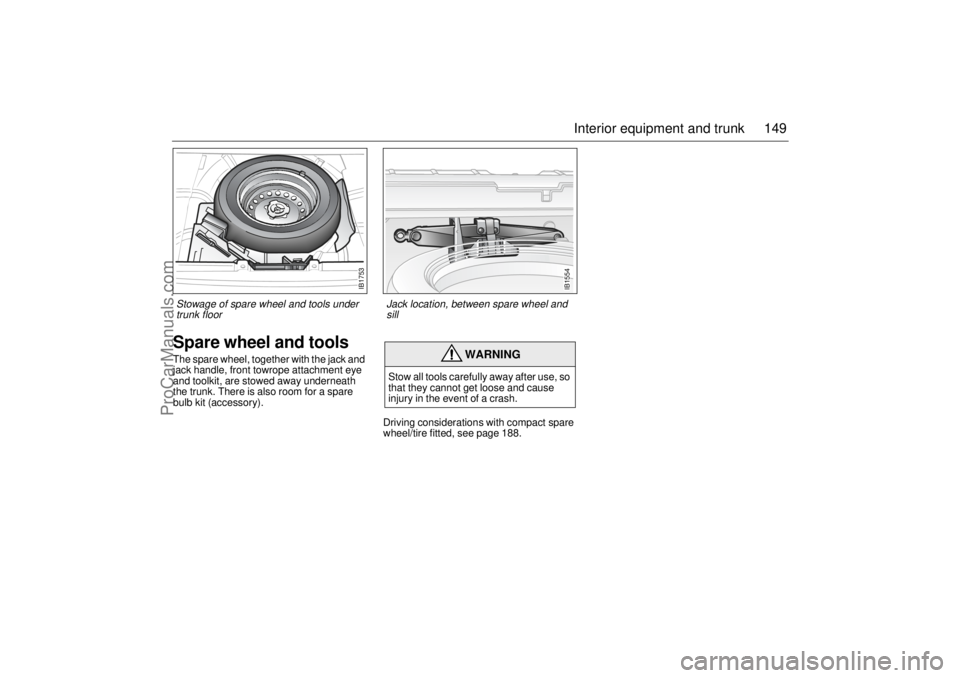
Spare wheel and toolsThe spare wheel, together with the jack and
jack handle, front towrope attachment eye
and toolkit, are stowed away underneath
the trunk. There is also room for a spare
bulb kit (accessory).
Driving considerations with compact spare
wheel/tire fitted, see page 188.
WARNING
Stow all tools carefully away after use, so
that they cannot get loose and cause
injury in the event of a crash.
IB1753
Stowage of spare wheel and tools under
trunk floor
IB1554
Jack location, between spare wheel and
sill
ProCarManuals.com
Page 197 of 288
197 Car care and technical information
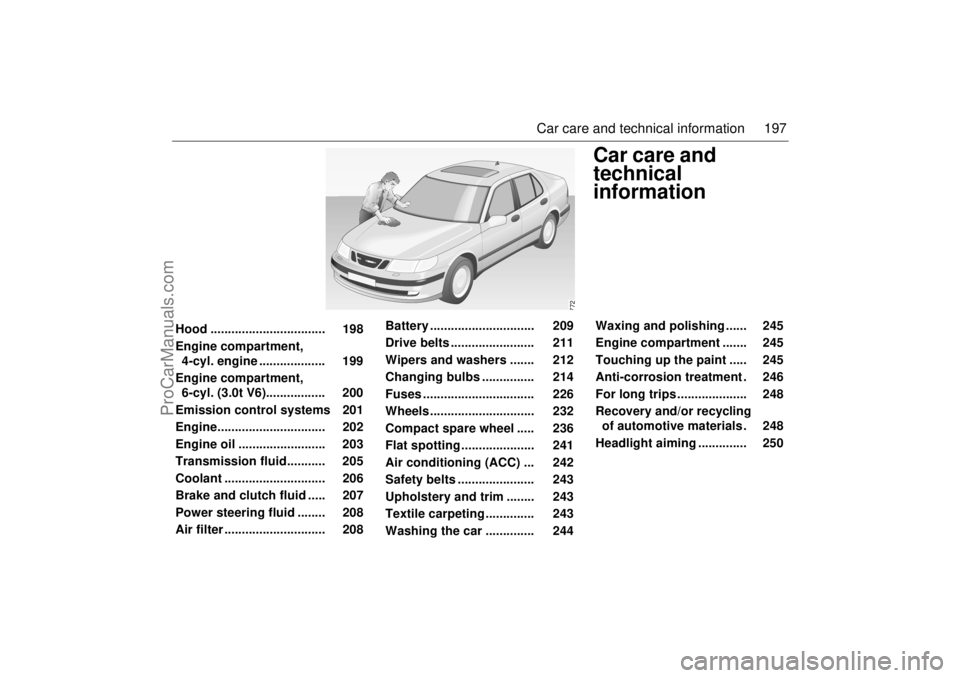
Car care and
technical
information
772
Hood ................................. 198
Engine compartment,
4-cyl. engine ................... 199
Engine compartment,
6-cyl. (3.0t V6)................. 200
Emission control systems 201
Engine............................... 202
Engine oil ......................... 203
Transmission fluid........... 205
Coolant ............................. 206
Brake and clutch fluid ..... 207
Power steering fluid ........ 208
Air filter ............................. 208 Battery .............................. 209
Drive belts ........................ 211
Wipers and washers ....... 212
Changing bulbs ............... 214
Fuses ................................ 226
Wheels .............................. 232
Compact spare wheel ..... 236
Flat spotting..................... 241
Air conditioning (ACC) ... 242
Safety belts ...................... 243
Upholstery and trim ........ 243
Textile carpeting.............. 243
Washing the car .............. 244 Waxing and polishing ...... 245
Engine compartment ....... 245
Touching up the paint ..... 245
Anti-corrosion treatment . 246
For long trips .................... 248
Recovery and/or recycling
of automotive materials. 248
Headlight aiming .............. 250
ProCarManuals.com
Page 214 of 288

214 Car care and technical informationChanging bulbsCheck that the new bulb is working when finished.
Use only "Long Life" bulbs.
Headlight aiming, see page 250.
Bi-Xenon headlight (certain models only)Bi-Xenon headlights produce roughly twice as much light as halo-
gen bulbs and have a significantly longer service life.
The lamp units consist of a gas discharge lamp containing xenon.
When the lights are switched on a very high voltage activates the
xenon gas. The lamps soon reach full intensity.
Cars with xenon headlights have automatic levelling. The levelling
system comprises two sensors on the front axle, one on the rear axle
and a control unit under the headlight housing. Headlight alignment
is regulated automatically to prevent dazzling oncoming traffic.
Alignment is also adjusted during braking.
WARNING
Before changing a bulb in the engine bay, switch off the engine to
avoid danger of fingers and hands being injured by moving parts.
The radiator fan can start up even when the engine is switched off.
Bi-Xenon headlights are high voltage and must therefore be
changed at an authorized Saab workshop. Work involving
high-voltage components is potentially lethal.NOTICE Since the headlight lenses are made of plastic, rinse dried-on
dirt with water and allow it time to soften up before cleaning
the lenses. Avoid rubbing the lenses when dry and never use
solvents.
Use de-icer spray instead of scraping the ice off.
NOTICE Do not fit bulbs with a higher rating than 55 W, since the head-
light reflector and the wiring of the car are not designed for a
higher wattage.
Switch off the ignition before changing a bulb, to avoid possi-
ble short-circuiting.
Do not touch the glass of the bulbs with your fingers. The oil
on your skin can shorten the life of the bulb.
ProCarManuals.com
Page 215 of 288
215 Car care and technical information
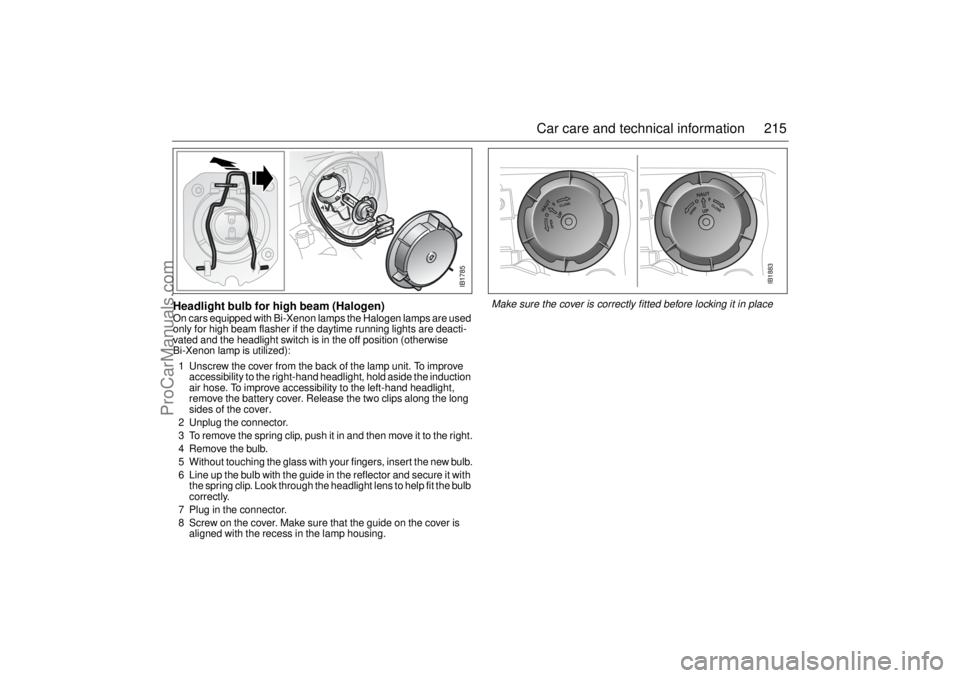
Headlight bulb for high beam (Halogen)On cars equipped with Bi-Xenon lamps the Halogen lamps are used
only for high beam flasher if the daytime running lights are deacti-
vated and the headlight switch is in the off position (otherwise
Bi-Xenon lamp is utilized):
1 Unscrew the cover from the back of the lamp unit. To improve
accessibility to the right-hand headlight, hold aside the induction
air hose. To improve accessibility to the left-hand headlight,
remove the battery cover. Release the two clips along the long
sides of the cover.
2 Unplug the connector.
3 To remove the spring clip, push it in and then move it to the right.
4 Remove the bulb.
5 Without touching the glass with your fingers, insert the new bulb.
6 Line up the bulb with the guide in the reflector and secure it with
the spring clip. Look through the headlight lens to help fit the bulb
correctly.
7 Plug in the connector.
8 Screw on the cover. Make sure that the guide on the cover is
aligned with the recess in the lamp housing.
IB1785
IB1883
Make sure the cover is correctly fitted before locking it in place
ProCarManuals.com
Page 216 of 288
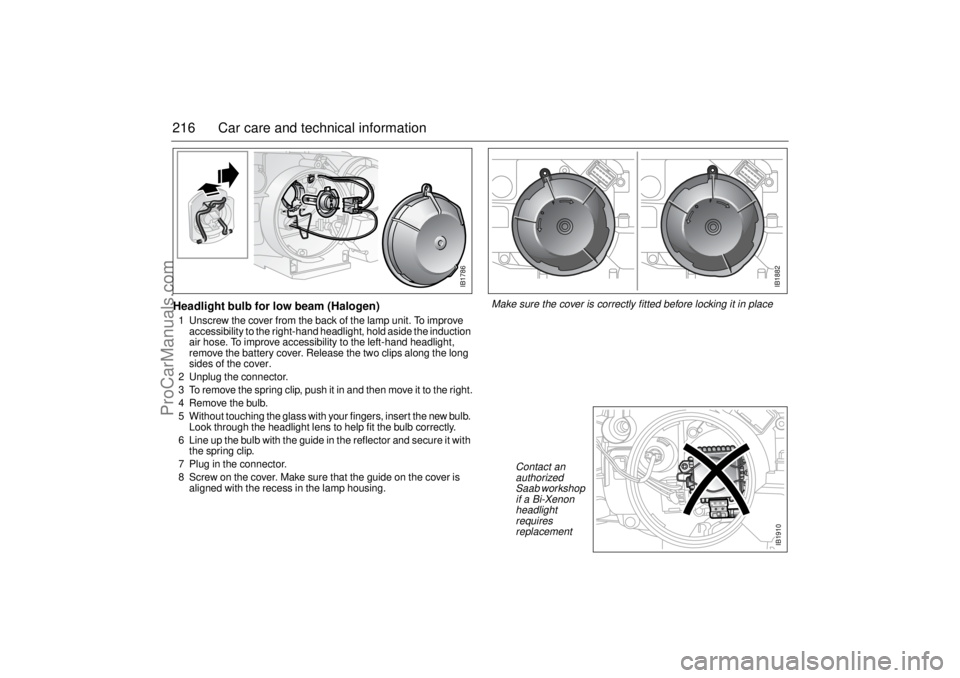
216 Car care and technical informationHeadlight bulb for low beam (Halogen)1 Unscrew the cover from the back of the lamp unit. To improve
accessibility to the right-hand headlight, hold aside the induction
air hose. To improve accessibility to the left-hand headlight,
remove the battery cover. Release the two clips along the long
sides of the cover.
2 Unplug the connector.
3 To remove the spring clip, push it in and then move it to the right.
4 Remove the bulb.
5 Without touching the glass with your fingers, insert the new bulb.
Look through the headlight lens to help fit the bulb correctly.
6 Line up the bulb with the guide in the reflector and secure it with
the spring clip.
7 Plug in the connector.
8 Screw on the cover. Make sure that the guide on the cover is
aligned with the recess in the lamp housing.
IB1786
IB1882
Make sure the cover is correctly fitted before locking it in place
IB1910
Contact an
authorized
Saab workshop
if a Bi-Xenon
headlight
requires
replacement
ProCarManuals.com
Page 217 of 288
217 Car care and technical information
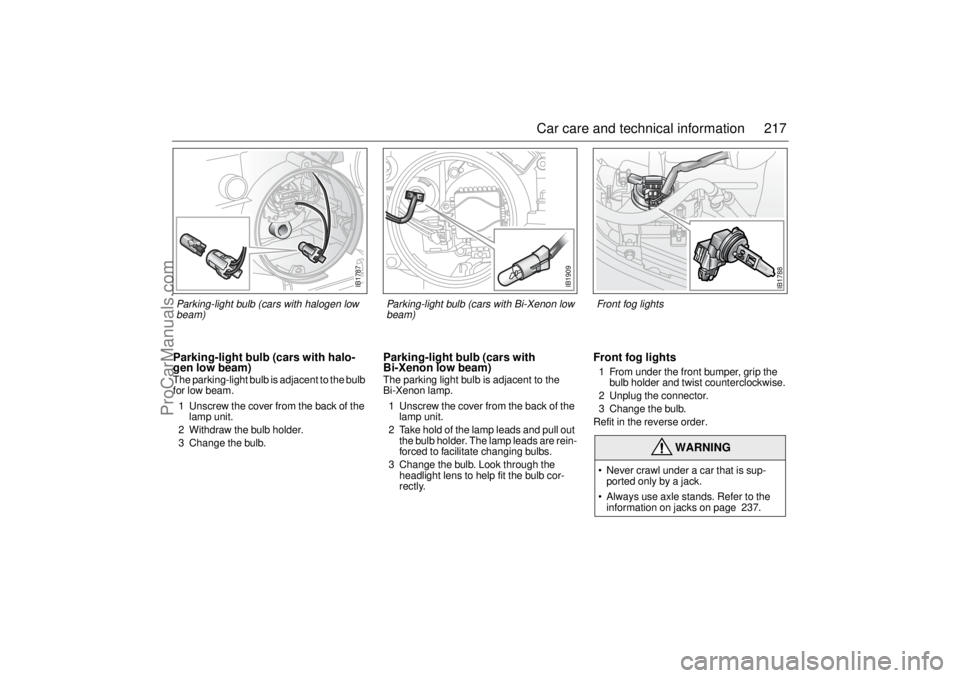
Parking-light bulb (cars with halo-
gen low beam)The parking-light bulb is adjacent to the bulb
for low beam.
1 Unscrew the cover from the back of the
lamp unit.
2 Withdraw the bulb holder.
3 Change the bulb.
Parking-light bulb (cars with
Bi-Xenon low beam)The parking light bulb is adjacent to the
Bi-Xenon lamp.
1 Unscrew the cover from the back of the
lamp unit.
2 Take hold of the lamp leads and pull out
the bulb holder. The lamp leads are rein-
forced to facilitate changing bulbs.
3 Change the bulb. Look through the
headlight lens to help fit the bulb cor-
rectly.
Front fog lights 1 From under the front bumper, grip the
bulb holder and twist counterclockwise.
2 Unplug the connector.
3 Change the bulb.
Refit in the reverse order.
WARNING
Never crawl under a car that is sup-
ported only by a jack.
Always use axle stands. Refer to the
information on jacks on page 237.
IB1787
Parking-light bulb (cars with halogen low
beam)
IB1788
Front fog lights
IB1909
Parking-light bulb (cars with Bi-Xenon low
beam)
ProCarManuals.com
Page 218 of 288
218 Car care and technical information
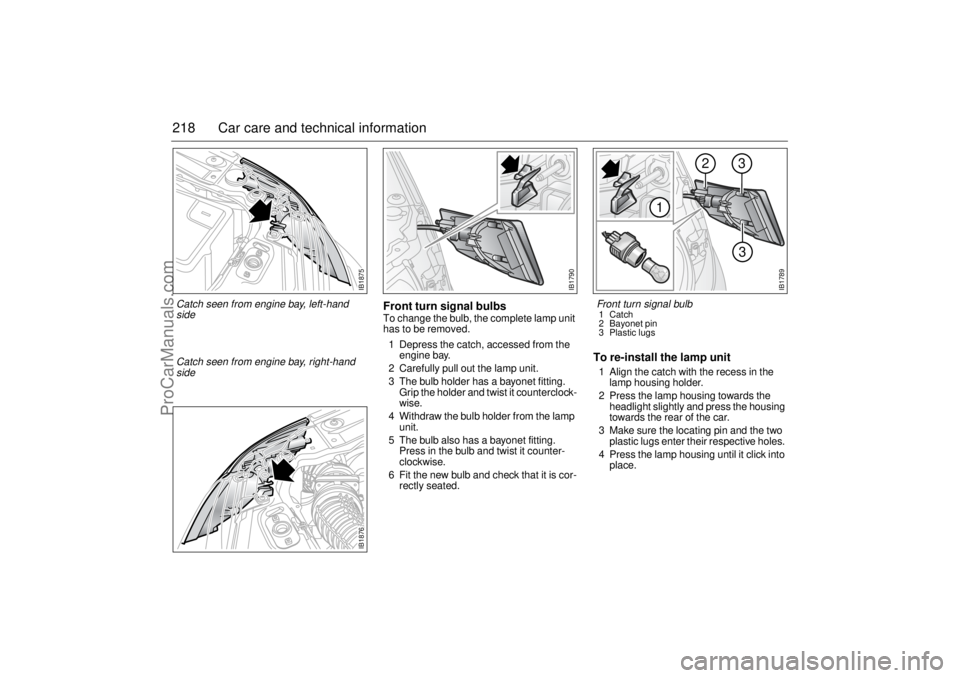
Front turn signal bulbsTo change the bulb, the complete lamp unit
has to be removed.
1 Depress the catch, accessed from the
engine bay.
2 Carefully pull out the lamp unit.
3 The bulb holder has a bayonet fitting.
Grip the holder and twist it counterclock-
wise.
4 Withdraw the bulb holder from the lamp
unit.
5 The bulb also has a bayonet fitting.
Press in the bulb and twist it counter-
clockwise.
6 Fit the new bulb and check that it is cor-
rectly seated.
To re-install the lamp unit1 Align the catch with the recess in the
lamp housing holder.
2 Press the lamp housing towards the
headlight slightly and press the housing
towards the rear of the car.
3 Make sure the locating pin and the two
plastic lugs enter their respective holes.
4 Press the lamp housing until it click into
place.
IB1789
2
13
3
Front turn signal bulb1Catch
2 Bayonet pin
3 Plastic lugs
IB1875
Catch seen from engine bay, left-hand
side
IB1876
Catch seen from engine bay, right-hand
side
IB1790
ProCarManuals.com
Page 219 of 288
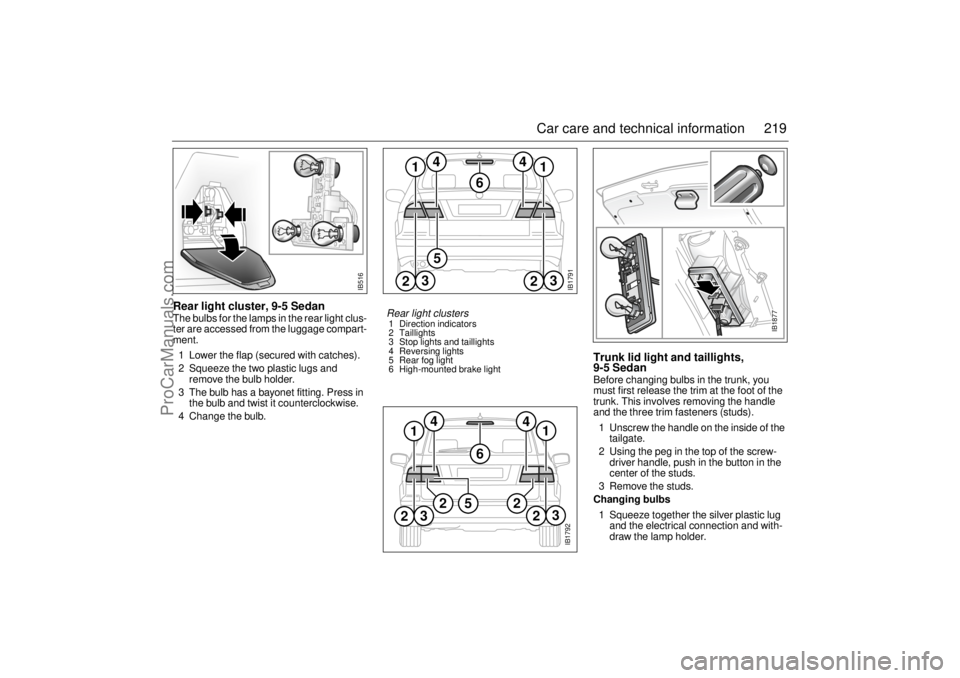
219 Car care and technical information
Rear light cluster, 9-5 SedanThe bulbs for the lamps in the rear light clus-
ter are accessed from the luggage compart-
ment.
1 Lower the flap (secured with catches).
2 Squeeze the two plastic lugs and
remove the bulb holder.
3 The bulb has a bayonet fitting. Press in
the bulb and twist it counterclockwise.
4 Change the bulb.
Trunk lid light and taillights,
9-5 SedanBefore changing bulbs in the trunk, you
must first release the trim at the foot of the
trunk. This involves removing the handle
and the three trim fasteners (studs).
1 Unscrew the handle on the inside of the
tailgate.
2 Using the peg in the top of the screw-
driver handle, push in the button in the
center of the studs.
3 Remove the studs.
Changing bulbs
1 Squeeze together the silver plastic lug
and the electrical connection and with-
draw the lamp holder.
IB1791
12
3
2
3
5
6
4
1
4
Rear light clusters 1 Direction indicators
2 Taillights
3 Stop lights and taillights
4 Reversing lights
5 Rear fog light
6 High-mounted brake light
IB516
IB1792
1
1
2
3
2
6
4
4
52
2
3
IB1877
ProCarManuals.com