SAAB 9-7X 2006 Owners Manual
Manufacturer: SAAB, Model Year: 2006, Model line: 9-7X, Model: SAAB 9-7X 2006Pages: 434, PDF Size: 2.89 MB
Page 211 of 434
If the CD is not removed, after 25 seconds, the CD will
be automatically pulled back into the player. If CD is
pushed back into the player, before the 25 second time
period is complete, the player will sense an error
and will try to eject the CD several times before
stopping.
Do not repeatedly press the CD eject button to eject a
CD after you have tried to push it in manually. The
player’s 25-second eject timer will reset at each press of
the eject button, causing the player to not eject the
CD until the 25-second time period has elapsed.
r(Reverse):Press this button to reverse within the
track.
[(Fast Forward):Press this button to fast forward
within the track.
N(Repeat):With repeat, one track or an entire CD
can be repeated.To use repeat, do the following:
To repeat the track you are listening to, press and
release the repeat button. RPT ON will appear on
the display. Press this button again to turn off repeat
play. RPT OFF will appear on the display.
To repeat the CD you are listening to, press and hold
the repeat button for two seconds. RPT ON will
appear on the display. Press this button again to turn
off repeat play. RPT OFF will appear on the display.
y(Random):With random, you can listen to the
tracks in random, rather than sequential, order, on one
CD or on all of the CDs. To use random, do one of
the following:
To play the tracks on the CD you are listening to in
random order, press and release the random
button. RANDOM ONE will appear on the display.
Press this button again to turn off random play.
To play the tracks on all of the CDs that are loaded
in random order, press and hold this button for
more than two seconds. You will hear a beep and
RANDOM ALL will appear on the display. Press this
button again to turn off random play.
3-81
ProCarManuals.com
Page 212 of 434
tSEEKu:Press the left arrow to go to the start of
the current track, if more than ten seconds have played.
Press the right arrow to go to the next track. If either
arrow is held or pressed more than once, the player will
continue moving backward or forward through the CD.
To scan one CD, press and hold either arrow for more
than two seconds until SCAN appears on the display and
you hear a beep. The radio will go to the next track, play
for 10 seconds, then go on to the next track. Press either
arrow again, to stop scanning.
To scan all loaded CDs, press and hold either arrow for
more than four seconds until CD SCAN appears on the
display and you hear a beep. Use this feature to listen to
10 seconds of the �rst track of each loaded CD. Press
either arrow again, to stop scanning.
DISP (Display):Press this knob to see how long the
current track has been playing. The elapsed time of the
track will appear on the display. To change the
default on the display, track or elapsed time, press this
knob until you see the display you want, then hold
the knob for two seconds. The radio will produce one
beep and the selected display will now be the default.
BAND:Press this button to listen to the radio when
a CD is playing. The inactive CD(s) will remain safely
inside the radio for future listening.B(CD):Press this button to play a CD when listening
to the radio. The CD symbol will appear on the display
when a CD is loaded.
AUTO EQ (Automatic Equalization):Press AUTO EQ
to select an equalization setting while playing a CD.
The equalization will be set whenever a CD is played.
See “AUTO EQ” listed previously for more information.
If you select an EQ setting for your CD, it will be
activated each time you play a CD.
Using Song List Mode
R
(Song List):The six-disc CD changer has a
feature called song list. This feature is capable of saving
20 track selections.
To save tracks into the song list feature, perform the
following steps:
1. Turn the CD player on and load it with at least one
CD. See “LOAD CD” listed previously in this section
for more information.
2. Check to see that the CD changer is not in song list
mode. S-LIST should not appear on the display. If
S-LIST is present, press the song list button to
turn it off.
3-82
ProCarManuals.com
Page 213 of 434
3. Select the desired CD by pressing the numbered
pushbutton and then use the SEEK SCAN right
arrow to locate the track to be saved. the track will
begin to play.
4. Press and hold the song list button to save the
track into memory. When the song list button is
pressed, one beep will be heard immediately. After
two seconds of continuously pressing the song
list button, two beeps will sound to con�rm the track
has been saved.
5. Repeat Steps 3 and 4 for saving other selections.
S-LIST FULL will appear on the display if you try to save
more than 20 selections.
To play the song list, press the song list button.
One beep will be heard and S-LIST will appear on the
display. The recorded tracks will begin to play in
the order they were saved.
Seek through the song list by using the SEEK SCAN
arrows. Seeking past the last saved track will return to
the �rst saved track.
To delete tracks from the song list, perform the following
steps:
1. Turn the CD player on.
2. Press the song list button to turn song list on.
S-LIST will appear on the display.3. Press either SEEK SCAN arrow to select the
desired track to be deleted.
4. Press and hold the song list button for two seconds.
When the song list button is pressed, one beep
will be heard immediately. After two seconds of
continuously pressing the song list button, two beeps
will be heard to con�rm that the track has been
deleted.
After a track has been deleted, the remaining tracks are
moved up the list. When another track is added to the
song list, the track will be added to the end of the list.
To delete the entire song list, perform the following
steps:
1. turn the CD player on.
2. Press the song list button to turn song list on.
S-LIST will appear on the display.
3. Press and hold the song list button for more than
four seconds. One beep will be heard, followed by
two beeps after two seconds, and a �nal beep
will be heard after four seconds. S-LIST EMPTY will
appear on the display indicating the song list has
been deleted.
3-83
ProCarManuals.com
Page 214 of 434
If a CD is ejected, and the song list contains saved
tracks from that CD, those tracks are automatically
deleted from the song list. Any tracks saved to the song
list again are added to the bottom of the list.
To end song list mode, press the song list button.
One beep will be heard and S-LIST will be removed
from the display.
CD Messages
CHECK CD:If this message appears on the display
and/or the CD comes out, it could be for one of the
following reasons:
It is very hot. When the temperature returns to
normal, the CD should play.
You are driving on a very rough road. When the
road becomes smoother, the CD should play.
The CD is dirty, scratched, wet, or upside down.
The air is very humid. If so, wait about an hour and
try again.
There may have been a problem while burning
the CD.
The label may be caught in the CD player.If the CD is not playing correctly, for any other reason,
try a known good CD.
If any error occurs repeatedly or if an error cannot be
corrected, contact your dealer. If the radio displays
an error message, write it down and provide it to your
dealer when reporting the problem.
Navigation/Radio System
Your vehicle may have a navigation radio system.
The navigation system has built-in features intended to
minimize driver distraction. Technology alone, no matter
how advanced, can never replace your own judgment.
See the navigation system manual for some tips to help
you reduce distractions while driving.
Rear Seat Entertainment System
Your vehicle may have a DVD Rear Seat Entertainment
(RSE) system. The RSE system includes a DVD
player, a video display screen, two sets of wireless
headphones, and a remote control.
3-84
ProCarManuals.com
Page 215 of 434
Parental Control
This button is located behind the video screen. Press
this button while a DVD or CD is playing to freeze
the video and mute the audio. The video screen will
display Parental Control ON and the power indicator
light on the DVD player will �ash. It will also disable all
other button operations from the remote control and
the DVD player, with the exception of the eject button.
Press this button again to restore operation of the
DVD player.
This button may also be used to turn the DVD player
power on and automatically resume play if the ignition is
in RUN, ACCESSORY, or if RAP is active.
Before You Drive
The RSE system is for rear seat passengers only.
The driver cannot safely view the video screen while
driving and should not try to do so.
Headphones
The RSE system includes two sets of wireless
headphones.
Each set of headphones has an ON/OFF control. An
indicator light will illuminate on the headphones when
they are on. If the light does not illuminate, the batteries
may need to be replaced. See “Battery Replacement”
following for more information.
Each set of headphones has a volume knob. To adjust
the volume, adjust this knob.
The transmitters are located below the video display
screen. The headphones will shut off automatically
if they lose the signal from the system after about
four minutes to save battery power. The signal may
be lost if the system is turned off or if the headphones
are out of range of the transmitters.
When using the wired headphones, if the front seat
passengers play a CD in the Radio with Six-Disc CD
(if equipped) or use XM™ Satellite Radio Service
(if equipped), you will hear the audio for these sources,
instead of the DVD or CD that is currently playing
through the RSE.
Notice:Do not store the headphones in heat or
direct sunlight. This could damage the headphones
and repairs will not be covered by your warranty.
Keep the headphones stored in a cool, dry place.
3-85
ProCarManuals.com
Page 216 of 434
Battery Replacement
To change the batteries, do the following:
1. Loosen the screw on the battery compartment door
located on the left side of the headphone earpiece.
2. Replace the two AAA batteries in the compartment.
Make sure that they are installed correctly, using
the diagram on the inside of the battery
compartment.
3. Tighten the screw to close the compartment door.
If the headphones are to be stored for a long period
of time, remove the batteries and keep them in a cool,
dry place.
Stereo RCA Jacks
The RCA jacks are located behind the video screen.
The RCA jacks allow audio and video signals to
be connected from an auxiliary device such as a
camcorder or a video game unit to the RSE system.
Standard RCA cables, not included, are needed
to connect the auxiliary device to the RCA jacks. The
yellow connector inputs video and the red and white
connectors input right and left audio. Refer to the
manufacturer’s instructions for proper connection of the
auxiliary device.To use the auxiliary inputs on the RSE system, connect
an external auxiliary device to the color-coded RCA
jacks and turn both the auxiliary device and the
RSE system power on. If the RSE system had been
previously in the DVD player mode, pressing the SRCE
button on the faceplate or the remote control will
switch the RSE system between the auxiliary device
and the DVD player.
How to Change the Video Format when in
the Auxiliary Mode
The auxiliary input video format is preset to NTSC.
In some countries, the video format may be in the PAL
system. To change the video format, perform the
following:
1. Press the display menu button.
2. Press the down arrow button to highlight the Video
Format option.
3. Press the enter button to select Video Format.
4. Press the right or left arrow button to select
the desired video format.
5. Press the enter button to accept the change.
3-86
ProCarManuals.com
Page 217 of 434
Audio Output
Audio from the DVD player or auxiliary inputs may be
heard through the following possible sources:
Wireless Headphones
Vehicle Speakers
Vehicle wired headphone jacks on the Rear Seat
Audio system (if equipped)
The RSE system will always transmit the audio signal by
infrared to the wireless headphones, if there is audio
available. See “Headphones” previously for more
information.
The RSE system is capable of outputting audio to the
vehicle speakers by using the radio. The RSE system
may be selected as an audio source on the radio if the
RSE system power is on. Once the RSE system is
selected as an audio source on the radio, adjust the
speaker volume on the radio, if necessary. If the RSE
system power is not on, the RSE system will not be an
available source on the radio. Refer to the radio
information for the radio that your vehicle has for more
information.
The RSE system is capable of outputting audio to the
wired headphone jacks on the rear seat audio system
(if equipped). The RSE system may be selected as
an audio source on the rear seat audio system if
the RSE system power is on. Refer toRear Seat Audio
(RSA) on page 3-96for more information.
Video Screen
The video screen is located in the overhead console.
To use the video screen, push forward on the release
latch and the screen will fold down. Adjust the screen’s
position as desired. When the video screen is not in
use, push it up into its latched position.
The DVD player and display will continue to operate
when the screen is in the up or the down position. The
video screen contains the transmitters for the wireless
headphones and the remote control. If the screen is in the
closed position, the signals will not be available for the
operation of the headphones or the remote control.
Notice:Avoid directly touching the video screen,
as damage may occur. See “Cleaning the Video
Screen” later in this section for more information.
DVD Player
The DVD player is located in the overhead console. The
DVD player can be controlled by the buttons on the
DVD player and/or by the buttons on the remote control.
See “Remote Control” later in this section for more
information.
The DVD player power may be turned on when the
ignition is in RUN, ACCESSORY, or when Retained
Accessory Power (RAP) is active.
3-87
ProCarManuals.com
Page 218 of 434
The RSE system DVD player is only compatible with
DVDs of the appropriate region code for the country that
the vehicle was sold in. The DVD region code is
printed on the jacket of most DVDs.
Standard audio CDs, CD-R, CD-RW, Video CD and
Photo CD/CD-R media are fully supported by this DVD
player. DVD-R and DVD-RW media is supported if
formatted as DVD-Video. DVD+R and DVD+RW media
may or may not be supported by the DVD player.
The DVD player does not support DVD-RAM,
DVD-ROM, and DVD Audio media. An error message
will appear on the display if this type of media is inserted
into the DVD player.
When using the wired headphones, not included, if the
front seat passengers play a CD in the Radio with
Six-Disc CD (if equipped) or use XM™ Satellite Radio
Service (if equipped), you will hear the audio for
these sources, instead of the DVD or CD that is currently
playing through the RSE.
If an error message appears on the video screen, see
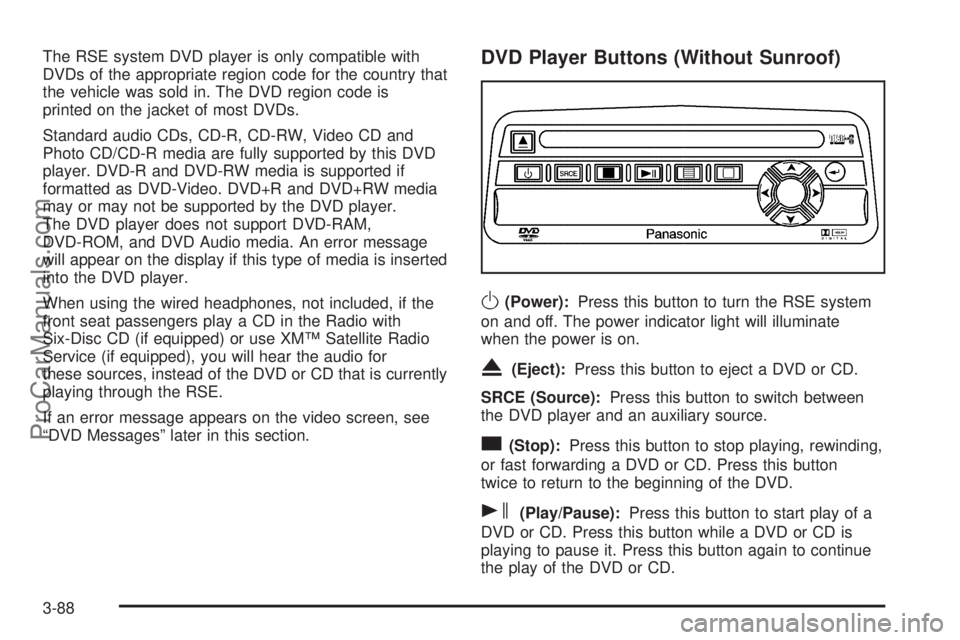
“DVD Messages” later in this section.DVD Player Buttons (Without Sunroof)
O(Power):Press this button to turn the RSE system
on and off. The power indicator light will illuminate
when the power is on.
X(Eject):Press this button to eject a DVD or CD.
SRCE (Source):Press this button to switch between
the DVD player and an auxiliary source.
c(Stop):Press this button to stop playing, rewinding,
or fast forwarding a DVD or CD. Press this button
twice to return to the beginning of the DVD.
s(Play/Pause):Press this button to start play of a
DVD or CD. Press this button while a DVD or CD is
playing to pause it. Press this button again to continue
the play of the DVD or CD.
3-88
ProCarManuals.com
Page 219 of 434
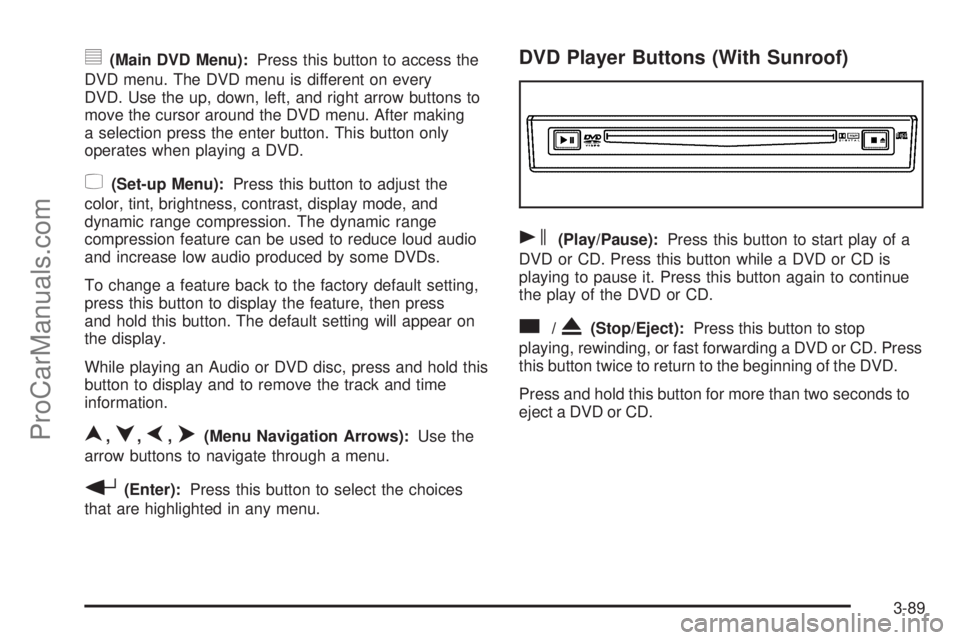
y(Main DVD Menu):Press this button to access the
DVD menu. The DVD menu is different on every
DVD. Use the up, down, left, and right arrow buttons to
move the cursor around the DVD menu. After making
a selection press the enter button. This button only
operates when playing a DVD.
z(Set-up Menu):Press this button to adjust the
color, tint, brightness, contrast, display mode, and
dynamic range compression. The dynamic range
compression feature can be used to reduce loud audio
and increase low audio produced by some DVDs.
To change a feature back to the factory default setting,
press this button to display the feature, then press
and hold this button. The default setting will appear on
the display.
While playing an Audio or DVD disc, press and hold this
button to display and to remove the track and time
information.
n,q,p,o(Menu Navigation Arrows):Use the
arrow buttons to navigate through a menu.
r(Enter):Press this button to select the choices
that are highlighted in any menu.
DVD Player Buttons (With Sunroof)
s(Play/Pause):Press this button to start play of a
DVD or CD. Press this button while a DVD or CD is
playing to pause it. Press this button again to continue
the play of the DVD or CD.
c/X(Stop/Eject):Press this button to stop
playing, rewinding, or fast forwarding a DVD or CD. Press
this button twice to return to the beginning of the DVD.
Press and hold this button for more than two seconds to
eject a DVD or CD.
3-89
ProCarManuals.com
Page 220 of 434

Playing a Disc
To play a disc, gently insert the disc with the label side
up into the loading slot. The DVD player will continue
loading the disc and the player will automatically start, if
the vehicle is in RUN, ACCESSORY, or when RAP is
active.
If a disc is already in the player, press the play/pause
button on the DVD player faceplate or on the remote
control.
Some DVDs will not allow fast forwarding or skipping of
the copyright information or the previews. Some
DVDs will begin playing after the previews have �nished.
If the DVD does not begin to play the main title, refer
to the on-screen instructions.
Stopping and Resuming Playback
To stop playing a disc, press and release the stop
button on the DVD player faceplate or the remote
control.
To resume playback, press the play/pause button on
the DVD player faceplate or the remote control.
The movie should resume play from where it was last
stopped, if the disc has not been ejected and the
stop button has not been pressed twice. If the disc has
been ejected or if the stop button has been pressed
twice, the disc will resume play at the beginning.
Ejecting a Disc
Press the eject button on the DVD player faceplate to
eject the disc. There is not an eject button on the remote
control.
If a disc is ejected from the player, but is not removed,
the DVD player will reload the disc after a short
period of time. The disc will be stored in the DVD player.
The DVD player will not resume play of the disc
automatically.
Remote Control
To use the remote control, aim it at the transmitter
window below the video screen and press the desired
button. Direct sunlight or very bright light may affect the
ability of the RSE system to receive signals from the
remote control. If the remote control does not seem to
be working, the batteries may need to be replaced.
See “Battery Replacement” later in this section.
Objects blocking the line of sight may also affect the
function of the remote control.
Notice:Storing the remote control in a hot area or
in direct sunlight may damage it, and the repairs
will not be covered by your warranty. Keep the
remote control stored in a cool, dry place.
To extend the life of the batteries, the remote control
does not have a press and hold feature.
3-90
ProCarManuals.com