run SAAB 9-7X 2006 Owners Manual
[x] Cancel search | Manufacturer: SAAB, Model Year: 2006, Model line: 9-7X, Model: SAAB 9-7X 2006Pages: 434, PDF Size: 2.89 MB
Page 9 of 434
Heated Seats
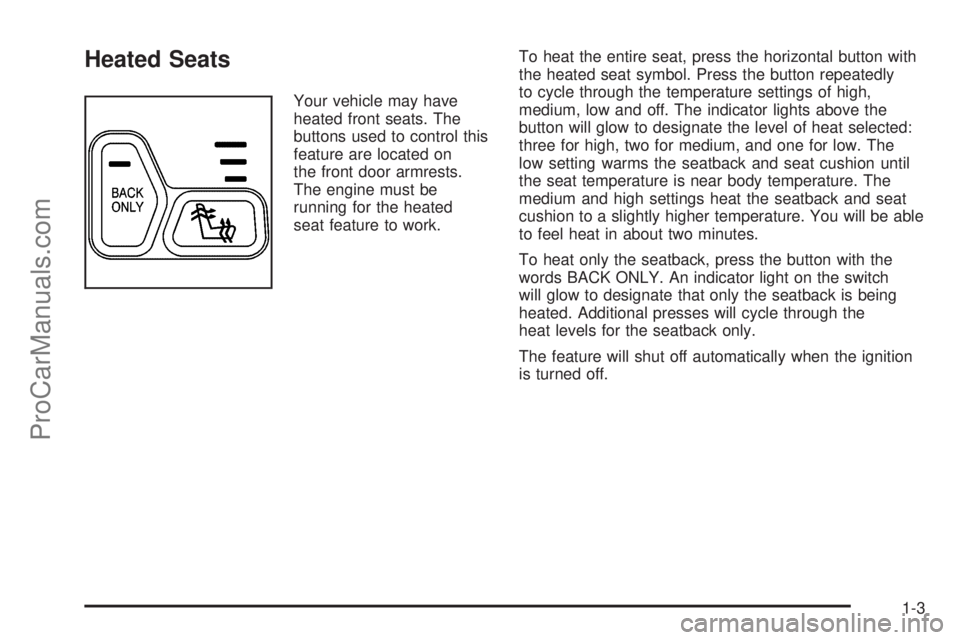
Your vehicle may have
heated front seats. The
buttons used to control this
feature are located on
the front door armrests.
The engine must be
running for the heated
seat feature to work.To heat the entire seat, press the horizontal button with
the heated seat symbol. Press the button repeatedly
to cycle through the temperature settings of high,
medium, low and off. The indicator lights above the
button will glow to designate the level of heat selected:
three for high, two for medium, and one for low. The
low setting warms the seatback and seat cushion until
the seat temperature is near body temperature. The
medium and high settings heat the seatback and seat
cushion to a slightly higher temperature. You will be able
to feel heat in about two minutes.
To heat only the seatback, press the button with the
words BACK ONLY. An indicator light on the switch
will glow to designate that only the seatback is being
heated. Additional presses will cycle through the
heat levels for the seatback only.
The feature will shut off automatically when the ignition
is turned off.
1-3
ProCarManuals.com
Page 50 of 434

Fold down the head
restraint and route the
single tether under the
head restraint and in
between the head restraint
posts. SeeRear Seat
Operation on page 1-6.
Fold down the head
restraint and route the
dual tether around the head
restraint. SeeRear Seat
Operation on page 1-6.
3. Push and pull the child restraint in different
directions to be sure it is secure.Securing a Child Restraint in a Rear
Outside Seat Position
If your child restraint is equipped with the LATCH system,
seeLower Anchors and Tethers for Children (LATCH) on
page 1-39.
If your child restraint does not have the LATCH system,
you will be using the lap-shoulder belt to secure the child
restraint in this position. Be sure to follow the instructions
that came with the child restraint. Secure the child in the
child restraint when and as the instructions say.
1. Put the child restraint on the seat.
2. Pick up the latch plate, and run the lap and shoulder
portions of the vehicle’s safety belt through or around
the restraint. The child restraint instructions will show
you how.
1-44
ProCarManuals.com
Page 55 of 434
1. Your vehicle has a right front passenger’s frontal
airbag. SeePassenger Sensing System on
page 1-61. We recommend that rear-facing child
restraints be secured in a rear seat, even if the airbag
is off. If your child restraint is forward-facing, move
the seat as far back as it will go before securing the
child restraint in this seat. SeePower Seats on
page 1-2.
When the passenger sensing system has turned
off the right front passenger’s frontal airbag, the off
indicator on the passenger airbag status indicator
should light and stay lit when you turn the ignition
to RUN or START. SeePassenger Airbag Status
Indicator on page 3-30.
2. Put the child restraint on the seat.
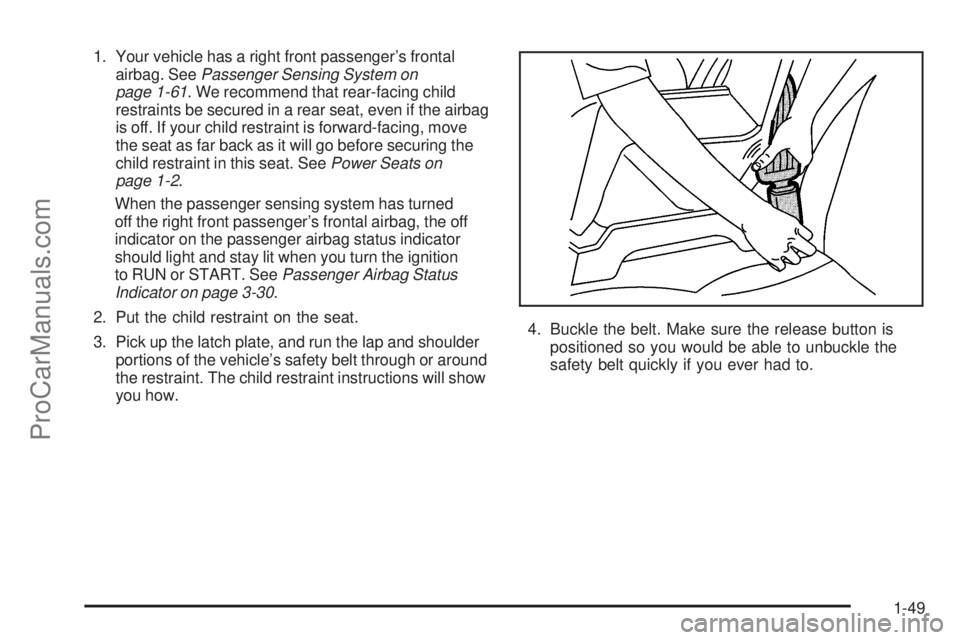
3. Pick up the latch plate, and run the lap and shoulder
portions of the vehicle’s safety belt through or around
the restraint. The child restraint instructions will show
you how.4. Buckle the belt. Make sure the release button is
positioned so you would be able to unbuckle the
safety belt quickly if you ever had to.
1-49
ProCarManuals.com
Page 56 of 434
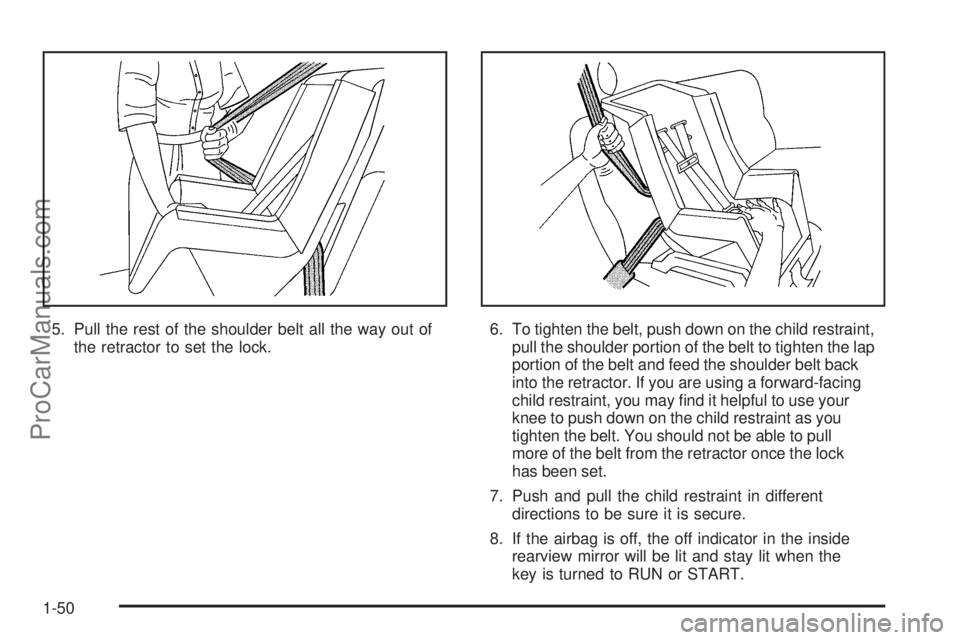
5. Pull the rest of the shoulder belt all the way out of
the retractor to set the lock.6. To tighten the belt, push down on the child restraint,
pull the shoulder portion of the belt to tighten the lap
portion of the belt and feed the shoulder belt back
into the retractor. If you are using a forward-facing
child restraint, you may nd it helpful to use your
knee to push down on the child restraint as you
tighten the belt. You should not be able to pull
more of the belt from the retractor once the lock
has been set.
7. Push and pull the child restraint in different
directions to be sure it is secure.
8. If the airbag is off, the off indicator in the inside
rearview mirror will be lit and stay lit when the
key is turned to RUN or START.
1-50
ProCarManuals.com
Page 67 of 434

Your vehicle has a feature that may automatically unlock
the doors and turn the interior lamps on when the airbags
inate (if battery power is available). You can lock the
doors again and turn the interior lamps off by using the
door lock and interior lamp controls.
In many crashes severe enough to inate an airbag,
windshields are broken by vehicle deformation. Additional
windshield breakage may also occur from the right front
passenger airbag.
Airbags are designed to inate only once. After an
airbag inates, you will need some new parts for your
airbag system. If you do not get them, the airbag
system will not be there to help protect you in another
crash. A new system will include airbag modules and
possibly other parts. The service manual for your
vehicle covers the need to replace other parts.
Your vehicle is equipped with a crash sensing and
diagnostic module which records information after a
crash. SeeVehicle Data Collection and Event Data
Recorders on page 7-6.
Let only qualied technicians work on your airbag
system. Improper service can mean that your airbag
system will not work properly. See your dealer for
service.
Passenger Sensing System
Your vehicle has a passenger sensing system for the
right front passenger’s position. A passenger airbag
status indicator in the rearview mirror will be visible when
you turn your ignition key to START or RUN. The words
ON and OFF or the symbol for on and off, will be visible
during the system check. When the system check is
complete, either the word ON or the word OFF, or the
symbol for on or the symbol for off will be visible. See
Passenger Airbag Status Indicator on page 3-30.
Passenger Airbag Status Indicator – United States
Passenger Airbag Status Indicator – Canada
1-61
ProCarManuals.com
Page 75 of 434

Keys...............................................................2-3
Remote Keyless Entry System.........................2-5
Remote Keyless Entry System Operation...........2-6
Doors and Locks.............................................2-8
Door Locks....................................................2-8
Power Door Locks..........................................2-9
Delayed Locking.............................................2-9
Programmable Automatic Door Locks................2-10
Rear Door Security Locks..............................2-12
Lockout Protection........................................2-12
Liftgate/Liftglass............................................2-13
Windows........................................................2-14
Power Windows............................................2-15
Sun Visors...................................................2-15
Theft-Deterrent Systems..................................2-16
Content Theft-Deterrent.................................2-16
PASS-Key
®III ..............................................2-18
PASS-Key®III Operation...............................2-18Starting and Operating Your Vehicle................2-20
New Vehicle Break-In....................................2-20
Ignition Positions..........................................2-20
Retained Accessory Power (RAP)...................2-21
Starting the Engine.......................................2-21
Adjustable Throttle and Brake Pedal................2-22
Engine Coolant Heater..................................2-23
Automatic Transmission Operation...................2-24
Parking Brake..............................................2-27
Shifting Into Park (P).....................................2-28
Shifting Out of Park (P).................................2-29
Parking Over Things That Burn.......................2-29
Engine Exhaust............................................2-30
Running the Engine While Parked...................2-30
Mirrors...........................................................2-31
Manual Rearview Mirror with Compass............2-31
Automatic Dimming Rearview Mirror with
OnStar®and Compass...............................2-33
Section 2 Features and Controls
2-1
ProCarManuals.com
Page 84 of 434
Programming Delayed Locking
To turn the delayed locking feature on or off, do the
following:
1. Press and hold the power door lock switch on the
driver’s door in the lock position.
2. Press the remote keyless entry transmitter unlock
button twice.
If the delayed locking feature was on, it will now be off.
If the feature was off, it will now be on.
Programmable Automatic
Door Locks
Your vehicle is equipped with an automatic lock/unlock
feature which enables you to program your vehicle’s
power door locks. You can program this feature through
the Driver Information Center (DIC), or by the following
method. SeeDIC Vehicle Customization on page 3-52.
Programmable Locking Feature
Following are the two locking modes that can be
programmed:
Mode 1:All doors lock when the transmission is shifted
out of PARK (P).
Mode 2:All doors lock when the vehicle speed is
greater than 8 mph (13 km/h).The automatic door locks were pre-programmed at the
factory to lock all the doors when the transmission is
shifted into gear. The following instructions detail how
to program your door locks differently than the factory
setting. Choose one of the two programming options
listed previously before entering the program mode.
To enter the program mode, do the following:
1. Begin with the ignition off. Then pull the turn
signal/multifunction lever toward you and hold
it there while you perform the next step.
2. Turn the key to RUN and LOCK twice. Then, with the
key in LOCK, release the turn signal/multifunction
lever. Once you do this, you will hear the lock switch
lock and unlock, the horn will chirp twice, and a
30-second program timer will begin.
3. You are now ready to program the automatic door
locks. Select one of the two programming options
listed previously, and press the lock side of the
power door lock switch to cycle through the lock
options. You will have 30 seconds to begin
programming. If you exceed the 30-second limit,
the locks will automatically lock and unlock and
the horn will chirp twice to indicate that you have
left the program mode. If this occurs, repeat the
procedure beginning with Step 1 to re-enter the
programming mode.
2-10
ProCarManuals.com
Page 85 of 434

You can exit the program mode any time by turning the
ignition to RUN. The locks will automatically lock and
unlock and the horn will chirp twice to indicate that you
are leaving the program mode. If the lock/unlock switches
are not pressed while in the programming mode, the
current auto lock/unlock setting will not be modied.
See your dealer for more information.
Programmable Unlocking Feature
The following is the list of available programming
options:
Mode 1:Driver’s door unlocks when the transmission is
shifted into PARK (P).
Mode 2:All doors unlock when the transmission is
shifted into PARK (P).
Mode 3:All doors unlock when the key is removed
from the ignition.
Mode 4:No automatic door unlock.
The automatic door locks were pre-programmed at the
factory to unlock all doors once the transmission is shifted
to PARK (P). The following instructions detail how to
program your door locks differently than the factory
setting. Choose one of the four programming options
listed previously before entering the program mode.To enter the program mode you need to do the
following:
1. Begin with the ignition off. Then pull the turn
signal/multifunction lever toward you and hold
it there while you perform the next step.
2. Turn the key to RUN and LOCK twice. Then, with
the key in LOCK, release the turn signal/multifunction
lever. Once you do this, you will hear the lock switch
lock and unlock, the horn will chirp twice, and a
30-second program timer will begin.
3. You are now ready to program the automatic door
locks. Select one of the four programming options
listed above, and press the unlock side of the power
door lock switch to cycle through the unlocking
options. You will have 30 seconds to begin
programming. If you exceed the 30-second limit,
the locks will automatically lock and unlock and
the horn will chirp twice to indicate that you have
left the program mode. If this occurs, repeat the
procedure beginning with Step 1 to re-enter the
programming mode.
You can exit the program mode any time by turning the
ignition to RUN. The locks will automatically lock and
unlock and the horn will chirp twice to indicate that you
are leaving the program mode. If the lock/unlock switches
are not pressed while in the programming mode, the
current auto lock/unlock setting will not be modied.
See your dealer for more information.
2-11
ProCarManuals.com
Page 89 of 434

Power Windows
The controls for the power windows are located on the
armrest on each of the side doors. With power windows,
the switches operate the windows when the ignition is in
RUN, ACCESSORY or when Retained Accessory Power
(RAP) is active. SeeRetained Accessory Power (RAP)
on page 2-21. The driver’s door also has a switch for
each of the passenger’s windows.
Press down the top of the switch to lower the window and
pull up on the switch to raise the window. If you hold the
switch down for three to seven seconds after the window
has been completely lowered or raised, the window will
not operate for about 15 seconds.
Express-Down Window
AUTO (Express-down):The driver’s and front
passenger’s window switches have an express-down
feature that allows you to lower the window without
holding the switch down. Press down briey on the
driver’s or front passenger’s window switch labeled
AUTO to activate the express-down feature. Lightly tap
the switch to open the window slightly. The express-down
feature can be interrupted at any time by pressing the top
of the switch.
Window Lockout
o
(Lockout):Your vehicle has a lockout feature to
prevent passengers from operating the power windows.
The lockout switch is located in front of the window
switches on the driver’s door. A light in the lockout switch
will come on to show that the switch has been activated.
Press the lockout switch again to return to normal
operation.
Sun Visors
Sun Visors with Slide Rod
Your vehicle may have this feature. Pull the sun visor
down to block glare. Detach the sun visor from the center
mount and slide it along the rod from side-to-side to cover
the driver or passenger side of the front window. Swing
the sun visor to the side to cover the side window. It can
also be moved along the rod from side-to-side in this
position.
2-15
ProCarManuals.com
Page 94 of 434

Starting and Operating Your
Vehicle
New Vehicle Break-In
Notice:Your vehicle does not need an elaborate
break-in. But it will perform better in the long run if
you follow these guidelines:
Keep your speed at 55 mph (88 km/h) or less for
the rst 500 miles (805 km).
Do not drive at any one constant speed, fast or
slow, for the rst 500 miles (805 km). Do not
make full-throttle starts. Avoid downshifting to
brake, or slow, the vehicle.
Avoid making hard stops for the rst
200 miles (322 km) or so. During this time
your new brake linings are not yet broken
in. Hard stops with new linings can mean
premature wear and earlier replacement.
Follow this breaking-in guideline every
time you get new brake linings.
Do not tow a trailer during break-in. See
Towing a Trailer on page 4-41for the trailer
towing capabilities of your vehicle and more
information.
Following break-in, engine speed and load can be
gradually increased.
Ignition Positions
Use the key to turn
the ignition switch to
four different positions.
The ignition switch is
located on the center
console.
9(OFF/LOCK):This position locks the ignition and
transmission. It is a theft-deterrent feature. You will only
be able to remove the key when the ignition is turned
to OFF/LOCK and the vehicle has power.
Notice:Using a tool to force the key from the
ignition switch could cause damage or break the key.
Use the correct key and turn the key only with your
hand. Make sure the key is all the way in. If it is, turn
the steering wheel left and right while you turn the
key hard. If none of this works, then your vehicle
needs service.
2-20
ProCarManuals.com