buttons SATURN ASTRA 2008 Owners Manual
[x] Cancel search | Manufacturer: SATURN, Model Year: 2008, Model line: ASTRA, Model: SATURN ASTRA 2008Pages: 304, PDF Size: 1.92 MB
Page 10 of 304
Active Head Restraint System
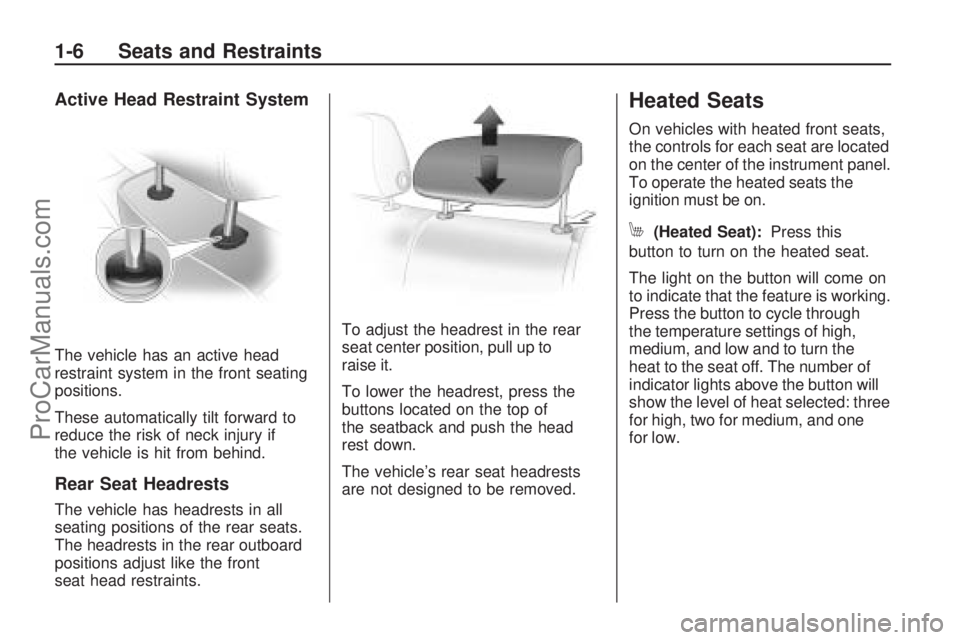
The vehicle has an active head
restraint system in the front seating
positions.
These automatically tilt forward to
reduce the risk of neck injury if
the vehicle is hit from behind.
Rear Seat Headrests
The vehicle has headrests in all
seating positions of the rear seats.
The headrests in the rear outboard
positions adjust like the front
seat head restraints.To adjust the headrest in the rear
seat center position, pull up to
raise it.
To lower the headrest, press the
buttons located on the top of
the seatback and push the head
rest down.
The vehicle’s rear seat headrests
are not designed to be removed.
Heated Seats
On vehicles with heated front seats,
the controls for each seat are located
on the center of the instrument panel.
To operate the heated seats the
ignition must be on.
M(Heated Seat):Press this
button to turn on the heated seat.
The light on the button will come on
to indicate that the feature is working.
Press the button to cycle through
the temperature settings of high,
medium, and low and to turn the
heat to the seat off. The number of
indicator lights above the button will
show the level of heat selected: three
for high, two for medium, and one
for low.
1-6 Seats and Restraints
ProCarManuals.com
Page 72 of 304
Mirrors
Manual Rearview Mirror
Hold the mirror in the center to move
it for a clearer view of behind your
vehicle.
Headlamp Glare
To reduce headlamp glare from
vehicles following from behind, pull
the lever toward you. Push the
lever forward after the vehicle glare
is gone, to return the mirror back
to the original position.
Vehicles with OnStar
®have three
OnStar®control buttons located at
the bottom of the mirror. See your
dealer/retailer for more information
on the system and how to subscribe
to OnStar
®. SeeOnStar®System on
page 4-38.
Cleaning the Mirror
Do not spray glass cleaner directly
on the mirror. Use a soft towel
dampened with glass cleaner.
Outside Mirror(s)
To maximize the viewing area,
adjust each mirror to see the side of
your vehicle and the area beside
and behind your vehicle.
Manually fold the mirrors �at against
the side of the vehicle by pushing
them toward the vehicle’s doors.
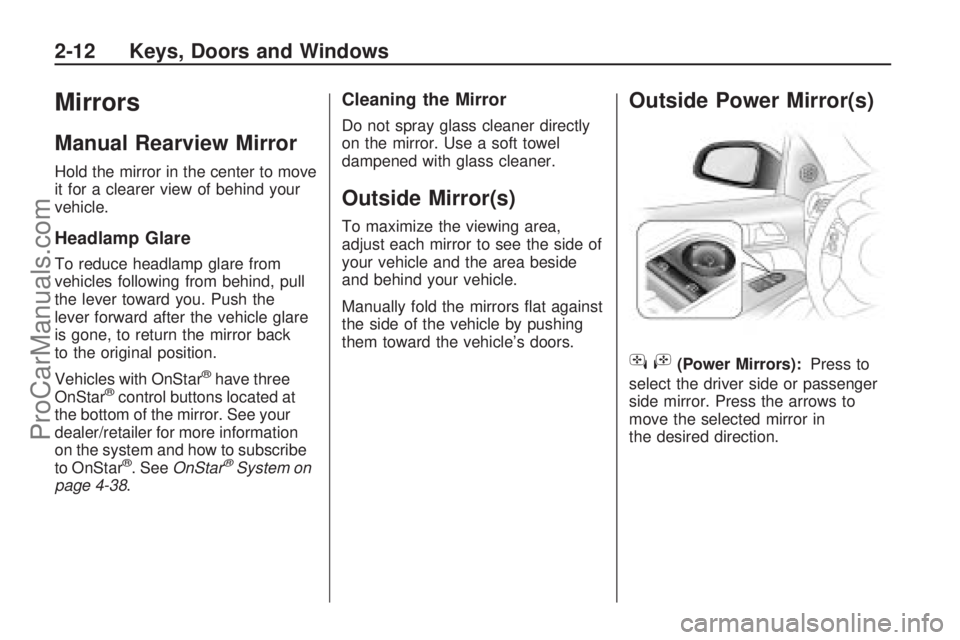
Outside Power Mirror(s)
hi
(Power Mirrors):Press to
select the driver side or passenger
side mirror. Press the arrows to
move the selected mirror in
the desired direction.
2-12 Keys, Doors and Windows
ProCarManuals.com
Page 81 of 304
Cruise Control
{CAUTION
Cruise control can be
dangerous where you cannot
drive safely at a steady speed.
So, do not use your cruise
control on winding roads or
in heavy traffic.
Cruise control can be
dangerous on slippery roads.
On such roads, fast changes
in tire traction can cause
excessive wheel slip, and you
could lose control. Do not use
cruise control on slippery
roads.With cruise control, a speed of about
25 mph (40 km/h) or more can be
maintained without keeping your foot
on the accelerator. This can really
help on long trips. Cruise control
does not work at speeds below
about 25 mph (40 km/h).
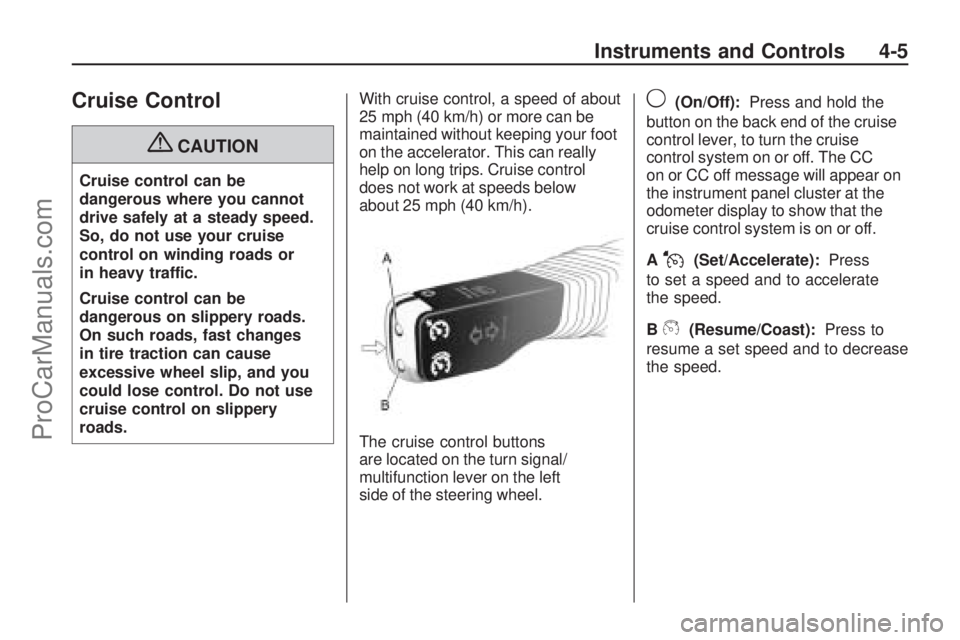
The cruise control buttons
are located on the turn signal/
multifunction lever on the left
side of the steering wheel.
9(On/Off):Press and hold the
button on the back end of the cruise
control lever, to turn the cruise
control system on or off. The CC
on or CC off message will appear on
the instrument panel cluster at the
odometer display to show that the
cruise control system is on or off.
A
J(Set/Accelerate):Press
to set a speed and to accelerate
the speed.
B
W(Resume/Coast):Press to
resume a set speed and to decrease
the speed.
Instruments and Controls 4-5
ProCarManuals.com
Page 103 of 304
DIC Operation and Displays (Base Level DIC
and Audio)
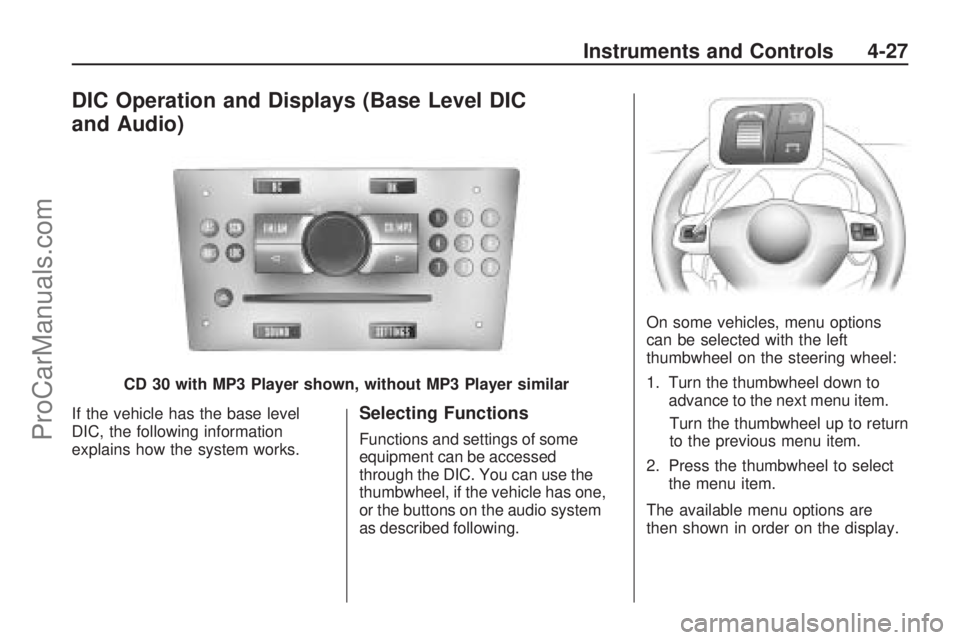
If the vehicle has the base level
DIC, the following information
explains how the system works.Selecting Functions
Functions and settings of some
equipment can be accessed
through the DIC. You can use the
thumbwheel, if the vehicle has one,
or the buttons on the audio system
as described following.On some vehicles, menu options
can be selected with the left
thumbwheel on the steering wheel:
1. Turn the thumbwheel down to
advance to the next menu item.
Turn the thumbwheel up to return
to the previous menu item.
2. Press the thumbwheel to select the menu item.
The available menu options are
then shown in order on the display.
CD 30 with MP3 Player shown, without MP3 Player similar
Instruments and Controls 4-27
ProCarManuals.com
Page 117 of 304

OnStar service cannot work unless
your vehicle is in a place where
OnStar has an agreement with a
wireless service provider for service
in that area. OnStar service also
cannot work unless you are in a
place where the wireless service
provider OnStar has hired for that
area has coverage, network capacity
and reception when the service is
needed, and technology that is
compatible with the OnStar service.
Not all services are available
everywhere, particularly in remote
or enclosed areas, or at all times.OnStar service that involves location
information about your vehicle
cannot work unless GPS satellite
signals are unobstructed and
available in that place as well.
Your vehicle must have a working
electrical system (including adequate
battery power) for the OnStar
equipment to operate. There are
other problems OnStar cannot
control that may prevent OnStar
from providing service to you at
any particular time or place. Some
examples are damage to important
parts of your vehicle in an accident,
hills, tall buildings, tunnels, weather
or wireless phone network
congestion.Your Responsibility
You may need to increase the
volume of your radio to hear the
OnStar advisor. If the light next to the
OnStar buttons is red, this means
that your system is not functioning
properly and should be checked
by your dealer/retailer. If the light
appears clear (no light is appearing),
your OnStar subscription has
expired. You can always press the
OnStar button to con�rm that your
OnStar equipment is active.
Instruments and Controls 4-41
ProCarManuals.com
Page 121 of 304

Instrument Panel
Brightness
D
(Instrument Panel
Brightness):The knob with this
symbol on it is located next to the
exterior lamps control to the left of
the steering wheel. Push the knob in
all the way until it extends out and
then turn the knob clockwise or
counterclockwise to brighten or dim
the lights. Push the knob back in
when �nished.
Dome Lamp(s)
There are two dome lamps. The rear
dome lamp turns on automatically
with the front dome lamp.
+(On/Off):Press to turn the
front dome lamp on or off while
the doors are closed.
Entry Lighting
With entry lighting, the interior of the
vehicle is illuminated while entering
the vehicle. The interior lamps
turn on brie�y when the door
is unlocked using the key or the
Remote Keyless Entry (RKE)
transmitter and the ignition is in
LOCK/OFF. After a few seconds
have passed, the interior lamps
will slowly fade out.
Reading Lamps
Front Reading Lamps
The front reading lamps, located on
the headliner, can be controlled
separately by the buttons located
near each lamp.
\(On/Off):Press to turn the lamp
on or off.
Lighting 5-3
ProCarManuals.com
Page 129 of 304

Finding an FM/AM Station
1 - 9 (Station Preset Buttons):
Press to play stations that are
programmed to the radio preset
pushbuttons.
SCN (Station Preset Scan):Press
to start station preset scan. The radio
goes to the �rst preset station, plays
for a few seconds, then goes to the
next preset station. Press SCN again
to stop scanning preset stations.
\or]:Press to �nd radio stations
using the automatic station search
or the manual station search.Automatic Station Search:Use
automatic station search when
the radio frequency is unknown.
Press
\or]for more then
one second to have the radio search
for the next station. Seek is shown
on the display and the radio is
muted until a station is found.
If the radio fails to locate a station,
the last active frequency is then
reset. When LOC is activated,
a search for the next strong station
is made. If it is not activated, it
searches the next receivable station.Manual Station Search:Use
manual station search when
the radio frequency is known.
To use manual station search:
Press and hold\or]until the
desired frequency is reached.
Tap\or]until the desired
frequency is reached.
Setting Preset Stations
The radio can store up to 36 stations
using the station preset buttons:
9FM
9 FM - AS (Autostore)
9AM
9 AM - AS (Autostore)
Infotainment 6-7
ProCarManuals.com
Page 130 of 304

Radio stations can be stored
manually, and by using Autostore.
To manually store preset stations:
1. Select FM or AM and tune to the
desired radio station.
2. Press and hold one of the nine
station preset buttons, the radio
brie�y mutes and displays the
previously stored station. The
new station has been stored
when the radio begins playing
again.
3. Repeat the steps for each radio
station to be stored.
AS (Autostore):Press to
automatically store the nine
strongest stations in the selected
radio band.
To use Autostore:
1. Select FM or AM.
2. Press and hold AS until a beep
is heard.
3. The radio begins storing the
stations in the nine preset
button locations.Using the CD Player
Display Options
The display can be changed
depending on what type of CD
is in the CD player. The display
options are:
Audio CD without CD text:
Track number and playing time.
Audio CD with CD text:
Track title
Artist name
Tack number and playing time
CD name
To change the display:
1. Press CD/MP3 twice, CD info
appears on the display.
2. Press
\or]to select the
display type.
3. After about �ve seconds, the
selected display type is saved.Loading a CD
To load a CD, insert the CD label
side up in the CD player. The CD
player pulls the CD in automatically.
The display shows Read CD, the
CD symbol and the number of CD
tracks.
When the �rst track starts to play,
the display shows track 1 and the
playing time.
Playing a CD
CD/MP3:Press to play a CD or
MP3 CD that is already loaded into
the CD player while the radio is
playing. See “Using an MP3” in the
owner manual index.
\or]:Press to go to the next or
previous track. Press and hold to
fast forward or fast rewind within
a track and the CD plays at a higher
speed and a reduced volume.
Z:Press to eject a CD, Eject CD
is displayed and the radio begins
playing.
6-8 Infotainment
ProCarManuals.com
Page 139 of 304

Using the Radio
FM/AM:Press to select between
FM, FM-AS, AM, and AM-AS,
or to listen to the radio while a CD
is playing. The Tuner Menu
displays.
LOC (LOCAL/DX Function):Press
to change between LOC ON or
LOC OFF. When the LOC function
is on, it searches for the strongest
radio frequency. If none is found,
it automatically searches for a
weaker radio frequency. If no
frequency is found after the second
search, the radio returns to the
last active frequency. If a new
station search is not started within
one minute, the low sensitivity
(LOCAL) is set when the next
search is started. When LOC OFF
is set, a search is carried out
using the high sensitivity (DX).Finding an FM/AM Station
1 - 9 (Station Preset Buttons):
Press to play stations that are
programmed to the radio preset
pushbuttons.
Automatic Station Search:Use
automatic station search when
the radio frequency is unknown.
The radio is volume is muted
while the radio searches for a
station with strong reception. If the
radio is unable to �nd a station, it
automatically switches to a more
sensitive search level. The radio
returns to the last station playing
if it fails to locate a station.
To use automatic station search, do
one of the following:
Press and hold\or]until
seek displays.
Selecttorufrom the radio
menu with the multifunction knob.Manual Station Search:Use
manual station search when
the radio frequency is known.
To use manual station search with
the four-way switch:
Press and hold_or^until the
desired frequency is reached.
Press_or^repeatedly until the
desired frequency is reached.
To use manual station search with
the multifunction knob:
1. Select Manual from the
Tuner menu.
2. Turn the multifunction knob until
the desired frequency is reached
and press the knob.
Infotainment 6-17
ProCarManuals.com
Page 140 of 304
Setting Preset Stations
The radio can store up to
36 stations using the station
preset buttons:
9FM
9 FM - AS (Autostore)
9AM
9 AM - AS (Autostore)
Radio stations can be stored using
the station preset buttons, the
multifunction knob, and by using
Autostore.
To manually store stations using the
station preset buttons:
1. Select FM or AM and tune to the
desired radio station.
2. Press and hold one of the
9 station preset buttons, the
radio brie�y mutes and displays
the previously stored station.
The new station is stored and
the radio begins playing.
3. Repeat the steps for each radio
station to be stored.To manually store stations using the
multifunction knob:
1. Select the desired radio station
and select Store from the Tuner
Menu, a list of all stored
stations is displayed.
2. Turn the multifunction knob to
choose the location for the
station to be stored and press
the multifunction knob.
To store stations using Autostore:
1. Select FM or AM and then select
Autostore from the Tuner Menu.
2. The Autostore menu is displayed,
and the automatic station storing
is started.
3. The nine strongest stations in the
selected band are stored to the
preset buttons.
Using the CD Player
The CDC 40 is capable of playing
CDs, MP3 CD-Rs, and mixed mode
CD-Rs that have both audio and
MP3 tracks on it.
The CD changer holds a maximum
of 6 CDs, and can play smaller
3 inch (8 cm) single CDs with an
adapter ring.
Loading a CD
To load CDs:
1. Press
Z(Eject), the
CD-Changer menu displays.
2. Select an empty CD
compartment using the
multifunction knob, Please
insert CD now displays.
3. Insert a CD into the slot, Reading
CD displays and
aappears next
to the selected position.
4. Repeat Step 2 to load
additional CDs.
6-18 Infotainment
ProCarManuals.com