tow SATURN ASTRA 2009 Owner's Manual
[x] Cancel search | Manufacturer: SATURN, Model Year: 2009, Model line: ASTRA, Model: SATURN ASTRA 2009Pages: 314, PDF Size: 1.94 MB
Page 186 of 314

When It Is Time for
New Tires.......................9-54
Buying New Tires.............9-54
Different Size Tires and
Wheels............................9-56
Uniform Tire Quality
Grading...........................9-57
Wheel Alignment and
Tire Balance....................9-58
Wheel Replacement..........9-59
Tire Chains.......................9-60
Tire ChangingIf a Tire Goes Flat............9-60
Changing a Flat Tire.........9-61
Removing the Spare Tire
and Tools........................9-62
Removing the Flat Tire
and Installing the
Spare Tire
.......................9-63
Storing a Flat or Spare
Tire and Tools.................9-66
Compact Spare Tire..........9-68
Jump Starting
Jump Starting...................9-69
Towing
Towing Your Vehicle.........9-73
Recreational Vehicle
Towing............................9-73
Towing a Trailer................9-73
Appearance Care
Interior Cleaning................9-73
Exterior Cleaning..............9-76
Sheet Metal Damage........9-79
Finish Damage..................9-79
Underbody Maintenance. . . .9-80
Chemical Paint Spotting. . . .9-80
Service
For service and parts needs,
visit your dealer/retailer. You will
receive genuine Saturn parts
and Saturn-trained and supported
service people.
Genuine Saturn parts have one of
these marks.
9-2 Vehicle Service and Care
ProCarManuals.com
Page 191 of 314

A.Engine Air Cleaner/Filter on
page 9-11.
B. Engine Oil Fill Cap.Engine Oil
on page 9-7.
C. Brake Fluid Reservoir.Brakes
on page 9-22.
D. Coolant Reservoir.Cooling
System on page 9-12.
E. Coolant Reservoir Pressure Cap.
Pressure Cap on page 9-18.
F.Engine Compartment Fuse Block
on page 9-35.
G.Battery on page 9-25.
H.Windshield Washer Fluid on
page 9-20.
I. Engine Oil Dipstick.Engine Oil
on page 9-7.Engine Oil
If the low oil level light appears on
the instrument cluster, check the
engine oil level right away. SeeLow
Oil Level Light on page 4-22.
Check the engine oil level regularly;
this is just a reminder.
Checking Engine Oil
It is a good idea to check the
engine oil level at each fuel �ll.
In order to get an accurate reading,
the oil must be warm and the
vehicle must be on level ground.The engine oil dipstick handle
is a yellow loop. SeeEngine
Compartment Overview on page 9-6
for the location of the engine oil
dipstick.
1. Turn off the engine and give the
oil several minutes to drain back
into the oil pan. If this is not
done, the oil dipstick might not
show the actual level.
2. Pull the dipstick and clean it with
a paper towel or cloth, then push
it back in all the way. Remove
it again, keeping the tip down and
check the level.
Vehicle Service and Care 9-7
ProCarManuals.com
Page 217 of 314

License Plate Lamp
To replace one of these bulbs:
1. Push tab in and pull down on it to
remove the license plate lamp.2. Turn and pull the license plate
lamp toward you through the
opening.3. Turn the bulb socket
counterclockwise and pull the
bulb straight out of the socket.
4. Install the new bulb.
5. Reverse Steps 1 through 3 to
reinstall the license plate lamp.
Vehicle Service and Care 9-33
ProCarManuals.com
Page 244 of 314

Tire Chains
{CAUTION
Do not use tire chains. There is
not enough clearance. Tire chains
used on a vehicle without the
proper amount of clearance can
cause damage to the brakes,
suspension or other vehicle parts.
The area damaged by the tire
chains could cause you to lose
control of the vehicle and you or
others may be injured in a crash.
Use another type of traction
device only if its manufacturer
recommends it for use on the
vehicle and tire size combination
and road conditions. Follow that
manufacturer’s instructions. To
help avoid damage to the vehicle,
drive slowly, readjust or remove
the device if it is contacting the
vehicle, and do not spin the
vehicle’s wheels. If you do �nd
traction devices that will �t,
install them on the front tires.
Tire Changing
If a Tire Goes Flat
It is unusual for a tire to blowout
while you are driving, especially if
you maintain your vehicle’s tires
properly. If air goes out of a tire, it is
much more likely to leak out slowly.
But if you should ever have a
blowout, here are a few tips about
what to expect and what to do:
If a front tire fails, the �at tire creates
a drag that pulls the vehicle
toward that side. Take your foot off
the accelerator pedal and grip
the steering wheel �rmly. Steer to
maintain lane position, and then
gently brake to a stop well out of the
traffic lane.
A rear blowout, particularly on a
curve, acts much like a skid and
may require the same correction you
would use in a skid. In any rear
blowout remove your foot from the
accelerator pedal. Get the vehicle
under control by steering the
way you want the vehicle to go.It may be very bumpy and noisy, but
you can still steer. Gently brake to a
stop, well off the road if possible.{CAUTION
Lifting a vehicle and getting under
it to do maintenance or repairs is
dangerous without the appropriate
safety equipment and training. If a
jack is provided with the vehicle,
it is designed only for changing a
�at tire. If it is used for anything
else, you or others could be badly
injured or killed if the vehicle slips
off the jack. If a jack is provided
with the vehicle, only use it for
changing a �at tire.
If a tire goes �at, the next part
shows how to use the jacking
equipment to change a �at tire
safely.
9-60 Vehicle Service and Care
ProCarManuals.com
Page 249 of 314

{CAUTION
Rust or dirt on a wheel, or on
the parts to which it is fastened,
can make wheel bolts become
loose after time. The wheel could
come off and cause an accident.
When you change a wheel,
remove any rust or dirt from
places where the wheel attaches
to the vehicle. In an emergency,
you can use a cloth or a paper
towel to do this; but be sure to
use a scraper or wire brush later,
if needed, to get all the rust or
dirt off. SeeChanging a Flat Tire
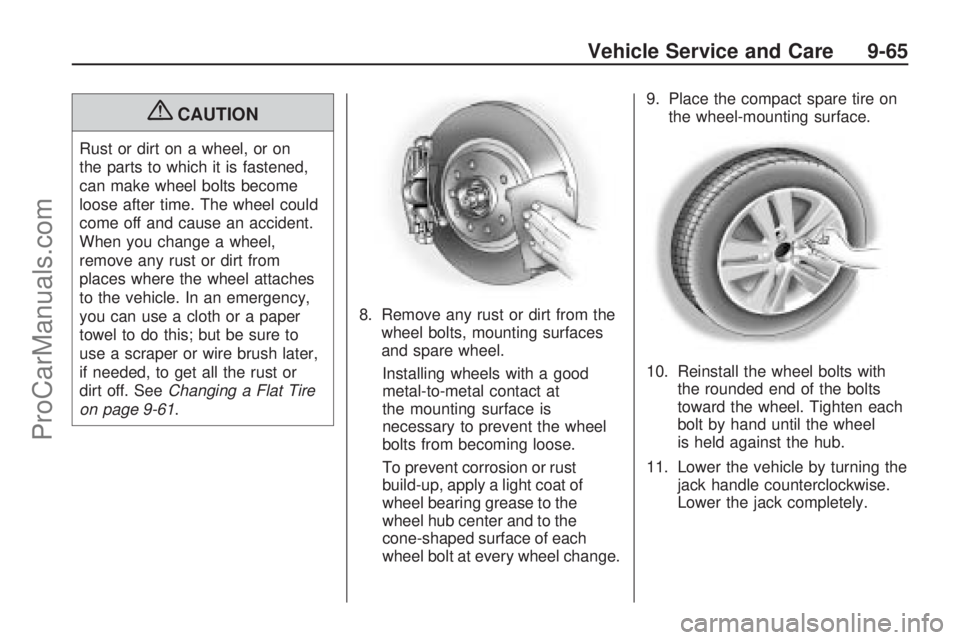
on page 9-61.8. Remove any rust or dirt from the
wheel bolts, mounting surfaces
and spare wheel.
Installing wheels with a good
metal-to-metal contact at
the mounting surface is
necessary to prevent the wheel
bolts from becoming loose.
To prevent corrosion or rust
build-up, apply a light coat of
wheel bearing grease to the
wheel hub center and to the
cone-shaped surface of each
wheel bolt at every wheel change.9. Place the compact spare tire on
the wheel-mounting surface.
10. Reinstall the wheel bolts with
the rounded end of the bolts
toward the wheel. Tighten each
bolt by hand until the wheel
is held against the hub.
11. Lower the vehicle by turning the
jack handle counterclockwise.
Lower the jack completely.
Vehicle Service and Care 9-65
ProCarManuals.com
Page 257 of 314

Towing
Towing Your Vehicle
To avoid damage, the disabled
vehicle should be towed with all
four wheels off the ground.
Consult your dealer/retailer or a
professional towing service if
the disabled vehicle must be towed.
SeeRoadside Assistance Program
on page 12-6.
Recreational Vehicle
Towing
Notice:Dolly towing or dinghy
towing the vehicle may cause
damage because of reduced
ground clearance. Always put the
vehicle on a �atbed truck or
trailer.
The vehicle was neither designed
nor intended to be towed with any
of its wheels on the ground.
Towing a Trailer
The vehicle is neither designed nor
intended to tow a trailer.
Appearance Care
Interior Cleaning
Your vehicle’s interior will continue
to look its best if it is cleaned
often. Although not always visible,
dust and dirt can accumulate
on your upholstery. Dirt can damage
carpet, fabric, leather, and plastic
surfaces. Regular vacuuming is
recommended to remove particles
from the upholstery. It is important
to keep your upholstery from
becoming and remaining heavily
soiled. Soils should be removed as
quickly as possible. Your vehicle’s
interior may experience extremes of
heat that could cause stains to
set rapidly.
Lighter colored interiors may require
more frequent cleaning. Use care
because newspapers and garments
that transfer color to your home
furnishings may also transfer color
to your vehicle’s interior.
Vehicle Service and Care 9-73
ProCarManuals.com
Page 259 of 314

Fabric/Carpet
Use a vacuum cleaner with a soft
brush attachment frequently to
remove dust and loose dirt.
A canister vacuum with a beater bar
in the nozzle may only be used
on �oor carpet and carpeted �oor
mats. For soils, always try to remove
them �rst with plain water or club
soda. Before cleaning, gently
remove as much of the soil as
possible using one of the following
techniques:
For liquids: gently blot the
remaining soil with a paper towel.
Allow the soil to absorb into
the paper towel until no more can
be removed.
For solid dry soils: remove as
much as possible and then
vacuum.To clean, use the following
instructions:
1. Saturate a lint-free, clean white
cloth with water or club soda.
2. Wring the cloth to remove excess
moisture.
3. Start on the outside edge of the
soil and gently rub toward the
center. Continue cleaning, using
a clean area of the cloth each
time it becomes soiled.
4. Continue to gently rub the soiled
area until the cleaning cloth
remains clean.
5. If the soil is not completely
removed, use a mild soap
solution and repeat the cleaning
process that was used with
plain water.If any of the soil remains, a
commercial fabric cleaner or spot
lifter may be necessary. When a
commercial upholstery cleaner
or spot lifter is to be used, test a
small hidden area for colorfastness
�rst. If the locally cleaned area
gives any impression that a ring
formation may result, clean the
entire surface.
After the cleaning process has been
completed, a paper towel can be
used to blot excess moisture
from the fabric or carpet.
Vehicle Service and Care 9-75
ProCarManuals.com
Page 262 of 314

Rinse the vehicle well, before
washing and after to remove all
cleaning agents completely. If they
are allowed to dry on the surface,
they could stain.
Dry the �nish with a soft, clean
chamois or an all-cotton towel to
avoid surface scratches and
water spotting.
High pressure car washes may
cause water to enter the vehicle.
Avoid using high pressure washes
closer than 12 inches (30 cm) to
the surface of the vehicle. Use of
power washers exceeding 1,200 psi
(8 274 kPa) can result in damage
or removal of paint and decals.
Weatherstrips
Silicone grease on weatherstrips
will make them last longer, seal
better, and not stick or squeak.
Apply silicone grease with a clean
cloth. During very cold, damp
weather frequent application
may be required.See “Fluids and Lubricants” in the
Index of the “Maintenance and
Warranty and Owner assistance
Information” manual.
Wheels and Trim — Aluminum
or Chrome
Your vehicle may have either
aluminum or chrome-plated wheels.
Keep the wheels clean using a
soft clean cloth with mild soap and
water. Rinse with clean water.
After rinsing thoroughly, dry with a
soft clean towel. A wax may then
be applied.
Notice:Chrome wheels and
other chrome trim may be
damaged if the vehicle is not
washed after driving on roads
that have been sprayed with
magnesium, calcium or sodium
chloride. These chlorides are
used on roads for conditions
such as ice and dust. Always
wash the vehicle’s chrome with
soap and water after exposure.Notice:Using strong soaps,
chemicals, abrasive polishes,
cleaners, brushes, or cleaners
that contain acid on aluminum or
chrome-plated wheels, could
damage the surface of the
wheel(s). The repairs would not
be covered by the warranty.
Use only approved cleaners on
aluminum or chrome-plated
wheels.
The surface of these wheels is
similar to the painted surface of your
vehicle. Do not use strong soaps,
chemicals, abrasive polishes,
abrasive cleaners, cleaners with
acid, or abrasive cleaning brushes
on them because you could damage
the surface. Do not use chrome
polish on aluminum wheels.
Notice:Using chrome polish on
aluminum wheels could damage
the wheels. The repairs would not
be covered by the warranty.
Use chrome polish on chrome
wheels only.
9-78 Vehicle Service and Care
ProCarManuals.com
Page 263 of 314

Use chrome polish only on
chrome-plated wheels, but avoid
any painted surface of the wheel,
and buff off immediately after
application.
Notice:Driving the vehicle
through an automatic car wash
that has silicone carbide tire
cleaning brushes, could damage
the aluminum or chrome-plated
wheels. The repairs would not be
covered by the warranty. Never
drive a vehicle equipped with
aluminum or chrome-plated
wheels through an automatic car
wash that uses silicone carbide
tire cleaning brushes.
Windshield and Wiper Blades
Clean the outside of the windshield
with glass cleaner.
Clean the rubber blades using a lint
free cloth or paper towel soaked with
windshield washer �uid or a mild
detergent. Wash the windshield
thoroughly when cleaning the blades.Bugs, road grime, sap, and a buildup
of vehicle wash/wax treatments may
cause wiper streaking. Replace the
wiper blades if they are worn or
damaged.
Wipers can be damaged by:
Extreme dusty conditions
Sand and salt
Heat and sun
Snow and ice, without proper
removal
Tires
To clean the tires, use a stiff brush
with tire cleaner.
Notice:Using petroleum-based
tire dressing products on the
vehicle may damage the paint
�nish and/or tires. When applying
a tire dressing, always wipe off
any overspray from all painted
surfaces on the vehicle.
Sheet Metal Damage
If the vehicle is damaged and
requires sheet metal repair or
replacement, make sure the body
repair shop applies anti-corrosion
material to parts repaired or replaced
to restore corrosion protection.
Original manufacturer replacement
parts will provide the corrosion
protection while maintaining
the vehicle warranty.
Finish Damage
Any stone chips, fractures or deep
scratches in the �nish should be
repaired right away. Bare metal will
corrode quickly and may develop into
major repair expense.
Minor chips and scratches can be
repaired with touch-up materials
available from your dealer/retailer.
Larger areas of �nish damage can be
corrected in your dealer’s/retailer’s
body and paint shop.
Vehicle Service and Care 9-79
ProCarManuals.com
Page 276 of 314

Maintenance Footnotes
(a)A fluid loss in any vehicle system
could indicate a problem. Have the
system inspected and repaired
and the fluid level checked. Add fluid
if needed.
(b)If driving regularly under dusty
conditions or in high-polluted
regions, replace the filter at each
engine oil change.
(c)Inspect brake lines and hoses for
proper hook-up, binding, leaks,
cracks, chafing, etc. Inspect disc
brake pads for wear and rotors for
surface condition. Inspect other
brake parts, including calipers,
parking brake, etc.
(d)Inspect front and rear suspension
and steering system for damaged,
loose, or missing parts or signs of
wear. Inspect power steering cables
for proper hook-up, binding, cracks,
chafing, etc. Inspect power steering
hydraulic lines and hoses for proper
hook-up, binding, leaks, cracks,
chafing, etc.(e)Inspect hoses and have them
replaced if they are cracked,
swollen, or deteriorated. Inspect all
pipes, fittings and clamps; replace
with genuine parts as needed.
To help ensure proper operation,
a pressure test of the cooling system
and pressure cap and cleaning
the outside of the radiator and
air conditioning condenser is
recommended at least once a year.
(f)Inspect wiper blades for wear,
cracking, or contamination.
Clean the windshield and wiper
blades, if contaminated. Replace
wiper blades that are worn or
damaged. See Windshield Wiper
Blade Replacement on page 9-21
and “Windshield and Wiper Blades”
in Exterior Cleaning on page 9-76.
(g)Make sure the safety belt
reminder light and safety belt
assemblies are working properly.
Look for any other loose or
damaged safety belt system parts.
If you see anything that might keep
a safety belt system from doingits job, have it repaired. Have any
torn or frayed safety belts replaced.
Also see Airbag System Check
on page 1-37.
(h)Lubricate all key lock cylinders,
door hinges and latches, hood
hinges and latches, and trunk lid
hinges and latches. More frequent
lubrication may be required
when exposed to a corrosive
environment. Applying silicone
grease on weatherstrips with a clean
cloth will make them last longer,
seal better, and not stick or squeak.
(i)Change automatic transmission
fluid if the vehicle is mainly driven
under one or more of these
conditions:
�In heavy city traffic where the
outside temperature regularly
reaches 90°F (32°C) or higher.
�In hilly or mountainous terrain.
�When doing frequent trailer
towing.
�Uses such as found in taxi, police,
or delivery service.
11-8 Service and Maintenance
ProCarManuals.com