radio controls SATURN AURA 2009 Owners Manual
[x] Cancel search | Manufacturer: SATURN, Model Year: 2009, Model line: AURA, Model: SATURN AURA 2009Pages: 408, PDF Size: 2.61 MB
Page 130 of 408
Driver Information Center (DIC).......................3-43
DIC Operation and Displays...........................3-43
DIC Warnings and Messages.........................3-45
DIC Vehicle Personalization............................3-50
Audio System(s).............................................3-55
Setting the Clock..........................................3-56
Radio(s)......................................................3-57
Using an MP3..............................................3-67
XM Radio Messages.....................................3-74Bluetooth®...................................................3-75
Rear Seat Audio (RSA).................................3-86
Theft-Deterrent Feature..................................3-89
Audio Steering Wheel Controls.......................3-89
Radio Reception...........................................3-91
Backglass Antenna.......................................3-92
XM™ Satellite Radio Antenna System...............3-92
Chime Level Adjustment................................3-92
Section 3 Instrument Panel
3-2
ProCarManuals.com
Page 143 of 408
Automatic Headlamp System
When it is dark enough outside, the automatic headlamp
system turns on the headlamps at the normal brightness
along with other lamps such as the taillamps, sidemarker,
parking lamps, and the instrument panel lights. The radio
lights will also be dim.
The vehicle has a light sensor on top of the instrument
panel that controls the automatic headlamp system.
Do not cover the sensor or the automatic headlamp
system will turn on when it is not needed.
There is a delay in the transition between the daytime
and nighttime operation of the DRL and the automatic
headlamp systems so that driving under bridges or
bright overhead street lights does not affect the system.
The DRL and automatic headlamp systems will only be
affected when the light sensor sees a change in lighting
lasting longer than this delay.
If vehicle is started in a dark garage, the automatic
headlamp system comes on immediately. Once the
vehicle leaves the garage, it takes about one minute for
the automatic headlamp system to change to DRL if it is
light outside. During that delay, the instrument panel
cluster may not be as bright as usual. Make sure the
instrument panel brightness control is in the full bright
position. SeeInstrument Panel Brightness on page 3-16.To idle the vehicle with the automatic headlamp system
off, turn the ignition on and set the exterior light switch to
the off/on position. For vehicles �rst sold in Canada, the
transmission must stay in P (Park) for this function.
The regular headlamps should be used when needed.
Fog Lamps
For vehicles with fog lamps, the button for this feature is
located on the instrument panel, to the left of the
steering wheel.
The ignition must be on for the fog lamps to work.
#:Press to turn the fog lamps on or off. An indicator
light comes on when the fog lamps are on.
The parking lamps automatically turn on and off when
the fog lamps are turned on and off.
The fog lamps turn off while the high-beam headlamps
are turned on.
Some localities have laws that require the headlamps to
be on along with the fog lamps.
3-15
ProCarManuals.com
Page 183 of 408

Exiting Personalization Menu
The personalization menu will be exited when any of the
following conditions occur:
A ten second time period has elapsed.
The ignition is turned off.
The end of the personalization menu list is reached.
Audio System(s)
Determine which radio the vehicle has and read the
following pages to become familiar with its features.
{CAUTION:
Taking your eyes off the road for extended periods
could cause a crash resulting in injury or death to
you or others. Do not give extended attention to
entertainment tasks while driving.
This system provides access to many audio and non
audio listings.To minimize taking your eyes off the road while driving,
do the following while the vehicle is parked:
Become familiar with the operation and controls of
the audio system.
Set up the tone, speaker adjustments, and preset
radio stations.
For more information, seeDefensive Driving on page 4-2.
Notice:Contact your dealer/retailer before adding
any equipment.
Adding audio or communication equipment could
interfere with the operation of the vehicle’s engine,
radio, or other systems, and could damage them.
Follow federal rules covering mobile radio and
telephone equipment.
Notice:The chime signals related to safety belts,
parking brake, and other functions of your vehicle
operate through the radio/entertainment system. If
that equipment is replaced or additional equipment is
added to your vehicle, the chimes may not work.
Make sure that replacement or additional equipment
is compatible with your vehicle before installing it.
SeeAccessories and Modifications on page 5-3.
The vehicle has Retained Accessory Power (RAP). With
RAP, the audio system can be played even after the
ignition is turned off. SeeRetained Accessory Power
(RAP) on page 2-23for more information.
3-55
ProCarManuals.com
Page 187 of 408

¨SEEK:Press to seek or scan stations with a strong
signal in the selected band.
To seek stations, press and release¨SEEK to go
to the next station and stay there.
To scan stations, press and hold¨SEEK for a
few seconds until the radio beeps once. The radio
goes to a station, plays for a few seconds, then goes
to the next station. Press
¨SEEK again to stop
scanning.
To scan preset stations in the selected band, press
and hold
¨SEEK for four seconds until a double
beep sounds. The radio goes to a stored preset,
plays for a few seconds, then goes to the next stored
preset. Press
¨SEEK again to stop scanning
preset stations.
4(Information):For vehicles with XM, MP3, WMA,
or RDS features, press
4to display additional text
information related to the current FM-RDS or XM station;
or CD, MP3, WMA song. Song title information will be
displayed on the top line of the display while the artist
information will be displayed on the bottom line, if the
information is available during XM, CD, MP3, or WMA
playback. When information is not available, “No Info”
displays.
Storing a Radio Station
Drivers are encouraged to set up radio station favorites
while the vehicle is in P (Park). Tune to favorite stations
using the softkeys, favorites button, and steering wheel
controls. SeeDefensive Driving on page 4-2Defensive
Driving.
FAV (Favorites):A maximum of 36 stations can be
stored as favorites using the six softkeys located below
the radio station frequency tabs and by using the radio
favorites page button (FAV button). Press FAV to go
through up to six pages of favorites, each having six
favorite stations available per page. Each page of
favorites can contain any combination of AM, FM, or XM
stations. The current balance/fade and tone settings are
also stored with the favorite stations.
To store a station as a favorite:
1. Tune to the desired radio station and set the
balance/fade and tone settings to the desired levels.
2. Press FAV to display the page where to store the
station.
3. Press and hold one of the six softkeys until a beep
sounds.
4. Repeat the steps for each radio station to be stored
as a favorite.
3-59
ProCarManuals.com
Page 188 of 408

To setup the number of favorites pages:
1. Press MENU to display the radio setup menu.
2. Press the softkey located below the FAV 1-6 tab.
3. Select the desired number of favorites pages by
pressing the softkey located below the displayed
page numbers.
4. Press FAV, or let the menu time out, to return to
the original main radio screen showing the radio
station frequency tabs and to begin programming
favorites.
Auto Text (Satellite Radio Service, CD, MP3, and
WMA features):If additional information is available
for the current song being played, Auto Text will
automatically page/scroll the information every
three seconds above the FAV presets on the radio
display.
To activate Auto Text:
1. Press MENU to display the radio setup menu.
2. Press the softkey under AUTO TXT tab on the radio
display.
3. Press the softkey under the ON tab on the radio
display.
If
4is pressed and the song title or artist information is
longer than what can be displayed, the extra information
will page every three seconds when Auto Text is
activated.
Setting the Tone
(Bass/Midrange/Treble)
BASS/MID/TREB (Bass, Midrange, or Treble):The
radio may display some or all tones such as BASS, MID,
and TREB.
To adjust the tone settings:
1. Press
funtil the tone control tabs display.
2. Press the softkey below the desired tab, then
turn
fto adjust the highlighted setting. The
highlighted setting can also be adjusted by pressing
either SEEK arrow, or
\FWD andsREV.
The radio may be capable of adjusting bass, midrange,
or treble to the middle position by pressing the softkey
below the BASS, MID, or TREB tab for more than
two seconds. The radio beeps once and the level
adjusts to the middle position.
The radio may also be capable of adjusting all tone and
speaker controls to the middle position by pressing
ffor
more than two seconds until the radio beeps once.
If a station’s frequency is weak, or has static, decrease
the treble.
3-60
ProCarManuals.com
Page 189 of 408

EQ (Equalization):Press this button to select preset
equalization settings.
To return to the manual mode, press EQ until Manual
displays or start to manually adjust the bass, midrange,
or treble by pressing
f.
Adjusting the Speakers (Balance/Fade)
To adjust balance or fade:
1. Press
funtil the speaker control labels display.
2. Press the softkey under the desired tab, or continue
pressing
fto highlight the desired tab.
3. Turn
fto adjust the highlighted setting. The
highlighted setting can also be adjusted by pressing
either SEEK arrow.
On some radios,
\FWD andsREV can also
be used to adjust the highlighted level.
The radio may be capable of adjusting balance or fade to
the middle position by pressing the softkey below the BAL
or FADE tab for more than two seconds. The radio beeps
once and the level adjusts to the middle position.
The radio may also be capable of adjusting all tone and
speaker controls to the middle position by pressing
ffor
more than two seconds until the radio beeps once.
Finding a Category (CAT) Station
(XM Satellite Radio Service Only)
CAT (Category):The radio may have the CAT button
feature.
To select and �nd a desired category:
1. Press BAND until the XM frequency displays.
2. Press CAT to display the category labels on the
radio display. Continue pressing the CAT button
until the desired category name displays.
3. Press either of the two softkeys below the desired
category tab to immediately tune to the �rst XM
station associated with that category.
4. To go to the previous or to the next XM station within
the selected category, do one of the following:
Turnf.
Press the softkeys below the right or left arrows
on the radio display.
Press©SEEK or¨SEEK.
5. To exit the category search mode, press the FAV
button or BAND button to display the favorites
again.
3-61
ProCarManuals.com
Page 215 of 408
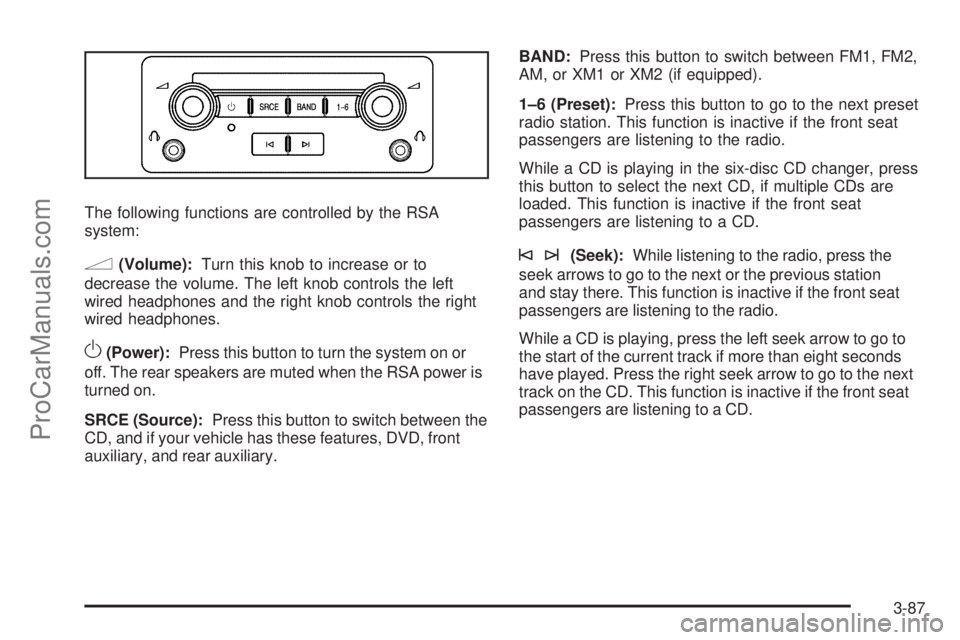
The following functions are controlled by the RSA
system:
n(Volume):Turn this knob to increase or to
decrease the volume. The left knob controls the left
wired headphones and the right knob controls the right
wired headphones.
O(Power):Press this button to turn the system on or
off. The rear speakers are muted when the RSA power is
turned on.
SRCE (Source):Press this button to switch between the
CD, and if your vehicle has these features, DVD, front
auxiliary, and rear auxiliary.BAND:Press this button to switch between FM1, FM2,
AM, or XM1 or XM2 (if equipped).
1–6 (Preset):Press this button to go to the next preset
radio station. This function is inactive if the front seat
passengers are listening to the radio.
While a CD is playing in the six-disc CD changer, press
this button to select the next CD, if multiple CDs are
loaded. This function is inactive if the front seat
passengers are listening to a CD.
©¨(Seek):While listening to the radio, press the
seek arrows to go to the next or the previous station
and stay there. This function is inactive if the front seat
passengers are listening to the radio.
While a CD is playing, press the left seek arrow to go to
the start of the current track if more than eight seconds
have played. Press the right seek arrow to go to the next
track on the CD. This function is inactive if the front seat
passengers are listening to a CD.
3-87
ProCarManuals.com
Page 216 of 408
Rear Seat Audio Controls
The following function is controlled by the main radio:
Front seat passengers can turn the RSA off by
quickly pressing the front radio power knob twice.
Headphones
The RSA includes two wireless headphones that are
dedicated to this system. These headphones are used
to listen to media such as CDs or radio. The wireless
headphones have an On/Off button and a volume control.
Push the power button to turn on the headphones. An
indicator light located on the headphones comes on. If
the light does not come on, the batteries might need to be
replaced. See “Battery Replacement” later in this section
for more information. Switch the headphones to Off when
not in use.
Infrared transmitters are located on the rear seat audio
faceplate above the top row of buttons. This area is
not a display. The headphones shut off automatically
to save the battery power if the RSA shuts off or if the
headphones are out of range of the transmitters for more
than three minutes. If you move too far forward or step
out of the vehicle, the headphones lose the audio signal.The headphones automatically turn off after four hours
of continuous use.
To adjust the volume on the headphones, use the
volume control located on the right side.
For optimal audio performance, the headphones must
be worn correctly. Headphones should be worn with
the headband over the top of the head for best audio
reception. The symbol L (Left) appears on the upper left
side, above the ear pad and should be positioned on the
left ear. The symbol R (Right) appears on the upper right
side, above the ear pad and should be positioned on the
right ear.
Notice:Do not store the headphones in heat or
direct sunlight. This could damage the headphones
and repairs will not be covered by the warranty.
Storage in extreme cold can weaken the batteries.
Keep the headphones stored in a cool, dry place.
If the foam ear pads attached to the headphones
become worn or damaged, the pads can be replaced
separately from the headphone set. Contact your
dealer/retailer for more information.
3-88
ProCarManuals.com
Page 217 of 408
Battery Replacement
To change the batteries on the headphones, do the
following:
1. Turn the screw to loosen the battery door located on
the left side of the headphones. Slide the battery
door open.
2. Replace the two batteries in the compartment. Make
sure that they are installed correctly, using the
diagram on the inside of the battery compartment.
3. Replace the battery door and tighten the door
screw.
If the headphones are to be stored for a long period of
time, remove the batteries and keep them in a cool,
dry place.
Theft-Deterrent Feature
THEFTLOCK®is designed to discourage theft of the
vehicle’s radio by learning a portion of the Vehicle
Identi�cation Number (VIN). The radio does not operate
if it is stolen or moved to a different vehicle.
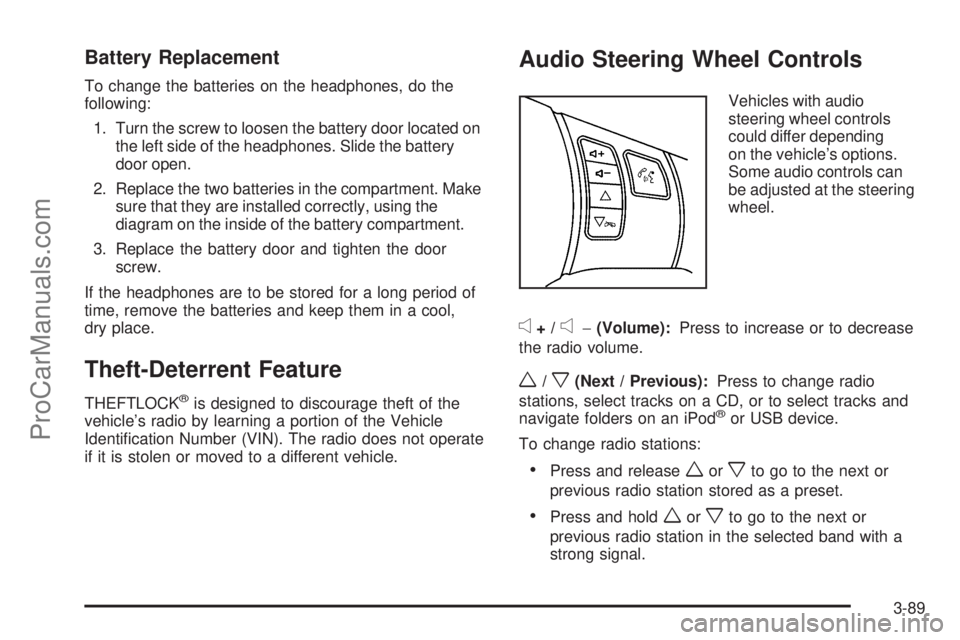
Audio Steering Wheel Controls
Vehicles with audio
steering wheel controls
could differ depending
on the vehicle’s options.
Some audio controls can
be adjusted at the steering
wheel.
e+/e−(Volume):Press to increase or to decrease
the radio volume.
w/x(Next / Previous):Press to change radio
stations, select tracks on a CD, or to select tracks and
navigate folders on an iPod
®or USB device.
To change radio stations:
Press and releaseworxto go to the next or
previous radio station stored as a preset.
Press and holdworxto go to the next or
previous radio station in the selected band with a
strong signal.
3-89
ProCarManuals.com
Page 355 of 408
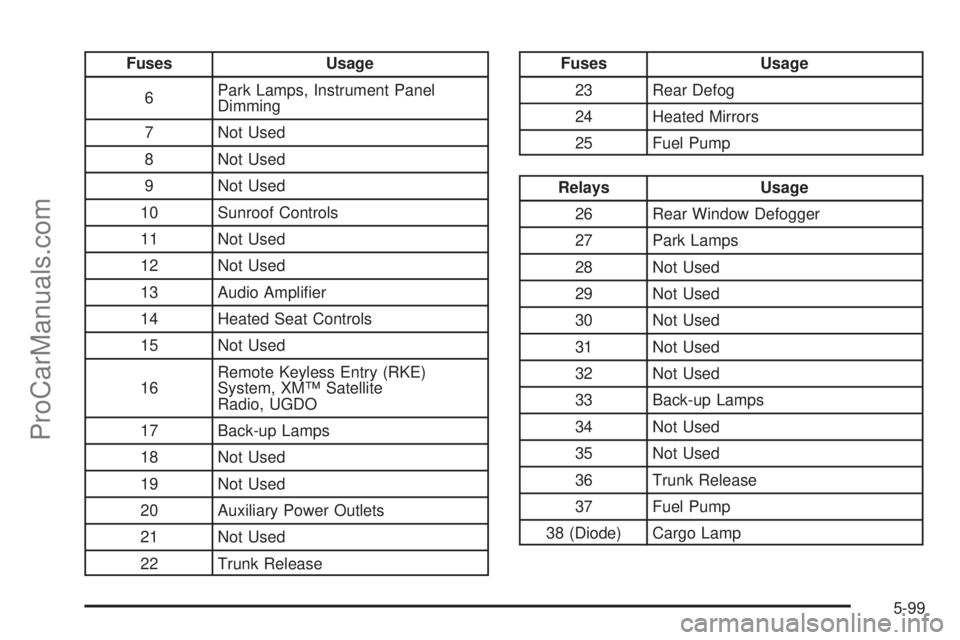
Fuses Usage
6Park Lamps, Instrument Panel
Dimming
7 Not Used
8 Not Used
9 Not Used
10 Sunroof Controls
11 Not Used
12 Not Used
13 Audio Ampli�er
14 Heated Seat Controls
15 Not Used
16Remote Keyless Entry (RKE)
System, XM™ Satellite
Radio, UGDO
17 Back-up Lamps
18 Not Used
19 Not Used
20 Auxiliary Power Outlets
21 Not Used
22 Trunk ReleaseFuses Usage
23 Rear Defog
24 Heated Mirrors
25 Fuel Pump
Relays Usage
26 Rear Window Defogger
27 Park Lamps
28 Not Used
29 Not Used
30 Not Used
31 Not Used
32 Not Used
33 Back-up Lamps
34 Not Used
35 Not Used
36 Trunk Release
37 Fuel Pump
38 (Diode) Cargo Lamp
5-99
ProCarManuals.com