SATURN AURA 2010 User Guide
Manufacturer: SATURN, Model Year: 2010, Model line: AURA, Model: SATURN AURA 2010Pages: 428, PDF Size: 2.78 MB
Page 11 of 428

Canceling a Remote Start
To cancel a remote start:
•Aim the RKE transmitter at the vehicle and press
and hold
/until the parking lamps turn off.
•Turn on the hazard warning flashers.
•Turn the ignition switch out of LOCK/OFF position
and then back to LOCK/OFF.
SeeRemote Vehicle Start on page 3-5.
Door Locks
Manual Locks
To operate the locks, use the key or the Remote
Keyless Entry (RKE) transmitter from outside the
vehicle, and the manual lock knob from the inside.
SeeDoor Locks on page 3-8.
Power Door Locks
Power door lock switches are located on the
front doors.
Lock or unlock the doors by pressing the inboard or
outboard sides of the switch.
For more information, see:
•Power Door Locks on page 3-8.
Trunk Release
In addition to the trunk release button on the RKE
transmitter, there is a remote release
Vbutton located
on the driver door near the map pocket.
For more information seeTrunk on page 3-11.
Windows
On vehicles with power
windows, the switches
are on the driver door
armrest.
Each passenger door has a switch that controls only
that window.
Press the front of the switch to open the window.
Pull the switch up to close it.
For more information, seePower Windows on
page 3-14.
1-5
ProCarManuals.com
Page 12 of 428

Seat Adjustment
Manual Seat
1. Lift the bar under the
seat to unlock the seat.
2. Slide the seat to
the desired position
and release the bar.
Try to move the seat to be sure it is locked in place.
SeeManual Seats on page 2-4.
Power Seats (If Equipped)
Move the seat forward or rearward by moving the
control forward or rearward.
Raise or lower the front or rear of the seat cushion by
moving the front or rear of the control up or down.
SeePower Seats on page 2-5.
1-6
ProCarManuals.com
Page 13 of 428

Power Reclining Seatbacks
(If Equipped)
To raise or recline the seatback, tilt the top of the
control forward or rearward.
SeeReclining Seatbacks on page 2-6.
Power Lumbar
Press the front (A) or rear (B) of the control to increase
or decrease lumbar support.
SeePower Lumbar on page 2-5.
1-7
ProCarManuals.com
Page 14 of 428

Heated Seats (If Equipped)
Press the top of the switch to turn the feature on to the
high heat setting. The indicator light (2) will be lit.
Press the top of the switch again to go to the low heat
setting. The indicator light (1) will be lit.
Press the bottom of the switch to turn the feature off.
Second Row Seats
Rear Seat
Either side of the seatback can be folded down.
Pull up on the seatback strap while folding the seatback
down to allow access to the trunk.
SeeSplit Folding Rear Seat on page 2-10
1-8
ProCarManuals.com
Page 15 of 428

Safety Belt
Refer to the following sections for important information
on how to use safety belts properly.
•Safety Belts: They Are for Everyone on page 2-12.
•How to Wear Safety Belts Properly on page 2-17.
•Lap-Shoulder Belt on page 2-25.
•Lower Anchors and Tethers for Children (LATCH)
on page 2-44.
Sensing System for Passenger
Airbag
The passenger sensing system will turn off the right
front passenger frontal airbag and seat-mounted
side impact airbag under certain conditions. The driver
airbags and roof-rail airbags are not affected by this.
The passenger airbag status indicator will be visible on
the instrument panel when the vehicle is started.
SeePassenger Sensing System on page 2-68for
important information.
United StatesCanada
1-9
ProCarManuals.com
Page 16 of 428

Mirror Adjustment
Exterior Mirrors
Controls for the outside
power mirrors are located
on the inside of the
vehicle near the driver
side mirror.
Use the selector switch to choose either the left or right
outside mirror. Then press the four-way control pad
to move the selected mirror in the desired direction.
The vehicle may also have an automatic dimming
feature on the driver side mirror that adjusts for the glare
of headlamps behind you. This feature is controlled
by the on and off settings on the automatic dimming
inside rearview mirror.For more information, see:
•Outside Power Mirrors on page 3-34.
•Outside Automatic Dimming Mirror on page 3-34.
Interior Mirror
Vehicles with a manual rearview mirror can be adjusted
by holding the mirror in the center to move it for a
clearer view of behind the vehicle. Adjust the mirror
to reduce the glare of headlamps from behind you.
Push the tab located at the base of the mirror, forward
for daytime use and pull it for nighttime use.
Vehicles with an automatic dimming rearview mirror will
automatically adjust to reduce the glare of lights from
behind the vehicle. The dimming feature comes on and
the indicator light illuminates each time the vehicle is
started.
For more information, seeAutomatic Dimming Rearview
Mirror on page 3-32.
1-10
ProCarManuals.com
Page 17 of 428

Steering Wheel Adjustment
The lever is located on the left side of the steering
wheel column.
To adjust the steering wheel:
1. Pull the lever down.
2. Move the steering wheel up or down or backward
or forward into a comfortable position.
3. Pull the lever up to lock the steering wheel in place.
SeeTilt and Telescopic Steering Wheel on page 4-3.
Interior Lighting
Dome Lamp
The dome lamps come on when any door is opened.
They turn off after all the doors are closed.
The dome lamps can also be turned on by turning the
instrument panel brightness knob, located on the
instrument panel to the left of the steering column,
clockwise to the farthest position. In this position, the
dome lamps remain on whether a door is opened
or closed.
Reading Lamps
For vehicles with front overhead console and rear
reading lamps, they come on automatically when any
door is opened. For manual operation while the doors
are closed, press the lens to turn the lamp on or off.
For more information on interior lighting, see:
•Instrument Panel Brightness on page 4-13.
•Entry/Exit Lighting on page 4-13.
•Parade Dimming on page 4-13.
1-11
ProCarManuals.com
Page 18 of 428

Exterior Lighting
The lever is located on the left side of the steering
wheel.
2:Turns on the headlamps, parking lamps, and
taillamps.
;:Turns on the parking lamps and taillamps only.
AUTO:Automatically turns on the Daytime Running
Lamps during daytime, and the headlamps, parking
lamps, and taillamps at night.
P:Turn the band to this position to turn the Automatic
Headlamp System on or off. In Canada, this position
only works when a vehicle is in the P (Park) position.For more information, see:
•Headlamps on page 4-10.
•Daytime Running Lamps (DRL) on page 4-11.
•Automatic Headlamp System on page 4-11.
Windshield Wiper/Washer
The windshield wiper lever is on the right side of the
steering column.
9:Turns the wipers off.
&:For intermittent or speed sensitive operation.
The amount of delay time varies between wiping cycles
due to the delay setting selected or the speed of the
vehicle. As vehicle speed is increased or decreased,
the wiper interval also increases or decreases.
1-12
ProCarManuals.com
Page 19 of 428

x:Move the lever to the&position, then turn
the
xband up for more frequent wipes or down for
less frequent wipes.
6:Slow wipes.
1:Fast wipes.
8:Single wipe, move the lever down, then release it.
Several wipes, hold the lever down.
Windshield Washer:Press the button at the end of the
lever until the washers begin.
SeeWindshield Wipers on page 4-5andWindshield
Washer on page 4-6.
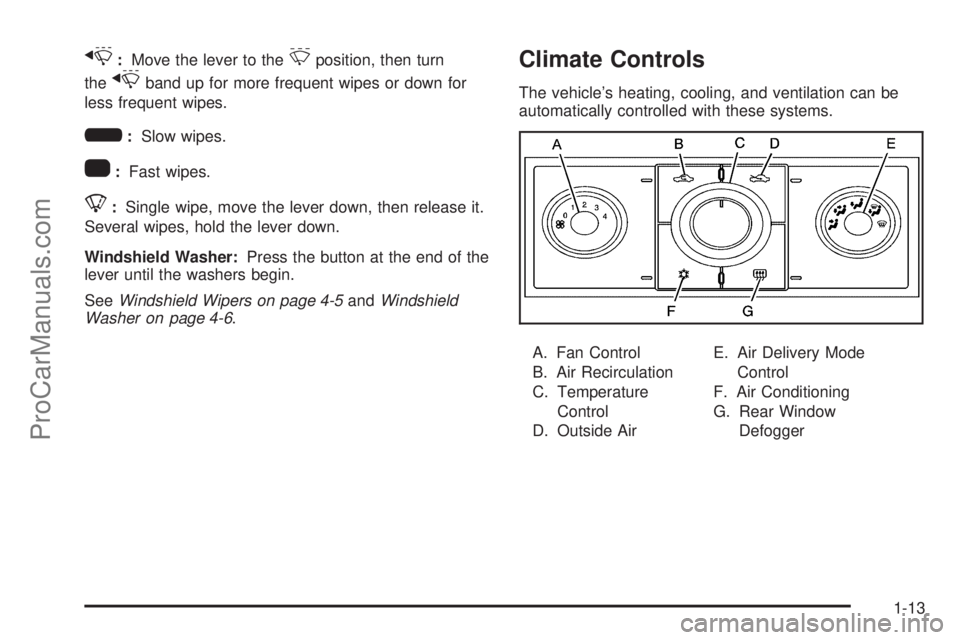
Climate Controls
The vehicle’s heating, cooling, and ventilation can be
automatically controlled with these systems.
A. Fan Control
B. Air Recirculation
C. Temperature
Control
D. Outside AirE. Air Delivery Mode
Control
F. Air Conditioning
G. Rear Window
Defogger
1-13
ProCarManuals.com
Page 20 of 428

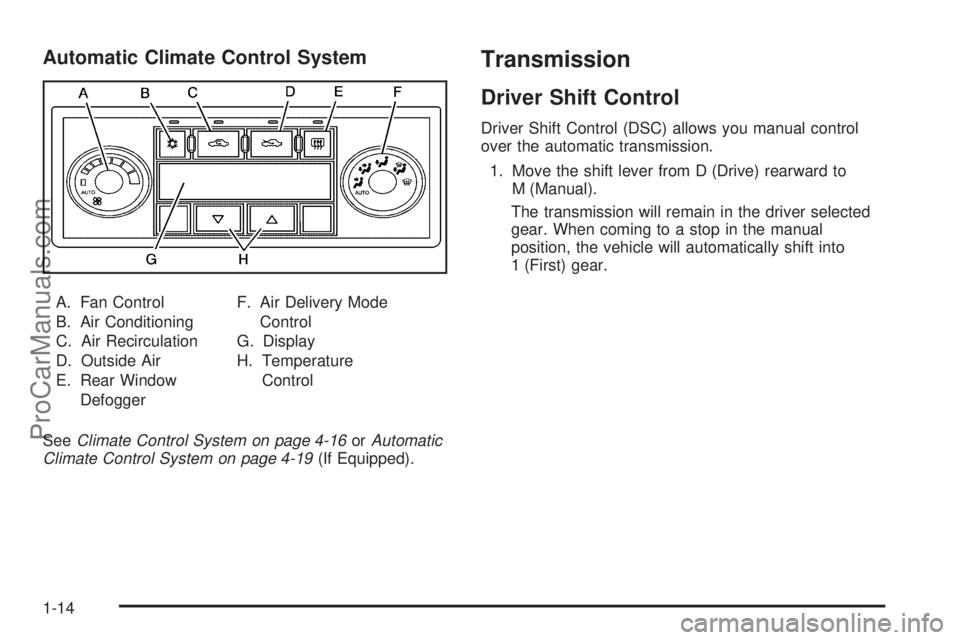
Automatic Climate Control System
A. Fan Control
B. Air Conditioning
C. Air Recirculation
D. Outside Air
E. Rear Window
DefoggerF. Air Delivery Mode
Control
G. Display
H. Temperature
Control
SeeClimate Control System on page 4-16orAutomatic
Climate Control System on page 4-19(If Equipped).
Transmission
Driver Shift Control
Driver Shift Control (DSC) allows you manual control
over the automatic transmission.
1. Move the shift lever from D (Drive) rearward to
M (Manual).
The transmission will remain in the driver selected
gear. When coming to a stop in the manual
position, the vehicle will automatically shift into
1 (First) gear.
1-14
ProCarManuals.com