coolant level SATURN AURA 2010 Owners Manual
[x] Cancel search | Manufacturer: SATURN, Model Year: 2010, Model line: AURA, Model: SATURN AURA 2010Pages: 428, PDF Size: 2.78 MB
Page 168 of 428

Climate Controls
Climate Control System
The heating, cooling and ventilation for the vehicle can
be controlled with this system.
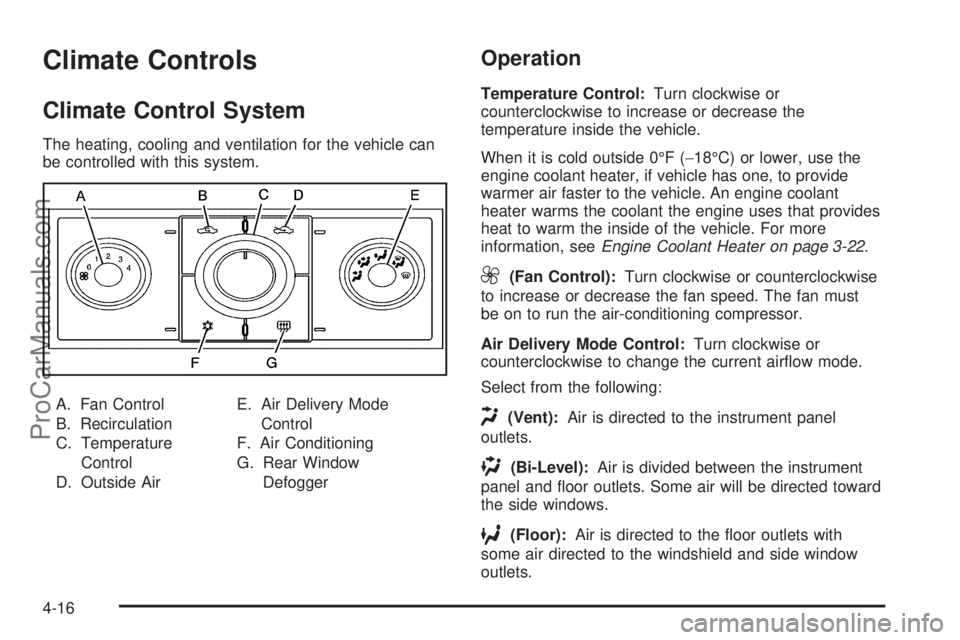
A. Fan Control
B. Recirculation
C. Temperature
Control
D. Outside AirE. Air Delivery Mode
Control
F. Air Conditioning
G. Rear Window
Defogger
Operation
Temperature Control:Turn clockwise or
counterclockwise to increase or decrease the
temperature inside the vehicle.
When it is cold outside 0°F (−18°C) or lower, use the
engine coolant heater, if vehicle has one, to provide
warmer air faster to the vehicle. An engine coolant
heater warms the coolant the engine uses that provides
heat to warm the inside of the vehicle. For more
information, seeEngine Coolant Heater on page 3-22.
9(Fan Control):Turn clockwise or counterclockwise
to increase or decrease the fan speed. The fan must
be on to run the air-conditioning compressor.
Air Delivery Mode Control:Turn clockwise or
counterclockwise to change the current airflow mode.
Select from the following:
H(Vent):Air is directed to the instrument panel
outlets.
)(Bi-Level):Air is divided between the instrument
panel and floor outlets. Some air will be directed toward
the side windows.
6(Floor):Air is directed to the floor outlets with
some air directed to the windshield and side window
outlets.
4-16
ProCarManuals.com
Page 287 of 428

A. SeeEngine Air Cleaner/Filter on page 6-21.
B. Power Steering Fluid Reservoir. SeePower Steering
Fluid on page 6-30.
C. Engine Oil Fill Cap. See “When to Add Engine Oil”
underEngine Oil on page 6-17.
D. Engine Oil Dipstick. See “Checking Engine Oil”
underEngine Oil on page 6-17.
E. Electric Engine Cooling Fans (Out of View). See
Cooling System on page 6-24.
F. Engine Coolant Surge Tank. SeeEngine Coolant on
page 6-25.
G. Pressure Cap. SeeCooling System on page 6-24.
H. Brake Master Cylinder Reservoir. See “Brake
Fluid” underBrakes on page 6-33.
I. Automatic transmission Fluid Dipstick. See “Checking
the Fluid Level” underAutomatic Transmission
Fluid on page 6-23.
J. SeeBattery on page 6-35.
K. Underhood Fuse Block. SeeEngine Compartment
Fuse Block on page 6-100.
L. Windshield Washer Fluid Reservoir. See “Adding
Washer Fluid” underWindshield Washer Fluid
on page 6-32.Engine Oil
Checking Engine Oil
It is a good idea to check the engine oil level at each
fuel fill. In order to get an accurate reading, the oil must
be warm and the vehicle must be on level ground.
The engine oil dipstick handle is a yellow loop. See
Engine Compartment Overview on page 6-14for
the location of the engine oil dipstick.
1. Turn off the engine and give the oil several minutes
to drain back into the oil pan. If this is not done, the
oil dipstick might not show the actual level.
2. Pull out the dipstick and clean it with a paper towel
or cloth, then push it back in all the way. Remove it
again, keeping the tip down, and check the level.
6-17
ProCarManuals.com
Page 296 of 428

•Protects against rust and corrosion.
•Will not damage aluminum parts.
•Helps keep the proper engine temperature.
Notice:If an improper coolant mixture is used, the
engine could overheat and be badly damaged.
The repair cost would not be covered by the vehicle
warranty. Too much water in the mixture can
freeze and crack the engine, radiator, heater core,
and other parts.
Notice:If extra inhibitors and/or additives are used
in the vehicle’s cooling system, the vehicle could
be damaged. Use only the proper mixture of
the engine coolant listed in this manual for the
cooling system. SeeRecommended Fluids and
Lubricants on page 7-10for more information.
Checking Coolant
The vehicle must be on a level surface when checking
the coolant level.
Check to see if coolant is visible in the coolant recovery
tank. If the coolant inside the coolant recovery tank is
boiling, do not do anything else until it cools down.
If coolant is visible but the coolant level is not at
or above the FULL COLD mark, add a 50/50 mixture of
clean, drinkable water and DEX-COOL
®coolant atthe coolant recovery tank, but be sure the cooling
system is cool before this is done. SeeEngine Coolant
on page 6-25for more information.
The coolant level should be at or above the FULL
COLD mark on the coolant surge tank. If it is not, you
may have a leak at the pressure cap or in the radiator
hoses, heater hoses, radiator, water pump, or
somewhere else in the cooling system.
How to Add Coolant to the
Recovery Tank
{WARNING:
You can be burned if you spill coolant on hot
engine parts. Coolant contains ethylene glycol and
it will burn if the engine parts are hot enough. Do
not spill coolant on a hot engine.
Notice:This vehicle has a speci�c coolant �ll
procedure. Failure to follow this procedure could
cause the engine to overheat and be severely
damaged.
If coolant is needed, add the proper DEX-COOL
®
coolant mixture at the coolant recovery tank.
6-26
ProCarManuals.com
Page 298 of 428

3. Fill the coolant surge tank with the proper mixture,
to the FULL COLD mark. Wait about five minutes,
then check to see if the level is below the mark.
If the level is below the FULL COLD mark,
add additional coolant to bring the level up to the
mark. Repeat this procedure until the level remains
constant at the FULL COLD mark for at least
five minutes.
4. With the coolant surge tank pressure cap off,
start the engine and let it run until you can feel
the upper radiator hose getting hot. Watch out for
the engine cooling fans.
By this time, the coolant level inside the coolant
surge tank might be lower. If the level is lower than
the FULL COLD mark, add more of the proper
mixture to the coolant surge tank until the level
reaches the FULL COLD mark.
5. Then replace the pressure cap. Be sure the
pressure cap is hand-tight and fully seated.
Notice:If the pressure cap is not tightly installed,
coolant loss and possible engine damage may
occur. Be sure the cap is properly and tightly
secured.Engine Overheating
The vehicle has several indicators to warn of engine
overheating.
You will find an engine coolant temperature gage as
well as an engine coolant temperature warning light on
your vehicle’s instrument panel cluster. SeeEngine
Coolant Temperature Gage on page 4-33andEngine
Coolant Temperature Warning Light on page 4-33.
You may decide not to lift the hood when this warning
appears, but instead get service help right away.
SeeRoadside Assistance Program on page 8-6.
If you do decide to lift the hood, make sure the vehicle
is parked on a level surface.
Then check to see if the engine cooling fans are
running. If the engine is overheating, both fans should
be running. If they are not, do not continue to run
the engine and have the vehicle serviced.
Notice:Engine damage from running the engine
without coolant is not covered by the warranty.
Notice:If the engine catches �re while driving with
no coolant, the vehicle can be badly damaged.
The costly repairs would not be covered by
the vehicle warranty. SeeOverheated Engine
Protection Operating Mode on page 6-30for
information on driving to a safe place in an
emergency.
6-28
ProCarManuals.com
Page 379 of 428

Rotation of New Tires
To maintain ride, handling, and performance of the
vehicle, it is important that the first rotation service for
new tires be performed when they have 8 000 to
13 000 km (5,000 to 8,000 miles). SeeTire Inspection
and Rotation on page 6-57.
Scheduled Maintenance
When the Change Oil Soon Message
Displays
Change engine oil and filter. SeeEngine Oil on
page 6-17.An Emission Control Service.
When the Change Oil Soon message displays, service
is required for the vehicle as soon as possible, within
the next 1 000 km/600 miles. If driving under the
best conditions, the engine oil life system might not
indicate the need for vehicle service for more than
a year. The engine oil and filter must be changed at
least once a year and the oil life system must be reset.
Your dealer/retailer has trained service technicians
who will perform this work and reset the system. If the
engine oil life system is reset accidentally, service
the vehicle within 5 000 km/3,000 miles since the last
service. Reset the oil life system whenever the oil
is changed. SeeEngine Oil Life System on page 6-20.When the Change Oil Soon message displays, certain
services, checks, and inspections are required. The
services described for MaintenanceIshould be
performed at every engine oil change. The services
described for MaintenanceIIshould be performed when:
•MaintenanceIwas performed the last time the
engine oil was changed.
•It has been 10 months or more since the Change
Oil Soon message has displayed or since the last
service.
MaintenanceI
•Change engine oil and filter. SeeEngine Oil on
page 6-17.An Emission Control Service.
•Engine coolant level check. SeeEngine Coolant on
page 6-25.
•Windshield washer fluid level check. SeeWindshield
Washer Fluid on page 6-32.
•Tire inflation check. SeeIn�ation - Tire Pressure on
page 6-51.
•Tire wear inspection. SeeTire Inspection and
Rotation on page 6-57.
•Rotate tires. SeeTire Inspection and Rotation on
page 6-57.
7-3
ProCarManuals.com
Page 380 of 428

•Fluids visual leak check (or every 12 months,
whichever occurs first). A leak in any system must
be repaired and the fluid level checked.
•Engine air cleaner filter inspection (vehicles driven
in dusty conditions only). SeeEngine Air
Cleaner/Filter on page 6-21.
•Brake system inspection (or every 12 months,
whichever occurs first).
MaintenanceII
•Perform all services described in MaintenanceI.
•Steering and suspension inspection. Visual
inspection for damaged, loose, or missing parts or
signs of wear.
•Engine cooling system inspection. Visual inspection
of hoses, pipes, fittings, and clamps and
replacement, if needed.
•Windshield wiper blade inspection for wear,
cracking, or contamination and windshield and wiper
blade cleaning, if contaminated. SeeWindshield
and Wiper Blades on page 6-93. Worn or damaged
wiper blade replacement. SeeWindshield Wiper
Blade Replacement on page 6-44.
•Body hinges and latches, key lock cylinders, and
rear compartment and hood hinges and latches
lubrication. SeeRecommended Fluids and
Lubricants on page 7-10. More frequent lubrication
may be required when vehicle is exposed to a
corrosive environment. Applying silicone grease on
weatherstrips with a clean cloth makes them last
longer, seal better, and not stick or squeak.
•Restraint system component check. SeeChecking
the Restraint Systems on page 2-75.
•Engine air cleaner filter inspection. SeeEngine Air
Cleaner/Filter on page 6-21.
•3.6L Engine Only: Automatic transmission fluid level
check and adding fluid, if needed. SeeAutomatic
Transmission Fluid on page 6-23.
Additional Required Services
At Each Fuel Stop
•
Engine oil level check. SeeEngine Oil on
page 6-17.
•Engine coolant level check. SeeEngine Coolant on
page 6-25.
•Windshield washer fluid level check. SeeWindshield
Washer Fluid on page 6-32.
7-4
ProCarManuals.com
Page 383 of 428

Scheduled Maintenance
Service MaintenanceIMaintenanceII
Change engine oil and filter. Reset oil life system.••
Engine coolant level check.••
Windshield washer fluid level check.••
Tire inflation pressures check.••
Tire wear inspection.••
Rotate tires.••
Fluids visual leak check.••
Engine air cleaner filter inspection (vehicles driven in dusty conditions only).••
Brake system inspection.••
Steering and suspension inspection.•
Engine cooling system inspection.•
Windshield wiper blades inspection.•
Body components lubrication.•
Restraint system components check.•
Engine air cleaner filter inspection (vehicles not driven in dusty conditions).•
3.6L Engine Only: Automatic transmission fluid level check.•
7-7
ProCarManuals.com
Page 413 of 428

C
Calibration.....................................................3-33
California
Perchlorate Materials Requirements................. 6-4
Warning....................................................... 6-4
California Fuel.................................................. 6-6
Call Waiting...................................................4-76
Calling for Assistance........................................ 8-6
Canadian Owners............................................... iii
Canceling a Remote Start.................................. 1-5
Capacities and Specifications..........................6-105
Carbon Monoxide
Engine Exhaust...........................................3-30
Trunk.........................................................3-11
Winter Driving.............................................5-16
Care of
Safety Belts................................................6-91
Care of CDs ..................................................4-59
Care of the CD Player.....................................4-59
CD Messages................................................4-59
CD, MP3 .......................................................4-61
Cellular Phone Usage......................................4-83
Center Console Storage...................................3-41
Certification Label...........................................5-22
Chains, Tire...................................................6-65
Changing a Tire When Trailer Towing................5-33
Charging System Light....................................4-30Check
Engine Lamp..............................................4-34
Check Engine Light.........................................4-34
Checking Coolant............................................6-26
Checking Engine Oil........................................6-17
Checking Things Under the Hood......................6-12
Chemical Paint Spotting...................................6-95
Child Restraints
Infants and Young Children...........................2-35
Lower Anchors and Tethers for Children..........2-44
Older Children.............................................2-32
Securing a Child Restraint in a Rear Seat
Position..................................................2-51
Securing a Child Restraint in the Right Front
Seat Position...........................................2-54
Systems.....................................................2-39
Where to Put the Restraint...........................2-42
Chime Level Adjustment..................................4-84
Cleaning
Aluminum Wheels........................................6-94
Exterior Lamps/Lenses.................................6-92
Fabric/Carpet..............................................6-90
Finish Care.................................................6-92
Instrument Panel, Vinyl, and Other Plastic
Surfaces.................................................6-91
Interior.......................................................6-89
Leather......................................................6-91
Tires..........................................................6-94
3
ProCarManuals.com