clock SATURN AURA HYBRID 2008 Owners Manual
[x] Cancel search | Manufacturer: SATURN, Model Year: 2008, Model line: AURA HYBRID, Model: SATURN AURA HYBRID 2008Pages: 362, PDF Size: 2.05 MB
Page 83 of 362

Doors and Locks
Door Locks
{CAUTION:
Unlocked doors can be dangerous.
Passengers, especially children, can easily
open the doors and fall out of a moving
vehicle. When a door is locked, the handle
will not open it. You increase the chance
of being thrown out of the vehicle in a
crash if the doors are not locked. So, wear
safety belts properly and lock the doors
whenever you drive.
Young children who get into unlocked
vehicles may be unable to get out. A child
can be overcome by extreme heat and can
suffer permanent injuries or even death
from heat stroke. Always lock your vehicle
whenever you leave it.
Outsiders can easily enter through an
unlocked door when you slow down or
stop your vehicle. Locking your doors can
help prevent this from happening.There are several ways to lock and unlock your vehicle.
From the outside, use your key or Remote Keyless
Entry (RKE) transmitter, if the vehicle has one. Turn the
key counterclockwise to unlock the door.
From the inside, lock and unlock the door by moving the
manual lock knob down and up, or by using the power
door lock switches.
Power Door Locks
The power door lock switches are located on the
driver’s and front passenger’s door.
Press the outboard side of the switch to unlock all doors.
Press the inboard side of the switch to lock all doors.
The rear doors do not have power door lock switches.
Rear seat passengers must use the manual lock
knob on their doors.
2-7
Page 118 of 362
Engine Coolant Temperature Warning Light......3-35
Tire Pressure Light.......................................3-35
Malfunction Indicator Lamp.............................3-36
Oil Pressure Light.........................................3-39
Security Light...............................................3-40
Cruise Control Light......................................3-40
Highbeam On Light.......................................3-40
Fuel Gage...................................................3-41
Auto Stop Mode...........................................3-42
Charge/Assist Gage......................................3-42
Fuel Economy Light......................................3-43
Driver Information Center (DIC).......................3-43
DIC Operation and Displays...........................3-44
DIC Warnings and Messages.........................3-46
DIC Vehicle Personalization............................3-51Audio System(s).............................................3-56
Setting the Clock..........................................3-57
Radio(s)......................................................3-58
Using an MP3..............................................3-66
XM Radio Messages.....................................3-71
Theft-Deterrent Feature..................................3-72
Audio Steering Wheel Controls.......................3-72
Radio Reception...........................................3-73
Backglass Antenna.......................................3-74
XM™ Satellite Radio Antenna System.............3-74
Section 3 Instrument Panel
3-2
Page 132 of 362
Instrument Panel Brightness
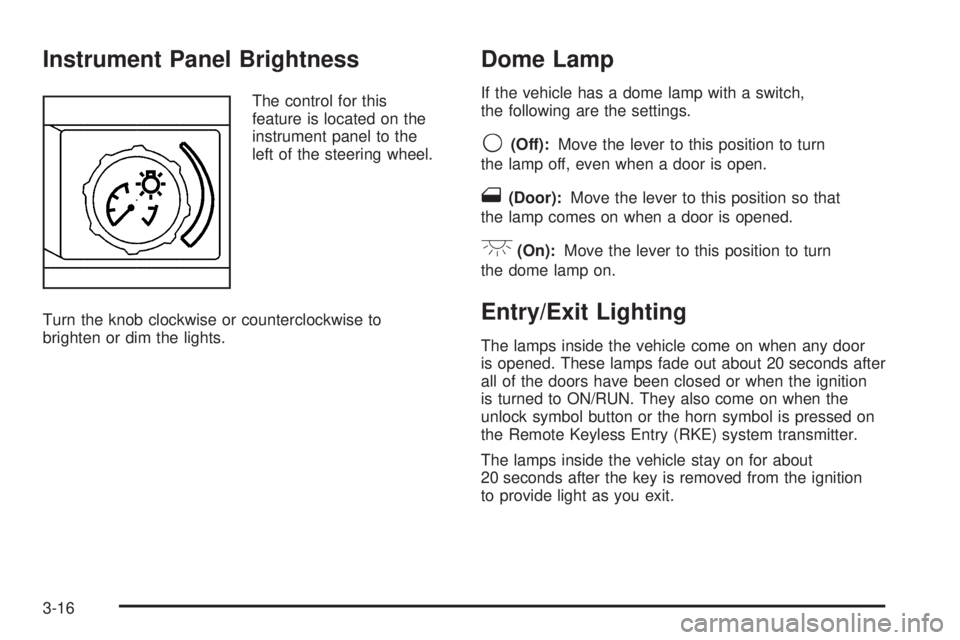
The control for this
feature is located on the
instrument panel to the
left of the steering wheel.
Turn the knob clockwise or counterclockwise to
brighten or dim the lights.
Dome Lamp
If the vehicle has a dome lamp with a switch,
the following are the settings.
9(Off):Move the lever to this position to turn
the lamp off, even when a door is open.
1(Door):Move the lever to this position so that
the lamp comes on when a door is opened.
+(On):Move the lever to this position to turn
the dome lamp on.
Entry/Exit Lighting
The lamps inside the vehicle come on when any door
is opened. These lamps fade out about 20 seconds after
all of the doors have been closed or when the ignition
is turned to ON/RUN. They also come on when the
unlock symbol button or the horn symbol is pressed on
the Remote Keyless Entry (RKE) system transmitter.
The lamps inside the vehicle stay on for about
20 seconds after the key is removed from the ignition
to provide light as you exit.
3-16
Page 173 of 362
Setting the Clock
Your vehicle has a radio with aH(clock) button for
setting the time and date.
To set the time and date, follow these instructions:
1. Turn the radio on.
2. Press the
Hbutton and the HR, MIN, MM, DD,
YYYY (hour, minute, month, day, and year)
displays.
3. Press the pushbutton located under any one of the
labels to be changed. Every time the pushbutton is
pressed again, the time or the date if selected,
increases by one.
Another way to increase the time or date, is to
press the right
¨SEEK arrow or\FWD
(forward) button.
To decrease the time or date, press the left©
SEEK arrow orsREV (reverse) button, or
turn the
fknob, located on the upper right side
of the radio.The date does not automatically display. To see the
date press the
H(clock) button while the radio is
on. The date with display times out after a few seconds
and goes back to the normal radio and time display.
To change the time default setting from 12 hour to
24 hour or to change the date default setting from
month/day/year to day/month/year, follow these
instructions:
1. Press the
Hbutton and then the pushbutton
located under the forward arrow label. Once
the time 12H and 24H, and the date MM/DD/YYYY
(month, day, and year) and DD/MM/YYYY (day,
month, and year) displays.
2. Press the pushbutton located under the desired
option.
3. Press the
Hbutton again to apply the selected
default, or let the screen time out.
3-57
Page 175 of 362
Playing the Radio
O
(Power/Volume):Press to turn the system
on and off.
Turn clockwise or counterclockwise to increase or
decrease the volume.
Speed Compensated Volume (SCV):The radio
has Speed Compensated Volume (SCV). When SCV
is on, the radio volume automatically adjusts to
compensate for road and wind noise as you speed
up or slow down while driving. That way, the volume
level should sound about the same as you drive.
To activate SCV:
1. Set the radio volume to the desired level.
2. Press the MENU button to display the radio
setup menu.
3. Press the pushbutton under the AUTO VOLUM
label on the radio display.
4. Press the pushbutton under the desired Speed
Compensated Volume setting (OFF, Low, Med,
or High) to select the level of radio volume
compensation. The display times out after
approximately 10 seconds. Each higher setting
allows for more radio volume compensation at
faster vehicle speeds.
Finding a Station
BAND:Press this button to switch between AM, FM,
or XM™ (if equipped).
f(Tune):Turn to select radio stations.
©SEEK¨:Press the arrows to go to the previous or
to the next station and stay there.
To scan stations, press and hold either arrow for
a few seconds until a beep sounds. The radio goes to
a station, plays for a few seconds, then goes to the
next station. Press either arrow again to stop scanning.
The radio seeks and scans stations only with a
strong signal that are in the selected band.
4(Information) (XM™ Satellite Radio Service, MP3,
and RDS Features):Press to display additional
text information related to the current FM-RDS or
MP3 song. A choice of additional information such
as: Channel, Song, Artist, and CAT (category)
can appear. Continue pressing this button to highlight
the desired label, or press the pushbutton positioned
under any one of the labels and the information
about that label displays.
While information is not available, No Info displays.
3-59
Page 177 of 362
Setting the Tone
(Bass/Midrange/Treble)
BASS/MID/TREB (Bass, Midrange, or Treble):To
adjust bass, midrange, or treble, press the
fknob until
the tone control labels display. Continue pressing to
highlight the desired label, or press the pushbutton
positioned under the desired label. Turn the
fknob
clockwise or counterclockwise to adjust the highlighted
setting. The highlighted setting can also be adjusted
by pressing either SEEK arrow,
\FWD (forward) or
sREV (reverse) button until the desired levels
are obtained. If a station’s frequency is weak, or has
static, decrease the treble.
To quickly adjust bass, midrange, or treble to the middle
position, press the pushbutton positioned under the
BASS, MID, or TREB label for more than two seconds.
A beep sounds and the level adjusts to the middle
position.
To quickly adjust all tone and speaker controls to the
middle position, press the
fknob for more than
two seconds until a beep sounds.EQ (Equalization):Press this button to select preset
equalization settings.
To return to the manual mode, press the EQ button until
Manual displays or press the
fknob to adjust the
bass, midrange, or treble.
Adjusting the Speakers (Balance/Fade)
BAL/FADE (Balance/Fade):To adjust balance or
fade, press the
fknob until the speaker control labels
display. Continue pressing to highlight the desired
label, or press the pushbutton positioned under
the desired label. Turn the
fknob clockwise or
counterclockwise to adjust the highlighted setting.
The highlighted setting can also be adjusted by pressing
either SEEK arrow,
\FWD orsREV button until
the desired levels are obtained.
To quickly adjust balance or fade to the middle position,
press the pushbutton positioned under the BAL or
FADE label for more than two seconds. A beep sounds
and the level adjusts to the middle position.
To quickly adjust all speaker and tone controls to the
middle position, press the
fknob for more than
two seconds until a beep sounds.
3-61
Page 182 of 362

To use a portable audio player, connect a 3.5 mm
(1/8 inch) cable to the radio’s front auxiliary input jack.
When a device is connected, press the radio CD/AUX
button to begin playing audio from the device over
the vehicle speakers.
O(Power/Volume):Turn clockwise or
counterclockwise to increase or decrease the volume
of the portable player. Additional volume adjustments
can be made from the portable device if the volume
is not loud or soft enough.
BAND:Press to listen to the radio while a portable
audio device is playing. The portable audio device
continues playing, so you might want to stop it or
turn it off.
CD/AUX (CD/Auxiliary):Press to play a CD while a
portable audio device is playing. Press again and
the system begins playing audio from the connected
portable audio player. If a portable audio player is
not connected, No Input Device Found displays.
Using an MP3
MP3 CD-R or CD-RW Disc
The radio plays MP3 �les that were recorded on a
CD-R or CD-RW disc. The �les can be recorded with
the following �xed bit rates: 32 kbps, 40 kbps, 56 kbps,
64 kbps, 80 kbps, 96 kbps, 112 kbps, 128 kbps,
160 kbps, 192 kbps, 224 kbps, 256 kbps, and
320 kbps or a variable bit rate. Song title, artist name,
and album are available for display by the radio
when recorded using ID3 tags version 1 and 2.
Compressed Audio
The radio also plays discs that contain both
uncompressed CD audio (.CDA �les) and MP3 �les.
By default the radio reads only the uncompressed
audio and ignore the MP3 �les. Pressing the CAT
button toggles between compressed and uncompressed
audio format.
3-66
Page 201 of 362

Try to adjust your speed so you can drive through the
curve. Maintain a reasonable, steady speed. Wait
to accelerate until you are out of the curve, and then
accelerate gently into the straightaway.
Adding non-dealer/non-retailer accessories can affect
your vehicle’s performance. SeeAccessories and
Modifications on page 5-3.
Steering in Emergencies
There are times when steering can be more effective
than braking. For example, you come over a hill and
�nd a truck stopped in your lane, or a car suddenly
pulls out from nowhere, or a child darts out from
between parked cars and stops right in front of you.
You can avoid these problems by braking — if you
can stop in time. But sometimes you cannot; there is
not room. That is the time for evasive action — steering
around the problem.
Your vehicle can perform very well in emergencies like
these. First apply the brakes. SeeBraking on page 4-3.
It is better to remove as much speed as you can from a
possible collision. Then steer around the problem, to the
left or right depending on the space available.An emergency like this requires close attention and a
quick decision. If you are holding the steering wheel
at the recommended 9 and 3 o’clock positions, you can
turn it a full 180 degrees very quickly without removing
either hand. But you have to act fast, steer quickly,
and just as quickly straighten the wheel once you have
avoided the object.
The fact that such emergency situations are always
possible is a good reason to practice defensive driving
at all times and wear safety belts properly.
4-11
Page 229 of 362

The fuel door is located on the passenger side of the
vehicle.
To open the fuel door, apply pressure on the center of
the rear edge of the fuel door and it will pop open.
To remove the tethered fuel cap, turn it slowly
counterclockwise.
5-9
Page 230 of 362
While refueling, hang the tethered fuel cap from the
hook on the fuel door.
{CAUTION:
Fuel can spray out on you if you open the
fuel cap too quickly. If you spill fuel and then
something ignites it, you could be badly burned.
This spray can happen if your tank is nearly full,
and is more likely in hot weather. Open the fuel
cap slowly and wait for any hiss noise to stop.
Then unscrew the cap all the way.
Be careful not to spill fuel. Do not top off or over�ll the
tank and wait a few seconds after you have �nished
pumping the fuel before removing the nozzle. Clean
fuel from painted surfaces as soon as possible.
SeeWashing Your Vehicle on page 5-80.
When replacing the fuel cap, turn it to the clockwise
until it clicks. Make sure the cap is fully installed.
The diagnostic system can determine if the fuel
cap has been left off or improperly installed. This
would allow fuel to evaporate into the atmosphere.
SeeMalfunction Indicator Lamp on page 3-36.If your vehicle has a Driver Information Center (DIC),
the CHECK GAS CAP message displays if the
fuel cap is not properly installed.
{CAUTION:
If a �re starts while you are refueling, do not
remove the nozzle. Shut off the �ow of fuel
by shutting off the pump or by notifying the
station attendant. Leave the area immediately.
Notice:If you need a new fuel cap, be sure to
get the right type. Your dealer/ retailer can get
one for you. If you get the wrong type, it may not
�t properly. This may cause your malfunction
indicator lamp to light and may damage your fuel
tank and emissions system. SeeMalfunction
Indicator Lamp on page 3-36.
5-10