engine coolant SATURN AURA HYBRID 2010 Owners Manual
[x] Cancel search | Manufacturer: SATURN, Model Year: 2010, Model line: AURA HYBRID, Model: SATURN AURA HYBRID 2010Pages: 400, PDF Size: 2.46 MB
Page 4 of 400
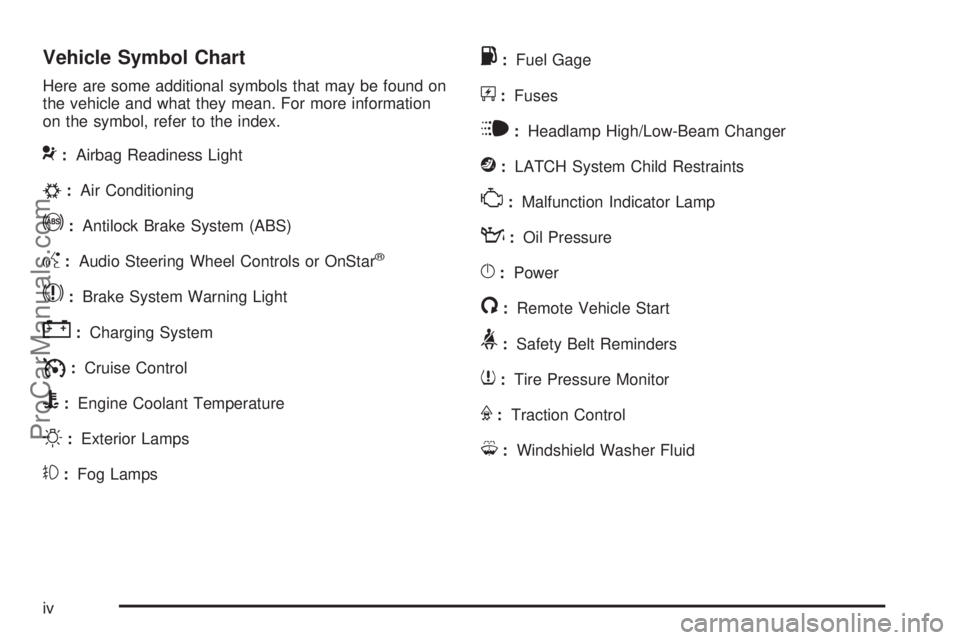
Vehicle Symbol Chart
Here are some additional symbols that may be found on
the vehicle and what they mean. For more information
on the symbol, refer to the index.
9:Airbag Readiness Light
#:Air Conditioning
!:Antilock Brake System (ABS)
g:Audio Steering Wheel Controls or OnStar®
$:Brake System Warning Light
":Charging System
I:Cruise Control
B:Engine Coolant Temperature
O:Exterior Lamps
#:Fog Lamps
.:Fuel Gage
+:Fuses
i:Headlamp High/Low-Beam Changer
j:LATCH System Child Restraints
*:Malfunction Indicator Lamp
::Oil Pressure
}:Power
/:Remote Vehicle Start
>:Safety Belt Reminders
7:Tire Pressure Monitor
F:Traction Control
M:Windshield Washer Fluid
iv
ProCarManuals.com
Page 109 of 400

Keys...............................................................3-2
Remote Keyless Entry (RKE) System................3-3
Remote Keyless Entry (RKE) System
Operation...................................................3-4
Remote Vehicle Start......................................3-7
Doors and Locks.............................................3-9
Door Locks....................................................3-9
Power Door Locks..........................................3-9
Door Ajar Reminder........................................3-9
Delayed Locking...........................................3-10
Programmable Automatic Door Locks..............3-10
Rear Door Security Locks..............................3-11
Lockout Protection........................................3-12
Trunk..........................................................3-12
Windows........................................................3-14
Power Windows............................................3-15
Sun Visors...................................................3-17
Theft-Deterrent Systems..................................3-17
Content Theft-Deterrent.................................3-17
PASS-Key
®III+ Electronic Immobilizer.............3-19
PASS-Key®III+ Electronic Immobilizer
Operation.................................................3-19Starting and Operating Your Vehicle................3-21
New Vehicle Break-In....................................3-21
Ignition Positions..........................................3-21
Retained Accessory Power (RAP)...................3-22
Starting the Engine (Automatic Engine
Start/Stop)................................................3-22
Engine Coolant Heater..................................3-26
Automatic Transmission Operation...................3-27
Parking Brake..............................................3-29
Regenerative Braking....................................3-30
Shifting Into Park..........................................3-30
Shifting Out of Park......................................3-32
Parking Over Things That Burn.......................3-32
Engine Exhaust............................................3-33
Running the Vehicle While Parked..................3-34
Mirrors...........................................................3-35
Manual Rearview Mirror.................................3-35
Outside Power Mirrors...................................3-35
Outside Automatic Dimming Mirror..................3-36
Storage Areas................................................3-36
Glove Box...................................................3-36
Cupholders..................................................3-36
Center Console Storage.................................3-37
Convenience Net..........................................3-37
Sunroof.........................................................3-37
Section 3 Features and Controls
3-1
ProCarManuals.com
Page 116 of 400
The engine will shut off automatically after 10 minutes,
unless a time extension has been done or the
vehicle’s key is inserted into the ignition switch and
turned to ON/RUN.
To manually shut off a remote start, do any of the
following.
•Aim the RKE transmitter at the vehicle and press
and release the remote start button.
•Turn on the hazard warning flashers.
•Turn the ignition switch out of LOCK/OFF position
and then back to LOCK/OFF.
The parking lamps turn off to indicate the engine is off.
After the engine has been started two times, or one
time with a time extension, the vehicle’s ignition must be
turned to ON/RUN using the key before the remote
start procedure can be used again. SeeIgnition
Positions on page 3-21for information regarding the
ignition positions on your vehicle.The remote vehicle start feature will not operate if any
of the follow occur:
•The remote start system is disabled through
the DIC.
•The vehicle’s key is in the ignition.
•The vehicle’s hood is open.
•The hazard warning flashers are on.
•The check engine light is on. SeeMalfunction
Indicator Lamp on page 4-31.
•The engine coolant temperature is too high.
•The oil pressure is low.
•Two remote vehicle starts, or one start with a time
extension, have already been provided for that
ignition cycle.
Vehicles that have the remote vehicle start feature are
shipped from the factory with the remote start system
enabled. The system may be enabled or disabled
through the DIC. See “REMOTE START” underDIC
Vehicle Personalization on page 4-45for additional
information.
3-8
ProCarManuals.com
Page 134 of 400

Engine Coolant Heater
The engine coolant heater can provide easier starting
and better fuel economy during engine warm-up in cold
weather conditions at or below 0°F (−18°C). Vehicles
with an engine coolant heater should be plugged
in at least four hours before starting. Some models may
have an internal thermostat in the cord which will
prevent engine coolant heater operation at temperatures
above 0°F (−18°C).
To Use the Engine Coolant Heater
1. Turn off the engine.
2. Open the hood and unwrap the electrical cord. The
engine coolant heater cord is located near the air
cleaner box on the passenger side of the engine
compartment. SeeEngine Compartment Overview
on page 6-14for more information on location.
3. Plug the cord into a normal, grounded 110-volt AC
outlet.
{WARNING:
Plugging the cord into an ungrounded outlet could
cause an electrical shock. Also, the wrong kind of
extension cord could overheat and cause a fire.
You could be seriously injured. Plug the cord into
a properly grounded three-prong 110-volt AC
outlet. If the cord will not reach, use a heavy-duty
three-prong extension cord rated for at least
15 amps.
4. Before starting the engine, be sure to unplug and
store the cord as it was before to keep it away
from moving engine parts. If you do not, it could be
damaged.
The length of time the heater should remain plugged in
depends on several factors. Ask a dealer/retailer in
the area where you will be parking the vehicle for the
best advice on this.
3-26
ProCarManuals.com
Page 147 of 400
Instrument Panel Overview...............................4-3
Hazard Warning Flashers................................4-3
Horn .............................................................4-3
Tilt and Telescopic Steering Wheel...................4-3
Turn Signal/Multifunction Lever.........................4-4
Turn and Lane-Change Signals........................4-4
Headlamp High/Low-Beam Changer..................4-5
Flash-to-Pass.................................................4-5
Windshield Wipers..........................................4-5
Windshield Washer.........................................4-6
Cruise Control................................................4-7
Headlamps..................................................4-10
Headlamps on Reminder................................4-10
Headlamps Off in Park..................................4-11
Delayed Headlamps......................................4-11
Daytime Running Lamps (DRL).......................4-11
Automatic Headlamp System..........................4-12
Instrument Panel Brightness...........................4-12
Dome Lamps ...............................................4-13
Entry/Exit Lighting.........................................4-13
Parade Dimming...........................................4-13
Reading Lamps............................................4-13
Trunk Lamp.................................................4-13
Electric Power Management...........................4-13
Battery Run-Down Protection..........................4-14
Accessory Power Outlet(s).............................4-15Climate Controls............................................4-16
Automatic Climate Control System...................4-16
Outlet Adjustment.........................................4-21
Warning Lights, Gages, and Indicators............4-21
Instrument Panel Cluster................................4-22
Speedometer and Odometer...........................4-23
Trip Odometer..............................................4-23
Tachometer.................................................4-23
Safety Belt Reminders
...................................4-24
Airbag Readiness Light..................................4-25
Passenger Airbag Status Indicator...................4-26
Charging System Light..................................4-27
Brake System Warning Light..........................4-27
Antilock Brake System (ABS)
Warning Light...........................................4-28
Electronic Stability Control (ESC)/Traction
Control System (TCS)
Indicator/Warning Light...............................4-29
Engine Coolant Temperature
Warning Light...........................................4-30
Tire Pressure Light.......................................4-30
Malfunction Indicator Lamp.............................4-31
Oil Pressure Light.........................................4-33
Security Light...............................................4-34
Cruise Control Light......................................4-34
Highbeam On Light.......................................4-34
Section 4 Instrument Panel
4-1
ProCarManuals.com
Page 163 of 400

Automatic Operation
AUTO (Automatic):Select AUTO on both the fan
speed knob and the air delivery mode knob to activate
the automatic system. When automatic operation is
active the system controls the inside temperature and
air delivery.
Use the steps below to place the entire system in full
automatic control:
1. Turn the fan knob and the mode knob to the AUTO
position.
The current set temperature displays. When AUTO
is selected, the air conditioning operation and air
inlet is automatically controlled. The air conditioning
compressor runs while the outside temperature is
over about 40°F (4°C). The air inlet is normally
set to outside air. If it is hot outside, the air inlet can
automatically switch to recirculate inside air to
help quickly cool down the vehicle.2. Set the temperature.
An initial setting of 73°F (23°C) is recommended.
Allow about 20 minutes for the system to regulate.
Press the
worxarrow temperature buttons
to adjust the temperature setting as necessary. If
the temperature is set at 60°F (15°C) the system
remains at the maximum cooling setting. If the
temperature is set at 90°F (32°C) the system
remains at the maximum heat setting. Choosing
either maximum setting does not cause the vehicle
to heat or cool any faster.
Do not cover the sensor located on the top of the
instrument panel near the windshield. This
sensor regulates air temperature based on the
intensity of the sun.
Also do not cover the sensor grille on the lower
right side of the climate control faceplate, as
this regulates the inside temperature.
To avoid blowing cold air at engine start-up in cold
weather, the system delays turning on the fan
until warm air is available. The length of delay
depends on the engine coolant temperature. Turning
the fan knob overrides this delay and changes
the fan to the selected speed.
4-17
ProCarManuals.com
Page 166 of 400

When the heater is in use, there might be slight noise or
vibration during Auto Stops. This is due to the coolant
circulation pump that continues to circulate heat through
the system during the engine Auto Stop.
The heater works best if the windows are kept closed.
h(Recirculation):Press to turn on the recirculation
mode. An indicator light above the button comes on
to show it is on. The recirculation mode recirculates and
helps to quickly cool the air inside the vehicle. It can
be used to prevent outside air and odors from entering
the vehicle and for maximum air conditioning
performance in hot weather. Only use this mode when it
is needed for comfort.
Press this button to cancel the auto recirculation
feature. Each time the vehicle is started, the system
reverts to the auto recirculation function.
If recirculation is selected while in defrost, defog or floor
mode, the light on the button flashes three times and
then goes out to indicate that this is not allowed. This is
to prevent window fogging.
When the weather is cool or damp, operating the
system in recirculation for extended periods of time can
cause fogging of the vehicle’s windows. To clear the
fog, select either defog or defrost. Make sure the
air conditioning is on. Allow the air conditioning to run
automatically to help dehumidify the air.
Rear Window Defogger
The rear window defogger uses a warming grid to
remove fog from the rear window.
<(Rear):Press to turn the rear window defogger on
or off. An indicator light above the button comes on
to show that the rear window defogger is on.
If driving below 50 mph (80 km/h), the rear window
defogger turns off about 15 minutes after the button is
pressed. If additional warming time is needed, press the
button again.
If the vehicle’s speed is maintained above 50 mph
(80 km/h), the rear window defogger remains on once
the button is pressed.
If the vehicle has heated outside mirrors, the surface of
the outside mirrors also heat when the rear window
defogger is activated. SeeOutside Power Mirrors
on page 3-35.
Notice:Do not use a razor blade or sharp object to
clear the inside rear window. Do not adhere
anything to the defogger grid lines in the rear glass.
These actions may damage the rear defogger.
Repairs would not be covered by your warranty.
4-20
ProCarManuals.com
Page 176 of 400
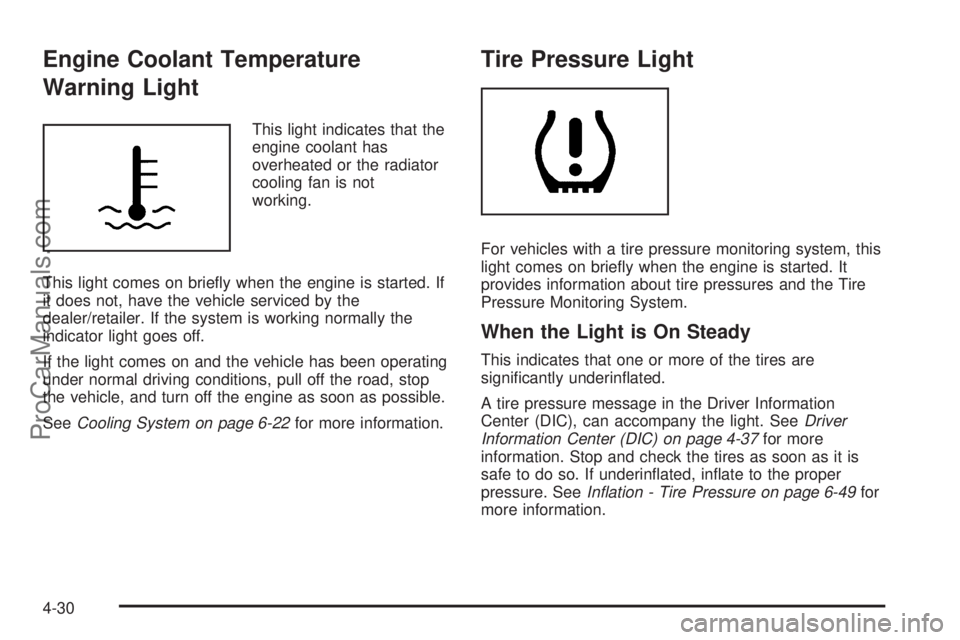
Engine Coolant Temperature
Warning Light
This light indicates that the
engine coolant has
overheated or the radiator
cooling fan is not
working.
This light comes on briefly when the engine is started. If
it does not, have the vehicle serviced by the
dealer/retailer. If the system is working normally the
indicator light goes off.
If the light comes on and the vehicle has been operating
under normal driving conditions, pull off the road, stop
the vehicle, and turn off the engine as soon as possible.
SeeCooling System on page 6-22for more information.
Tire Pressure Light
For vehicles with a tire pressure monitoring system, this
light comes on briefly when the engine is started. It
provides information about tire pressures and the Tire
Pressure Monitoring System.
When the Light is On Steady
This indicates that one or more of the tires are
significantly underinflated.
A tire pressure message in the Driver Information
Center (DIC), can accompany the light. SeeDriver
Information Center (DIC) on page 4-37for more
information. Stop and check the tires as soon as it is
safe to do so. If underinflated, inflate to the proper
pressure. SeeIn�ation - Tire Pressure on page 6-49for
more information.
4-30
ProCarManuals.com
Page 186 of 400
OIL LIFE
Press the information button until OIL LIFE displays.
The engine oil life system shows an estimate of the oil’s
remaining useful life. It shows 100% when the system
is reset after an oil change. It alerts you to change the oil
on a schedule consistent with your driving conditions.
In addition to the engine oil life system monitoring the oil
life, additional maintenance is recommended in the
Maintenance Schedule in this manual. SeeEngine Oil
on page 6-15andScheduled Maintenance on page 7-3.
Always reset the engine oil life system after an oil
change. See “How to Reset the Engine Oil Life System”
underEngine Oil Life System on page 6-18.
COOLANT
Press the information button until COOLANT displays.
This mode shows the temperature of the engine coolant
in either degrees Fahrenheit (°F) or degrees Celsius (°C).
Tire Pressure
On vehicles with the Tire Pressure Monitor System
(TPMS), the pressure for each tire can be viewed in the
DIC. The tire pressure is shown in either pounds per
square inch (psi) or kilopascals (kPa). Press the
information button until LF ## PSI (kPa) ## RF displays
for the front tires. Press the information button again
until LR ## PSI (kPa) ## RR displays for the rear tires.
If a low tire pressure condition is detected by the system
while driving, a message advising you to add air will
appear in the display. SeeIn�ation - Tire Pressure on
page 6-49andDIC Warnings and Messages on
page 4-41for more information.
4-40
ProCarManuals.com
Page 259 of 400

Service............................................................6-3
Accessories and Modifications..........................6-3
California Proposition 65 Warning.....................6-4
California Perchlorate Materials
Requirements.............................................6-4
Doing Your Own Service Work.........................6-4
Adding Equipment to the Outside
of the Vehicle.............................................6-5
Fuel................................................................6-6
Gasoline Octane............................................6-6
Gasoline Specifications....................................6-7
California Fuel...............................................6-7
Additives.......................................................6-7
Fuels in Foreign Countries...............................6-8
Filling the Tank..............................................6-9
Filling a Portable Fuel Container.....................6-11
Checking Things Under the Hood....................6-12
Hood Release..............................................6-12
Engine Compartment Overview.......................6-14
Engine Oil...................................................6-15
Engine Oil Life System..................................6-18
Engine Air Cleaner/Filter................................6-20
Automatic Transmission Fluid.........................6-22
Cooling System............................................6-22
Engine Coolant.............................................6-23
Engine Overheating.......................................6-28Windshield Washer Fluid................................6-30
Brakes........................................................6-31
Battery........................................................6-34
Jump Starting...............................................6-35
Headlamp Aiming...........................................6-39
Bulb Replacement..........................................6-39
Halogen Bulbs..............................................6-39
Taillamps, Turn Signal, Sidemarker,
Stoplamps and Back-up Lamps...................6-40
License Plate Lamp.....................................
.6-41
Replacement Bulbs.......................................6-42
Windshield Wiper Blade Replacement..............6-42
Tires..............................................................6-43
Tire Sidewall Labeling...................................6-44
Tire Terminology and Definitions.....................6-46
Inflation - Tire Pressure.................................6-49
High-Speed Operation...................................6-50
Tire Pressure Monitor System.........................6-51
Tire Pressure Monitor Operation.....................6-52
Tire Inspection and Rotation...........................6-55
When It Is Time for New Tires.......................6-57
Buying New Tires.........................................6-58
Different Size Tires and Wheels......................6-59
Uniform Tire Quality Grading..........................6-60
Wheel Alignment and Tire Balance..................6-61
Wheel Replacement......................................6-62
Section 6 Service and Appearance Care
6-1
ProCarManuals.com