change time SATURN ION 2005 User Guide
[x] Cancel search | Manufacturer: SATURN, Model Year: 2005, Model line: ION, Model: SATURN ION 2005Pages: 366, PDF Size: 2.74 MB
Page 152 of 366

Audio System(s)
Notice:Before adding any sound equipment to
your vehicle, like a tape player, CB radio, mobile
telephone, or two-way radio, make sure that it can
be added by checking with your retailer. Also,
check federal rules covering mobile radio and
telephone units. If sound equipment can be added,
it is very important to do it properly. Added
sound equipment may interfere with the operation
of your vehicle’s engine, radio, or other systems,
and even damage them. Your vehicle’s systems may
interfere with the operation of sound equipment
that has been added improperly.
Notice:Getting suntan lotion, hand lotion, or hand
cleaner on the radio, will soften the paint, and
the paint will eventually begin to peel. Repairs will
not be covered by your vehicle’s warranty. Try not to
get suntan lotion, hand lotion, or hand cleaner on
the radio. If you do, wipe the lotion or cleaner
off immediately.
Figure out which audio system is in your vehicle, �nd
out what your audio system can do, and how to operate
all of its controls.
Setting the Time for Radios without
Radio Data Systems (RDS)
Press and hold the RCL button, at the same time press
the TUNE/SEEK down or up arrows. Press the arrows
until the correct time appears on the display. The
time can be set with the ignition on or off.
Setting the Time for Radios with
Radio Data Systems (RDS)
Press and hold the RCL button and at the same time
press the HR (AUTO EQ left) or MN (AUTO EQ
right) arrows. You will hear a beep indicating that you
can change the time. Release the RCL button and press
HR until the correct hour appears on the display.
Press MN until the correct minute appears on the
display. The time can be set with the ignition on or off.
To synchronize the time with an FM station broadcasting
Radio Data System (RDS) information, press and
hold the RCL and RDS buttons at the same time for
two seconds until SET RDS TIME appears on the
display. If the time is not available from the station, NO
RDS TIME SET will appear on the display.
RDS time is broadcast once a minute. After tuning to an
RDS broadcast station, it may take a few minutes for
the time to update.
3-44
ProCarManuals.com
Page 160 of 366

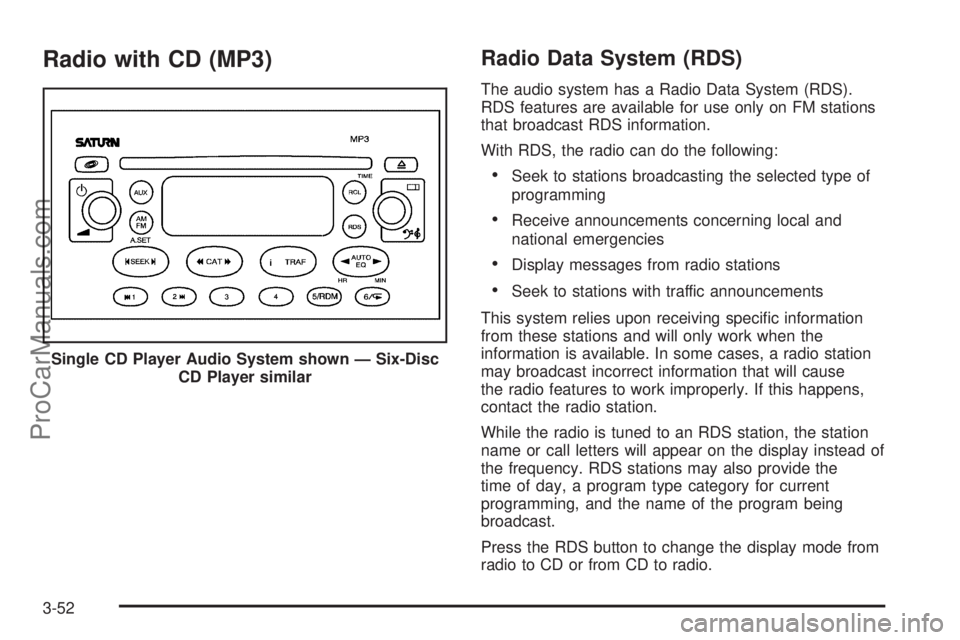
Radio with CD (MP3)Radio Data System (RDS)
The audio system has a Radio Data System (RDS).
RDS features are available for use only on FM stations
that broadcast RDS information.
With RDS, the radio can do the following:
Seek to stations broadcasting the selected type of
programming
Receive announcements concerning local and
national emergencies
Display messages from radio stations
Seek to stations with traffic announcements
This system relies upon receiving speci�c information
from these stations and will only work when the
information is available. In some cases, a radio station
may broadcast incorrect information that will cause
the radio features to work improperly. If this happens,
contact the radio station.
While the radio is tuned to an RDS station, the station
name or call letters will appear on the display instead of
the frequency. RDS stations may also provide the
time of day, a program type category for current
programming, and the name of the program being
broadcast.
Press the RDS button to change the display mode from
radio to CD or from CD to radio. Single CD Player Audio System shown — Six-Disc
CD Player similar
3-52
ProCarManuals.com
Page 162 of 366

Press either arrow again or one of the pushbuttons to
stop scanning presets.
The radio will only seek and scan stations with a strong
signal that are in the selected band.
Setting Preset Stations
Up to 30 stations (six FM1, six FM2, and six AM,
six XM1 and six XM2 (if equipped), can be programmed
on the six numbered pushbuttons, by performing the
following steps:
1. Turn the radio on.
2. Press AM FM to select FM1, FM2, or AM. Press
the AUX button to select XM1 or XM2.
3. Tune in the desired station.
4. Press the right or left AUTO EQ button to select the
equalization.
5. Press and hold one of the six numbered
pushbuttons. Preset X Stored will appear on the
display and you will hear a beep. Whenever
that numbered pushbutton is pressed, the station
that was set will return and the equalization that was
selected will be stored for that pushbutton. If the
equalization of a preset is changed while listening to
that station, the radio will save the new equalization.
6. Repeat the steps for each pushbutton.If the battery has been disconnected or a radio fuse has
been removed, the preset stations and time of day
may need to be reset.
Using Automatic Set
A.SET (Automatic Set):Press and hold the
AM FM button to have the radio automatically select
the �rst 12 strongest radio stations for FM and the
six strongest radio stations for AM.
To select the stations, perform the following:
1. Press AM FM to select FM1, FM2, or AM.
2. Press and hold AM FM until you hear a beep.
The radio will begin to search the current band.
The radio will store the stations, starting from the
lowest frequency, to each preset pushbutton. A.SET
will appear on the display when the radio is
�nished storing the stations.
Cancelling Automatic Set
The radio retains the previously stored stations so they
can be recalled when automatic set is canceled.
Press and hold AM FM until you hear a beep. A.SET
will no longer appear on the display.
3-54
ProCarManuals.com
Page 166 of 366

rCAT (Reverse):Press and hold the left arrow to
reverse quickly within a track. Release this pushbutton
to play the passage. The elapsed time of the track
will appear on the display.
CAT
[(Forward):Press and hold the right arrow to
advance quickly within a track. Release this pushbutton
to play the passage. The elapsed time of the track
will appear on the display.
tSEEKu:Press the left arrow to go to the start of
the current or to the previous track. Press the right
arrow to go to the start of the next track. If either arrow
is held or pressed more than once, the player will
continue moving backward or forward through the CD.
To scan tracks, press either SEEK arrow for
four seconds. The radio will go to the next track, play
for a few seconds, then go on to the next track.
Press either SEEK arrow again to stop scanning tracks.
O(Tune):Turn this knob to quickly change
tracks.
If you are playing an MP3 CD, turn this knob to search
�le folders.
4(Information):Press this button to view CD text
information, if available. To change the default on the
display to track name, album name, or artist name,
instead of elapsed track time, press this button to view
the available information. Then press and hold the
RCL button for �ve seconds. The selected display will
now be the default.
RCL (Recall):Press and hold the RCL button until you
hear a beep, this is to inform you that the system
has been reset to default.
AM FM:Press this button to listen to the radio when a
CD is playing. The inactive CD will remain safely
inside the radio for future listening.
AUX (Auxiliary):Press this button to play a CD or to
switch to XM1 or XM2 when listening to the radio.
Z(Eject):Press this button to eject a CD. Eject may
be activated with either the ignition or radio off.
If you eject a CD, but decide that you want to listen to
it, press the CD button. The CD player will pull the
CD back in and the CD will begin to play. If a CD is
ejected, but not removed from the radio, the radio
will automatically reload the CD, after 25 seconds, to
prevent damage.
3-58
ProCarManuals.com
Page 171 of 366

Playing an MP3
If the ignition or radio is turned off with a CD in the
player, it will stay in the player. When the ignition
or radio is turned on, the CD will start playing where it
stopped, if it was the last selected audio source.
Play full size CDs only. The CD player cannot play the
smaller 3 inch (8 cm) single CDs.
If playing a CD-R the sound quality may be reduced
due to CD-R quality, the method of recording, the quality
of the music that has been recorded, and the way the
CD-R has been handled. There may be an increase
in skipping, difficulty in �nding tracks, and/or difficulty in
loading and ejecting. If these problems occur try a
known good CD.
Do not add paper labels to CDs, they could get caught
in the CD player.
Notice:If you add any label to a CD, insert more
than one CD into the slot at a time, or attempt
to play scratched or damaged CDs, you could
damage the CD player. When using the CD player,
use only CDs in good condition without any
label, load one CD at a time, and keep the CD player
and the loading slot free of foreign materials,
liquids, and debris.
If an error appears on the display, see “CD Messages”
later in this section.See “Playing the Single CD Player” and “Playing the
Six-Disc CD Player” earlier to use any radio control,
while playing an MP3, that is not listed here.
g1 (Previous):Press this pushbutton to go to the
start of the current track. If this pushbutton is held
or pressed more than once, the player will continue
moving backward through the current directory.
2
l(Next):Press this pushbutton to go to the next
track. If this pushbutton is held or pressed more
than once, the player will continue moving forward
through the current directory.
4:Press this pushbutton to enter playlist mode.
Use the tune knob to cycle through the available
playlists. Playlist X will appear on the display. Use
the 1 and 2 pushbuttons to cycle through songs in a
particular playlist. Press the 4 pushbutton again to exit
playlist mode.
If a CD is a mixed mode, containing standard CD audio
and MP3 compressed audio, the radio will assign the
standard CD audio to a directory, which is listed as ROM
audio directory.
O(Tune):Turn this knob to quickly change tracks
on the CDDA and the MP3 folder �les.
3-63
ProCarManuals.com
Page 172 of 366

4(Information):Press this button to see the elapsed
time of the track and the current track time. To
change the default on the display, track name, artist
name, album name, �le name, or directory, press
this button to scroll through each display. Once the
desired display is shown, press and hold the RCL button
for �ve seconds. The selected display will now be the
default.
rCAT[:Press either arrow to change directories.
CD Messages
If any error message appears on the display and/or the
CD comes out, it could be for one of the following
reasons:
It is very hot. When the temperature returns to
normal, the CD should play.
You are driving on a very rough road. When the
road becomes smoother, the CD should play.
The CD is dirty, scratched, wet, or upside down.
The air is very humid. If so, wait about an hour and
try again.
The format of the CD may not be compatible. See
“MP3 Format” earlier for more information.
There may have been a problem while burning
the CD.
The label may be caught in the CD player.
If the CD is not playing correctly, for any other reason,
try a known good CD.
If any error occurs repeatedly or if an error cannot be
corrected, contact your retailer. If the radio displays
an error message, write it down and provide it to your
retailer when reporting the problem.
Radio Personalization
This radio has a personalization feature. You can
change the following features:
Clock Function:Change the time of the day displayed
on the radio between 12 hour and 24 hour.
Language:This radio supports three languages: ENG
(English), FRE (French), and SPA (Spanish). The
only terms translated are the terms which are �xed in
the display. Terms that are not translated include: MP3
ID3 tags, CD-TEXT information, RDS Text, and
Satellite PDT information.
3-64
ProCarManuals.com
Page 173 of 366

Beep Level:Change the volume level of the radio’s
beeps between Normal and Loud.
CD Text:Change whether or not the radio displays CD
text by choosing Text On or Text Off.
To change these features, do the following:
1. Press and hold the information button for
�ve seconds.
2. Press either SEEK arrow to scroll through the
features.
3. Once the feature is displayed, press either CAT
arrow to change the setting.
4. Press the information button again to exit the menu.
Theft-Deterrent Feature
The Radio with Single CD (MP3) and the Radio with
Six-Disc CD (MP3) have a theft deterrent feature.
The theft deterrent feature is designed to discourage
theft of your vehicle’s radio. It works by using a secret
code to disable all radio functions whenever battery
power is interrupted.
The theft deterrent feature for the radio may be used or
ignored. If ignored, the radio plays normally and the
radio is not protected by the feature. If the theft deterrent
feature is activated, the radio will not operate if stolen.When the theft deterrent feature is activated. LOCK will
appear on the radio display to indicate a locked
condition anytime battery power has been removed. If
the battery loses power for any reason, you must unlock
the radio with the secret code before it will operate.
Activating the Theft-Deterrent Feature
The instructions which follow explain how to enter
your secret code to activate the theft deterrent feature.
Read through all 10 steps before starting the
procedure.
If you allow more than 15 seconds to elapse between
any steps, the radio automatically reverts to time
and you must start the procedure over at Step 4.
1. Write down any four-digit number from 0000 to
9999 and keep it in a safe place separate from
the vehicle.
2. Turn the ignition to RUN.
3. Turn the radio off.
4. Press the 5 and 6 pushbuttons at the same time for
�ve seconds. -- -- -- -- will appear on the display.
Next you will use the secret code number which you
have written down.
5. Press the SEEK/SCAN down or SEEK left arrow to
make the �rst digit agree with your code.
3-65
ProCarManuals.com
Page 183 of 366

Let us say the road is wet and you are driving safely.
Suddenly, an animal jumps out in front of you. You slam
on the brakes and continue braking. Here is what
happens with ABS:
A computer senses that wheels are slowing down. If
one of the wheels is about to stop rolling, the computer
will separately work the brakes at each wheel.
The anti-lock system can change the brake pressure
faster than any driver could. The computer is
programmed to make the most of available tire and roadconditions. This can help you steer around the obstacle
while braking hard.
As you brake, your computer keeps receiving updates on
wheel speed and controls braking pressure accordingly.
Remember: Anti-lock does not change the time you
need to get your foot up to the brake pedal or always
decrease stopping distance. If you get too close to
the vehicle in front of you, you will not have time to apply
your brakes if that vehicle suddenly slows or stops.
Always leave enough room up ahead to stop, even
though you have anti-lock brakes.
4-7
ProCarManuals.com
Page 186 of 366

If you turn the steering wheel in either direction several
times until it stops, or hold the steering wheel in the
stopped position for an extended amount of time, you
may notice a reduced amount of power steering
assist. The normal amount of power steering assist
should return shortly after a few normal steering
movements.
If you suspect steering
problems and/or the
PWR STR message is
displayed, see your retailer
for service and repair.
Steering Tips
Driving on Curves
It is important to take curves at a reasonable speed.
A lot of the “driver lost control” accidents mentioned on
the news happen on curves. Here is why:
Experienced driver or beginner, each of us is subject to
the same laws of physics when driving on curves.
The traction of the tires against the road surface makes
it possible for the vehicle to change its path when
you turn the front wheels. If there is no traction, inertiawill keep the vehicle going in the same direction. If you
have ever tried to steer a vehicle on wet ice, you will
understand this.
The traction you can get in a curve depends on the
condition of your tires and the road surface, the angle at
which the curve is banked, and your speed. While
you are in a curve, speed is the one factor you
can control.
Suppose you are steering through a sharp curve.
Then you suddenly apply the brakes. Both control
systems — steering and braking — have to do their work
where the tires meet the road. Unless you have
four-wheel anti-lock brakes, adding the hard braking can
demand too much of those places. You can lose control.
The same thing can happen if you are steering through
a sharp curve and you suddenly accelerate. Those
two control systems — steering and acceleration — can
overwhelm those places where the tires meet the
road and make you lose control. SeeEnhanced Traction
System (ETS) on page 4-8.
What should you do if this ever happens? Ease up on
the brake or accelerator pedal, steer the vehicle the way
you want it to go, and slow down.
Speed limit signs near curves warn that you should
adjust your speed. Of course, the posted speeds
are based on good weather and road conditions. Under
less favorable conditions you will want to go slower.
4-10
ProCarManuals.com
Page 189 of 366

Do not get too close to the vehicle you want to
pass while you are awaiting an opportunity. For one
thing, following too closely reduces your area of
vision, especially if you are following a larger
vehicle. Also, you will not have adequate space if
the vehicle ahead suddenly slows or stops.
Keep back a reasonable distance.
When it looks like a chance to pass is coming up,
start to accelerate but stay in the right lane and
do not get too close. Time your move so you will be
increasing speed as the time comes to move into
the other lane. If the way is clear to pass, you
will have a running start that more than makes up
for the distance you would lose by dropping
back. And if something happens to cause you to
cancel your pass, you need only slow down
and drop back again and wait for another
opportunity.
If other vehicles are lined up to pass a slow vehicle,
wait your turn. But take care that someone is not
trying to pass you as you pull out to pass the slow
vehicle. Remember to glance over your shoulder
and check the blind spot.
Check your mirrors, glance over your shoulder, and
start your left lane change signal before moving out
of the right lane to pass. When you are farenough ahead of the passed vehicle to see its front
in your inside mirror, activate your right lane
change signal and move back into the right lane.
Remember that your right outside mirror is convex.
The vehicle you just passed may seem to be
farther away from you than it really is.
Try not to pass more than one vehicle at a time on
two-lane roads. Reconsider before passing the
next vehicle.
Do not overtake a slowly moving vehicle too rapidly.
Even though the brake lamps are not �ashing, it
may be slowing down or starting to turn.
If you are being passed, make it easy for the
following driver to get ahead of you. Perhaps
you can ease a little to the right.
Loss of Control
Let us review what driving experts say about what
happens when the three control systems — brakes,
steering, and acceleration — do not have enough friction
where the tires meet the road to do what the driver
has asked.
In any emergency, do not give up. Keep trying to
steer and constantly seek an escape route or area of
less danger.
4-13
ProCarManuals.com