ignition SATURN ION 2006 Workshop Manual
[x] Cancel search | Manufacturer: SATURN, Model Year: 2006, Model line: ION, Model: SATURN ION 2006Pages: 392, PDF Size: 2.8 MB
Page 227 of 392

Here are some important things to consider before you
do recreational vehicle towing:
What’s the towing capacity of the towing vehicle?
Be sure you read the tow vehicle manufacturer’s
recommendations.
How far will you tow? Some vehicles have
restrictions on how far and how long they can tow.
Do you have the proper towing equipment?
See your dealer or trailering professional for
additional advice and equipment recommendations.
Is your vehicle ready to be towed? Just as you
would prepare your vehicle for a long trip, you’ll
want to make sure your vehicle is prepared to
be towed. SeeBefore Leaving on a Long Trip
on page 4-22.
Dinghy Towing (All Transaxles)
Notice:Dolly towing or dinghy towing your vehicle
may cause damage because of reduced ground
clearance. Always tow your vehicle using the dolly
towing or dinghy towing procedure listed in this
section or put your vehicle on a �atbed truck.To tow your vehicle from the front with all four wheels
on the ground, do the following:
1. Set the parking brake.
2. Turn the ignition key to ACC to unlock the
steering wheel.
3. Shift your transaxle to NEUTRAL.
4. Release the parking brake.
To prevent battery rundown on long trips, remove the
IP BATT 2 fuse (#41) from the engine compartment
fuse block. SeeEngine Compartment Fuse Block
on page 5-102for more information.
4-37
ProCarManuals.com
Page 280 of 392

Notice:If you leave your radio or other accessories
on during the jump starting procedure, they could
be damaged. The repairs would not be covered
by your warranty. Always turn off your radio and
other accessories when jump starting your vehicle.
3. Turn off the ignition on both vehicles. Unplug
unnecessary accessories plugged into the cigarette
lighter or the accessory power outlet. Turn off
the radio and all lamps that are not needed. This
will avoid sparks and help save both batteries.
And it could save the radio!
4. Open the hoods and locate the positive (+) and
negative (−) terminal locations on each vehicle.
You will not need to access your battery for jump
starting. Your vehicle has a remote positive (+)
and a remote negative (−) jump starting terminal.The remote positive (+) terminal is located on the
engine compartment fuse block, under a red
cap. SeeEngine Compartment Overview on
page 5-12for more information on location.
The remote negative (−) ground terminal is a bolt
located under the metal frame that supports
the radiator. It is at the front of the engine
compartment, on the driver’s side of the vehicle,
and is marked with a label that says GND (−).
{CAUTION:
An electric fan can start up even when the
engine is not running and can injure you.
Keep hands, clothing and tools away from
any underhood electric fan.
5-44
ProCarManuals.com
Page 337 of 392
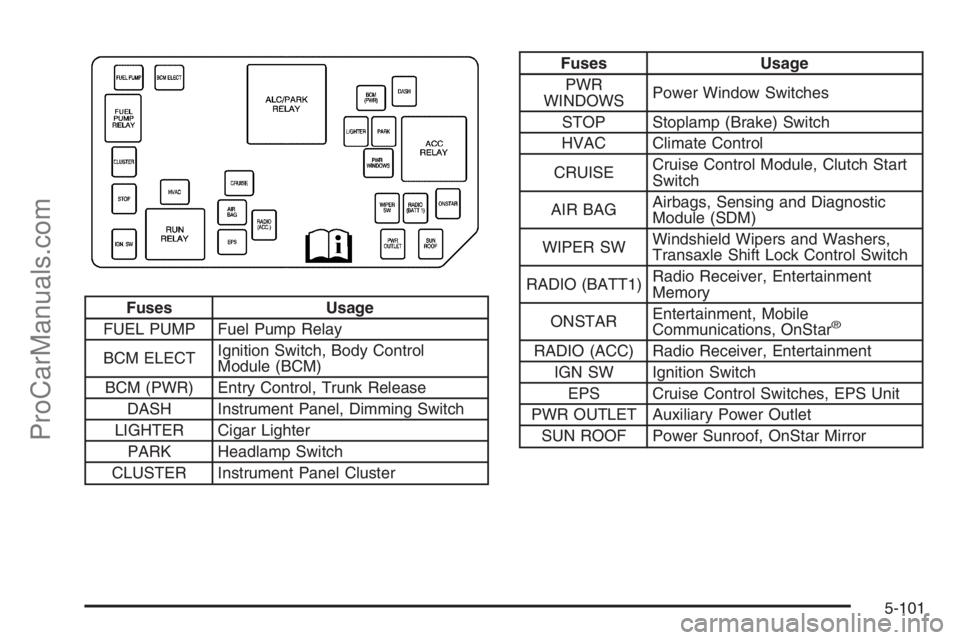
Fuses Usage
FUEL PUMP Fuel Pump Relay
BCM ELECTIgnition Switch, Body Control
Module (BCM)
BCM (PWR) Entry Control, Trunk Release
DASH Instrument Panel, Dimming Switch
LIGHTER Cigar Lighter
PARK Headlamp Switch
CLUSTER Instrument Panel Cluster
Fuses Usage
PWR
WINDOWSPower Window Switches
STOP Stoplamp (Brake) Switch
HVAC Climate Control
CRUISECruise Control Module, Clutch Start
Switch
AIR BAGAirbags, Sensing and Diagnostic
Module (SDM)
WIPER SWWindshield Wipers and Washers,
Transaxle Shift Lock Control Switch
RADIO (BATT1)Radio Receiver, Entertainment
Memory
ONSTAREntertainment, Mobile
Communications, OnStar
®
RADIO (ACC) Radio Receiver, Entertainment
IGN SW Ignition Switch
EPS Cruise Control Switches, EPS Unit
PWR OUTLET Auxiliary Power Outlet
SUN ROOF Power Sunroof, OnStar Mirror
5-101
ProCarManuals.com
Page 339 of 392
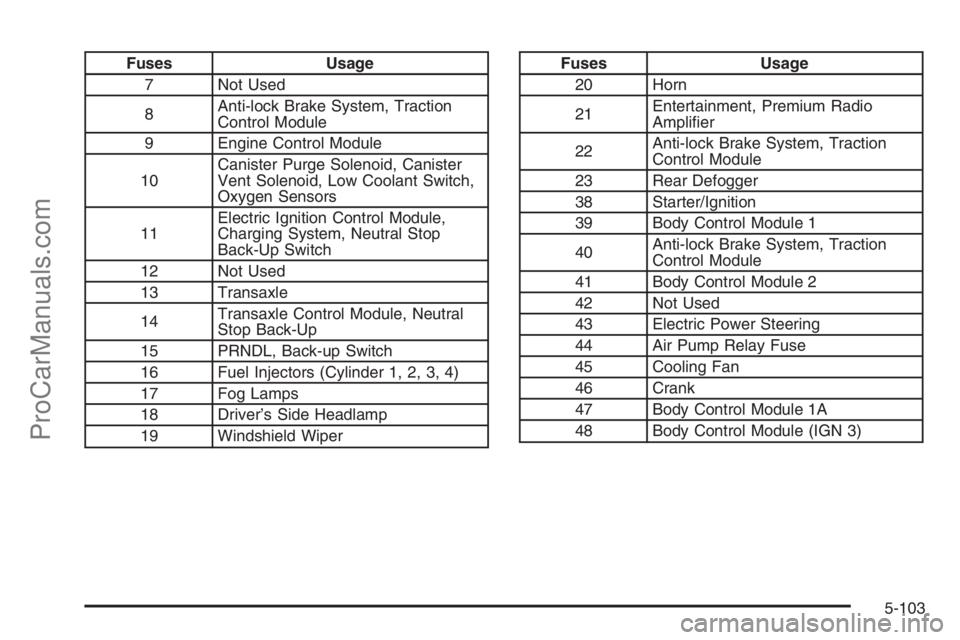
Fuses Usage
7 Not Used
8Anti-lock Brake System, Traction
Control Module
9 Engine Control Module
10Canister Purge Solenoid, Canister
Vent Solenoid, Low Coolant Switch,
Oxygen Sensors
11Electric Ignition Control Module,
Charging System, Neutral Stop
Back-Up Switch
12 Not Used
13 Transaxle
14Transaxle Control Module, Neutral
Stop Back-Up
15 PRNDL, Back-up Switch
16 Fuel Injectors (Cylinder 1, 2, 3, 4)
17 Fog Lamps
18 Driver’s Side Headlamp
19 Windshield WiperFuses Usage
20 Horn
21Entertainment, Premium Radio
Ampli�er
22Anti-lock Brake System, Traction
Control Module
23 Rear Defogger
38 Starter/Ignition
39 Body Control Module 1
40Anti-lock Brake System, Traction
Control Module
41 Body Control Module 2
42 Not Used
43 Electric Power Steering
44 Air Pump Relay Fuse
45 Cooling Fan
46 Crank
47 Body Control Module 1A
48 Body Control Module (IGN 3)
5-103
ProCarManuals.com
Page 341 of 392
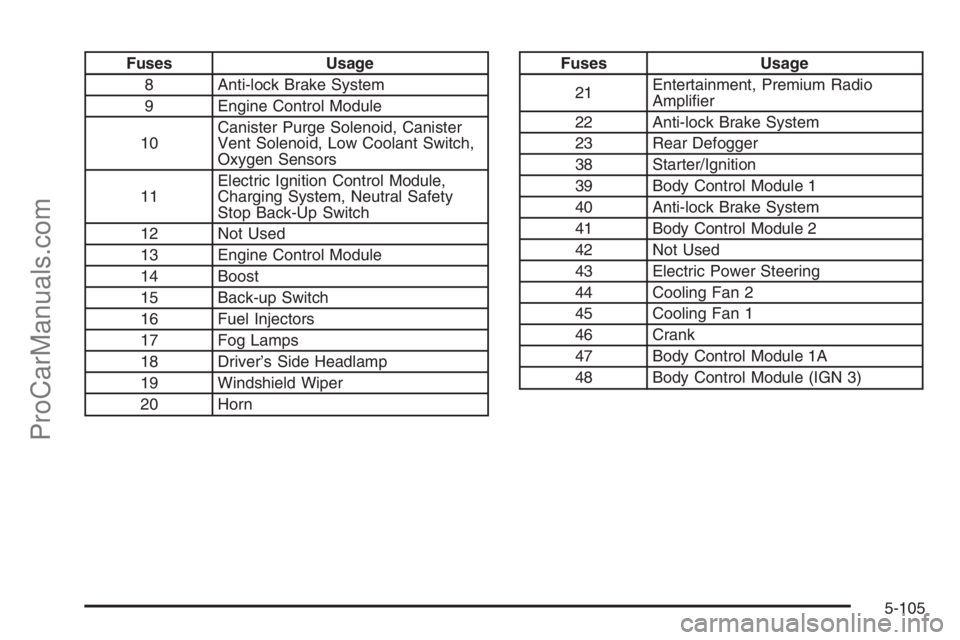
Fuses Usage
8 Anti-lock Brake System
9 Engine Control Module
10Canister Purge Solenoid, Canister
Vent Solenoid, Low Coolant Switch,
Oxygen Sensors
11Electric Ignition Control Module,
Charging System, Neutral Safety
Stop Back-Up Switch
12 Not Used
13 Engine Control Module
14 Boost
15 Back-up Switch
16 Fuel Injectors
17 Fog Lamps
18 Driver’s Side Headlamp
19 Windshield Wiper
20 HornFuses Usage
21Entertainment, Premium Radio
Ampli�er
22 Anti-lock Brake System
23 Rear Defogger
38 Starter/Ignition
39 Body Control Module 1
40 Anti-lock Brake System
41 Body Control Module 2
42 Not Used
43 Electric Power Steering
44 Cooling Fan 2
45 Cooling Fan 1
46 Crank
47 Body Control Module 1A
48 Body Control Module (IGN 3)
5-105
ProCarManuals.com
Page 343 of 392
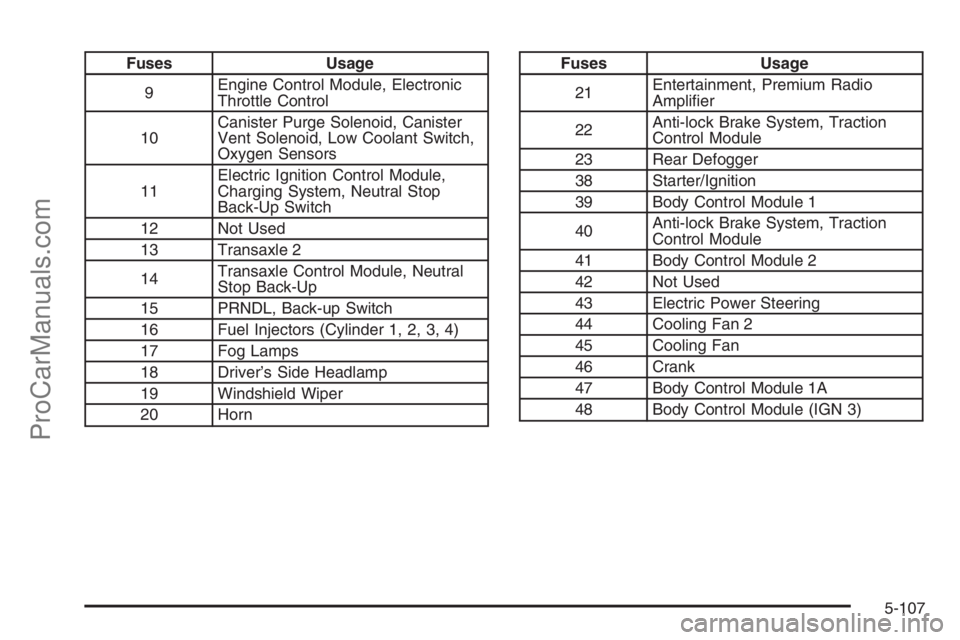
Fuses Usage
9Engine Control Module, Electronic
Throttle Control
10Canister Purge Solenoid, Canister
Vent Solenoid, Low Coolant Switch,
Oxygen Sensors
11Electric Ignition Control Module,
Charging System, Neutral Stop
Back-Up Switch
12 Not Used
13 Transaxle 2
14Transaxle Control Module, Neutral
Stop Back-Up
15 PRNDL, Back-up Switch
16 Fuel Injectors (Cylinder 1, 2, 3, 4)
17 Fog Lamps
18 Driver’s Side Headlamp
19 Windshield Wiper
20 HornFuses Usage
21Entertainment, Premium Radio
Ampli�er
22Anti-lock Brake System, Traction
Control Module
23 Rear Defogger
38 Starter/Ignition
39 Body Control Module 1
40Anti-lock Brake System, Traction
Control Module
41 Body Control Module 2
42 Not Used
43 Electric Power Steering
44 Cooling Fan 2
45 Cooling Fan
46 Crank
47 Body Control Module 1A
48 Body Control Module (IGN 3)
5-107
ProCarManuals.com
Page 357 of 392

3. On automatic transaxle vehicles, try to start the
engine in each gear. The vehicle should start
only in PARK (P) or NEUTRAL (N). If the vehicle
starts in any other position, contact your Saturn
retailer for service.
On manual transaxle vehicles, put the shift lever in
NEUTRAL, push the clutch pedal down halfway, and
try to start the engine. The vehicle should start only
when the clutch pedal is pushed down all the way to
the �oor. If the vehicle starts when the clutch is not
pushed all the way down, contact your Saturn retailer
for service.
Automatic Transaxle Shift Lock Control
System Check
{CAUTION:
When you are doing this inspection, the
vehicle could move suddenly. If the vehicle
moves, you or others could be injured.
1. Before you start, be sure you have enough room
around the vehicle. It should be parked on a level
surface.2. Firmly apply the parking brake. SeeParking Brake
on page 2-27.
Be ready to apply the regular brake immediately if
the vehicle begins to move.
3. With the engine off, turn the ignition to RUN, but do
not start the engine. Without applying the regular
brake, try to move the shift lever out of PARK (P)
with normal effort. If the shift lever moves out
of PARK (P), contact your Saturn retailer for service.
Ignition Transaxle Lock Check
While parked, and with the parking brake set, try to turn
the ignition to LOCK in each shift lever position.
With an automatic transaxle, the ignition should turn
to LOCK only when the shift lever is in PARK (P).
The key should come out only in LOCK.
With a manual transaxle, the key should come out
only in LOCK.
Contact your Saturn retailer if service is required.
6-11
ProCarManuals.com
Page 385 of 392
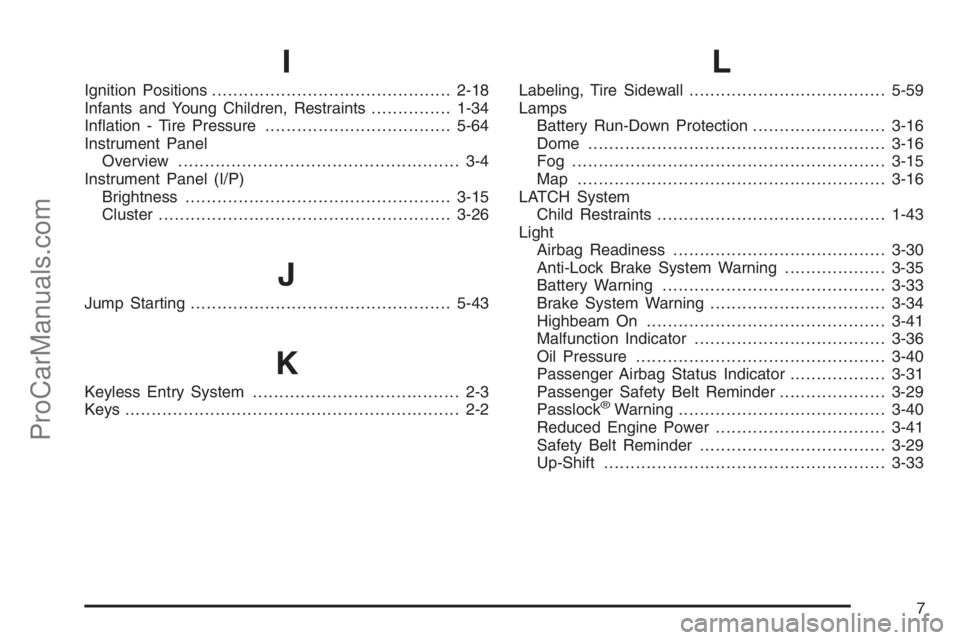
I
Ignition Positions.............................................2-18
Infants and Young Children, Restraints...............1-34
In�ation - Tire Pressure...................................5-64
Instrument Panel
Overview..................................................... 3-4
Instrument Panel (I/P)
Brightness..................................................3-15
Cluster.......................................................3-26
J
Jump Starting.................................................5-43
K
Keyless Entry System....................................... 2-3
Keys............................................................... 2-2
L
Labeling, Tire Sidewall.....................................5-59
Lamps
Battery Run-Down Protection.........................3-16
Dome ........................................................3-16
Fog ...........................................................3-15
Map ..........................................................3-16
LATCH System
Child Restraints...........................................1-43
Light
Airbag Readiness........................................3-30
Anti-Lock Brake System Warning...................3-35
Battery Warning..........................................3-33
Brake System Warning.................................3-34
Highbeam On.............................................3-41
Malfunction Indicator....................................3-36
Oil Pressure...............................................3-40
Passenger Airbag Status Indicator..................3-31
Passenger Safety Belt Reminder....................3-29
Passlock
®Warning.......................................3-40
Reduced Engine Power................................3-41
Safety Belt Reminder...................................3-29
Up-Shift.....................................................3-33
7
ProCarManuals.com