cruise control SATURN ION 2006 Owners Manual
[x] Cancel search | Manufacturer: SATURN, Model Year: 2006, Model line: ION, Model: SATURN ION 2006Pages: 392, PDF Size: 2.8 MB
Page 119 of 392

Instrument Panel Overview...............................3-4
Hazard Warning Flashers................................3-6
Other Warning Devices...................................3-6
Horn .............................................................3-6
Tilt Wheel.....................................................3-7
Turn Signal/Multifunction Lever.........................3-7
Turn and Lane-Change Signals........................3-8
Headlamp High/Low-Beam Changer..................3-8
Flash-to-Pass.................................................3-8
Windshield Washer.........................................3-9
Windshield Wiper Lever...................................3-9
Cruise Control..............................................3-10
Headlamps..................................................3-13
Daytime Running Lamps (DRL).......................3-14
Automatic Headlamp System..........................3-14
Fog Lamps ..................................................3-15
Instrument Panel Brightness...........................3-15
Dome Lamp .................................................3-16
Entry Lighting...............................................3-16
Map Lamps .................................................3-16
Battery Run-Down Protection..........................3-16
Accessory Power Outlet(s).............................3-16
Ashtray(s) and Cigarette Lighter......................3-17Climate Controls............................................3-18
Climate Control System
(Without Air Conditioning)...........................3-18
Climate Control System
(With Air Conditioning)...............................3-20
Outlet Adjustment.........................................3-22
Passenger Compartment Air Filter...................3-23
Warning Lights, Gages, and Indicators............3-25
Instrument Panel Cluster................................3-26
Speedometer and Odometer...........................3-27
Trip Odometer..............................................3-27
Tachometer.................................................3-28
Safety Belt Reminder Light.............................3-29
Passenger Safety Belt Reminder Light.............3-29
Airbag Readiness Light..................................3-30
Passenger Airbag Status Indicator...................3-31
Battery Warning Light....................................3-33
Up-Shift Light...............................................3-33
Brake System Warning Light..........................3-34
Anti-Lock Brake System Warning Light.............3-35
Engine Coolant Temperature Gage..................3-36
Malfunction Indicator Lamp.............................3-36
Oil Pressure Light.........................................3-40
Passlock
®Warning Light................................3-40
Section 3 Instrument Panel
3-1
ProCarManuals.com
Page 120 of 392

Reduced Engine Power Light.........................3-41
Highbeam On Light.......................................3-41
Fuel Gage...................................................3-42
Boost Gage.................................................3-43
Message Center.............................................3-43
Low Traction Message...................................3-44
Traction Off Message....................................3-44
Cruise Control Message.................................3-44
Transaxle Fluid Hot Message.........................3-45
Change Engine Oil Message..........................3-45
Check Gage Message...................................3-45
Power Steering Message...............................3-46
Trunk Ajar Warning Message.........................3-46
Check Gas Cap Message..............................3-46
Low Fuel Warning Message...........................3-46
Service Vehicle Message...............................3-47
Error Message.............................................3-47Audio System(s).............................................3-48
Setting the Time (Without Date Display)...........3-49
Setting the Time (With Date Display)...............3-50
Radio with CD (Base)...................................3-50
Radio with CD (MP3)....................................3-55
Radio Reception...........................................3-70
Care of Your CDs.........................................3-71
Care of the CD Player...................................3-71
Fixed Mast Antenna......................................3-72
XM™ Satellite Radio Antenna System.............3-72
Section 3 Instrument Panel
3-2
ProCarManuals.com
Page 123 of 392

The main components of the instrument panel are the following:
A. Air Outlets. SeeOutlet Adjustment on page 3-22.
B. Turn Signal/Multifunction Lever. SeeTurn
Signal/Multifunction Lever on page 3-7.
C. Horn. SeeHorn on page 3-6.
D. Windshield Wiper Lever. SeeWindshield Wiper
Lever on page 3-9.
E. Hazard Warning Flasher Button. SeeHazard
Warning Flashers on page 3-6.
F. Instrument Panel Cluster. SeeInstrument Panel
Cluster on page 3-26.
G. Enhanced Traction System (ETS) (If Equipped).
SeeEnhanced Traction System (ETS) on page 4-9.
H. Audio System. SeeAudio System(s) on page 3-48.
I. Hood Release. SeeHood Release on page 5-10.
J. Trunk Release Button. SeeTrunk on page 2-11.K. Fog Lamp (If Equipped)/Dimmer Switch. SeeFog
Lamps on page 3-15andInstrument Panel
Brightness on page 3-15.
L. Cruise Control Switches. SeeCruise Control on
page 3-10.
M. Climate Control System. SeeClimate Control
System (Without Air Conditioning) on page 3-18
orClimate Control System (With Air Conditioning)
on page 3-20.
N. Transaxle Shift Lever. SeeAutomatic Transaxle
Operation on page 2-22orManual Transaxle
Operation on page 2-25Manual Transaxle
Operation.
O. Passenger Air Bag Status Indicator. SeePassenger
Airbag Status Indicator on page 3-31.
P. Glove Box. SeeGlove Box on page 2-40.
3-5
ProCarManuals.com
Page 128 of 392

&(Delay):Put the lever in this position to set a delay
between wipes. Turn the end of the lever to set the
length of the delay.
6(Low Speed):Put the lever in this position for
slow, steady wiping cycles.
1(High Speed):Put the lever in this position for
rapid wiping cycles.
Be sure to clear ice and snow from the wiper blades
before using them. If they’re frozen to the windshield,
gently loosen or thaw them. If the blades do become
damaged, install new blades or blade inserts.
Heavy snow or ice can overload the wiper motor. A
circuit breaker will stop the motor until it cools down.
Clear away snow or ice to prevent an overload.
Cruise Control
With cruise control, you can maintain a speed of about
25 mph (40 km/h) or more without keeping your foot on
the accelerator. This can really help on long trips. Cruise
control does not work at speeds below 25 mph (40 km/h).
{CAUTION:
Cruise control can be dangerous where you
cannot drive safely at a steady speed. So, do
not use your cruise control on winding roads
or in heavy traffic.
Cruise control can be dangerous on slippery
roads. On such roads, fast changes in tire
traction can cause excessive wheel slip,
and you could lose control. Do not use cruise
control on slippery roads.
3-10
ProCarManuals.com
Page 129 of 392

Setting Cruise Control
{CAUTION:
If you leave your cruise control on when you
are not using cruise, you might hit a button
and go into cruise when you do not want to.
You could be startled and even lose control.
Keep the cruise control switch off until you
want to use cruise control.
The cruise control buttons are located on the steering
wheel.
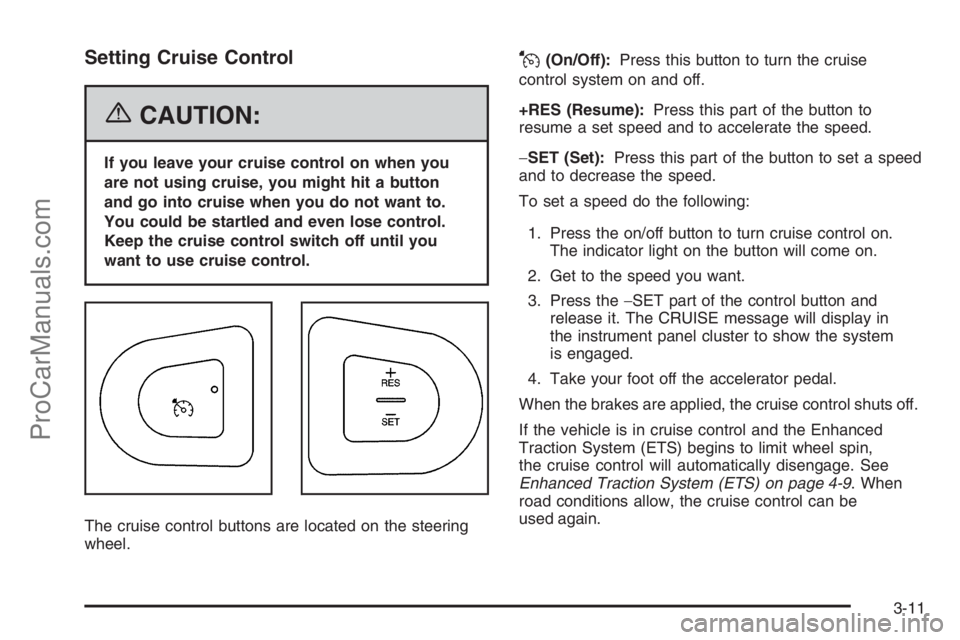
J(On/Off):Press this button to turn the cruise
control system on and off.
+RES (Resume):Press this part of the button to
resume a set speed and to accelerate the speed.
−SET (Set):Press this part of the button to set a speed
and to decrease the speed.
To set a speed do the following:
1. Press the on/off button to turn cruise control on.
The indicator light on the button will come on.
2. Get to the speed you want.
3. Press the−SET part of the control button and
release it. The CRUISE message will display in
the instrument panel cluster to show the system
is engaged.
4. Take your foot off the accelerator pedal.
When the brakes are applied, the cruise control shuts off.
If the vehicle is in cruise control and the Enhanced
Traction System (ETS) begins to limit wheel spin,
the cruise control will automatically disengage. See
Enhanced Traction System (ETS) on page 4-9. When
road conditions allow, the cruise control can be
used again.
3-11
ProCarManuals.com
Page 130 of 392

Resuming a Set Speed
Suppose you set your cruise control at a desired
speed and then you apply the brake. This, of course,
disengages the cruise control. The CRUISE message in
the instrument panel cluster will also go out indicating
cruise is no longer engaged. To return to your previously
set speed, you do not need to go through the set process
again. Once you’re going about 25 mph (40 km/h) or
more, you can press the +RES part of the button brie�y.
This will take you back up to your previously chosen
speed and stay there.
Increasing Speed While Using
Cruise Control
There are two ways to go to a higher speed.
Disengage the cruise control but do not turn it off.
Accelerate to a higher speed and reset the cruise
control.
If the cruise control system is already engaged,
press the +RES part of the button. Hold it there until
you get up to the speed you want, and then release
the button. To increase your speed in very small
amounts, press the +RES part of the button brie�y
and then release it. Each time you do this, your
vehicle will go about 1 mph (1.6 km/h) faster.
Reducing Speed While Using
Cruise Control
If the cruise control system is already engaged,
Push and hold the−SET part of the button until you
reach the lower speed you want, then release it.
To slow down in very small amounts, push
the−SET part of the button brie�y. Each time you
do this, you’ll go about 1 mph (1.6 km/h) slower.
Passing Another Vehicle While Using
Cruise Control
Use the accelerator pedal to increase your speed.
When you take your foot off the pedal, your vehicle will
slow down to the cruise control speed you set earlier.
Using Cruise Control on Hills
How well your cruise control will work on hills depends
upon your speed, load and the steepness of the hills.
When going up steep hills, you may have to step on the
accelerator pedal to maintain your speed. When going
downhill, you may have to brake or shift to a lower gear to
keep your speed down. Of course, applying the brake
takes you out of cruise control. Many drivers �nd this to
be too much trouble and don’t use cruise control on
steep hills.
3-12
ProCarManuals.com
Page 131 of 392

Ending Cruise Control
To end the cruise control session, step lightly on the
brake pedal or tap the clutch if your vehicle has a
manual transmission.
Stepping on the brake pedal or clutch will only end the
current cruise control session. Press the cruise control
on/off button to turn the system completely off.
Erasing Speed Memory
When you turn off the cruise control or the ignition,
your cruise control set speed memory is erased.
Headlamps
The exterior lamp control is located in the middle of the
turn signal/multifunction lever.
O(Exterior Lamp Control):Turn the control with this
symbol on it to operate the exterior lamps.
The exterior lamp control has the following four positions:
9(Off):Turning the control to this position turns off
all lamps except the Daytime Running Lamps (DRL).
On some vehicles, this position activates the automatic
headlamp system.AUTO (Automatic):If your turn signal lever has this
position, turning the control to this position puts the
headlamps in automatic mode. AUTO mode will turn the
exterior lamps on and off depending upon how much
light is available outside of the vehicle.
;(Parking Lamps):Turning the control to this
position turns on the parking lamps together with the
following:
Sidemarker Lamps
Taillamps
License Plate Lamps
Instrument Panel Lights
5(Headlamps):Turning the control to this position
turns on the headlamps, together with the previously
listed lamps and lights.
Lamps On Reminder
If you open the driver’s door with the ignition off and the
lamps on, you will hear a warning chime.
3-13
ProCarManuals.com
Page 162 of 392

Changing the Language (Canada Only)
Vehicles �rst sold in Canada have instrument panel
clusters that show messages in either English or French.
To change the language, do the following:
1. Turn the ignition on.
2. Press the trip/reset button until the current language
of ENGLISH or FRENCH is displayed.
3. Press and hold the trip/reset button for
several seconds until the language is changed.
4. Press the trip/reset button to return to the odometer
display.
Low Traction Message
If your vehicle has an
enhanced traction system
(ETS), this LOW TRAC
message will be displayed
when the system is
limiting wheel spin.
SeeEnhanced Traction System (ETS) on page 4-9for
more information.
Traction Off Message
If your vehicle has an
enhanced traction system
(ETS), this TRAC OFF
message will be displayed
brie�y when the system
has been turned off.
SeeEnhanced Traction System (ETS) on page 4-9for
more information.
Cruise Control Message
The CRUISE message is
displayed brie�y when your
cruise control system has
been activated, or set to a
desired speed.
SeeCruise Control on page 3-10for more information.
3-44
ProCarManuals.com
Page 199 of 392

Braking in Emergencies
At some time, nearly every driver gets into a situation
that requires hard braking.
If you have ABS, you can steer and brake at the same
time. However, if you do not have ABS, your �rst
reaction — to hit the brake pedal hard and hold it
down — may be the wrong thing to do. Your wheels can
stop rolling. Once they do, the vehicle cannot respond
to your steering. Momentum will carry it in whatever
direction it was headed when the wheels stopped rolling.
That could be off the road, into the very thing you
were trying to avoid, or into traffic.
If you do not have ABS, use a “squeeze” braking
technique. This will give you maximum braking while
maintaining steering control. You can do this by pushing
on the brake pedal with steadily increasing pressure.
In an emergency, you will probably want to squeeze the
brakes hard without locking the wheels. If you hear or
feel the wheels sliding, ease off the brake pedal.
This will help you retain steering control. If you do have
ABS, it is different. SeeAnti-Lock Brake System
(ABS) on page 4-7.
In many emergencies, steering can help you more than
even the very best braking.
Enhanced Traction System (ETS)
Your vehicle may have an Enhanced Traction System
(ETS) that limits wheel spin. This is especially useful in
slippery road conditions. The system operates only if
it senses that one or both of the front wheels are
spinning or beginning to lose traction. When this
happens, the system reduces engine power and may
also upshift the transaxle to limit wheel spin.
The LOW TRAC message will be displayed when your
Enhanced Traction System is engaged and limiting
wheel spin. SeeLow Traction Message on page 3-44.
You may feel or hear the system working, but this
is normal.
If your vehicle is in cruise control when the Enhanced
Traction System begins to limit wheel spin, the
cruise control will automatically disengage. When road
conditions allow you to safely use it again, you may
re-engage the cruise control. SeeCruise Control
on page 3-10.
The Enhanced Traction System operates in all transaxle
shift lever positions. But the system can upshift the
transaxle only as high as the shift lever position
you have chosen, so you should use the lower gears
only when necessary.
4-9
ProCarManuals.com
Page 337 of 392

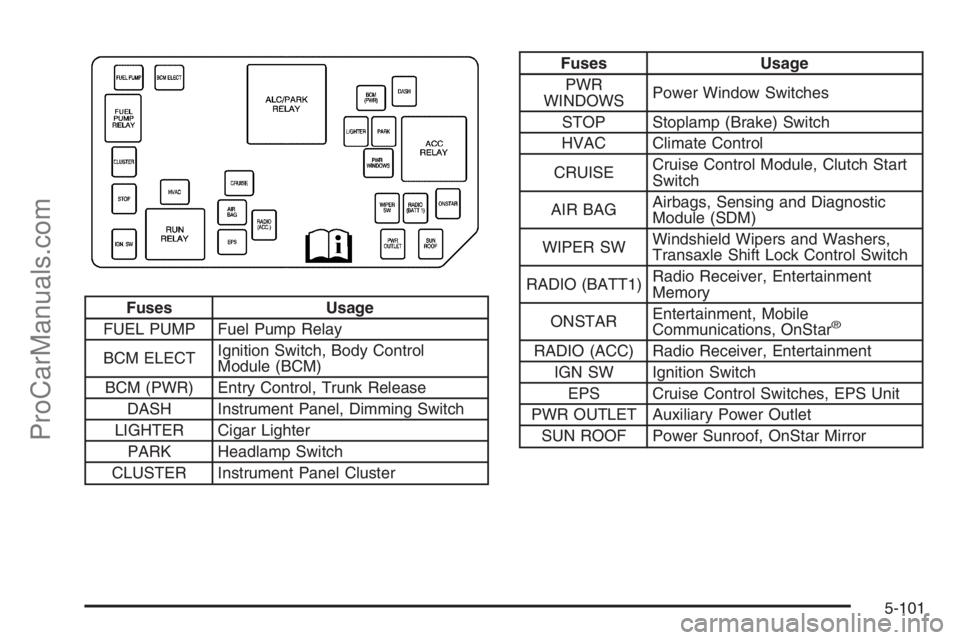
Fuses Usage
FUEL PUMP Fuel Pump Relay
BCM ELECTIgnition Switch, Body Control
Module (BCM)
BCM (PWR) Entry Control, Trunk Release
DASH Instrument Panel, Dimming Switch
LIGHTER Cigar Lighter
PARK Headlamp Switch
CLUSTER Instrument Panel Cluster
Fuses Usage
PWR
WINDOWSPower Window Switches
STOP Stoplamp (Brake) Switch
HVAC Climate Control
CRUISECruise Control Module, Clutch Start
Switch
AIR BAGAirbags, Sensing and Diagnostic
Module (SDM)
WIPER SWWindshield Wipers and Washers,
Transaxle Shift Lock Control Switch
RADIO (BATT1)Radio Receiver, Entertainment
Memory
ONSTAREntertainment, Mobile
Communications, OnStar
®
RADIO (ACC) Radio Receiver, Entertainment
IGN SW Ignition Switch
EPS Cruise Control Switches, EPS Unit
PWR OUTLET Auxiliary Power Outlet
SUN ROOF Power Sunroof, OnStar Mirror
5-101
ProCarManuals.com