stop start SATURN ION 2007 Owner's Manual
[x] Cancel search | Manufacturer: SATURN, Model Year: 2007, Model line: ION, Model: SATURN ION 2007Pages: 440, PDF Size: 2.93 MB
Page 276 of 440

{CAUTION:
If you spill fuel and then something
ignites it, you could be badly burned. Fuel
can spray out on you if you open the fuel
cap too quickly. This spray can happen if
your tank is nearly full, and is more likely
in hot weather. Open the fuel cap slowly
and wait for any hiss noise to stop. Then
unscrew the cap all the way.
Be careful not to spill fuel. Do not top off or over�ll
the tank and wait a few seconds after you have
�nished pumping before removing the nozzle.
Clean fuel from painted surfaces as soon
as possible. SeeWashing Your Vehicle on
page 369.
When replacing the fuel cap, turn it clockwise until
it clicks. Make sure the cap is fully installed.
The diagnostic system can determine if the fuel
cap has been left off or improperly installed.This would allow fuel to evaporate into the
atmosphere. SeeMalfunction Indicator Lamp on
page 174.
In addition, the CHECK GAS CAP message will
be displayed in the Message Center if the fuel cap
is not properly reinstalled. SeeCheck Gas Cap
Message on page 185for more information.
{CAUTION:
If a �re starts while you are refueling, do
not remove the nozzle. Shut off the �ow of
fuel by shutting off the pump or by
notifying the station attendant. Leave the
area immediately.
Notice:If you need a new fuel cap, be sure
to get the right type. Your retailer can get
one for you. If you get the wrong type, it may
not �t properly. This may cause your
malfunction indicator lamp to light and may
damage your fuel tank and emissions system.
SeeMalfunction Indicator Lamp on page 174.
276
ProCarManuals.com
Page 306 of 440

{CAUTION:
You can be burned if you spill coolant on
hot engine parts. Coolant contains
ethylene glycol and it will burn if the
engine parts are hot enough. Do not spill
coolant on a hot engine.
1. You can remove the Intercooler System
pressure cap when the Intercooler System,
including the upper intercooler hoses, are nolonger hot. Turn the pressure cap slowly
counterclockwise about one-quarter of a turn. If
you hear a hiss, wait for that to stop. This will
allow any pressure still left to be vented.
2. Then keep turning the pressure cap slowly,
and remove it.
3. Add the proper DEX-COOL
®coolant mixture
to the �ll neck, until there is coolant visible in
the horizontal tube section of the �ll neck.
4. With the Intercooler System pressure cap off,
start the engine and let it run for a couple of
minutes. Watch out for the engine cooling fan.
Turn the engine off.
By this time, the coolant level inside the �ll
neck may be lower. If the level drops to where
coolant is no longer visible in the horizontal
tube section of the �ll neck, with the engine off
add more of the DEX-COOL
®coolant
mixture to the �ll neck until the level is again
visible in the horizontal tube section.
5. Then replace the pressure cap. Be sure the
pressure cap is hand-tight and fully seated.
If the coolant is not at the proper level when the
system cools down again, see your retailer.
306
ProCarManuals.com
Page 377 of 440

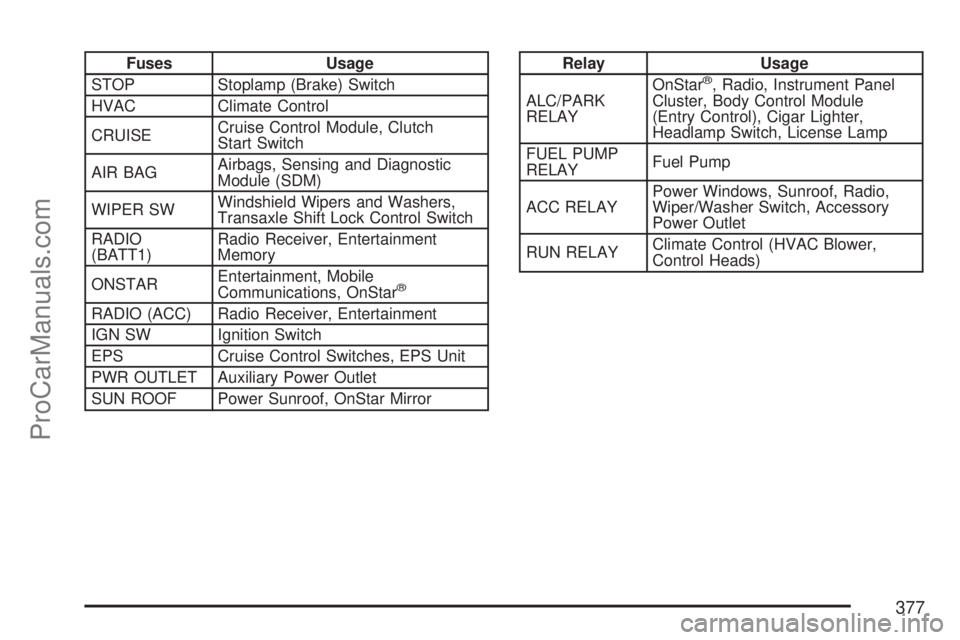
Fuses Usage
STOP Stoplamp (Brake) Switch
HVAC Climate Control
CRUISECruise Control Module, Clutch
Start Switch
AIR BAGAirbags, Sensing and Diagnostic
Module (SDM)
WIPER SWWindshield Wipers and Washers,
Transaxle Shift Lock Control Switch
RADIO
(BATT1)Radio Receiver, Entertainment
Memory
ONSTAREntertainment, Mobile
Communications, OnStar
®
RADIO (ACC) Radio Receiver, Entertainment
IGN SW Ignition Switch
EPS Cruise Control Switches, EPS Unit
PWR OUTLET Auxiliary Power Outlet
SUN ROOF Power Sunroof, OnStar Mirror
Relay Usage
ALC/PARK
RELAYOnStar®, Radio, Instrument Panel
Cluster, Body Control Module
(Entry Control), Cigar Lighter,
Headlamp Switch, License Lamp
FUEL PUMP
RELAYFuel Pump
ACC RELAYPower Windows, Sunroof, Radio,
Wiper/Washer Switch, Accessory
Power Outlet
RUN RELAYClimate Control (HVAC Blower,
Control Heads)
377
ProCarManuals.com
Page 438 of 440

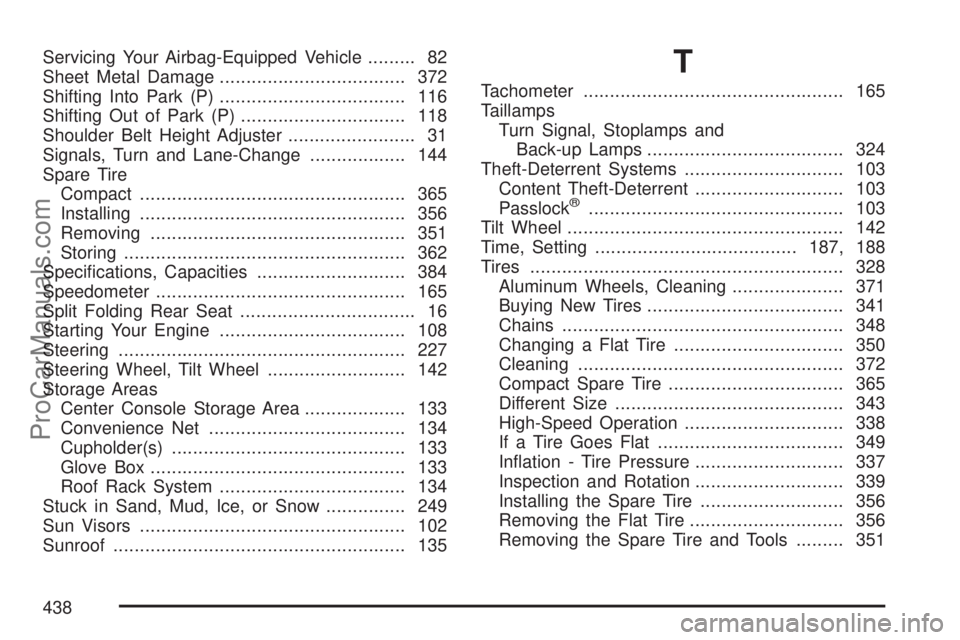
Servicing Your Airbag-Equipped Vehicle......... 82
Sheet Metal Damage................................... 372
Shifting Into Park (P)................................... 116
Shifting Out of Park (P)............................... 118
Shoulder Belt Height Adjuster........................ 31
Signals, Turn and Lane-Change.................. 144
Spare Tire
Compact.................................................. 365
Installing.................................................. 356
Removing................................................ 351
Storing..................................................... 362
Speci�cations, Capacities............................ 384
Speedometer............................................... 165
Split Folding Rear Seat................................. 16
Starting Your Engine................................... 108
Steering...................................................... 227
Steering Wheel, Tilt Wheel.......................... 142
Storage Areas
Center Console Storage Area................... 133
Convenience Net..................................... 134
Cupholder(s)............................................ 133
Glove Box................................................ 133
Roof Rack System................................... 134
Stuck in Sand, Mud, Ice, or Snow............... 249
Sun Visors.................................................. 102
Sunroof....................................................... 135T
Tachometer................................................. 165
Taillamps
Turn Signal, Stoplamps and
Back-up Lamps..................................... 324
Theft-Deterrent Systems.............................. 103
Content Theft-Deterrent............................ 103
Passlock
®................................................ 103
Tilt Wheel.................................................... 142
Time, Setting......................................187, 188
Tires........................................................... 328
Aluminum Wheels, Cleaning..................... 371
Buying New Tires..................................... 341
Chains..................................................... 348
Changing a Flat Tire................................ 350
Cleaning.................................................. 372
Compact Spare Tire................................. 365
Different Size........................................... 343
High-Speed Operation.............................. 338
If a Tire Goes Flat................................... 349
In�ation - Tire Pressure............................ 337
Inspection and Rotation............................ 339
Installing the Spare Tire........................... 356
Removing the Flat Tire............................. 356
Removing the Spare Tire and Tools......... 351
438
ProCarManuals.com