ECO mode SATURN ION 2007 Owners Manual
[x] Cancel search | Manufacturer: SATURN, Model Year: 2007, Model line: ION, Model: SATURN ION 2007Pages: 440, PDF Size: 2.93 MB
Page 3 of 440
SATURN, the SATURN Emblem, and the name
ION are registered trademarks of Saturn
Corporation. GENERAL MOTORS and GM are
registered trademarks of General Motors
Corporation.
This manual includes the latest information at the
time it was printed. We reserve the right to
make changes after that time without further
notice.
This manual describes features that may be
available in this model, but your vehicle may not
have all of them. For example, more than one
entertainment system may be offered or your
vehicle may have been ordered without a front
passenger or rear seats.Keep this manual in the vehicle, so it will be there
if it is needed while you are on the road. If the
vehicle is sold, leave this manual in the vehicle.
Canadian Owners
A French language copy of this manual can be
obtained from your retailer or from:
Helm, Incorporated
P.O. Box 07130
Detroit, MI 48207
How to Use This Manual
Many people read the owner manual from
beginning to end when they �rst receive their new
vehicle. If this is done, it can help you learn
about the features and controls for the vehicle.
Pictures and words work together in the
owner manual to explain things.
Litho in U.S.A.
Part No. 15860076 B Second Printing
©2006 General Motors Corporation. All Rights Reserved.
3
ProCarManuals.com
Page 113 of 440
Here is how to operate your transaxle:
FIRST (1):Press the clutch pedal and shift into
FIRST (1). Then, slowly let up on the clutch pedal
as you press the accelerator pedal.
You can shift into FIRST (1) when you are going
less than 20 mph (32 km/h). If you have come to a
complete stop and it is hard to shift into FIRST (1),
put the shift lever in NEUTRAL and let up on
the clutch. Press the clutch pedal back down.
Then shift into FIRST (1).
SECOND (2):Press the clutch pedal as you let
up on the accelerator pedal and shift into
SECOND (2). Then, slowly let up on the clutch
pedal as you press the accelerator pedal.
THIRD (3), FOURTH (4) and FIFTH (5):Shift into
THIRD (3), FOURTH (4) and FIFTH (5), the same
way you do for SECOND (2). Slowly let up on the
clutch pedal as you press the accelerator pedal.To stop, let up on the accelerator pedal and press
the brake pedal. Just before the vehicle stops,
press the clutch pedal and the brake pedal, and
shift to NEUTRAL.
NEUTRAL:Use this position when you start or
idle your engine.
REVERSE (R):To back up, press down the
clutch pedal, and shift into REVERSE (R). Let up
on the clutch pedal slowly while pressing the
accelerator pedal.
To back up a Red Line model vehicle, press down
the clutch pedal, lift up the ring on the shift
lever, and shift into REVERSE (R). Let up on the
clutch pedal slowly while pressing the accelerator
pedal.
Notice:Shifting to REVERSE (R) while your
vehicle is moving forward could damage the
transaxle. The repairs would not be covered by
your warranty. Shift to REVERSE (R) only after
your vehicle is stopped.
Also, use REVERSE (R), along with the parking
brake, for parking your vehicle.
113
ProCarManuals.com
Page 123 of 440
Automatic Dimming Mirror Operation
The automatic dimming mirror function is turned on
automatically each time the ignition is started.
To operate the automatic dimming mirror do the
following:
1. Make sure the green indicator light, located to
the left of the on/off button, is on. If it is not,
press and hold the on/off button for
approximately six seconds until the green light
comes on, indicating that the mirror is in
automatic dimming mode.
2. Turn off the automatic dimming mirror function
by pressing and holding the on/off button for
approximately six seconds until the green
indicator light turns off.
Compass Calibration
The compass may need calibration from time
to time.
In order to calibrate, CAL must be displayed in the
mirror compass windows. If CAL is not displayed,
push in the on/off button for approximately
nine seconds or until CAL is displayed.
The compass can be calibrated by driving the
vehicle in circles at 5 mph (8 km/h) or less until
the display reads a direction, or the word CAL
disappears.
123
ProCarManuals.com
Page 124 of 440
Compass Variance
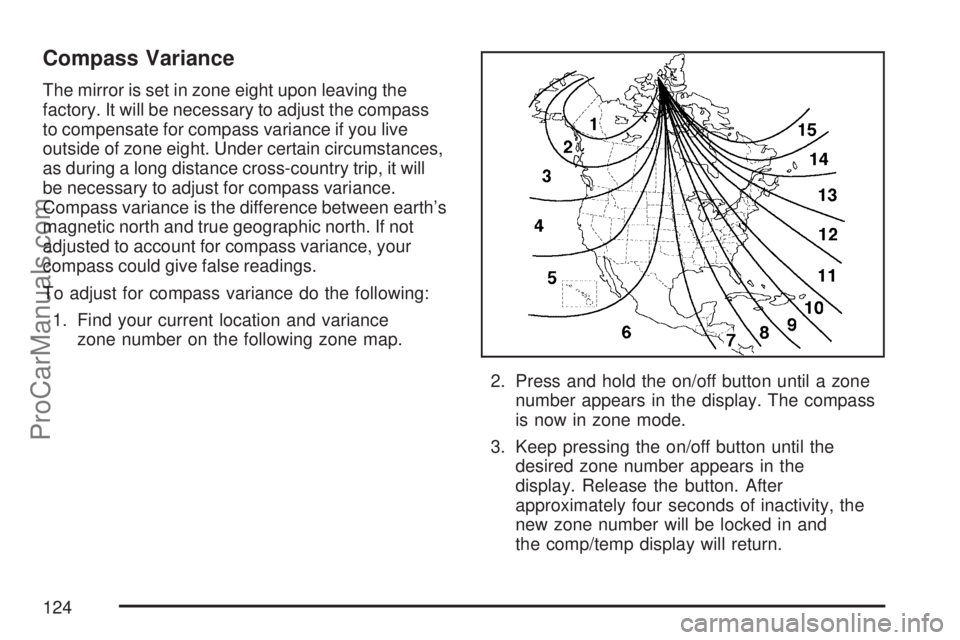
The mirror is set in zone eight upon leaving the
factory. It will be necessary to adjust the compass
to compensate for compass variance if you live
outside of zone eight. Under certain circumstances,
as during a long distance cross-country trip, it will
be necessary to adjust for compass variance.
Compass variance is the difference between earth’s
magnetic north and true geographic north. If not
adjusted to account for compass variance, your
compass could give false readings.
To adjust for compass variance do the following:
1. Find your current location and variance
zone number on the following zone map.
2. Press and hold the on/off button until a zone
number appears in the display. The compass
is now in zone mode.
3. Keep pressing the on/off button until the
desired zone number appears in the
display. Release the button. After
approximately four seconds of inactivity, the
new zone number will be locked in and
the comp/temp display will return.
124
ProCarManuals.com
Page 158 of 440
9(Off):To turn the fan off, turn the knob all the
way counterclockwise to the off position.
Temperature Control:Turn the right knob
clockwise or counterclockwise to increase or
decrease the temperature inside your vehicle.
>(Recirculate):This mode keeps outside air
from coming in the vehicle. It can be used to
prevent outside air and odors from entering your
vehicle or to help heat or cool the air inside
your vehicle more quickly. An indicator light will
come on in this mode. The air-conditioning
compressor also comes on. Operation in this mode
during periods of high humidity and cool outside
temperatures may result in increased window
fogging. If window fogging is experienced, select
the defrost mode.
#(Air Conditioning):Press this button to turn
the air-conditioning system on or off. When
this button is pressed, an indicator light above the
button will come on to let you know the air
conditioning is activated.
On hot days, open the windows to let hot inside
air escape; then close them. This helps to reduce
the time it takes for your vehicle to cool down.
It also helps the system to operate more efficiently.
For quick cool down on hot days:
1. Select the recirculation mode.
2. Select air conditioning.
3. Select the coolest temperature.
4. Select the highest fan speed.
Using these settings together for long periods of
time may cause the air inside of your vehicle to
become too dry. To prevent this from happening,
after the air in your vehicle has cooled, turn off the
recirculation by pressing the button again.
158
ProCarManuals.com
Page 181 of 440
If your vehicle has this gage, it is located on the
steering column.
This gage indicates vacuum during light to
moderate throttle and boost under heavier throttle.
This gage displays the air pressure level in the
intake manifold before it enters the engine’s
combustion chamber.This gage is automatically centered at zero every
time the ignition is turned to RUN. Actual
vacuum or boost is displayed from this zero point.
The boost gage has three pairs of lights that
are located on each side of the gage. These lights
are used to indicate three different engine rpm
levels. The default setting for the lower pair
of lights is 4,400 rpm, the middle pair of lights is
5,600 rpm, and the top pair of lights is 6,200 rpm.
These settings can be adjusted by turning the
stem behind each light. To have the light
pair come on at a higher rpm level, turn the stem
counterclockwise. To have the light pair come
on at a lower rpm level, turn the stem clockwise.
Each detent adjusts the settings by 100 rpm.
To restore the default settings, press and hold any
stem for three seconds. The lights will �ash
three times.
To turn the lights off or on, press and release
any stem.
Canada
181
ProCarManuals.com
Page 199 of 440
EQ (Equalization):Press this button to select
preset equalization settings.
To return to the manual mode, press the EQ
button until Manual displays or start to manually
adjust the bass, midrange, or treble by pressing
the tune knob.
Adjusting the Speakers (Balance/Fade)
BAL/FADE (Balance/Fade):To adjust balance
or fade, press the tune knob until the speaker
control labels appear on the display. Continue
pressing to highlight the desired label, or press the
pushbutton positioned under the desired label.
Turn the tune knob clockwise or counterclockwise
to adjust the highlighted setting. You can also
adjust the highlighted setting by pressing either the
SEEK, FWD, or REV button until the desired
levels are obtained.
To quickly adjust balance or fade to the middle
position, press the pushbutton positioned under the
BAL or FADE label for more than two seconds. A
beep sounds and the level adjusts to the middle
position.
To quickly adjust all speaker and tone controls to
the middle position, press the tune knob for more
than two seconds until a beep sounds.
Finding a Category (CAT) Station
CAT (Category):The CAT button is used to �nd
XM™ stations when the radio is in the XM™
mode. To �nd XM™ channels within a desired
category, perform the following:
1. Press the BAND button until the XM™
frequency is displayed. Press the CAT button
to display the category labels on the radio
display. Continue pressing the CAT button
until the desired category name is displayed.
2. Press either of the two buttons below
the desired category label to immediately tune
to the �rst XM™ station associated with
that category.
3. Turn the tune knob, press the buttons below
the right or left arrows displayed, or press the
right or left SEEK buttons to go to the next
or previous XM™ station within the selected
category.
4. To exit the category search mode, press the
FAV button or BAND button to display your
favorites again.
199
ProCarManuals.com
Page 207 of 440
Root Directory
The root directory of the CD-R is treated as a
folder. If the root directory has compressed audio
�les, the directory displays as F1 ROOT. All
�les contained directly under the root directory are
accessed prior to any root directory folders.
However, playlists (Px) are always accessed
before root folders or �les.
Empty Directory or Folder
If a root directory or a folder exists somewhere in
the �le structure that contains only
folders/subfolders and no compressed �les directly
beneath them, the player advances to the next
folder in the �le structure that contains compressed
audio �les. The empty folder does not display.
No Folder
When the CD-R contains only compressed �les,
the �les are located under the root folder. The next
and previous folder functions are not displayed
on a CD-R that was recorded without folders
or playlists. When displaying the name of the folder
the radio displays ROOT.When the CD-R contains only playlists and
compressed audio �les, but no folders, all �les are
located under the root folder. The folder down
and the folder up buttons search playlists (Px) �rst
and then goes to the root folder. When the
radio displays the name of the folder, the radio
displays ROOT.
Order of Play
Tracks recorded to the CD-R are played in the
following order:
Play begins from the �rst track in the �rst
playlist and continues sequentially through
all tracks in each playlist. When the last track
of the last playlist has played, play continues
from the �rst track of the �rst playlist.
Play begins from the �rst track in the �rst
folder and continues sequentially through
all tracks in each folder. When the last track of
the last folder has played, play continues
from the �rst track of the �rst folder.
When play enters a new folder, the display does
not automatically show the new folder name unless
the folder mode was chosen as the default
display. The new track name displays.
207
ProCarManuals.com
Page 211 of 440
h(Music Navigator):Use the music navigator
feature to play MP3 �les on the CD-R in order
by artist or album. Press the pushbutton located
below the music navigator label. The player scans
the disc to sort the �les by artist and album ID3
tag information. It can take several minutes to scan
the disc depending on the number of MP3 �les
recorded to the CD-R. The radio can begin playing
while it is scanning the disc in the background.
When the scan is �nished, the CD-R begins
playing again.
Once the disc has been scanned, the player
defaults to playing MP3 �les in order by artist. The
current artist playing is shown on the second line of
the display between the arrows. Once all songs by
that artist are played, the player moves to the next
artist in alphabetical order on the CD-R and begins
playing MP3 �les by that artist. If you want to listen
to MP3 �les by another artist, press the pushbutton
located below either arrow button. The CD goes to
the next or previous artist in alphabetical order.
Continue pressing either button until the desired
artist displays.
To change from playback by artist to playback by
album, press the pushbutton located below the Sort
By label. From the sort screen, push one of thebuttons below the album button. Press the
pushbutton below the back label to return to the
main music navigator screen. The album name
displays on the second line between the arrows and
songs from the current album and begins to play.
Once all songs from that album are played, the
player moves to the next album in alphabetical
order on the CD-R and begins playing MP3 �les
from that album.
To exit music navigator mode, press the pushbutton
below the Back label to return to normal MP3
playback.
BAND:Press this button to listen to the radio
while a CD is playing. The CD remains inside the
radio for future listening.
CD/AUX (CD/Auxiliary):Press this button to play
a CD while listening to the radio. The CD icon
and a message showing disc and/or track number
displays while a CD is in the player. Press this
button again and the system automatically
searches for an auxiliary input device such as a
portable audio player. If a portable audio player is
not connected, “No Aux Input Device” displays.
211
ProCarManuals.com
Page 311 of 440
Brake Pedal Travel
See your retailer if the brake pedal does not return
to normal height, or if there is a rapid increase
in pedal travel. This could be a sign of brake
trouble.
Brake Adjustment
Every time you make a moderate brake stop, your
brakes adjust for wear. If you rarely make a
moderate or heavier stop, then your brakes might
not adjust correctly. If you drive in that way,
then — very carefully — make a few moderate
brake stops about every 1,000 miles (1 600 km),
so your brakes will adjust properly.
Replacing Brake System Parts
The braking system on a vehicle is complex.
Its many parts have to be of top quality and work
well together if the vehicle is to have really
good braking. Your vehicle was designed and
tested with top-quality brake parts. When
you replace parts of your braking system — for
example, when your brake linings wear down and
you need new ones put in — be sure you get
new approved Saturn replacement parts. If you do
not, your brakes may no longer work properly.For example, if someone puts in brake linings that
are wrong for your vehicle, the balance between
your front and rear brakes can change — for
the worse. The braking performance you have
come to expect can change in many other ways if
someone puts in the wrong replacement brake
parts.
Battery
Your vehicle has a maintenance free battery.
When it is time for a new battery, get one that has
the replacement number shown on the original
battery’s label. We recommend an ACDelco
®
replacement battery.
Your vehicle’s battery is located in the trunk next
to the compact spare tire. To access the
battery, use the trunk’s �oor carpet latch to lift the
cover up.
Warning:Battery posts, terminals, and related
accessories contain lead and lead compounds,
chemicals known to the State of California
to cause cancer and reproductive harm.
Wash hands after handling.
311
ProCarManuals.com