battery SATURN L-SERIES 2005 User Guide
[x] Cancel search | Manufacturer: SATURN, Model Year: 2005, Model line: L-SERIES, Model: SATURN L-SERIES 2005Pages: 330, PDF Size: 2.4 MB
Page 132 of 330
Setting Preset Stations
Up to 18 stations (six FM1, six FM2, and six AM), can
be programmed on the six numbered pushbuttons,
by performing the following steps:
1. Turn the radio on.
2. Press AM FM to select FM1, FM2, or AM.
3. Tune in the desired station.
4. Press and hold one of the six numbered
pushbuttons until you hear a beep. Whenever
that numbered pushbutton is pressed, the station
that was set will return.
5. Repeat the steps for each pushbutton.
If the battery has been disconnected or a radio fuse
has been removed, the preset stations and time of day
will need to be reset.
Using Automatic Set
A.SET (Automatic Set):Press this button to have
the radio automatically select the first 12 strongest
radio stations for FM and the six strongest radio
stations for AM.To select the stations, perform the following:
1. Press AM FM to select FM1, FM2, or AM.
2. Press and hold AM FM until you hear a beep.
The radio will begin to search the current band.
The radio will store the stations, starting from the
lowest frequency, to each preset pushbutton. A.SET
will appear on the display when the radio is
finished storing the stations.
Cancelling Automatic Set
The radio retains the previously stored stations so they
can be recalled when automatic set is canceled.
Press and hold A.SET until you hear a beep. A.SET will
no longer appear on the display.
Setting the Tone (Bass/Treble)
MODE:Press this button until BAS or TRE appears
on the display. Press the plus or minus buttons to
increase or to decrease. The display will show the bass
or the treble level. If a station is weak or noisy,
decrease the treble.
3-40
ProCarManuals.com
Page 136 of 330
Setting Preset Stations
Up to 18 stations (six FM1, six FM2, and six AM), can
be programmed on the six numbered pushbuttons,
by performing the following steps:
1. Turn the radio on.
2. Press AM FM to select FM1, FM2, or AM.
3. Tune in the desired station.
4. Press the AUTO TONE arrow to select the
equalization.
5. Press and hold one of the six numbered
pushbuttons until you hear a beep. Whenever that
numbered pushbutton is pressed, the station
that was set will return and the equalization that
was selected will be stored for that pushbutton.
6. Repeat the steps for each pushbutton.
If the battery has been disconnected or a radio fuse has
been removed, the preset stations and time of day
will need to be reset.
Using Automatic Set
A.SET (Automatic Set):Press this button to have the
radio automatically select the first 12 strongest radio
stations for FM and the six strongest radio stations
for AM.
To select the stations, perform the following:
1. Press AM FM to select FM1, FM2, or AM.
2. Press and hold AM FM until you hear a beep.
The radio will begin to search the current band.
The radio will store the stations, starting from the
lowest frequency, to each preset pushbutton. A.SET
will appear on the display when the radio is
finished storing the stations.
Cancelling Automatic Set
The radio retains the previously stored stations so they
can be recalled when automatic set is canceled.
Press and hold A.SET until you hear a beep. A.SET will
no longer appear on the display.
3-44
ProCarManuals.com
Page 144 of 330

Rear Seat Entertainment System
Your vehicle may have a DVD Rear Seat Entertainment
(RSE) system. The RSE system works with the
vehicles audio system and includes a DVD radio, a
video display screen, two sets of wireless headphones,
and a remote control.
Before You Drive
The RSE system is designed for rear seat passengers
only. The driver cannot safely view the video screen
while driving and should not try to do so.
In severe or extreme weather conditions the RSE
system may or may not work until the temperature is
within the operating range. The operating range for the
RSE system is above−4°F (−20°C) or below
140°F (60°C). If the temperature of your vehicle is
outside of this range, heat or cool the vehicle until the
temperature is within the operating range of the
RSE system. To resume operation, shut off the RSE,
pull down the video screen and then heat or cool
the vehicle until the temperature is within the
operating range.
Headphones
The RSE system includes two sets of wireless
headphones. The headphones are used to listen to the
DVD radio or an auxiliary device connected to the
RCA jacks. The wireless headphones have an ON/OFF
switch and a volume control.
To use the headphones, turn the switch, located on the
left side, to ON. An indicator light located on the
headphones will illuminate. If the light does not illuminate,
the batteries may need to be replaced. See “Battery
Replacement” later in this section for more information.
Switch the headphones to OFF when not in use.
3-52
ProCarManuals.com
Page 145 of 330
The transmitters are located in the display above the
video screen. The headphones will shut off automatically
to save the battery power if the DVD system is shut
off or if the headphones are out of range of the
transmitters for more than three minutes. If you move
too far forward or step out of the vehicle, the
headphones will lose the audio signal.
If the RSE system is shut off or if the headphones are
out of range of the transmitters, located at the top of the
video screen, for more than three minutes, the
headphones will shut off automatically to save battery
power. If you move too far forward or step out of
the vehicle, the headphones will lose the audio signal.
To adjust the volume on the headphones, use the
volume control located on the right side.
Notice:Do not store the headphones in heat or
direct sunlight. This could damage the headphones
and repairs would not be covered by your warranty.
Keep the headphones stored in a cool, dry place.Battery Replacement
To change the batteries, do the following:
1. Slide open the battery door located on the left side
of the headphones.
2. Replace the two AAA batteries in the compartment.
Make sure that they are installed correctly.
3. Slide the battery door shut.
If the headphones are to be stored for a long period of
time, remove the batteries and keep them in a cool,
dry place.
Stereo RCA Jacks
The RCA jacks are located on the faceplate of the DVD
player. The RCA jacks allow audio or video signals
to be connected from an auxiliary device such as
a camcorder or a video game unit to the RSE system.
Adapter connectors or cables may be required to
connect the auxiliary device to the RCA jacks. Refer to
the manufacturer’s instructions for proper usage.
The RCA jacks are color coded to match typical home
entertainment system equipment. The yellow jack (top)
is for the video input. The white jack (middle) is for the
left audio input. The red jack (bottom) is for the right
audio input.
3-53
ProCarManuals.com
Page 149 of 330
Remote Control
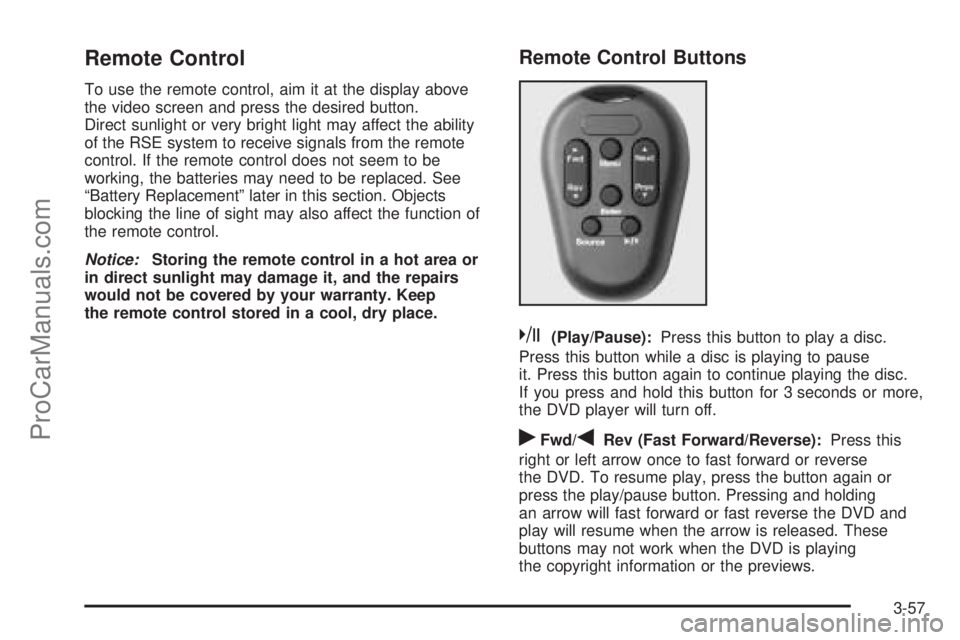
To use the remote control, aim it at the display above
the video screen and press the desired button.
Direct sunlight or very bright light may affect the ability
of the RSE system to receive signals from the remote
control. If the remote control does not seem to be
working, the batteries may need to be replaced. See
“Battery Replacement” later in this section. Objects
blocking the line of sight may also affect the function of
the remote control.
Notice:Storing the remote control in a hot area or
in direct sunlight may damage it, and the repairs
would not be covered by your warranty. Keep
the remote control stored in a cool, dry place.
Remote Control Buttons
k(Play/Pause):Press this button to play a disc.
Press this button while a disc is playing to pause
it. Press this button again to continue playing the disc.
If you press and hold this button for 3 seconds or more,
the DVD player will turn off.
rFwd/qRev (Fast Forward/Reverse):Press this
right or left arrow once to fast forward or reverse
the DVD. To resume play, press the button again or
press the play/pause button. Pressing and holding
an arrow will fast forward or fast reverse the DVD and
play will resume when the arrow is released. These
buttons may not work when the DVD is playing
the copyright information or the previews.
3-57
ProCarManuals.com
Page 150 of 330
QNext/RPrev (Next/Previous):Press the up or the
down arrow to select the next or the previous chapter.
These buttons may not work when the DVD is playing
the copyright information or the previews.
Menu:Press this button to view the media menu.
The media menu is different for every disc. Use the up,
down, right, and left arrow buttons to move the cursor
around the media menu. After making the selection,
press Enter. Some discs may contain a short skit leading
up to the media menu.
Source:Press this button to switch the source for the
RSE system between the auxiliary device (connected
to the RCA jacks) and the DVD player. Pressing
this button has no effect when there is no auxiliary
device connected.
Battery Replacement
To change the remote control batteries, do the following:
1. Remove the screw and open the battery
compartment door located on the back of the
remote control.
2. Replace the two AAA batteries in the compartment.
Make sure that they are installed correctly.
3. Replace the battery door and the screw.If the remote control is to be stored for a long period of
time, remove the batteries and keep them in a cool,
dry place.
DVD Distortion
There may be an experience with video distortion
when operating cellular phones, scanners, CB radios,
Global Position Systems (GPS)*, two-way radios, mobile
fax, or walkie talkies.
It may be necessary to turn off the DVD player when
operating one of these devices in or near the vehicle.
*Excludes the OnStar
®System.
Cleaning the DVD Player
When cleaning the outside DVD faceplate and buttons,
use only a clean cloth dampened with clean water.
Cleaning the Video Screen
When cleaning the video screen, use only a clean cloth
dampened with clean water. Use care when directly
touching or cleaning the screen, as damage may result.
Theft-Deterrent Feature
The Radio with Cassette and CD and the Radio with
Cassette and Six-Disc CD have a theft deterrent feature.
3-58
ProCarManuals.com
Page 151 of 330

The theft deterrent feature is designed to discourage
theft of your vehicle’s radio. It works by using a secret
code to disable all radio functions whenever battery
power is interrupted.
The theft deterrent feature for the radio may be used or
ignored. If ignored, the radio plays normally and the
radio is not protected by the feature. If the theft deterrent
feature is activated, the radio will not operate if stolen.
When the theft deterrent feature is activated, LOCK will
appear on the radio display to indicate a locked condition
anytime battery power has been interrupted. If the battery
loses power for any reason, you must unlock the radio
with the secret code before it will operate.
Activating the Theft-Deterrent Feature
The instructions which follow explain how to enter your
secret code to activate the theft deterrent feature.
Read through all 10 steps before starting the procedure.
If you allow more than 15 seconds to elapse between
any steps, the radio automatically reverts to time
and you must start the procedure over at Step 4.
1. Write down any four-digit number from
0000 to 9999 and keep it in a safe place
separate from the vehicle.
2. Turn the ignition to RUN.3. Turn the radio off.
4. Press the 5 and 6 pushbuttons at the same time for
five seconds. -- -- -- -- will appear on the display.
Next you will use the secret code number which you
have written down.
5. Press the SEEK/SCAN up arrow to make the first
digit agree with your code.
6. Press the SEEK/SCAN down arrow to make the
second digit agree with your code.
7. Press the TUNE up arrow to make the third digit
agree with your code.
8. Press the TUNE down arrow to make the fourth
digit agree with your code.
9. Press AM-FM after you have confirmed that the
code matches the secret code you have written
down. REP will appear on the display to indicate
that Steps 5 through 8 need to be repeated to
confirm your secret code.
10. Press AM-FM again. SEC will appear on the display
to indicate that the radio is secure.
If SEC is not displayed, but displays Err1, Err2, or
LOCK, the theft deterrent feature is already set
to another code. See “Disabling the Theft-Deterrent
Feature” later in this section.
3-59
ProCarManuals.com
Page 183 of 330

•Put on extra clothing or wrap a blanket around you.
If you have no blankets or extra clothing, make
body insulators from newspapers, burlap bags, rags,
floor mats — anything you can wrap around
yourself or tuck under your clothing to keep warm.
You can run the engine to keep warm, but be careful.
{CAUTION:
Snow can trap exhaust gases under your
vehicle. This can cause deadly CO (carbon
monoxide) gas to get inside. CO could
overcome you and kill you. You cannot see it
or smell it, so you might not know it is in your
vehicle. Clear away snow from around the
base of your vehicle, especially any that is
blocking your exhaust pipe. And check around
again from time to time to be sure snow does
not collect there.
Open a window just a little on the side of the
vehicle that is away from the wind. This will
help keep CO out.
Run your engine only as long as you must. This saves
fuel. When you run the engine, make it go a little
faster than just idle. That is, push the accelerator
slightly. This uses less fuel for the heat that you get and
it keeps the battery charged. You will need a
well-charged battery to restart the vehicle, and possibly
for signaling later on with your headlamps. Let the
heater run for a while.
4-29
ProCarManuals.com
Page 201 of 330

Service............................................................5-3
Doing Your Own Service Work.........................5-4
Adding Equipment to the Outside
of Your Vehicle...........................................5-5
Fuel................................................................5-5
Gasoline Octane............................................5-5
Gasoline Specifications....................................5-5
California Fuel...............................................5-6
Additives.......................................................5-6
Fuels in Foreign Countries...............................5-7
Filling Your Tank............................................5-8
Filling a Portable Fuel Container.....................5-10
Checking Things Under the Hood....................5-10
Hood Release..............................................5-11
Engine Compartment Overview.......................5-12
Engine Oil...................................................5-13
Engine Oil Life System..................................5-16
Engine Air Cleaner/Filter................................5-17
Automatic Transaxle Fluid..............................5-20
Engine Coolant.............................................5-20
Coolant Surge Tank Pressure Cap..................5-23
Engine Overheating.......................................5-23
Cooling System............................................5-26
Power Steering Fluid.....................................5-31
Windshield Washer Fluid................................5-32Brakes........................................................5-33
Battery........................................................5-36
Jump Starting...............................................5-37
Bulb Replacement..........................................5-42
Halogen Bulbs..............................................5-42
Headlamps, Front Turn Signal, Sidemarker,
and Parking Lamps....................................5-42
Fog Lamps..................................................5-44
Center High-Mounted Stoplamp (CHMSL).........5-45
Taillamps, Turn Signal, Stoplamps and
Back-up Lamps.........................................5-45
Replacement Bulbs.......................................5-46
Windshield Wiper Blade Replacement..............5-47
Tires..............................................................5-48
Tire Sidewall Labelling...................................5-49
Tire Terminology and Definitions.....................5-51
Inflation - Tire Pressure.................................5-54
Tire Inspection and Rotation...........................5-55
When It Is Time for New Tires.......................5-56
Buying New Tires.........................................5-57
Uniform Tire Quality Grading..........................5-58
Wheel Alignment and Tire Balance..................5-59
Wheel Replacement......................................5-60
Tire Chains..................................................5-61
If a Tire Goes Flat........................................5-62
Section 5 Service and Appearance Care
5-1
ProCarManuals.com
Page 213 of 330

A. Engine Air Cleaner/Filter. SeeEngine Air
Cleaner/Filter on page 5-17for more information.
B. Engine Oil Dipstick. See “Checking Engine Oil” under
Engine Oil on page 5-13for more information.
C. Engine Oil Fill Cap. See “When to Add Engine Oil”
underEngine Oil on page 5-13for more information.
D. Brake Master Cylinder Reservoir. See “Brake
Fluid” underBrakes on page 5-33for more
information.
E. Power Steering Fluid. SeePower Steering Fluid on
page 5-31for more information.
F. Battery. SeeBattery on page 5-36for more
information.
G. Engine Coolant Recovery Tank. SeeCooling System
on page 5-26for more information.
H. Windshield Washer Fluid Reservoir. See “Adding
Washer Fluid” underWindshield Washer Fluid
on page 5-32for more information.
Engine Oil
Checking Engine Oil
It is a good idea to check your engine oil every time you
get fuel. In order to get an accurate reading, the oil
must be warm and the vehicle must be on level ground.The engine oil dipstick handle is a yellow loop. See
Engine Compartment Overview on page 5-12for
the location of the engine oil dipstick
1. Turn off the engine and give the oil several minutes
to drain back into the oil pan. If you do not do this,
the oil dipstick might not show the actual level.
2. Pull out the dipstick and clean it with a paper towel
or cloth, then push it back in all the way. Remove it
again, keeping the tip down, and check the level.
When to Add Engine Oil
If the oil is at or below the MIN mark, then you will need
to add at least one quart of oil. But you must use the
right kind. This section explains what kind of oil to use.
For engine oil crankcase capacity, seeCapacities
and Speci�cations on page 5-89.
Notice:Do not add too much oil. If your engine
has so much oil that the oil level gets above
the upper mark that shows the proper operating
range, your engine could be damaged.
5-13
ProCarManuals.com