radio controls SATURN OUTLOOK 2008 Owners Manual
[x] Cancel search | Manufacturer: SATURN, Model Year: 2008, Model line: OUTLOOK, Model: SATURN OUTLOOK 2008Pages: 488, PDF Size: 3 MB
Page 148 of 488
StabiliTrak®Indicator Light.............................3-46
Engine Coolant Temperature Warning Light......3-47
Engine Coolant Temperature Gage..................3-47
Tire Pressure Light.......................................3-48
Malfunction Indicator Lamp.............................3-48
Oil Pressure Light.........................................3-51
Security Light...............................................3-51
Fog Lamp Light............................................3-52
Cruise Control Light......................................3-52
Highbeam On Light.......................................3-52
Tow/Haul Mode Light....................................3-52
Fuel Gage...................................................3-53
Driver Information Center (DIC).......................3-54
DIC Operation and Displays
(With DIC Buttons)....................................3-54
DIC Operation and Displays
(Without DIC Buttons)................................3-60
DIC Warnings and Messages.........................3-64
DIC Vehicle Customization
(With DIC Buttons)....................................3-74Audio System(s).............................................3-82
Setting the Clock..........................................3-84
Radio(s) (MP3).............................................3-86
Using an MP3 (Radio with CD and
Six-Disc CD Player).................................3-104
Using an MP3 (Radio with CD and
DVD Player)...........................................3-108
XM Radio Messages...................................3-114
Navigation/Radio System..............................3-115
Rear Seat Entertainment (RSE) System.........3-115
Rear Seat Audio (RSA)................................3-124
Theft-Deterrent Feature................................3-126
Audio Steering Wheel Controls......................3-126
Radio Reception.........................................3-127
Multi-Band Antenna.....................................3-128
Section 3 Instrument Panel
3-2
ProCarManuals.com
Page 151 of 488
The main components of your instrument panel are listed here:
A. Air Vent. SeeOutlet Adjustment on page 3-34.
B. Multifunction Lever. SeeTurn Signal/Multifunction
Lever on page 3-8.
Windshield Wipers. SeeTurn Signal/Multifunction
Lever on page 3-8.
C. Instrument Panel Cluster. SeeInstrument Panel
Cluster on page 3-38.
D. Driver Information Center (DIC) Buttons. SeeDriver
Information Center (DIC) on page 3-54.
E. Storage Area. SeeInstrument Panel Storage on
page 2-55.
F. Audio System. SeeAudio System(s) on page 3-82.
Navigation/Radio System (If Equipped). See
Navigation/Radio System on page 3-115.
G. Exterior Lamps Control. SeeExterior Lamps on
page 3-15.
H. Hood Release. SeeHood Release on page 5-11.I. Dome Lamp Override Button. SeeDome Lamp
Override on page 3-18. Instrument Panel Brightness
Control. SeeInstrument Panel Brightness on
page 3-17.
J. Cruise Control Buttons. SeeCruise Control on
page 3-12.
K. Tilt and Telescopic Steering Wheel. SeeTilt and
Telescopic Steering Wheel on page 3-7. Power Tilt
Wheel and Telescopic Steering (If Equipped).
SeePower Tilt Wheel and Telescopic Steering
Column on page 3-8.
L. Horn. SeeHorn on page 3-7.
M. Audio Steering Wheel Control Buttons. SeeAudio
Steering Wheel Controls on page 3-126.
N. Hazard Warning Flasher Button. SeeHazard
Warning Flashers on page 3-6.
O. Center Console Shift Lever. See “Console Shift
Lever” underShifting Into Park on page 2-35.
3-5
ProCarManuals.com
Page 229 of 488
Keeping your mind on the drive is important for
safe driving. SeeDefensive Driving on page 4-2.
Here are some ways in which you can help avoid
distraction while driving.
While your vehicle is parked:
Familiarize yourself with all of its controls.
Familiarize yourself with its operation.
Set up your audio system by presetting your
favorite radio stations, setting the tone, and
adjusting the speakers. Then, when driving
conditions permit, you can tune to your favorite
radio stations using the presets and steering wheel
controls if the vehicle has them.Notice:Before adding any sound equipment to
your vehicle, such as an audio system, CD player,
CB radio, mobile telephone, or two-way radio, make
sure that it can be added by checking with your
dealer/retailer. Also, check federal rules covering
mobile radio and telephone units. If sound
equipment can be added, it is very important to do
it properly. Added sound equipment may interfere
with the operation of your vehicle’s engine, radio, or
other systems, and even damage them. Your
vehicle’s systems may interfere with the operation
of sound equipment that has been added.
Your vehicle has a feature called Retained Accessory
Power (RAP). With RAP, the audio system can be
played even after the ignition is turned off. SeeRetained
Accessory Power (RAP) on page 2-27for more
information.
3-83
ProCarManuals.com
Page 234 of 488
Finding a Station
BAND:Press to switch between AM, FM, or XM™
(if equipped). The selection displays.
f(Tune):Turn to select radio stations.
©SEEK¨:Press the arrows to go to the previous or
to the next station and stay there.
To scan stations, press and hold either arrow for a
few seconds until a beep sounds. The radio goes to a
station, plays for a few seconds, then goes to the
next station. Press either arrow again to stop scanning.
The radio only seeks and scans stations with a
strong signal that are in the selected band.
4(Information) (XM™ Satellite Radio Service, MP3,
and RDS Features):Press to display additional
text information related to the current FM-RDS or XM™
station, or MP3 song. A choice of additional information
such as: Channel, Song, Artist, and CAT (category)
can display. Continue pressing to highlight the desired
label, or press the pushbutton positioned under any one
of the labels and the information about that label displays.
When information is not available, No Info displays.
Storing a Radio Station as a Favorite
Drivers are encouraged to set up their radio station
favorites while the vehicle is in P (Park). Tune to favorite
stations using the presets, favorites button, and steering
wheel controls. SeeDefensive Driving on page 4-2.
FAV (Favorites):A maximum of 36 stations can be
programmed as favorites using the six pushbuttons
positioned below the radio station frequency labels and
by using the radio favorites page button (FAV button).
Press to go through up to six pages of favorites,
each having six favorite stations available per page.
Each page of favorites can contain any combination of
AM, FM, or XM™ (if equipped) stations.
The balance/fade and tone settings that were previously
adjusted, are stored with the favorite stations.
To store a station as a favorite, perform the
following steps:
1. Tune to the desired radio station.
2. Press the FAV button to display the page where to
store the station.
3. Press and hold one of the six pushbuttons until a
beep sounds. When that pushbutton is pressed
and released, the station that was set, returns.
4. Repeat the steps for each pushbutton radio station
to be stored as a favorite.
3-88
ProCarManuals.com
Page 235 of 488
The number of favorites pages can be setup using the
MENU button. To setup the number of favorites pages,
perform the following steps:
1. Press the MENU button to display the radio
setup menu.
2. Press the pushbutton located below the
FAV 1-6 label.
3. Select the desired number of favorites pages by
pressing the pushbutton located below the
displayed page numbers.
4. Press the FAV button, or let the menu time out, to
return to the original main radio screen showing the
radio station frequency labels and to begin the
process of programming favorites for the chosen
amount of numbered pages.
Setting the Tone
(Bass/Midrange/Treble)
BASS/MID/TREB (Bass, Midrange, or Treble):To
adjust bass, midrange, or treble, press the
fknob until
the tone control labels display. Continue pressing to
highlight the desired label, or press the pushbutton
positioned under the desired label. Turn the
fknob
clockwise or counterclockwise to adjust the highlightedsetting, or press either SEEK arrow,
\FWD (forward),
or
sREV (reverse) button until the desired levels
are obtained. If a station’s frequency is weak or if there
is static, decrease the treble.
To quickly adjust bass, midrange, or treble to the middle
position, press the pushbutton positioned under the
BASS, MID, or TREB label for more than two seconds.
A beep sounds and the level adjusts to the middle
position.
To quickly adjust all tone and speaker controls to the
middle position, press the
fknob for more than
two seconds until a beep sounds.
EQ (Equalization):Press to choose bass and treble
equalization settings designed for different types
of music. The choices are pop, rock, country, talk, jazz,
and classical. Selecting MANUAL or changing bass
or treble, returns the EQ to the manual bass and treble
settings.
Unique EQ settings can be saved for each source.
If the radio has a Bose
®audio system, the EQ settings
are either MANUAL or TALK.
3-89
ProCarManuals.com
Page 236 of 488
Adjusting the Speakers (Balance/Fade)
BAL/FADE (Balance/Fade):To adjust balance or
fade, press the
fknob until the speaker control labels
display. Continue pressing to highlight the desired
label, or press the pushbutton positioned under
the desired label. Turn the
fknob clockwise or
counterclockwise to adjust the highlighted setting, or
press either SEEK arrow,
\FWD, orsREV button
until the desired levels are obtained.
To quickly adjust balance or fade to the middle position,
press the pushbutton positioned under the BAL or
FADE label for more than two seconds. A beep sounds
and the level adjusts to the middle position.
To quickly adjust all speaker and tone controls to the
middle position, press the
fknob for more than
two seconds until a beep sounds.
Radios with CD and DVD differ when using fade in
5.1 Surround. The left front and right front speakers fade
rearward, leaving the center front speaker unaffected
until the last fade step, then all front speakers mute.
If the Rear Seat Audio (RSA) is turned on, the radio
disables FADE and mutes the rear speakers.
Finding a Category (CAT) Station
CAT (Category):The CAT button is used to �nd XM™
stations when the radio is in the XM™ mode. To �nd
XM™ channels within a desired category, perform
the following:
1. Press the BAND button until the XM™ frequency
displays. Press the CAT button to display the
category labels. Continue pressing the CAT button
until the desired category name displays.
Radios with CD and DVD can also navigate the
category list by pressing the
sREV button or
the
\FWD button.
2. Press either of the two buttons below the desired
category label to immediately tune to the �rst
XM™ station associated with that category.
3. Turn the
fknob, press the buttons below the right
or left arrows displayed, or press either SEEK arrow
to go to the previous or to the next XM™ station
within the selected category.
4. To exit the category search mode, press the
FAV button or BAND button to display the
favorites again.
3-90
ProCarManuals.com
Page 246 of 488
DVD-V (Video) Display Buttons
Once a DVD-V is inserted, the radio display menu
shows several tag options for DVD playing. Press the
pushbuttons located under any desired tag option during
DVD playback. See the tag options listed after, for
more information.
The rear seat passenger can navigate the DVD-V
menus and controls through the remote control.
See “Remote Control”, underRear Seat Entertainment
(RSE) System on page 3-115for more information.
The Video Screen automatically turns on when
the DVD-V is inserted into the DVD slot.
r/j(Play/Pause):Press either the play or pause
icon displayed on the radio system, to toggle between
pausing or restarting playback of a DVD. If the
forward arrow is showing on display, the system is in
pause mode. If the pause icon is showing on display, the
system is in playback mode. If the DVD screen is off,
press the play button to turn the screen on.
Some DVDs begin playing after the previews have
�nished, although there could be a delay of up to
30 seconds. If the DVD does not begin playing themovie automatically, press the pushbutton located
under the play/pause symbol tag displayed on the radio.
If the DVD still does not play, refer to the on-screen
instructions, if available.
c(Stop):Press to stop playing, rewinding, or fast
forwarding a DVD.
r(Enter):Press to select the choices that are
highlighted in any menu.
y(Menu):Press to access the DVD menu. The DVD
menu is different on every DVD. Use the pushbuttons
located under the navigation arrows to navigate
the cursor through the DVD menu. After making a
selection press this button. This button only operates
when using a DVD.
Nav (Navigate):Press to display directional arrows for
navigating through the menus.
q(Return):Press to exit the current active menu
and return to the previous menu. This button operates
only when a DVD is playing and a menu is active.
3-100
ProCarManuals.com
Page 247 of 488
DVD-A (Audio) Display Buttons
Once a DVD-A is inserted, radio display menu shows
several tag options for DVD playing. Press the
pushbuttons located under any desired tag option
during DVD playback. See the tag options listed after,
for more information.
The rear seat operator can navigate the DVD-A menus
and controls through the remote control. See “Remote
Control”, underRear Seat Entertainment (RSE) System
on page 3-115for more information. The Video Screen
does not automatically power on when the DVD-A
is inserted into the DVD slot. It must be manually turned
on by the rear seat occupant through the remote
control power button.
r/j(Play/Pause):Press either the play or pause
icon displayed on the radio system, to toggle between
pausing or restarting playback of a DVD. If the
forward arrow is showing on the display, the system is
in pause mode. If the pause icon is showing on the
display, the system is in playback mode.
qGroupr:Press to cycle through musical groupings
on the DVD-A disc.Nav (Navigate):Press to display directional arrows for
navigating through the menus.
e(Audio Stream):Press to cycle through audio
stream formats located on the DVD-A disc. The video
screen shows the audio stream changing.
Inserting a Disc
To play a disc, gently insert the disc, with the label side
up, into the loading slot. The DVD player might not
accept some paper labeled media. The player starts
loading the disc into the system and show “Loading
Disc” on the radio display. At the same time, the radio
displays a softkey menu of option(s). Some discs
automatically play the movie while others default to
the softkey menu display, which requires the Play, Enter,
or Navigation softkeys to be pressed; either by softkey
or by the rear seat passenger using the remote
control.
Loading a disc into the system, depending on media
type and format, ranges from 5 to 20 seconds for a CD,
and up to 30 seconds for a DVD.
3-101
ProCarManuals.com
Page 271 of 488
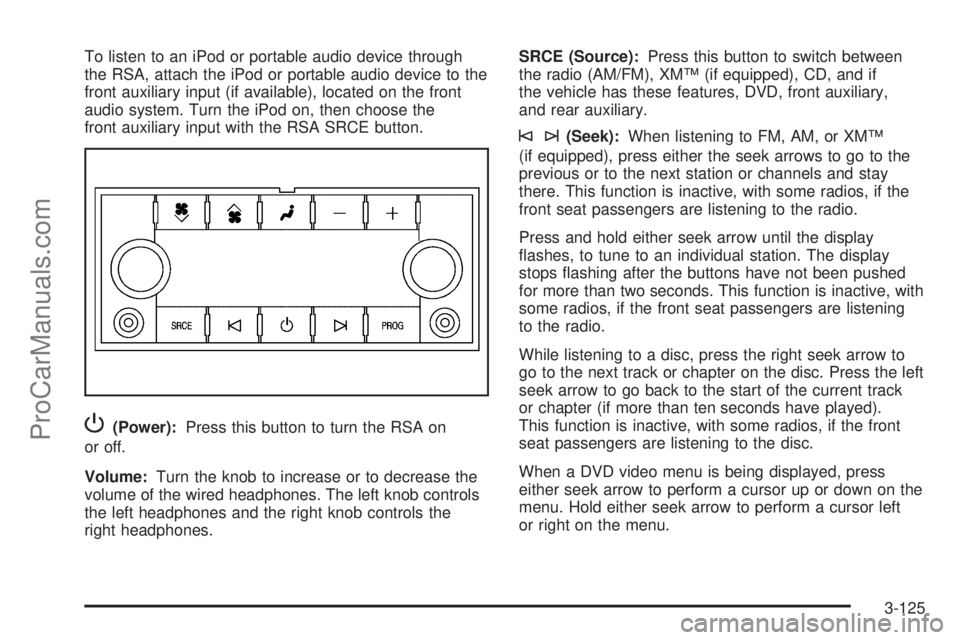
To listen to an iPod or portable audio device through
the RSA, attach the iPod or portable audio device to the
front auxiliary input (if available), located on the front
audio system. Turn the iPod on, then choose the
front auxiliary input with the RSA SRCE button.
P(Power):Press this button to turn the RSA on
or off.
Volume:Turn the knob to increase or to decrease the
volume of the wired headphones. The left knob controls
the left headphones and the right knob controls the
right headphones.SRCE (Source):Press this button to switch between
the radio (AM/FM), XM™ (if equipped), CD, and if
the vehicle has these features, DVD, front auxiliary,
and rear auxiliary.
©¨(Seek):When listening to FM, AM, or XM™
(if equipped), press either the seek arrows to go to the
previous or to the next station or channels and stay
there. This function is inactive, with some radios, if the
front seat passengers are listening to the radio.
Press and hold either seek arrow until the display
�ashes, to tune to an individual station. The display
stops �ashing after the buttons have not been pushed
for more than two seconds. This function is inactive, with
some radios, if the front seat passengers are listening
to the radio.
While listening to a disc, press the right seek arrow to
go to the next track or chapter on the disc. Press the left
seek arrow to go back to the start of the current track
or chapter (if more than ten seconds have played).
This function is inactive, with some radios, if the front
seat passengers are listening to the disc.
When a DVD video menu is being displayed, press
either seek arrow to perform a cursor up or down on the
menu. Hold either seek arrow to perform a cursor left
or right on the menu.
3-125
ProCarManuals.com
Page 272 of 488
PROG (Program):Press this button to go to the next
preset radio station or channel set on the main
radio. This function is inactive, with some radios, if the
front seat passengers are listening to the radio.
When a CD or DVD audio disc is playing, press this
button to go to the beginning of the CD or DVD audio.
This function is inactive, with some radios, if the
front seat passengers are listening to the disc.
When a disc is playing in the CD or DVD changer,
press this button to select the next disc, if multiple discs
are loaded. This function is inactive, with some radios,
if the front seat passengers are listening to the disc.
When a DVD video menu is being displayed, press the
PROG button to perform the menu function, enter.
Theft-Deterrent Feature
THEFTLOCK®is designed to discourage theft of the
vehicle’s radio. The feature works automatically by
learning a portion of the Vehicle Identi�cation Number
(VIN). If the radio is moved to a different vehicle, it does
not operate and LOC, LOCK, or LOCKED could display.
With THEFTLOCK activated, the radio does not operate
if stolen.
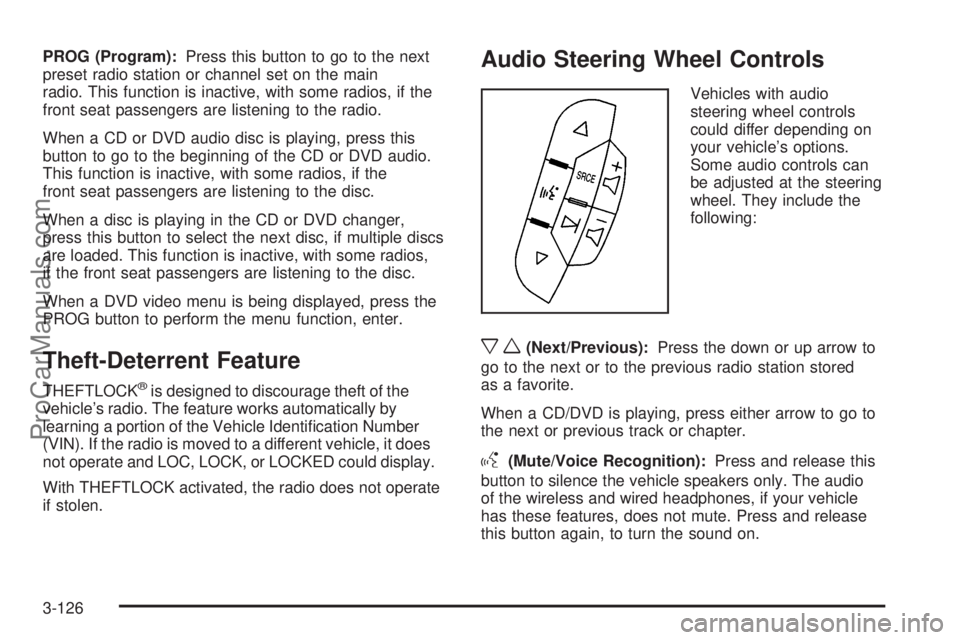
Audio Steering Wheel Controls
Vehicles with audio
steering wheel controls
could differ depending on
your vehicle’s options.
Some audio controls can
be adjusted at the steering
wheel. They include the
following:
xw(Next/Previous):Press the down or up arrow to
go to the next or to the previous radio station stored
as a favorite.
When a CD/DVD is playing, press either arrow to go to
the next or previous track or chapter.
g(Mute/Voice Recognition):Press and release this
button to silence the vehicle speakers only. The audio
of the wireless and wired headphones, if your vehicle
has these features, does not mute. Press and release
this button again, to turn the sound on.
3-126
ProCarManuals.com