lock SATURN OUTLOOK 2010 Owners Manual
[x] Cancel search | Manufacturer: SATURN, Model Year: 2010, Model line: OUTLOOK, Model: SATURN OUTLOOK 2010Pages: 444, PDF Size: 4.43 MB
Page 378 of 444

10-72 Vehicle Care
10. Remove any rust or dirt fromthe wheel bolts, mounting
surfaces, and spare wheel.
11. Place the spare tire on the wheel mounting surface.
12. Put the nuts on by hand by turning them clockwise until the
wheel is held against the
mounting surface. Make sure
the rounded end is toward the
wheel.
13. Lower the vehicle by attaching the lug wrench to the jack
and turning the wrench
counterclockwise. Lower the
jack completely.{WARNING
Wheel nuts that are improperly or
incorrectly tightened can cause
the wheels to become loose or
come off. The wheel nuts should
be tightened with a torque wrench
to the proper torque specification
after replacing. Follow the torque
specification supplied by the
aftermarket manufacturer when
using accessory locking wheel
nuts. See Capacities and
Specifications
on page 12‑2for
original equipment wheel nut
torque specifications.
Notice: Improperly tightened
wheel nuts can lead to brake
pulsation and rotor damage. To
avoid expensive brake repairs,
evenly tighten the wheel nuts in
the proper sequence and to the
proper torque specification. See
Capacities and Specifications
on
page 12‑2for the wheel nut
torque specification.
14. Tighten the wheel nuts firmly in a crisscross sequence, as
shown.
Notice: Wheel covers will not fit
on your vehicle's compact spare.
If you try to put a wheel cover on
the compact spare, the cover or
the spare could be damaged.
ProCarManuals.com
Page 381 of 444

Vehicle Care 10-75
8. Make sure the metal tube iscentered at the striker. Push the
tube toward the front of the
vehicle.
9. Close the liftgate and make sure it is latched properly.
Storing the Tools
A. Tool Bag
B. Wing Bolt
C. Jack
Put back all tools as they were
stored in the jack storage
compartment and put the
compartment cover back on.
1. Ensure that the bottom of thejack is facing toward you.
2. Turn the jack (C) on its side and place down on the holding
bracket. 3. Reinstall the wing bolt (B) by
turning clockwise.
4. To replace the cover, line up the tab at the front of the cover with
the notch in the cover opening.
Push the cover in place and
make sure that the rear clips are
in the slots and push the cover
closed.
Store the center cap or the plastic
bolt-on wheel covers until a full size
tire is put back on the vehicle. When
you replace the compact spare with
a full-size tire, reinstall the bolt-on
wheel covers or the center cap.
Hand-tighten them over the wheel
nuts, using the lug wrench.
ProCarManuals.com
Page 382 of 444

10-76 Vehicle Care
Secondary Latch System
This vehicle has an underbody
mounted tire hoist assembly that
has a secondary latch system. It is
designed to stop the compact spare
tire from suddenly falling off the
vehicle if the cable holding the
spare tire is damaged. For the
secondary latch to work, the tire
must be stowed with the valve stem
pointing down. SeeTire Changing
on page 10‑67for instructions on
storing the spare tire correctly.
{WARNING
Before beginning this procedure
read all the instructions. Failure to
read and follow the instructions
could damage the hoist assembly
and you and others could get
hurt. Read and follow the
instructions listed next. To release the spare tire from the
secondary latch:
{WARNING
Someone standing too close
during the procedure could be
injured by the jack. If the spare
tire does not slide off the jack
completely, make sure no one is
behind you or on either side of
you as you pull the jack out from
under the spare.
1. If the cable is not visible, start this procedure at Step 3.
All-Wheel-Drive Vehicle shown
2. Turn the lug wrench counterclockwise until
approximately 6 inches (15 cm)
of cable is exposed.
3. Attach the lug wrench to the jack and raise the jack at least
10 turns.
4. Place the jack under the vehicle, ahead of the rear bumper.
Position the center lift point of
the jack under the center of the
spare tire.
ProCarManuals.com
Page 383 of 444

Vehicle Care 10-77
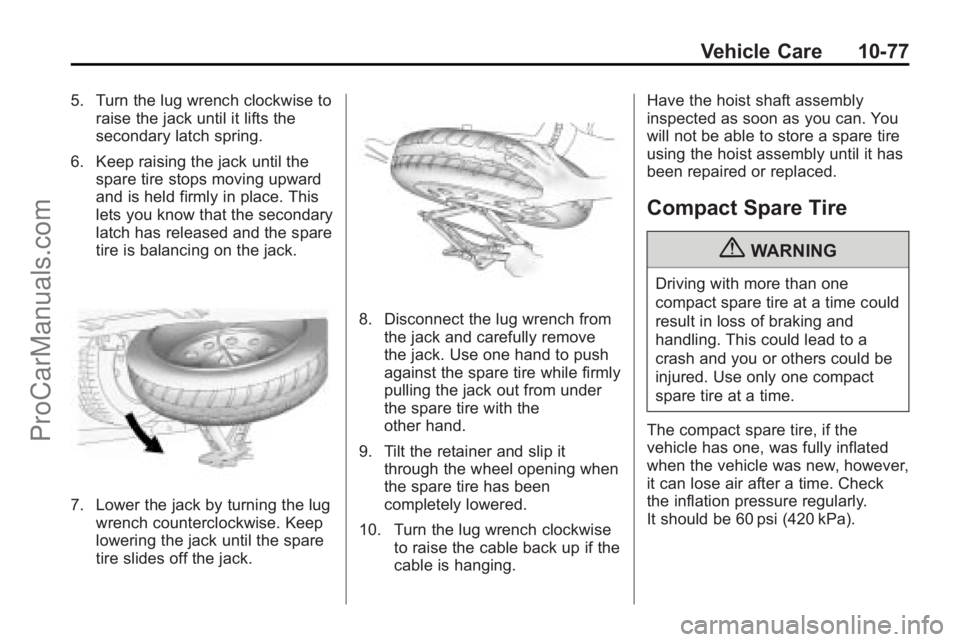
5. Turn the lug wrench clockwise toraise the jack until it lifts the
secondary latch spring.
6. Keep raising the jack until the spare tire stops moving upward
and is held firmly in place. This
lets you know that the secondary
latch has released and the spare
tire is balancing on the jack.
7. Lower the jack by turning the lugwrench counterclockwise. Keep
lowering the jack until the spare
tire slides off the jack.
8. Disconnect the lug wrench fromthe jack and carefully remove
the jack. Use one hand to push
against the spare tire while firmly
pulling the jack out from under
the spare tire with the
other hand.
9. Tilt the retainer and slip it through the wheel opening when
the spare tire has been
completely lowered.
10. Turn the lug wrench clockwise to raise the cable back up if the
cable is hanging. Have the hoist shaft assembly
inspected as soon as you can. You
will not be able to store a spare tire
using the hoist assembly until it has
been repaired or replaced.
Compact Spare Tire
{WARNING
Driving with more than one
compact spare tire at a time could
result in loss of braking and
handling. This could lead to a
crash and you or others could be
injured. Use only one compact
spare tire at a time.
The compact spare tire, if the
vehicle has one, was fully inflated
when the vehicle was new, however,
it can lose air after a time. Check
the inflation pressure regularly.
It should be 60 psi (420 kPa).
ProCarManuals.com
Page 390 of 444

10-84 Vehicle Care
Dinghy Towing
If the vehicle is front-wheel-drive, it
can be dinghy towed from the front.
These vehicles may also be towed
by putting the front wheels on a
dolly. See“Dolly Towing” later in this
section.
If the vehicle is all-wheel-drive, it
can be dinghy towed from the front.
These vehicles can also be towed
by placing them on a platform trailer
with all four wheels off of the
ground. These vehicles cannot be
towed using a dolly. For vehicles being dinghy towed,
the vehicle should be run at the
beginning of each day and at each
RV fuel stop for about five minutes.
This will ensure proper lubrication of
transmission components. Re-install
the fuse to start the vehicle.
To tow the vehicle from the front
with all four wheels on the ground:
1. Position the vehicle to be towed,
shift the transmission to
P (Park), and turn the ignition to
LOCK/OFF.
2. Secure the vehicle to the towing vehicle.
3. Set the parking brake.
4. Turn the ignition to ACC/ ACCESSORY.
5. Shift the transmission to N (Neutral). 6. To prevent the battery from
draining while the vehicle is
being towed, remove the 50 amp
BATT1 fuse from the underhood
fuse block and store in a safe
location. See Engine
Compartment Fuse Block
on
page 10‑31.
7. Release the parking brake.
Notice: If the vehicle is towed
without performing each of the
steps listed under “Dinghy
Towing,” the automatic
transmission could be damaged.
Be sure to follow all steps of the
dinghy towing procedure prior to
and after towing the vehicle.
Notice: If 105 km/h (65 mph) is
exceeded while towing the
vehicle, it could be damaged.
Never exceed 105 km/h (65 mph)
while towing the vehicle.
ProCarManuals.com
Page 391 of 444

Vehicle Care 10-85
Once the destination is reached:
1. Set the parking brake.
2. Reinstall the 50 amp BATT1 fuseto the underhood fuse block.
3. Shift the transmission to P (Park), turn the ignition to
LOCK/OFF and remove the key
from the ignition.
4. Disconnect the vehicle from the towing vehicle.
Notice: Do not tow a vehicle with
the front drive wheels on the
ground if one of the front tires is
a compact spare tire. Towing with
two different tire sizes on the
front of the vehicle can cause
severe damage to the
transmission.Dolly Towing (All-Wheel-Drive
Vehicles)
All-wheel-drive vehicles must not be
towed with two wheels on the
ground. To properly tow these
vehicles, they should be placed on
a platform trailer with all four wheels
off of the ground or dinghy towed
from the front.
Dolly Towing
(Front-Wheel-Drive
Vehicles Only)
To tow a front-wheel-drive vehicle
from the front with two wheels on
the ground:
1. Put the front wheels on a dolly.
2. Move the shift lever to P (Park).
3. Set the parking brake.
ProCarManuals.com
Page 399 of 444

Vehicle Care 10-93
Floor Mats
If the floor mat has a snap retainer,
a grommet in the driver side floor
mat attaches to a hook on the floor
of the vehicle to secure the floor
mat. To remove the floor mat, pull
the mat towards the rear of the
vehicle until the grommet can be
removed from the hook.
If the floor mat has a knob retainer,
a grommet in the floor mat attaches
to a knob on the floor of the vehicle
to secure the floor mat. To remove
the floor mat, turn the knob till it is
aligned with the slot in the floor mat
grommet and pull the floor mat up.
To reinstall, center the slot in the
floor mat grommet with the knob on
the floor and set the mat in place.
Then turn the knob until it is
perpendicular to the slot in the
grommet to lock the mat in place.
ProCarManuals.com
Page 404 of 444

11-4 Service and Maintenance
.Body hinges and latches, key
lock cylinders, hood latch
assemblies, secondary latches,
pivots, spring anchor and
release pawl, hood and door
hinges, rear folding seats, and
liftgate hinges lubrication. See
Recommended Fluids and
Lubricants
on page 11‑7. More
frequent lubrication may be
required when vehicle is
exposed to a corrosive
environment. Applying silicone
grease on weatherstrips with a
clean cloth makes them last
longer, seal better, and not stick
or squeak.
.Restraint system component
check. See Safety System
Check on page 3‑28.
.Engine air cleaner filter
inspection. See Engine Air
Cleaner/Filter on page 10‑12.
Additional Required Services
At Each Fuel Stop
.Engine oil level check. See
Engine Oil on page 10‑8.
.Engine coolant level check. See
Engine Coolant on page 10‑14.
.Windshield washer fluid level
check. See Washer Fluidon
page 10‑21.
Once a Month
.Tire inflation check. See Tire
Pressure on page 10‑43.
.Tire wear inspection. See Tire
Inspection on page 10‑49.
Once a Year
.See Starter Switch Checkon
page 10‑25.
.See Automatic Transmission
Shift Lock Control System
Check on page 10‑25.
.See Ignition Transmission Lock
Check on page 10‑26.
.See Park Brake and P (Park)
Mechanism Checkon
page 10‑26.
.Engine cooling system and
pressure cap pressure check.
Radiator and air conditioning
condenser outside cleaning. See
Cooling System on page 10‑14.
.Exhaust system and nearby heat
shields inspection for loose or
damaged components.
.Accelerator pedal check for
damage, high effort, or binding.
Replace if needed.
.If the vehicle has a Tire Sealant
and Compressor Kit, check the
sealant expiration date printed
on the instruction label of the kit.
See Tire Sealant and
Compressor Kit on page 10‑59.
ProCarManuals.com
Page 407 of 444

Service and Maintenance 11-7
Recommended Fluids, Lubricants, and Parts
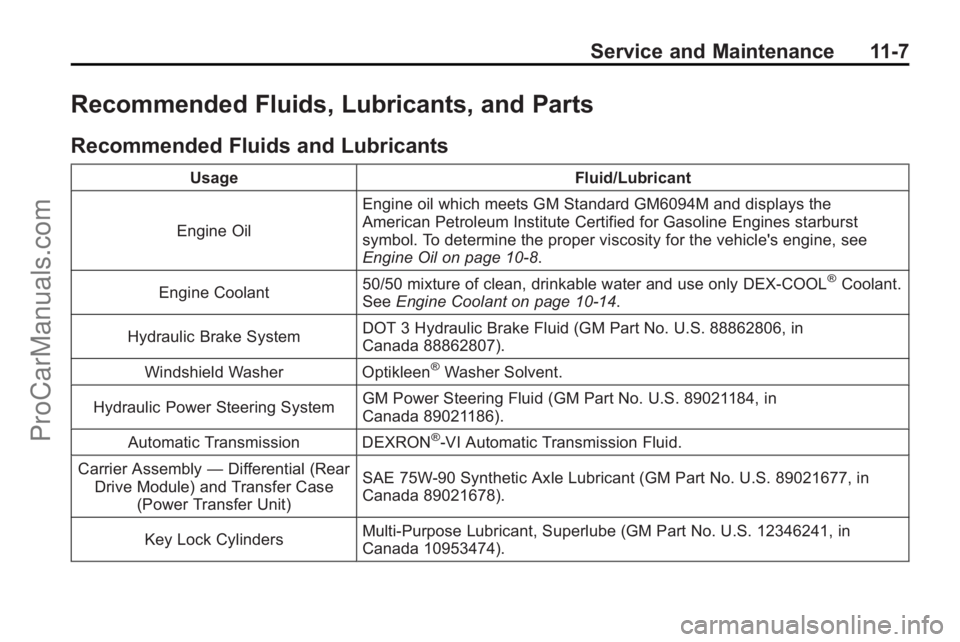
Recommended Fluids and Lubricants
UsageFluid/Lubricant
Engine Oil Engine oil which meets GM Standard GM6094M and displays the
American Petroleum Institute Certified for Gasoline Engines starburst
symbol. To determine the proper viscosity for the vehicle's engine, see
Engine Oil on page 10‑8.
Engine Coolant 50/50 mixture of clean, drinkable water and use only DEX-COOL
®Coolant.
See Engine Coolant on page 10‑14.
Hydraulic Brake System DOT 3 Hydraulic Brake Fluid (GM Part No. U.S. 88862806, in
Canada 88862807).
Windshield Washer Optikleen
®Washer Solvent.
Hydraulic Power Steering System GM Power Steering Fluid (GM Part No. U.S. 89021184, in
Canada 89021186).
Automatic Transmission DEXRON
®-VI Automatic Transmission Fluid.
Carrier Assembly —Differential (Rear
Drive Module) and Transfer Case (Power Transfer Unit) SAE 75W-90 Synthetic Axle Lubricant (GM Part No. U.S. 89021677, in
Canada 89021678).
Key Lock Cylinders Multi-Purpose Lubricant, Superlube (GM Part No. U.S. 12346241, in
Canada 10953474).
ProCarManuals.com
Page 422 of 444

13-6 Customer Information
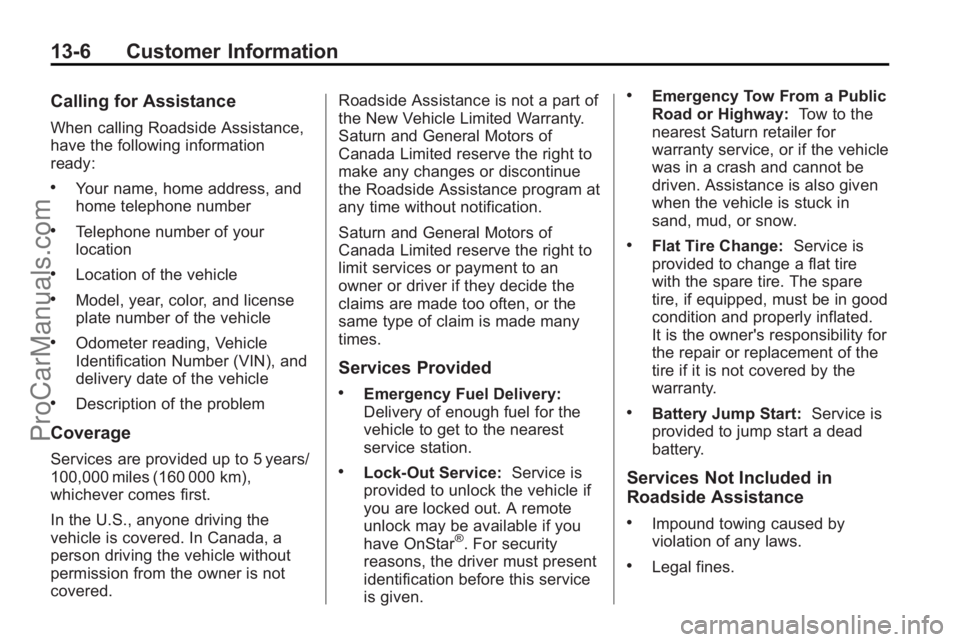
Calling for Assistance
When calling Roadside Assistance,
have the following information
ready:
.Your name, home address, and
home telephone number
.Telephone number of your
location
.Location of the vehicle
.Model, year, color, and license
plate number of the vehicle
.Odometer reading, Vehicle
Identification Number (VIN), and
delivery date of the vehicle
.Description of the problem
Coverage
Services are provided up to 5 years/
100,000 miles (160 000 km),
whichever comes first.
In the U.S., anyone driving the
vehicle is covered. In Canada, a
person driving the vehicle without
permission from the owner is not
covered.Roadside Assistance is not a part of
the New Vehicle Limited Warranty.
Saturn and General Motors of
Canada Limited reserve the right to
make any changes or discontinue
the Roadside Assistance program at
any time without notification.
Saturn and General Motors of
Canada Limited reserve the right to
limit services or payment to an
owner or driver if they decide the
claims are made too often, or the
same type of claim is made many
times.
Services Provided
.Emergency Fuel Delivery:
Delivery of enough fuel for the
vehicle to get to the nearest
service station.
.Lock-Out Service:
Service is
provided to unlock the vehicle if
you are locked out. A remote
unlock may be available if you
have OnStar
®. For security
reasons, the driver must present
identification before this service
is given.
.Emergency Tow From a Public
Road or Highway: Tow to the
nearest Saturn retailer for
warranty service, or if the vehicle
was in a crash and cannot be
driven. Assistance is also given
when the vehicle is stuck in
sand, mud, or snow.
.Flat Tire Change: Service is
provided to change a flat tire
with the spare tire. The spare
tire, if equipped, must be in good
condition and properly inflated.
It is the owner's responsibility for
the repair or replacement of the
tire if it is not covered by the
warranty.
.Battery Jump Start: Service is
provided to jump start a dead
battery.
Services Not Included in
Roadside Assistance
.Impound towing caused by
violation of any laws.
.Legal fines.
ProCarManuals.com