climate control SATURN OUTLOOK 2010 User Guide
[x] Cancel search | Manufacturer: SATURN, Model Year: 2010, Model line: OUTLOOK, Model: SATURN OUTLOOK 2010Pages: 444, PDF Size: 4.43 MB
Page 47 of 444
Keys, Doors and Windows 2-17
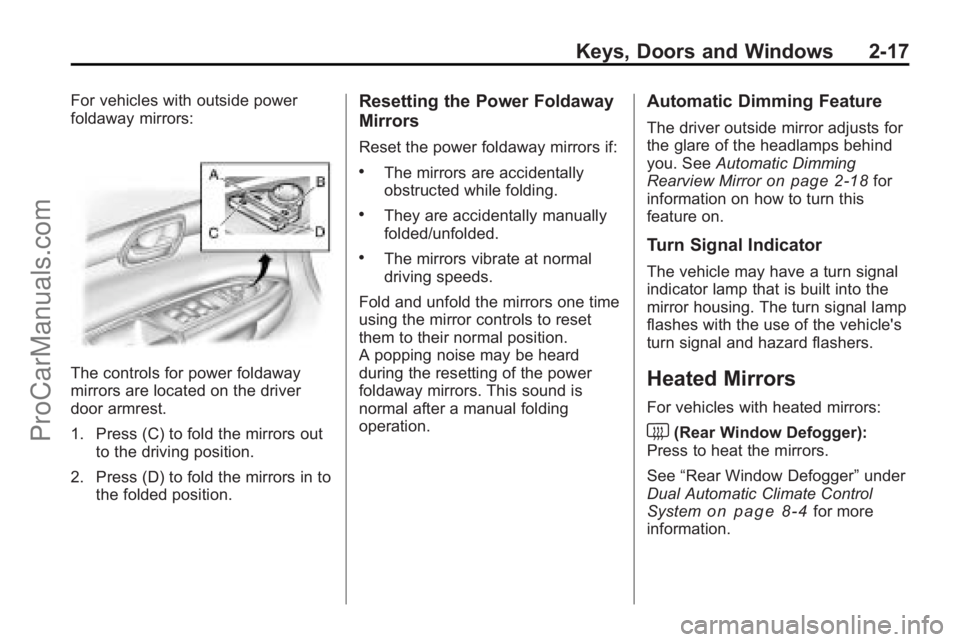
For vehicles with outside power
foldaway mirrors:
The controls for power foldaway
mirrors are located on the driver
door armrest.
1. Press (C) to fold the mirrors outto the driving position.
2. Press (D) to fold the mirrors in to the folded position.
Resetting the Power Foldaway
Mirrors
Reset the power foldaway mirrors if:
.The mirrors are accidentally
obstructed while folding.
.They are accidentally manually
folded/unfolded.
.The mirrors vibrate at normal
driving speeds.
Fold and unfold the mirrors one time
using the mirror controls to reset
them to their normal position.
A popping noise may be heard
during the resetting of the power
foldaway mirrors. This sound is
normal after a manual folding
operation.
Automatic Dimming Feature
The driver outside mirror adjusts for
the glare of the headlamps behind
you. See Automatic Dimming
Rearview Mirror
on page 2‑18for
information on how to turn this
feature on.
Turn Signal Indicator
The vehicle may have a turn signal
indicator lamp that is built into the
mirror housing. The turn signal lamp
flashes with the use of the vehicle's
turn signal and hazard flashers.
Heated Mirrors
For vehicles with heated mirrors:
<(Rear Window Defogger):
Press to heat the mirrors.
See “Rear Window Defogger” under
Dual Automatic Climate Control
System
on page 8‑4for more
information.
ProCarManuals.com
Page 63 of 444

Seats and Restraints 3-9
On vehicles with the heated and
ventilated seat feature, the controls
are located on the front doors near
the door handle.
H(Ventilated Seat):Press to
ventilate the entire seat.
This symbol appears on the climate
control display to indicate that the
feature is on.
z(Heated Seat and Seatback):
Press to heat the entire seat.
This symbol appears on the climate
control display to indicate that the
feature is on. For either feature press the button
once for the highest setting. With
each press of the switch, the seat
changes to the next lower setting,
and then the off setting. The lights
indicate three for the highest setting
and one for the lowest.
The heated and ventilated seats are
canceled after the ignition is turned
off. To use the heated and ventilated
seat feature after the vehicle is
started, you will need to press the
appropriate seat button again.
Rear Seats
A. Seat Adjustment Handle
B. Reclining Seatback Strap
C. Sliding Seat Lever
ProCarManuals.com
Page 128 of 444
5-6 Instruments and Controls
ignition key must be in ACC/
ACCESSORY or ON/RUN for this to
work. SeeWasher Fluid
on
page 10‑21Windshield Washer
Fluid .
{WARNING
In freezing weather, do not use
your washer until the windshield
is warmed. Otherwise the washer
fluid can form ice on the
windshield, blocking your vision.
WASHER FLUID LOW ADD FLUID
is displayed on the Driver
Information Center (DIC) when the
washer fluid is low. See Washer
Fluid Messages on page 5‑41.
Rear Window Wiper/
Washer
The rear wiper and rear wash button
is located on the instrument panel
below the climate control system.
Z (Rear Wiper): Press to turn the
rear wiper on and off. The wiper
speed cannot be changed.
Y (Wash): Press to spray washer
fluid on the rear window. The
window wiper will also come on.
Release the button when enough
fluid has been sprayed on the
window. The rear wiper will run a
few more cycles after it is released.
If the rear wiper function was
already on, prior to pressing the
wash button, it stays on until the
wiper button is pressed again.
The rear window washer uses the
same fluid that is in the windshield
washer reservoir. See Washer Fluid
on page 10‑21.
Compass
Your vehicle may have a compass
in the Driver Information Center
(DIC). SeeDriver Information
Center (DIC) (With DIC Buttons)
on
page 5‑24or Driver Information
Center (DIC) (Without DIC Buttons)
on page 5‑30for more information
about the DIC.
Compass Zone
The zone is set to zone eight upon
leaving the factory. Your dealer/
retailer will set the correct zone for
your location.
Under certain circumstances, such
as during a long distance
cross-country trip or moving to a
new state or province, it will be
necessary to compensate for
compass variance by resetting the
zone through the DIC if the zone is
not set correctly.
ProCarManuals.com
Page 130 of 444
5-8 Instruments and Controls
If the DIC display does not show a
heading, for example, N for North,
or the heading does not change
after making turns, there may be a
strong magnetic field interfering with
the compass. Such interference
may be caused by a magnetic CB or
cell phone antenna mount, a
magnetic emergency light, magnetic
note pad holder, or any other
magnetic item. Turn off the vehicle,
move the magnetic item, then turn
on the vehicle and calibrate the
compass.
To calibrate the compass, use the
following procedure:
Compass Calibration Procedure
1. Before calibrating the compass,make sure the compass zone is
set to the variance zone in which
the vehicle is located. See
“Compass Variance (Zone)
Procedure” earlier in this
section. Do not operate any switches
such as window, sunroof,
climate controls, seats, etc.
during the calibration procedure.
2. Press the vehicle information button until PRESS
VTO
CALIBRATE COMPASS
displays.
3. Press the set/reset button to start the compass calibration.
4. The DIC will display CALIBRATING: DRIVE IN
CIRCLES. Drive the vehicle in
tight circles at less than 5 mph
(8 km/h) to complete the
calibration. The DIC will display
CALIBRATION COMPLETE for a
few seconds when the
calibration is complete. The DIC
display will then return to the
previous menu.
Clock
To adjust the time and date:
1. Turn the ignition key to ACC/ACCESSORY or ON/RUN, then
press
O, to turn the radio on.
2. Press
Gto display HR, MIN,
MM, DD, YYYY (hour, minute,
month, day, and year).
3. Press the pushbutton located under any one of the labels to be
changed.
4. To increase the time or date, do one of the following:
.Press the pushbutton below
the selected label.
.Press¨SEEK.
.Press\FWD.
.Turnfclockwise.
ProCarManuals.com
Page 131 of 444
Instruments and Controls 5-9
5. To decrease the time or date, doone of the following:
.Press©SEEK.
.PresssREV.
.Turnfcounter-clockwise.
To change the time default setting
from 12 hour to 24 hour or to
change the date default setting from
month/day/year to day/month/year:
1. Press
Gand then the
pushbutton located under the
forward arrow that displays on
the radio screen until the time
12H (hour) and 24H (hour), and
the date MM/DD (month and
day) and DD/MM (day and
month) displays.
2. Press the pushbutton located under the desired option.
3. Press
Gagain to apply the
selected default, or let the
screen time out.
Power Outlets
The vehicle has three 12-volt outlets
which can be used to plug in
electrical equipment, such as a
cellular telephone, a compact disc
player, etc.
The power outlets are located on
the instrument panel below the
climate controls, at the rear of the
center console, and in the rear
cargo area. Lift the cover to access
the outlet. Close the cover when not
using the outlet.
Notice: Leaving electrical
equipment plugged in for an
extended period of time while the
vehicle is off will drain the
battery. Power is always supplied
to the outlets. Always unplug
electrical equipment when not in
use and do not plug in equipment
that exceeds the maximum
20 ampere rating. Certain accessory plugs may not be
compatible to the accessory power
outlet and could result in blown
vehicle and adapter fuses. If a
problem is experienced, see your
dealer/retailer for additional
information on the power accessory
outlets.
Notice:
Adding any electrical
equipment to the vehicle can
damage it or keep other
components from working as
they should. The repairs would
not be covered by the vehicle
warranty. Do not use equipment
exceeding maximum amperage
rating of 20 amperes. Check with
your dealer/retailer before adding
electrical equipment.
ProCarManuals.com
Page 161 of 444
Instruments and Controls 5-39
THEFT ATTEMPTED
This message displays if the content
theft-deterrent system has detected
a break-in attempt while you were
away from your vehicle. See
Anti-Theft Alarm System
on
page 2‑13for more information.
Service Vehicle Messages
SERVICE A/C (Air
Conditioning) SYSTEM
This message displays when the
electronic sensors that control the
air conditioning and heating
systems are no longer working.
Have the climate control system
serviced by your dealer/retailer if
you notice a drop in heating and air
conditioning efficiency.
SERVICE POWER STEERING
This message displays when a
problem is detected with the power
steering system. When this
message is displayed, you may
notice that the effort required to
steer the vehicle increases or feels heavier, but you will still be able to
steer the vehicle. Have your vehicle
serviced by your dealer/retailer
immediately.
SERVICE VEHICLE SOON
This message displays when a
non-emissions related malfunction
occurs. Have the vehicle serviced
by your dealer/retailer as soon as
possible.
STARTING DISABLED
SERVICE THROTTLE
This message displays when your
vehicle's throttle system is not
functioning properly. Have your
vehicle serviced by your dealer/
retailer.
Tire Messages
TIRE LOW ADD AIR TO TIRE
On vehicles with the Tire Pressure
Monitor System (TPMS), this
message displays when the
pressure in one or more of the
vehicle's tires is low.
This message also displays LEFT
FRT (left front), RIGHT FRT (right
front), LEFT RR (left rear),
or RIGHT RR (right rear) to indicate
the location of the low tire.
The low tire pressure warning light
will also come on. See
Tire
Pressure Light on page 5‑22.
If a tire pressure message appears
on the DIC, stop as soon as you
can. Inflate the tires by adding air
until the tire pressure is equal to the
values shown on the Tire Loading
Information label. See Tires
on
page 10‑37, Vehicle Load Limitson
page 9‑10, and Tire Pressureon
page 10‑43.
You can receive more than one tire
pressure message at a time. To
read the other messages that may
have been sent at the same time,
press the set/reset button or the trip
odometer reset stem. The DIC also
shows the tire pressure values. See
Driver Information Center (DIC)
(With DIC Buttons)
on page 5‑24or
ProCarManuals.com
Page 183 of 444

Lighting 6-7
Delayed Exit Lighting
Delayed exit lighting illuminates the
interior for a period of time after the
key is removed from the ignition.
The ignition must be off for delayed
exit lighting to work. When the key
is removed, interior illumination
activates and remains on until one
of the following occurs:
.The ignition is in ON/RUN.
.The power door locks are
activated.
.An illumination period of
20 seconds has elapsed.
If during the illumination period a
door is opened, the timed
illumination period will be canceled
and the interior lamps will remain on
because a door is open.
Parade Dimming
This feature automatically prohibits
the dimming of the instrument panel
displays in daylight while the
headlamps are on so that the
displays are still able to be seen.
Battery Load
Management
The vehicle has Electric Power
Management (EPM) that estimates
the battery's temperature and state
of charge. It then adjusts the voltage
for best performance and extended
life of the battery.
When the battery's state of charge
is low, the voltage is raised slightly
to quickly bring the charge back up.
When the state of charge is high,
the voltage is lowered slightly to
prevent overcharging. If the vehicle has a voltmeter gage or a voltage
display on the Driver Information
Center (DIC), you may see the
voltage move up or down. This is
normal. If there is a problem, an
alert will be displayed.
The battery can be discharged at
idle if the electrical loads are very
high. This is true for all vehicles.
This is because the generator
(alternator) may not be spinning fast
enough at idle to produce all the
power that is needed for very high
electrical loads.
A high electrical load occurs when
several of the following are on, such
as: headlamps, high beams, fog
lamps, rear window defogger,
climate control fan at high speed,
heated seats, engine cooling fans,
trailer loads, and loads plugged into
accessory power outlets.
ProCarManuals.com
Page 241 of 444

Climate Controls 8-1
Climate Controls
Climate Control Systems
Climate Control Systems . . . . . . 8-1
Dual Automatic Climate ControlSystem . . . . . . . . . . . . . . . . . . . . . . 8-4
Rear Climate Control System (Rear Climate
Control Only) . . . . . . . . . . . . . . . 8-10
Rear Climate Control System (Rear Climate with Rear Seat
Audio) . . . . . . . . . . . . . . . . . . . . . . 8-11
Air Vents
Air Vents . . . . . . . . . . . . . . . . . . . . . 8-12
Climate Control Systems
The heating, cooling, and ventilation in the vehicle can be controlled with
this system.
A. Fan Control
B. Temperature Control
C. Air Delivery Mode Control
D. Air Conditioning E. REAR (Rear Climate Control)
F. Recirculation
G. Rear Window Defogger
ProCarManuals.com
Page 242 of 444

8-2 Climate Controls
9(Off):Turn the fan control all the
way counterclockwise to turn the
front climate control system off.
9(Fan Control): Turn clockwise
or counterclockwise to increase or
decrease the fan speed.
Temperature Control: Turn
clockwise or counterclockwise to
increase or decrease the
temperature of the air flowing from
the system.
Air Delivery Mode Control: Turn
clockwise or counterclockwise to
change the current airflow mode.
By positioning the right knob
between two modes, a combination
of those two modes is selected.
H(Vent): Air is directed to the
instrument panel outlets.
)(Bi-Level): Air is divided
between the instrument panel and
floor outlets. Some air is directed
towards the windshield and side
window outlets. Cooler air is
directed to the upper outlets and
warmer air to the floor outlets.
6(Floor): Air is directed to the
floor outlets, with some of the air
directed to the windshield, side
window, and second row floor
outlets. In this mode, the system
automatically selects outside air.
Recirculation cannot be selected
while in floor mode.
-(Defog): This clears the
windows of fog or moisture. Air is
directed to the windshield, floor
outlets, and side window vents.
When this mode is selected, the
system turns off recirculation and
runs the air conditioning unless the
outside temperature is less than 4°C
(40°F). Recirculation cannot be
selected while in the defog mode.
Do not drive the vehicle until all the
windows are clear.
0(Defrost): This clears the
windshield of fog or frost, more
quickly. Air is directed to the
windshield and side window vents,
with some to the floor vents. In this
mode, outside air is pulled inside
the vehicle. Recirculation cannot be
selected while in the defrost mode.
The air conditioning system runs
automatically in this setting, unless
the outside temperature is less than
4°C (40°F). Do not drive the vehicle
until all the windows are clear.
#(Air Conditioning): Press to
turn the air conditioning system on
or off. An indicator light comes on
when A/C is on. The air conditioning
system does not operate when the
outside temperature is below 4°C
(40°F). The indicator light flashes
three times and turns off when
outside conditions affect air
conditioning operation. This is
normal.
ProCarManuals.com
Page 243 of 444

Climate Controls 8-3
For quicker cool down on hot days:
1. Open the windows to let hot airescape.
2. Select
Hmode.
3. Select
#.
4. Select the coolest temperature.
5. Select the highest fan speed.
6. Close the windows after the hot air has escaped.
7. Once the vehicle's interior temperature is below the outside
temperature, select
@mode
for faster cooling.
Using recirculation for long periods
of time could cause the air inside of
the vehicle to become too dry. To
prevent this from happening, after
the inside of the vehicle has cooled,
turn the recirculation mode off.
The air conditioning system
removes moisture from the air, so
water might drip under the vehicle
while idling or after turning off the
engine. This is normal.
@(Recirculation): Press to turn
the recirculation mode on or off. An
indicator light comes on when
recirculation is on. When the engine
is turned off, the recirculation mode
automatically turns off and must be
re-selected when the engine is
turned on again.
This mode recirculates and helps to
quickly cool the air inside the
vehicle. It can be used to prevent
outside air and odors from entering
the vehicle.
The recirculation mode cannot be
used with floor, defrost, or defogging
modes. If recirculation is selected in
these modes, the indicator flashes
three times and turns off. The air
conditioning also comes on when
this mode is activated unless the
outside air temperature is less than
4°C (40°F). While in recirculation
mode the windows can fog when
the weather is cold and damp. To
clear the fog, select either the defog
or defrost mode and increase the
fan speed. REAR (Rear Climate Control):
Press to turn the rear heating and
air conditioning on or off. See
Rear
Climate Control System (Rear
Climate Control Only)
on page 8‑10or Rear Climate Control System
(Rear Climate with Rear Seat Audio)
on page 8‑11.
Rear Window Defogger
The rear window defogger uses a
warming grid to remove fog from the
rear window.
<(Rear Window Defogger):
Press to turn the rear window
defogger on or off. The rear window
defogger stays on for about
10 minutes, before automatically
turning off. The defogger will also
turn off when the engine is
turned off.
ProCarManuals.com