remote control SATURN OUTLOOK 2010 Service Manual
[x] Cancel search | Manufacturer: SATURN, Model Year: 2010, Model line: OUTLOOK, Model: SATURN OUTLOOK 2010Pages: 444, PDF Size: 4.43 MB
Page 221 of 444
Infotainment System 7-37
Audio/Video (A/V) Jacks
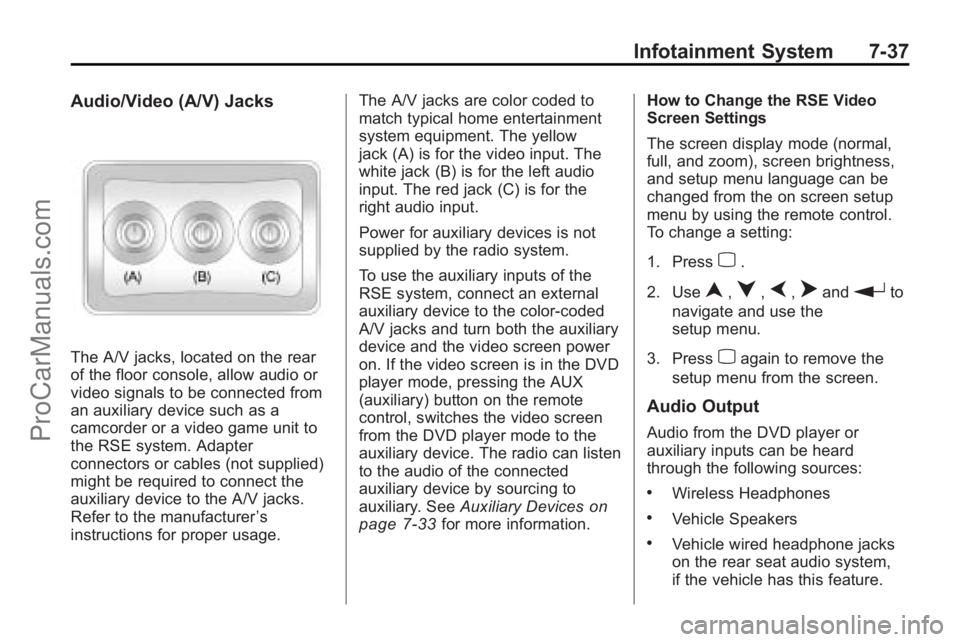
The A/V jacks, located on the rear
of the floor console, allow audio or
video signals to be connected from
an auxiliary device such as a
camcorder or a video game unit to
the RSE system. Adapter
connectors or cables (not supplied)
might be required to connect the
auxiliary device to the A/V jacks.
Refer to the manufacturer’s
instructions for proper usage. The A/V jacks are color coded to
match typical home entertainment
system equipment. The yellow
jack (A) is for the video input. The
white jack (B) is for the left audio
input. The red jack (C) is for the
right audio input.
Power for auxiliary devices is not
supplied by the radio system.
To use the auxiliary inputs of the
RSE system, connect an external
auxiliary device to the color-coded
A/V jacks and turn both the auxiliary
device and the video screen power
on. If the video screen is in the DVD
player mode, pressing the AUX
(auxiliary) button on the remote
control, switches the video screen
from the DVD player mode to the
auxiliary device. The radio can listen
to the audio of the connected
auxiliary device by sourcing to
auxiliary. See
Auxiliary Devices
on
page 7‑33for more information. How to Change the RSE Video
Screen Settings
The screen display mode (normal,
full, and zoom), screen brightness,
and setup menu language can be
changed from the on screen setup
menu by using the remote control.
To change a setting:
1. Press
z.
2. Use
n,q,p,oandrto
navigate and use the
setup menu.
3. Press
zagain to remove the
setup menu from the screen.
Audio Output
Audio from the DVD player or
auxiliary inputs can be heard
through the following sources:
.Wireless Headphones
.Vehicle Speakers
.Vehicle wired headphone jacks
on the rear seat audio system,
if the vehicle has this feature.
ProCarManuals.com
Page 222 of 444
7-38 Infotainment System
The RSE system always transmits
the audio signal to the wireless
headphones, if there is audio
available. See“Headphones” earlier
in this section for more information.
The DVD player is capable of
outputting audio to the wired
headphone jacks on the RSA
system, if the vehicle has this
feature. The DVD player can be
selected as an audio source on the
RSA system. See Rear Seat Audio
(RSA) System
on page 7‑43for
more information.
When a device is connected to the
A/V jacks, or the radio's auxiliary
input jack, if the vehicle has this
feature, the rear seat passengers
are able to hear audio from the
auxiliary device through the wireless
or wired headphones. The front seat
passengers are able to listen to
playback from this device through
the vehicle speakers by selecting
AUX as the source on the radio.
Video Screen
The video screen is located in the
overhead console. When the video
screen is not in use, push it up into
its locked position.
To use the video screen:
1. Push the release button located on the overhead console.
2. Move the screen to the desired position.
If a DVD is playing and the screen
is raised to its locked position, the
screen remains on; this is normal,
and the DVD continues to play
through the previous audio source.
Press
Pon the remote control or
eject the disc to turn off the screen.
The infrared receivers for the
wireless headphones and the
remote control are located at the
rear of the overhead console. Notice:
Avoid directly touching
the video screen, as damage may
occur. See “Cleaning the Video
Screen” later in this section for
more information.
Remote Control
To use the remote control, aim it at
the transmitter window at the rear of
the overhead console and press the
desired button. Direct sunlight or
very bright light could affect the
ability of the RSE transmitter to
receive signals from the remote
control. If the remote control does
not seem to be working, the
batteries might need to be replaced.
See “Battery Replacement” later in
this section. Objects blocking the
line of sight could also affect the
function of the remote control.
ProCarManuals.com
Page 223 of 444
Infotainment System 7-39
If a CD or DVD is in the Radio DVD
slot, the remote control
Obutton
can be used to turn on the video
screen display and start the disc.
The radio can also turn on the video
screen display. See Operation
on
page 7‑2for more information.
Notice: Storing the remote
control in a hot area or in direct
sunlight can damage it, and the
repairs will not be covered by the
warranty. Storage in extreme cold
can weaken the batteries. Keep
the remote control stored in a
cool, dry place.
Remote Control Buttons
O(Power): Press to turn the
video screen on and off.
P(Illumination): Press to turn the
remote control backlight on. The
backlight automatically times out
after seven to ten seconds if no
other button is pressed while the
backlight is on.
v(Title): Press to return the DVD
to the main menu of the DVD. This
function could vary for each disc.
y(Main Menu): Press to access
the DVD menu. The DVD menu is
different on every DVD. Use the
navigation arrows to move the
cursor around the DVD menu.
After making a selection press the
enter button. This button only
operates when using a DVD.
n,q,p,o(Menu Navigation
Arrows): Use the arrow buttons to
navigate through a menu.
r(Enter): Press to select the
choice that is highlighted in
any menu.
z(Display Menu): Press to adjust
the brightness, screen display mode
(normal, full, or zoom), and display
the language menu.
q(Return): Press to exit the
current active menu and return to
the previous menu. This button
operates only when the display
menu or a DVD menu is active.
c(Stop): Press to stop playing,
rewinding, or fast forwarding a DVD.
Press twice to return to the
beginning of the DVD.
s(Play/Pause): Press to start
playing a DVD. Press while a DVD
is playing to pause it. Press again to
continue playing the DVD.
When the DVD is playing,
depending on the radio, play may
be slowed down by pressing
sthen[. The DVD continues
playing in a slow play mode.
Depending on the radio, perform
reverse slow play by pressing
sthenr. To cancel slow play
mode, press
sagain.
ProCarManuals.com
Page 224 of 444
7-40 Infotainment System
t(Previous Track/Chapter):
Press to return to the start of the
current track or chapter. Press again
to go to the previous track or
chapter. This button might not work
when the DVD is playing the
copyright information or the
previews.
u(Next Track/Chapter): Press to
go to the beginning of the next
chapter or track. This button might
not work when the DVD is playing
the copyright information or the
previews.
r(Fast Reverse): Press to
quickly reverse the DVD or CD. To
stop fast reversing a DVD video,
press
s. To stop fast reversing a
DVD audio or CD, release
r. This
button might not work when the
DVD is playing the copyright
information or the previews.
[(Fast Forward): Press to fast
forward the DVD or CD. To stop fast
forwarding a DVD video, press
s. To stop fast forwarding a DVD
audio or CD, release
[. This
button might not work when the
DVD is playing the copyright
information or the previews.
e(Audio): Press to change audio
tracks on DVDs that have this
feature when the DVD is playing.
The format and content of this
function vary for each disc.
{(Subtitles): Press to turn ON/
OFF subtitles and to move through
subtitle options when a DVD is
playing. The format and content of
this function vary for each disc.
AUX (Auxiliary): Press to switch
the system between the DVD player
and an auxiliary source.
d(Camera): Press to change
camera angles on DVDs that have
this feature when a DVD is playing.
The format and content of this
function vary for each disc.
1 through 0 (Numeric Keypad):
The numeric keypad provides the
capability of direct chapter or track
number selection.
\(Clear): Press within
three seconds after entering a
numeric selection, to clear all
numerical inputs.
}10 (Double Digit Entries): Press
to select chapter or track numbers
greater than nine. Press this button
before entering the number.
If the remote control becomes lost
or damaged, a new universal
remote control can be purchased.
If this happens, make sure the
universal remote control uses a
Toshiba
®code set.
ProCarManuals.com
Page 225 of 444
Infotainment System 7-41
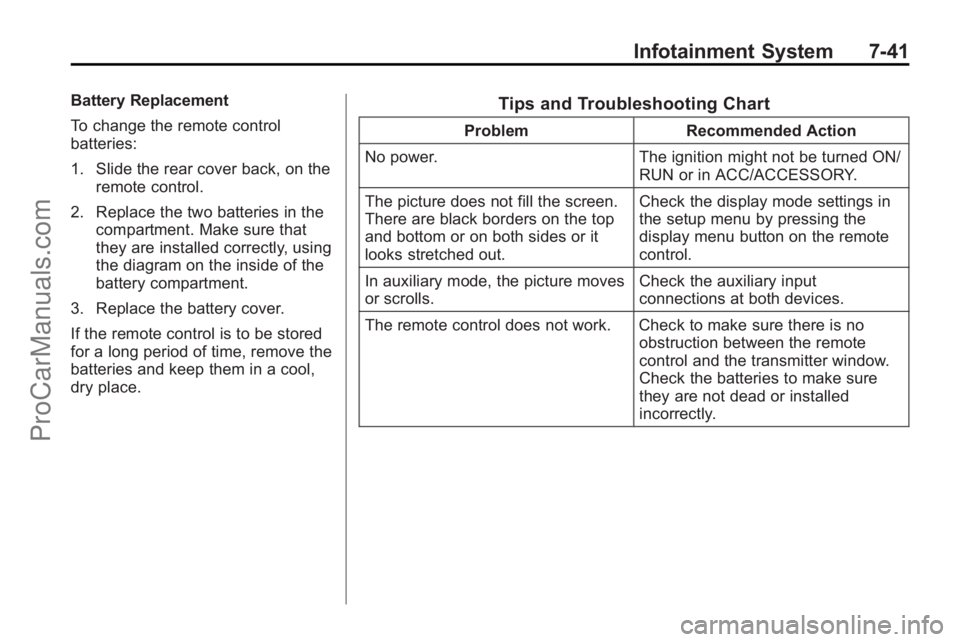
Battery Replacement
To change the remote control
batteries:
1. Slide the rear cover back, on theremote control.
2. Replace the two batteries in the compartment. Make sure that
they are installed correctly, using
the diagram on the inside of the
battery compartment.
3. Replace the battery cover.
If the remote control is to be stored
for a long period of time, remove the
batteries and keep them in a cool,
dry place.Tips and Troubleshooting Chart
Problem Recommended Action
No power. The ignition might not be turned ON/
RUN or in ACC/ACCESSORY.
The picture does not fill the screen.
There are black borders on the top
and bottom or on both sides or it
looks stretched out. Check the display mode settings in
the setup menu by pressing the
display menu button on the remote
control.
In auxiliary mode, the picture moves
or scrolls. Check the auxiliary input
connections at both devices.
The remote control does not work. Check to make sure there is no obstruction between the remote
control and the transmitter window.
Check the batteries to make sure
they are not dead or installed
incorrectly.
ProCarManuals.com
Page 305 of 444

Driving and Operating 9-53
Trailer Wiring Harness
Basic Trailer Wiring
The trailer wiring harness, with a
seven-pin connector, is located at
the rear of the vehicle and is tied to
the vehicle's frame. The harness
connector can be plugged into a
seven-pin universal heavy-duty
trailer connector available through
your dealer/retailer.
The seven-wire harness contains
the following trailer circuits:
.Yellow: Left Stop/Turn Signal
.Dark Green: Right Stop/Turn
Signal
.Brown: Taillamps
.Black: Ground
.Light Green: Back-up Lamps
.Red/Black: Battery Feed
.Dark Blue: Trailer Brake**The fuse for this circuit is installed
in the underhood electrical center,
but the wires are not connected.
They should be connected by your
dealer/retailer or a qualified service
center.
If the back-up lamp circuit is not
functional, contact your dealer/
retailer.
If a remote (non-vehicle) battery is
being charged, press the Tow/Haul
mode switch located on the center
console near the climate controls.
This will boost the vehicle system
voltage and properly charge the
battery. If the trailer is too light for
Tow/Haul mode, turn on the
headlamps (Non-HID only) as a
second way to boost the vehicle
system and charge the battery.
Electric Trailer Brake Control
Wiring Provisions
These wiring provisions for an
electric trailer brake controller are
included with the vehicle as part of
the trailer wiring package. The
instrument panel contains blunt cut
wires behind the steering column for
the electric trailer brake controller.
The harness contains the following
wires:
.Red/Black: Power Supply
.White: Brake Switch Signal
.Gray: Illumination
.Dark Blue: Trailer Brake Signal
.Black: Ground
The electric trailer brake controller
should be installed by your dealer/
retailer or a qualified service center.
ProCarManuals.com
Page 309 of 444

Vehicle Care 10-3
California Proposition
65 Warning
Most motor vehicles, including this
one, contain and/or emit chemicals
known to the State of California to
cause cancer and birth defects or
other reproductive harm. Engine
exhaust, many parts and systems,
many fluids, and some component
wear by-products contain and/or
emit these chemicals.
California Perchlorate
Materials Requirements
Certain types of automotive
applications, such as airbag
initiators, seat belt pretensioners,
and lithium batteries contained in
remote keyless transmitters, may
contain perchlorate materials.
Special handling may be necessary.
For additional information, see
www.dtsc.ca.gov/hazardouswaste/
perchlorate.
Accessories and
Modifications
Adding non-dealer/non-retailer
accessories to the vehicle can affect
vehicle performance and safety,
including such things as airbags,
braking, stability, ride and handling,
emissions systems, aerodynamics,
durability, and electronic systems
like antilock brakes, traction control,
and stability control. Some of these
accessories could even cause
malfunction or damage not covered
by the vehicle warranty.
Damage to vehicle components
resulting from the installation or use
of non-GM certified parts, including
control module modifications, are
not covered under the terms of the
vehicle warranty and may affect
remaining warranty coverage for
affected parts.GM Accessories are designed to
complement and function with other
systems on the vehicle. Your GM
dealer/retailer can accessorize the
vehicle using genuine GM
Accessories. When you go to your
GM dealer/retailer and ask for GM
Accessories, you will know that
GM-trained and supported service
technicians will perform the work
using genuine GM Accessories.
Also, see
Adding Equipment to the
Airbag-Equipped Vehicle
on
page 3‑42.
ProCarManuals.com
Page 438 of 444
i-6 INDEX
J
Jump Starting . . . . . . . . . . . . . . . . . 10-78
K
Key and Lock Messages . . . . . . . 5-37
Keyless EntryRemote (RKE) System . . . . . . . . 2-3
Keyless Entry System . . . . . . . . . . 2-2
Keys . . . . . . . . . . . . . . . . . . . . . . . . . . . . 2-2
L
Labeling, Tire Sidewall . . . . . . . . 10-37
Lamp Messages . . . . . . . . . . . . . . . 5-37
Lamps Courtesy . . . . . . . . . . . . . . . . . . . . . . . 6-5
Dome . . . . . . . . . . . . . . . . . . . . . . . . . . 6-5
Exterior Controls . . . . . . . . . . . . . . . 6-1
License Plate . . . . . . . . . . . . . . . 10-29
Malfunction Indicator . . . . . . . . . 5-17
Reading . . . . . . . . . . . . . . . . . . . . . . . 6-6
Lap-Shoulder Belt . . . . . . . . . . . . . 3-23 LATCH System
Replacing Parts After a
Crash . . . . . . . . . . . . . . . . . . . . . . . 3-58
Latch, Lower Anchors and Tethers for Children . . . . . . . . . . 3-52
Liftgate Carbon Monoxide . . . . . . . . . . . . . . 2-9
Lighting Delayed Entry . . . . . . . . . . . . . . . . . 6-6
Delayed Exit . . . . . . . . . . . . . . . . . . . 6-7
Entry . . . . . . . . . . . . . . . . . . . . . . . . . . 6-6
Parade Dimming . . . . . . . . . . . . . . . 6-7
Lights Airbag Readiness . . . . . . . . . . . . . 5-15
Antilock Brake System(ABS) Warning . . . . . . . . . . . . . . 5-21
Charging System . . . . . . . . . . . . . 5-17
Cruise Control . . . . . . . . . . . . . . . . 5-24
Engine Coolant Temperature Warning . . . . . . . 5-22
Engine Oil Pressure . . . . . . . . . . 5-23
Flash-to-Pass . . . . . . . . . . . . . . . . . . 6-3 Lights (cont.)
Fog Lamps . . . . . . . . . . . . . . . . . . . 5-24
High-Beam On . . . . . . . . . . . . . . . . 5-23
High/Low Beam Changer . . . . . . 6-2
Safety Belt Reminders . . . . . . . . 5-15
Security . . . . . . . . . . . . . . . . . . . . . . 5-23
StabiliTrak
®Indicator . . . . . . . . . 5-21
Tire Pressure . . . . . . . . . . . . . . . . . 5-22
Tow/Haul Mode . . . . . . . . . . . . . . . 5-21
Locks Automatic Door . . . . . . . . . . . . . . . . 2-8
Delayed Locking . . . . . . . . . . . . . . . 2-7
Door . . . . . . . . . . . . . . . . . . . . . . . . . . . 2-7
Lockout Protection . . . . . . . . . . . . . 2-8
Power Door . . . . . . . . . . . . . . . . . . . . 2-7
Safety . . . . . . . . . . . . . . . . . . . . . . . . . 2-8
Loss of Control . . . . . . . . . . . . . . . . . 9-5
Lower Anchors and Tethers for Children (LATCH
SYSTEM) . . . . . . . . . . . . . . . . . . . . 3-52
Lumbar Adjustment . . . . . . . . . . . . . 3-5 Front Seats . . . . . . . . . . . . . . . . . . . . 3-5
ProCarManuals.com
Page 441 of 444

INDEX i-9
Reclining Seatbacks . . . . . . . . . . . . 3-6
Recommended Fluids andLubricants . . . . . . . . . . . . . . . . . . . . 11-7
Recommended Fuel . . . . . . . . . . . 9-39
Records Maintenance . . . . . . . . . . . . . . . . . . 11-9
Recreational Vehicle
Towing . . . . . . . . . . . . . . . . . . . . . . 10-83
Reimbursement Program, GM Mobility . . . . . . . . . . . . . . . . . . 13-5
Remote Keyless Entry
(RKE) System . . . . . . . . . . . . . 2-2, 2-3
Remote Vehicle Start . . . . . . . . . . . 2-5
Replacement Bulbs . . . . . . . . . . . 10-29
Replacement Parts Airbags . . . . . . . . . . . . . . . . . . . . . . . 3-43
Maintenance . . . . . . . . . . . . . . . . . . 11-8
Replacing Airbag System . . . . . . 3-43
Replacing LATCH System Parts After a Crash . . . . . . . . . . . 3-58
Replacing Safety Belt
System Parts After a
Crash . . . . . . . . . . . . . . . . . . . . . . . . 3-29 Reporting Safety Defects
Canadian Government . . . . . . 13-13
General Motors . . . . . . . . . . . . . 13-14
U.S. Government . . . . . . . . . . . 13-13
Retained Accessory Power (RAP) . . . . . . . . . . . . . . . . . 9-17
Ride Control Systems
Messages . . . . . . . . . . . . . . . . . . . . 5-38
Roadside Assistance Program . . . . . . . . . . . . . . . . . . . . . . 13-5
Roof
Sunroof . . . . . . . . . . . . . . . . . . . . . . . 2-22
Roof Rack System . . . . . . . . . . . . . . 4-4
Rotation, Tires . . . . . . . . . . . . . . . . 10-49
Routing, Engine Drive Belt . . . . . 12-3
Running the Vehicle While Parked . . . . . . . . . . . . . . . . . . . . . . . 9-22
S
Safety Belts . . . . . . . . . . . . . . . . . . . 3-14Care . . . . . . . . . . . . . . . . . . . . . . . . . . 3-28
Extender . . . . . . . . . . . . . . . . . . . . . . 3-28
How to Wear Safety BeltsProperly . . . . . . . . . . . . . . . . . . . . . 3-18
Lap-Shoulder Belt . . . . . . . . . . . . 3-23 Safety Belts (cont.)
Reminders . . . . . . . . . . . . . . . . . . . . 5-15
Replacing After a Crash . . . . . . 3-29
Use During Pregnancy . . . . . . . . 3-28
Safety Defects Reporting Canadian Government . . . . . . 13-13
General Motors . . . . . . . . . . . . . 13-14
U.S. Government . . . . . . . . . . . 13-13
Safety Locks . . . . . . . . . . . . . . . . . . . . 2-8
Safety System Check . . . . . . . . . . 3-28
Satellite Radio . . . . . . . . . . . . . . . . . . 7-7
Scheduled Maintenance . . . . . . . 11-2
Scheduling Appointments . . . . . . 13-7
Sealant Kit, Tire . . . . . . . . . . . . . . 10-59
Seats
Adjustment, Front . . . . . . . . . . . . . . 3-3
Head Restraints . . . . . . . . . . . . . . . 3-2
Heated and Ventilated Front . . . 3-8
Heated Front . . . . . . . . . . . . . . . . . . 3-8
Lumbar Adjustment, Front . . . . . 3-5
Power Adjustment, Front . . . . . . 3-3
Rear . . . . . . . . . . . . . . . . . . . . . . . . . . . 3-9
Reclining Seatbacks . . . . . . . . . . . 3-6
Third Row Seat . . . . . . . . . . . . . . . 3-11
Secondary Latch System . . . . . 10-76
Securing Child Restraints . . . . . . . . . . . . . . 3-58, 3-60
ProCarManuals.com
Page 442 of 444

i-10 INDEX
SecurityLight . . . . . . . . . . . . . . . . . . . . . . . . . . 5-23
Vehicle . . . . . . . . . . . . . . . . . . . . . . . 2-13
Service Accessories andModifications . . . . . . . . . . . . . . . . 10-3
Doing Your Own Work . . . . . . . . 10-4
Engine Soon Lamp . . . . . . . . . . . 5-17
Maintenance Records . . . . . . . . 11-9
Maintenance, General Information . . . . . . . . . . . . . . . . . . 11-1
Parts Identification Label . . . . . 12-1
Publications Ordering Information . . . . . . . . . . . . . . . . .13-11
Scheduling Appointments . . . . . 13-7
Vehicle Messages . . . . . . . . . . . . 5-39
Servicing the Airbag-Equipped Vehicle . . . . . 3-41
Shifting Into Park . . . . . . . . . . . . . . . . . . . . . . 9-19
Out of Park . . . . . . . . . . . . . . . . . . . 9-20
Sidemarker and Stoplamps Bulb Replacement . . . . . . . . . . 10-28
Signals, Turn and Lane-Change . . . . . . . . . . . . . . . . . 6-4 Spare Tire
Compact . . . . . . . . . . . . . . . . . . . . 10-77
Specifications and Capacities . . . . . . . . . . . . . . . . . . . . 12-2
Speedometer . . . . . . . . . . . . . . . . . . 5-13
StabiliTrak System . . . . . . . . . . . . . 9-28
StabiliTrak
®Indicator Light . . . . 5-21
Start Vehicle, Remote . . . . . . . . . . 2-5
Starter Switch Check . . . . . . . . . 10-25
Starting the Engine . . . . . . . . . . . . 9-17
Steering . . . . . . . . . . . . . . . . . . . . . . . . 9-4 Fluid, Power . . . . . . . . . . . . . . . . 10-20
Wheel Adjustment . . . . . . . . . . . . . 5-2
Wheel Controls . . . . . . . . . . . . . . . . 5-3
Storage Areas Armrest . . . . . . . . . . . . . . . . . . . . . . . . 4-1
Cargo Cover . . . . . . . . . . . . . . . . . . . 4-3
Cargo Management System . . . 4-3
Center Console . . . . . . . . . . . . . . . . 4-1
Convenience Net . . . . . . . . . . . . . . 4-3
Floor Console . . . . . . . . . . . . . . . . . 4-2
Glove Box . . . . . . . . . . . . . . . . . . . . . 4-1
Instrument Panel . . . . . . . . . . . . . . 4-1
Roof Rack System . . . . . . . . . . . . . 4-4
Storing the Tire Sealant
and Compressor Kit . . . . . . . . . 10-66 Stuck Vehicle . . . . . . . . . . . . . . . . . . 9-10
Sun Visors . . . . . . . . . . . . . . . . . . . . . 2-21
Sunroof . . . . . . . . . . . . . . . . . . . . . . . . 2-22
Symbols . . . . . . . . . . . . . . . . . . . . . . . . . . iv
System
Roof Rack . . . . . . . . . . . . . . . . . . . . . 4-4
System Check
Automatic TransmissionShiftlock Control . . . . . . . . . . 10-25
T
Tachometer . . . . . . . . . . . . . . . . . . . . 5-13
TaillampsBulb Replacement . . . . . . . . . . 10-28
Text Telephone (TTY) Users . . . 13-4
Theft-Deterrent Systems . . . . . . . 2-14 Immobilizer . . . . . . . . . . . . . . . . . . . 2-14
Third-Row Seats . . . . . . . . . . . . . . . 3-11
Time . . . . . . . . . . . . . . . . . . . . . . . . . . . . 5-8
Tires
Buying New Tires . . . . . . . . . . . 10-51
Chains . . . . . . . . . . . . . . . . . . . . . . 10-56
Changing . . . . . . . . . . . . . . . . . . . 10-67
Compact Spare . . . . . . . . . . . . . 10-77
Designations . . . . . . . . . . . . . . . 10-39
Different Size . . . . . . . . . . . . . . . 10-53
ProCarManuals.com