jump start SATURN OUTLOOK 2010 Owners Manual
[x] Cancel search | Manufacturer: SATURN, Model Year: 2010, Model line: OUTLOOK, Model: SATURN OUTLOOK 2010Pages: 444, PDF Size: 4.43 MB
Page 2 of 444
2010 Saturn OUTLOOK Owner ManualM
Jump Starting . . . . . . . . . . . . . . . 10-78
Towing . . . . . . . . . . . . . . . . . . . . . . 10-83
Appearance Care . . . . . . . . . . . 10-86
Service and Maintenance . . . 11-1
General Information . . . . . . . . . . 11-1
Scheduled Maintenance . . . . . . 11-2
Recommended Fluids, Lubricants, and Parts . . . . . . . 11-7
Maintenance Records . . . . . . . . 11-9
Technical Data . . . . . . . . . . . . . . . 12-1
Vehicle Identification . . . . . . . . . 12-1
Vehicle Data . . . . . . . . . . . . . . . . . . 12-2
Customer Information . . . . . . . 13-1
Customer Information . . . . . . . . 13-1
Reporting Safety Defects . . . . 13-13
Vehicle Data Recording and
Privacy . . . . . . . . . . . . . . . . . . . . 13-14
Index . . . . . . . . . . . . . . . . . . . . . i-1
ProCarManuals.com
Page 272 of 444

9-20 Driving and Operating
you leave it. After you have moved
the shift lever into P (Park), hold the
regular brake pedal down. Then,
see if you can move the shift lever
away from P (Park) without first
pushing the button.
If you can, it means that the shift
lever was not fully locked in
P (Park).
Torque Lock
Torque lock is when the weight
of the vehicle puts too much
force on the parking pawl in the
transmission. This happens when
parking on a hill and shifting the
transmission into P (Park) is not
done properly and then it is difficult
to shift out of P (Park). To prevent
torque lock, set the parking brake
and then shift into P (Park). To find
out how, see“Shifting Into Park”
listed previously.
If torque lock does occur, your
vehicle may need to be pushed
uphill by another vehicle to relieve
the parking pawl pressure, so you
can shift out of P (Park).
Shifting Out of Park
The vehicle is equipped with an
electronic shift lock release system.
The shift lock release is
designed to:
.Prevent ignition key removal
unless the shift lever is in
P (Park) with the shift lever
button fully released, and
.Prevent movement of the shift
lever out of P (Park), unless the
ignition is in ON/RUN or ACC/
ACCESSORY and the regular
brake pedal is applied.
The shift lock release is always
functional except in the case of an
uncharged or low voltage (less than
9 volt) battery. If the vehicle has an uncharged
battery or a battery with low voltage,
try charging or jump starting the
battery. See
Jump Starting
on
page 10‑78for more information.
To shift out of P (Park):
1. Apply the brake pedal.
2. Press the shift lever button.
3. Move the shift lever to the desired position.
If you still are unable to shift out of
P (Park):
1. Fully release the shift lever button.
2. While holding down the brake pedal, press the shift lever
button again.
3. Move the shift lever to the desired position.
If you still cannot move the shift
lever from P (Park), see your dealer/
retailer.
ProCarManuals.com
Page 308 of 444

10-2 Vehicle Care
Tire Inspection . . . . . . . . . . . . . . 10-49
Tire Rotation . . . . . . . . . . . . . . . 10-49
When It Is Time for NewTires . . . . . . . . . . . . . . . . . . . . . . 10-51
Buying New Tires . . . . . . . . . . . 10-51
Different Size Tires and
Wheels . . . . . . . . . . . . . . . . . . . 10-53
Uniform Tire Quality Grading . . . . . . . . . . . . . . . . . . . 10-53
Wheel Alignment and Tire Balance . . . . . . . . . . . . . . . . . . . 10-55
Wheel Replacement . . . . . . . . 10-55
Tire Chains . . . . . . . . . . . . . . . . . 10-56
If a Tire Goes Flat . . . . . . . . . . 10-57
Tire Sealant and Compressor Kit . . . . . . . . . . . 10-59
Storing the Tire Sealant and Compressor Kit . . . . . . . . . . . 10-66
Tire Changing . . . . . . . . . . . . . . 10-67
Secondary Latch System . . . 10-76
Compact Spare Tire . . . . . . . . 10-77Jump Starting
Jump Starting . . . . . . . . . . . . . . 10-78
Towing
Towing the Vehicle . . . . . . . . . 10-83
Recreational Vehicle Towing . . . . . . . . . . . . . . . . . . . . 10-83
Appearance Care
Exterior Care . . . . . . . . . . . . . . . 10-86
Interior Care . . . . . . . . . . . . . . . . 10-90
Floor Mats . . . . . . . . . . . . . . . . . . 10-93
General Information
For service and parts needs, visit
your dealer/retailer. You will receive
genuine Saturn parts and
Saturn-trained and supported
service people.
Genuine Saturn parts have one of
these marks.
ProCarManuals.com
Page 313 of 444
Vehicle Care 10-7
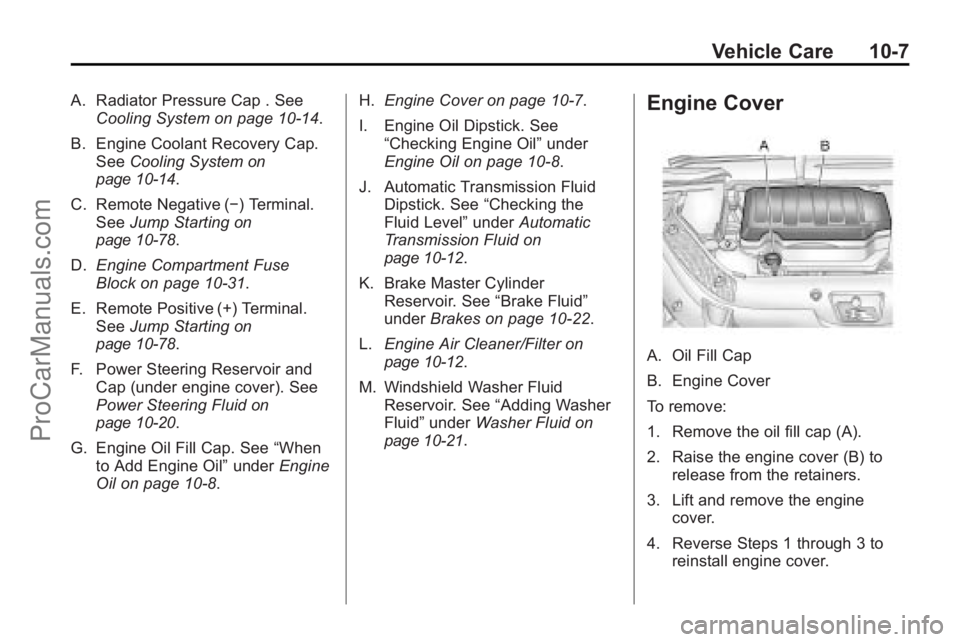
A. Radiator Pressure Cap . SeeCooling System on page 10‑14.
B. Engine Coolant Recovery Cap. See Cooling System
on
page 10‑14.
C. Remote Negative (−) Terminal. See Jump Starting
on
page 10‑78.
D. Engine Compartment Fuse
Block on page 10‑31.
E. Remote Positive (+) Terminal. See Jump Starting
on
page 10‑78.
F. Power Steering Reservoir and Cap (under engine cover). See
Power Steering Fluid
on
page 10‑20.
G. Engine Oil Fill Cap. See “When
to Add Engine Oil” underEngine
Oil on page 10‑8. H.
Engine Cover on page 10‑7.
I. Engine Oil Dipstick. See “Checking Engine Oil” under
Engine Oil on page 10‑8.
J. Automatic Transmission Fluid Dipstick. See “Checking the
Fluid Level” underAutomatic
Transmission Fluid
on
page 10‑12.
K. Brake Master Cylinder Reservoir. See “Brake Fluid”
under Brakes on page 10‑22.
L. Engine Air Cleaner/Filter
on
page 10‑12.
M. Windshield Washer Fluid Reservoir. See “Adding Washer
Fluid” under Washer Fluid
on
page 10‑21.
Engine Cover
A. Oil Fill Cap
B. Engine Cover
To remove:
1. Remove the oil fill cap (A).
2. Raise the engine cover (B) to release from the retainers.
3. Lift and remove the engine cover.
4. Reverse Steps 1 through 3 to reinstall engine cover.
ProCarManuals.com
Page 330 of 444

10-24 Vehicle Care
What to Add
Use only new DOT 3 brake fluid
from a sealed container. See
Recommended Fluids and
Lubricants on page 11‑7.
Always clean the brake fluid
reservoir cap and the area around
the cap before removing it. This
helps keep dirt from entering the
reservoir.
{WARNING
With the wrong kind of fluid in
the brake hydraulic system, the
brakes might not work well. This
could cause a crash. Always use
the proper brake fluid.
Notice:
.Using the wrong fluid can
badly damage brake
hydraulic system parts. For
example, just a few drops of
mineral-based oil, such as
engine oil, in the brake
hydraulic system can damage brake hydraulic
system parts so badly that
they will have to be replaced.
Do not let someone put in
the wrong kind of fluid.
.If brake fluid is spilled on
the vehicle's painted
surfaces, the paint finish can
be damaged. Be careful not
to spill brake fluid on the
vehicle. If you do, wash it
off immediately.
Battery
Refer to the replacement number on
the original battery label when a
new battery is needed.
{DANGER
Battery posts, terminals, and
related accessories contain lead
and lead compounds, chemicals
known to the State of California to
cause cancer and reproductive
harm. Wash hands after handling.
Vehicle Storage
{WARNING
Batteries have acid that can burn
you and gas that can explode.
You can be badly hurt if you are
not careful. See Jump Starting
on
page 10‑78
for tips on working
around a battery without
getting hurt.
Infrequent Usage: Remove the
black, negative (−) cable from the
battery to keep the battery from
running down.
Extended Storage: Remove the
black, negative (−) cable from the
battery or use a battery trickle
charger.
ProCarManuals.com
Page 384 of 444

10-78 Vehicle Care
After installing the compact spare
on the vehicle, stop as soon as
possible and make sure the spare
tire is correctly inflated. The
compact spare is made to perform
well at speeds up to 65 mph
(105 km/h) for distances up to
3,000 miles (5 000 km), so you can
finish your trip and have the full-size
tire repaired or replaced at your
convenience. Of course, it is best to
replace the spare with a full-size tire
as soon as possible. The spare tire
will last longer and be in good
shape in case it is needed again.
Notice:When the compact spare
is installed, do not take the
vehicle through an automatic car
wash with guide rails. The
compact spare can get caught on
the rails which can damage the
tire, wheel and other parts of the
vehicle.
Do not use the compact spare on
other vehicles. And do not mix the compact spare
tire or wheel with other wheels or
tires. They will not fit. Keep the
spare tire and its wheel together.
The All-Wheel Drive (AWD) system
will be automatically disabled when
you use the compact spare. To
restore the AWD and prevent
excessive wear on the clutch in your
AWD, replace the compact spare
tire with a full-size tire as soon as
possible.
Notice:
Tire chains will not fit the
compact spare. Using them can
damage the vehicle and can
damage the chains too. Do not
use tire chains on the compact
spare.Jump Starting
If the vehicle's battery has run
down, you may want to use another
vehicle and some jumper cables to
start your vehicle. Be sure to use
the following steps to do it safely.
{WARNING
Batteries can hurt you. They can
be dangerous because:
.They contain acid that can
burn you.
.They contain gas that can
explode or ignite.
.They contain enough
electricity to burn you.
If you do not follow these steps
exactly, some or all of these
things can hurt you.
ProCarManuals.com
Page 385 of 444
Vehicle Care 10-79
Notice:Ignoring these steps
could result in costly damage to
the vehicle that would not be
covered by the warranty.
Trying to start the vehicle by
pushing or pulling it will not
work, and it could damage the
vehicle.
1. Check the other vehicle. It must
have a 12-volt battery with a
negative ground system.
Notice: If the other vehicle's
system is not a 12-volt system
with a negative ground, both
vehicles can be damaged. Only
use vehicles with 12-volt systems
with negative grounds to jump
start your vehicle.
2. Get the vehicles close enough so the jumper cables can reach,
but be sure the vehicles are not
touching each other. If they are,
it could cause a ground
connection you do not want.
You would not be able to start your vehicle, and the bad
grounding could damage the
electrical systems.
To avoid the possibility of the
vehicles rolling, set the parking
brake firmly on both vehicles
involved in the jump start
procedure. Put an automatic
transmission in P (Park) or a
manual transmission in Neutral
before setting the parking brake.
If one of the vehicles is a
four-wheel-drive vehicle, be sure
the transfer case is not in
Neutral.
Notice: If you leave the radio or
other accessories on during the
jump starting procedure, they
could be damaged. The repairs
would not be covered by the
warranty. Always turn off the
radio and other accessories when
jump starting the vehicle. 3. Turn off the ignition on both
vehicles. Unplug unnecessary
accessories plugged into the
cigarette lighter or the accessory
power outlets. Turn off the radio
and all lamps that are not
needed. This will avoid sparks
and help save both batteries.
And it could save the radio!
4. Open the hoods and locate the positive (+) and negative (−)
terminal locations on the other
vehicle. Your vehicle has a
remote positive (+) and a remote
negative (−) jump starting
terminal. See Engine
Compartment Overview
on
page 10‑6for more information
on the terminal locations.
ProCarManuals.com
Page 388 of 444
10-82 Vehicle Care
10. Now start the vehicle with thegood battery and run the
engine for a while.
11. Try to start the vehicle that had the dead battery. If it will not
start after a few tries, it
probably needs service.
Notice: If the jumper cables are
connected or removed in the
wrong order, electrical shorting
may occur and damage the
vehicle. The repairs would not be
covered by the vehicle warranty.
Always connect and remove the
jumper cables in the correct
order, making sure that the
cables do not touch each other or
other metal.
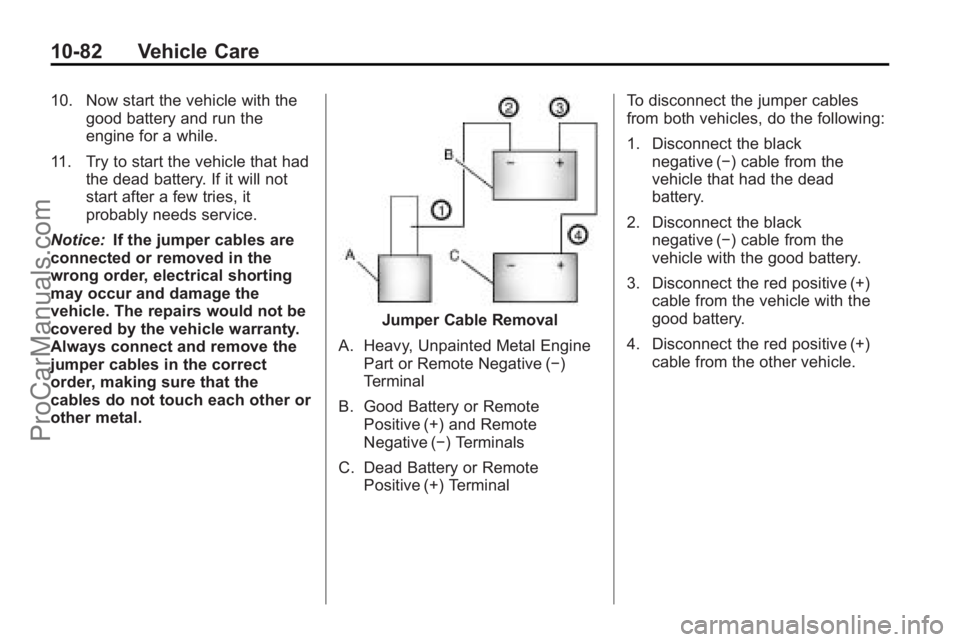
Jumper Cable Removal
A. Heavy, Unpainted Metal Engine Part or Remote Negative (−)
Terminal
B. Good Battery or Remote Positive (+) and Remote
Negative (−) Terminals
C. Dead Battery or Remote Positive (+) Terminal To disconnect the jumper cables
from both vehicles, do the following:
1. Disconnect the black
negative (−) cable from the
vehicle that had the dead
battery.
2. Disconnect the black negative (−) cable from the
vehicle with the good battery.
3. Disconnect the red positive (+) cable from the vehicle with the
good battery.
4. Disconnect the red positive (+) cable from the other vehicle.
ProCarManuals.com
Page 422 of 444
13-6 Customer Information
Calling for Assistance
When calling Roadside Assistance,
have the following information
ready:
.Your name, home address, and
home telephone number
.Telephone number of your
location
.Location of the vehicle
.Model, year, color, and license
plate number of the vehicle
.Odometer reading, Vehicle
Identification Number (VIN), and
delivery date of the vehicle
.Description of the problem
Coverage
Services are provided up to 5 years/
100,000 miles (160 000 km),
whichever comes first.
In the U.S., anyone driving the
vehicle is covered. In Canada, a
person driving the vehicle without
permission from the owner is not
covered.Roadside Assistance is not a part of
the New Vehicle Limited Warranty.
Saturn and General Motors of
Canada Limited reserve the right to
make any changes or discontinue
the Roadside Assistance program at
any time without notification.
Saturn and General Motors of
Canada Limited reserve the right to
limit services or payment to an
owner or driver if they decide the
claims are made too often, or the
same type of claim is made many
times.
Services Provided
.Emergency Fuel Delivery:
Delivery of enough fuel for the
vehicle to get to the nearest
service station.
.Lock-Out Service:
Service is
provided to unlock the vehicle if
you are locked out. A remote
unlock may be available if you
have OnStar
®. For security
reasons, the driver must present
identification before this service
is given.
.Emergency Tow From a Public
Road or Highway: Tow to the
nearest Saturn retailer for
warranty service, or if the vehicle
was in a crash and cannot be
driven. Assistance is also given
when the vehicle is stuck in
sand, mud, or snow.
.Flat Tire Change: Service is
provided to change a flat tire
with the spare tire. The spare
tire, if equipped, must be in good
condition and properly inflated.
It is the owner's responsibility for
the repair or replacement of the
tire if it is not covered by the
warranty.
.Battery Jump Start: Service is
provided to jump start a dead
battery.
Services Not Included in
Roadside Assistance
.Impound towing caused by
violation of any laws.
.Legal fines.
ProCarManuals.com
Page 433 of 444
INDEX i-1
A
Accessories andModifications . . . . . . . . . . . . . . . . . 10-3
Accessory Power . . . . . . . . . . . . . . 9-17
Add-On Electrical Equipment . . . . . . . . . . . . . . . . . . . 9-54
Adding Equipment to the
Airbag-Equipped Vehicle . . . . . 3-42
Adjustments Lumbar, Front Seats . . . . . . . . . . . 3-5
Air Cleaner/Filter, Engine . . . . . 10-12
Air Vents . . . . . . . . . . . . . . . . . . . . . . 8-12
Airbag System
Check . . . . . . . . . . . . . . . . . . . . . . . . 3-43
How Does an AirbagRestrain? . . . . . . . . . . . . . . . . . . . 3-35
Passenger Sensing System . . . . . . . . . . . . . . . . . . . . . . 3-37
What Makes an Airbag Inflate? . . . . . . . . . . . . . . . . . . . . . . 3-34
What Will You See After an Airbag Inflates? . . . . . . . . . . 3-35
When Should an Airbag Inflate? . . . . . . . . . . . . . . . . . . . . . . 3-33
Where Are the Airbags? . . . . . . 3-31 Airbags
Adding Equipment to the
Vehicle . . . . . . . . . . . . . . . . . . . . . . 3-42
Passenger Status Indicator . . . 5-16
Readiness Light . . . . . . . . . . . . . . 5-15
Servicing Airbag-Equipped Vehicles . . . . . . . . . . . . . . . . . . . . . 3-41
System Check . . . . . . . . . . . . . . . . 3-29
Alarm System Anti-Theft . . . . . . . . . . . . . . . . . . . . . 2-13
All-Wheel Drive . . . . . . . . . 10-25, 9-25
AM-FM Radio . . . . . . . . . . . . . . . . . . . 7-6
Antenna
Multi-Band . . . . . . . . . . . . . . . . . . . . 7-11
Anti-Theft Alarm System . . . . . . . . . . . . . . . . 2-13
Alarm System Messages . . . . . 5-38
Antilock Brake System (ABS) . . . . . . . . . . . . . . . . 9-26
Warning Light . . . . . . . . . . . . . . . . . 5-21
Appearance Care
Exterior . . . . . . . . . . . . . . . . . . . . . 10-86
Interior . . . . . . . . . . . . . . . . . . . . . . 10-90
Armrest Stoarge . . . . . . . . . . . . . . . . 4-1
Assistance Program, Roadside . . . . . . . . . . . . . . . . . . . . . 13-5 Audio Players . . . . . . . . . . . . . . . . . 7-12
CD . . . . . . . . . . . . . . . . . . . . . . . . . . . 7-12
MP3 . . . . . . . . . . . . . . . . . . . . 7-21, 7-27
Audio System Radio Reception . . . . . . . . . . . . . . 7-11
Rear Seat (RSA) . . . . . . . . . . . . . 7-43
Theft-Deterrent Feature . . . . . . . . 7-2
Automatic Door Locks . . . . . . . . . . . . . . . . . . . . 2-8
Automatic Transmission . . . . . . . 9-22 Fluid . . . . . . . . . . . . . . . . . . . . . . . . 10-12
Manual Mode . . . . . . . . . . . . . . . . . 9-24
Shiftlock Control System
Check . . . . . . . . . . . . . . . . . . . . . 10-25
Auxiliary Devices . . . . . . . . . . . . . . 7-33
B
Battery . . . . . . . . . . . . . . . . . . . . . . . 10-24 Jump Starting . . . . . . . . . . . . . . . 10-78
Load Management . . . . . . . . . . . . . 6-7
Power Protection . . . . . . . . . . . . . . 6-8
Voltage and ChargingMessages . . . . . . . . . . . . . . . . . . . 5-33
Blade Replacement, Wiper . . . 10-26
Bluetooth . . . . . . . . . . . . . . . . . . . . . . 7-45
ProCarManuals.com