language SATURN OUTLOOK 2010 Owners Manual
[x] Cancel search | Manufacturer: SATURN, Model Year: 2010, Model line: OUTLOOK, Model: SATURN OUTLOOK 2010Pages: 444, PDF Size: 4.43 MB
Page 3 of 444
Introduction iii
SATURN, the SATURN Emblem,
and the name OUTLOOK are
registered trademarks of Saturn
Corporation. GENERAL MOTORS
and GM are registered trademarks
of General Motors Corporation.
This manual describes features that
may or may not be on your specific
vehicle either because they are
options that you did not purchase or
due to changes subsequent to the
printing of this owner manual.Please refer to the purchase
documentation relating to your
specific vehicle to confirm each of
the features found on your vehicle.
For vehicles first sold in Canada,
substitute the name
“General
Motors of Canada Limited” for
Saturn Corporation wherever it
appears in this manual.
Keep this manual in the vehicle for
quick reference.
Canadian Vehicle Owners
Propriétaires Canadiens
A French language copy of this
manual can be obtained from your
dealer/retailer or from:
On peut obtenir un exemplaire de
ce guide en français auprès du
concessionnaire ou à l'adresse
suivante:
Helm, Incorporated
P.O. Box 07130
Detroit, MI 48207
1-800-551-4123
Numéro de poste 6438 de langue
française
www.helminc.com
Litho in the U.S.A.
Part No. 25851639 A First Printing©2009 General Motors Corporation. All rights Reserved.
ProCarManuals.com
Page 152 of 444
5-30 Instruments and Controls
Driver Information Center
(DIC) (Without DIC
Buttons)
If your vehicle does not have DIC
buttons, the information below
explains the operation of this
system.
The DIC has different displays
which can be accessed by pressing
the trip odometer reset stem located
on the instrument panel cluster.
Pressing the trip odometer reset
stem will also turn off,
or acknowledge, DIC messages.
The DIC displays trip and vehicle
system information, and warning
messages if a system problem is
detected.
If your vehicle does not have DIC
buttons, you can use the trip
odometer reset stem to view the
following displays: odometer, trip
odometers, oil life, park assist menu
for vehicles with the Ultrasonic Rear
Parking Assist (URPA) system,Remote Keyless Entry (RKE)
transmitter programming, units, and
display language.
If your vehicle has DIC buttons, you
can use the trip odometer reset
stem to view the following displays:
odometer and trip odometers.
Trip Odometer Reset Stem
Menu Items
ODOMETER
Press the trip odometer reset stem
until ODOMETER displays. This
display shows the distance the
vehicle has been driven in either
miles (mi) or kilometers (km).
To switch between English and
metric measurements, see
“UNITS”
later in this section.
TRIP A or TRIP B
Press the trip odometer reset stem
until TRIP A or TRIP B displays. This
display shows the current distance
traveled in either miles (mi) or
kilometers (km) since the last reset for each trip odometer. Both trip
odometers can be used at the
same time.
Each trip odometer can be reset to
zero separately by pressing and
holding the trip odometer reset stem
while the desired trip odometer is
displayed.
The trip odometer has a feature
called the retro-active reset. This
can be used to set the trip odometer
to the number of miles (kilometers)
driven since the ignition was last
turned on. This can be used if the
trip odometer is not reset at the
beginning of the trip.
To use the retro-active reset feature,
press and hold the trip odometer
reset stem for at least four seconds.
The trip odometer will display the
number of miles (mi) or
kilometers (km) driven since the
ignition was last turned on and the
vehicle was moving. Once the
vehicle begins moving, the trip
odometer will accumulate mileage.
ProCarManuals.com
Page 154 of 444
5-32 Instruments and Controls
RELEARN REMOTE KEY
To access this display, the vehicle
must be in P (Park). This display
allows you to match Remote
Keyless Entry (RKE) transmitters to
your vehicle. This procedure will
erase all previously learned
transmitters. Therefore, they must
be relearned as additional
transmitters.
To match an RKE transmitter to your
vehicle:
1. Press the trip odometer resetstem until RELEARN REMOTE
KEY displays.
2. Press and hold the trip odometer reset stem until REMOTE KEY
LEARNING ACTIVE is
displayed.
3. Press and hold the lock and unlock buttons on the first
transmitter at the same time for
about 15 seconds. On vehicles with memory recall
seats, the first transmitter
learned will match driver 1 and
the second will match driver 2.
A chime will sound indicating
that the transmitter is matched.
4. To match additional transmitters at this time, repeat Step 3.
Each vehicle can have a
maximum of eight transmitters
matched to it.
5. To exit the programming mode, you must cycle the key to
LOCK/OFF.
UNITS
To access this display, the vehicle
must be in P (Park). Press the trip
odometer reset stem until UNITS
displays. This display allows you to
select between English or Metric
units of measurement. Once in this
display, press and hold the trip
odometer reset stem to select
between ENGLISH or METRIC units. All of the vehicle information
will then be displayed in the unit of
measurement selected.
DISPLAY LANGUAGE
To access this display, the vehicle
must be in P (Park). This display
allows you to select the language in
which the DIC messages will
appear. To select a language:
1. Press the trip odometer reset
stem until DISPLAY LANGUAGE
displays.
2. Continue to press and hold the trip odometer reset stem to scroll
through all of the available
languages.
The available languages are
ENGLISH (default), FRANCAIS
(French), ESPANOL (Spanish),
and NO CHANGE.
3. Once the desired language is displayed, release the trip
odometer reset stem to set your
choice.
ProCarManuals.com
Page 164 of 444
5-42 Instruments and Controls
Vehicle
Personalization
Vehicle Personalization
(With DIC Buttons)
Your vehicle may have
customization capabilities that allow
you to program certain features to
one preferred setting. Customization
features can only be programmed to
one setting on the vehicle and
cannot be programmed to a
preferred setting for two different
drivers.
All of the customization options may
not be available on your vehicle.
Only the options available will be
displayed on the DIC.
The default settings for the
customization features were set
when your vehicle left the factory,
but may have been changed from
their default state since then.
The customization preferences are
automatically recalled.To change customization
preferences, use the following
procedure.
Entering the Feature
Settings Menu
1. Turn the ignition on and place
the vehicle in P (Park).
To avoid excessive drain on the
battery, it is recommended that
the headlamps are turned off.
2. Press the customization button to enter the feature
settings menu.
If the menu is not available,
FEATURE SETTINGS
AVAILABLE IN PARK will
display. Before entering the
menu, make sure the vehicle is
in P (Park).
Feature Settings Menu Items
The following are customization
features that allow you to program
settings to the vehicle:
DISPLAY IN ENGLISH
This feature will only display if a
language other than English has
been set. This feature allows you to
change the language in which the
DIC messages appear to English.
Press the customization button until
the PRESS
VTO DISPLAY IN
ENGLISH screen appears on the
DIC display. Press the set/reset
button once to display all DIC
messages in English.
DISPLAY LANGUAGE
This feature allows you to select the
language in which the DIC
messages will appear.
ProCarManuals.com
Page 165 of 444
Instruments and Controls 5-43
Press the customization button until
the DISPLAY LANGUAGE screen
appears on the DIC display. Press
the set/reset button once to access
the settings for this feature. Then
press the customization button to
scroll through the following settings:
ENGLISH (default):All messages
will appear in English.
FRANCAIS: All messages will
appear in French.
ESPANOL: All messages will
appear in Spanish.
NO CHANGE: No change will be
made to this feature. The current
setting will remain.
To select a setting, press the set/
reset button while the desired
setting is displayed on the DIC.
You can also change the language
by pressing the trip odometer reset
stem. See “Language” under Driver
Information Center (Without DIC
Buttons) earlier in this section for
more information. AUTO DOOR LOCK
This feature allows you to select
when the vehicle's doors will
automatically lock. See
Automatic
Door Locks
on page 2‑8for more
information.
Press the customization button until
AUTO DOOR LOCK appears on the
DIC display. Press the set/reset
button once to access the settings
for this feature. Then press the
customization button to scroll
through the following settings:
SHIFT OUT OF PARK (default):
The doors will automatically lock
when the vehicle is shifted out of
P (Park).
AT VEHICLE SPEED: The doors
will automatically lock when the
vehicle speed is above 8 mph
(13 km/h) for three seconds.
NO CHANGE: No change will be
made to this feature. The current
setting will remain. To select a setting, press the set/
reset button while the desired
setting is displayed on the DIC.
AUTO DOOR UNLOCK
This feature allows you to select
whether or not to turn off the
automatic door unlocking feature.
It also allows you to select which
doors and when the doors will
automatically unlock. See
Automatic
Door Locks
on page 2‑8for more
information.
Press the customization button until
AUTO DOOR UNLOCK appears on
the DIC display. Press the set/reset
button once to access the settings
for this feature. Then press the
customization button to scroll
through the following settings:
OFF: None of the doors will
automatically unlock.
DRIVER AT KEY OUT: Only the
driver's door will unlock when the
key is taken out of the ignition.
ProCarManuals.com
Page 193 of 444
Infotainment System 7-9
4. Press the softkey under theRemove tab until the category
name along with the word
Removed displays.
5. Repeat the steps to remove more categories.
Removed categories can be
restored by pressing the softkey
under the Add tab when a removed
category is displayed or by pressing
the softkey under the Restore
All tab.
Categories cannot be removed or
added while the vehicle is moving
faster than 8 km/h (5 mph).
Storing a Radio Station as a
Favorite
Drivers are encouraged to set up
their radio station favorites while the
vehicle is in P (Park). Tune to
favorite stations using the presets,
favorites button, and steering wheel
controls. See Steering Wheel
Controls on page 5‑3. FAV (Favorites):
A maximum of
36 stations can be programmed as
favorites using the six softkeys
below the radio station frequency
tabs and by using the radio favorites
page button (FAV button). Press to
go through up to six pages of
favorites, each having six favorite
stations available per page. Each
page of favorites can contain any
combination of AM, FM, or XM
stations.
The balance/fade and tone settings
that were previously adjusted, are
stored with the favorite stations.
To store a station as a favorite:
1. Tune to the desired radio station.
2. Press FAV to display the page to
store the station.
3. Press and hold one of the six softkeys until a beep sounds.
When that softkey is pressed
and released, the station that
was set, returns.
4. Repeat the steps for each radio station to be stored as a favorite. To setup the number of favorites
pages:
1. Press MENU to display the radio
setup menu.
2. Press the softkey below the FAV 1-6 tab.
3. Select the desired number of favorites pages by pressing the
softkey below the displayed
page numbers.
4. Press FAV, or let the menu time out, to return to the original main
radio screen showing the radio
station frequency tabs and to
begin the process of
programming favorites for the
chosen amount of numbered
pages.XM™ Radio Messages
XL (Explicit Language
Channels): These channels, or any
others, can be blocked at a
customer's request, by calling
1-800-852-XMXM (9696).
ProCarManuals.com
Page 221 of 444
Infotainment System 7-37
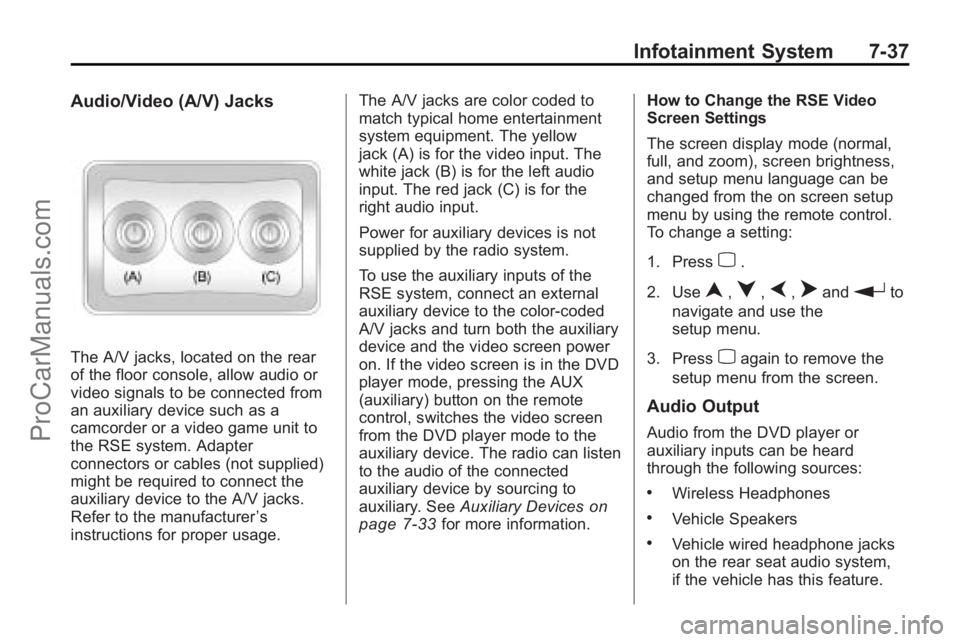
Audio/Video (A/V) Jacks
The A/V jacks, located on the rear
of the floor console, allow audio or
video signals to be connected from
an auxiliary device such as a
camcorder or a video game unit to
the RSE system. Adapter
connectors or cables (not supplied)
might be required to connect the
auxiliary device to the A/V jacks.
Refer to the manufacturer’s
instructions for proper usage. The A/V jacks are color coded to
match typical home entertainment
system equipment. The yellow
jack (A) is for the video input. The
white jack (B) is for the left audio
input. The red jack (C) is for the
right audio input.
Power for auxiliary devices is not
supplied by the radio system.
To use the auxiliary inputs of the
RSE system, connect an external
auxiliary device to the color-coded
A/V jacks and turn both the auxiliary
device and the video screen power
on. If the video screen is in the DVD
player mode, pressing the AUX
(auxiliary) button on the remote
control, switches the video screen
from the DVD player mode to the
auxiliary device. The radio can listen
to the audio of the connected
auxiliary device by sourcing to
auxiliary. See
Auxiliary Devices
on
page 7‑33for more information. How to Change the RSE Video
Screen Settings
The screen display mode (normal,
full, and zoom), screen brightness,
and setup menu language can be
changed from the on screen setup
menu by using the remote control.
To change a setting:
1. Press
z.
2. Use
n,q,p,oandrto
navigate and use the
setup menu.
3. Press
zagain to remove the
setup menu from the screen.
Audio Output
Audio from the DVD player or
auxiliary inputs can be heard
through the following sources:
.Wireless Headphones
.Vehicle Speakers
.Vehicle wired headphone jacks
on the rear seat audio system,
if the vehicle has this feature.
ProCarManuals.com
Page 223 of 444
Infotainment System 7-39
If a CD or DVD is in the Radio DVD
slot, the remote control
Obutton
can be used to turn on the video
screen display and start the disc.
The radio can also turn on the video
screen display. See Operation
on
page 7‑2for more information.
Notice: Storing the remote
control in a hot area or in direct
sunlight can damage it, and the
repairs will not be covered by the
warranty. Storage in extreme cold
can weaken the batteries. Keep
the remote control stored in a
cool, dry place.
Remote Control Buttons
O(Power): Press to turn the
video screen on and off.
P(Illumination): Press to turn the
remote control backlight on. The
backlight automatically times out
after seven to ten seconds if no
other button is pressed while the
backlight is on.
v(Title): Press to return the DVD
to the main menu of the DVD. This
function could vary for each disc.
y(Main Menu): Press to access
the DVD menu. The DVD menu is
different on every DVD. Use the
navigation arrows to move the
cursor around the DVD menu.
After making a selection press the
enter button. This button only
operates when using a DVD.
n,q,p,o(Menu Navigation
Arrows): Use the arrow buttons to
navigate through a menu.
r(Enter): Press to select the
choice that is highlighted in
any menu.
z(Display Menu): Press to adjust
the brightness, screen display mode
(normal, full, or zoom), and display
the language menu.
q(Return): Press to exit the
current active menu and return to
the previous menu. This button
operates only when the display
menu or a DVD menu is active.
c(Stop): Press to stop playing,
rewinding, or fast forwarding a DVD.
Press twice to return to the
beginning of the DVD.
s(Play/Pause): Press to start
playing a DVD. Press while a DVD
is playing to pause it. Press again to
continue playing the DVD.
When the DVD is playing,
depending on the radio, play may
be slowed down by pressing
sthen[. The DVD continues
playing in a slow play mode.
Depending on the radio, perform
reverse slow play by pressing
sthenr. To cancel slow play
mode, press
sagain.
ProCarManuals.com