reset SATURN RELAY 2005 Owner's Manual
[x] Cancel search | Manufacturer: SATURN, Model Year: 2005, Model line: RELAY, Model: SATURN RELAY 2005Pages: 446, PDF Size: 3.03 MB
Page 212 of 446
Press the menu button until PERSONALIZE KEY
appears on the DIC display. Press the set/reset button
to scroll through the following choices:
NO (default):The key will not be personalized.
YES:The key will be personalized.
Choose one of the available settings and press the
menu button while it is displayed on the DIC to select it
and move on to the next feature.
REPLACE KEY
This screen displays only if YES was selected for the
PERSONALIZE KEY feature, keys 1 and 2 have already
been personalized, and the current key being used is
not key 1 or 2. This feature allows you to program a key
to be recognized as key 1 or 2 in the event that the
previously programmed key needs to be replaced.
1:The key will be programmed to be recognized as
key 1.
2:The key will be programmed to be recognized as
key 2.
CANCEL (default):The key will not be programmed.
RADIO STATIONS PERSONALIZED
This screen displays only if YES was selected for the
PERSONALIZE KEY feature. This feature allows you to
set the radio station presets to be recognized for the
key, 1 or 2, that is being used. Once this message
displays, set the radio station presets. If the presets are
not set at this time, the presets will not be recognized
for key 1 or 2, however, the vehicle radio station presets
will be maintained.
AUTO DOOR UNLOCK
This feature allows automatic door unlocking to be
turned off, used for the driver’s door only, or for all of
the doors.
Press the menu button until AUTO DOOR UNLOCK
appears on the DIC display. Press the set/reset button
to scroll through the following choices:
OFF:None of the doors will unlock when the vehicle is
shifted into PARK (P) or the key is taken out of the
ignition.
DRIVER:Only the driver’s door will unlock when the
vehicle is shifted into PARK (P) or the key is taken out of
the ignition.
3-70
ProCarManuals.com
Page 213 of 446
ALL (default):All of the doors will unlock when the
vehicle is shifted into PARK (P) or the key is taken out
of the ignition.
Choose one of the available settings and press the
menu button while it is displayed on the DIC to select it
and move on to the next feature.
AUTO UNLOCK ON
This feature displays only if DRIVER or ALL was
selected for the AUTO DOOR UNLOCK feature. This
feature allows the selection of when the vehicle’s doors
will unlock.
Press the menu button until AUTO UNLOCK ON
appears on the DIC display. Press the set/reset button
to scroll through the following choices:
KEY-OUT:The door(s) will unlock when the key is
taken out of the ignition.
PARK (default):The door(s) will unlock when the
vehicle is shifted into PARK (P).
Choose one of the available settings and press the
menu button while it is displayed on the DIC to select it
and move on to the next feature.
FOB UNLOCK ON 1ST PRESS
This feature allows the selection of which doors will
unlock on the �rst press of the unlock button on
the remote keyless entry transmitter. SeeRemote
Keyless Entry System Operation on page 2-5for more
information.
Press the menu button until FOB UNLOCK ON 1ST
PRESS appears on the DIC display. Press the set/reset
button to scroll through the following choices:
DRIVER (default):The driver’s door will unlock on the
�rst press of the unlock button on the remote keyless
entry transmitter.
ALL:All of the doors will unlock on the �rst press of
the unlock button on the remote keyless entry
transmitter.
Choose one of the available settings and press the
menu button while it is displayed on the DIC to select it.
The DIC will then display PRESS UNLOCK SWITCH
ON KEY FOB. Press the unlock button on the remote
keyless entry transmitter and your setting will be
saved for that remote keyless entry transmitter.
After programming the last option, the message KEY
FOB NOW PERSONALIZED will appear on the
DIC display for a few seconds if you personalized the
key. Next, the message PERSONAL OPTIONS SAVED
will appear brie�y on the DIC display, then the display
will return to the PERSONAL PROGRAM main screen.
3-71
ProCarManuals.com
Page 217 of 446
To use AudioPilot®, set the radio volume to your
desired level. Turn AudioPilot®on by pressing the
automatic volume button until AVOL ON appears on the
display. As you increase vehicle speed, the background
noise in your vehicle will increase. AudioPilot
®will
adjust your audio system’s output for the background
noise it hears. To turn AudioPilot
®off, press the
automatic volume button until AVOL OFF appears on
the display. For additional information on AudioPilot
®,
please visit www.bose.com.
MUTE:Press this button to silence the system. Press
this button again to turn the sound on.
This button is not available on the Radio with
Six-Disc CD.
Finding a Station
BAND:Press this button to switch between FM1, FM2,
AM, or XM1 or XM2 (if equipped). The display will
show the selection.
O/e(Tune):Turn this knob to select radio
stations.
tSEEKu:Press the right or the left arrow to go to
the next or to the previous station and stay there.
The radio will only seek stations with a strong signal
that are in the selected band.
tSCANu:Press and hold either arrow for
two seconds until FREQUENCY SCAN appears on the
display. The radio will go to a station, play for a
few seconds, then go on to the next station. Press
either arrow again to stop scanning.
To scan preset stations, press and hold either arrow for
four seconds until PRESET SCAN appears on the
display. The radio will go to the next preset station, play
for a few seconds, then go on to the next preset
station. Press either scan arrow again or one of the
pushbuttons to stop scanning presets.
The radio will only scan stations with a strong signal
that are in the selected band.
Setting Preset Stations
Up to 30 stations (six FM1, six FM2, and six AM,
six XM1 and six XM2 (if equipped)), can be programmed
on the six numbered pushbuttons, by performing the
following steps:
1. Turn the radio on.
2. Press BAND to select FM1, FM2, AM, or
XM1 or XM2.
3. Tune in the desired station.
4. Press AUTO EQ to select the equalization.
3-75
ProCarManuals.com
Page 218 of 446
5. Press and hold one of the six numbered
pushbuttons until you hear a beep. Whenever that
numbered pushbutton is pressed, the station
that was set will return and the equalization that
was selected will be stored for that pushbutton.
6. Repeat the steps for each pushbutton.
Setting the Tone (Bass/Treble)
e
(Bass/Treble/Midrange):Press this knob to select
BASS, MIDRANGE, or TREBLE. Turn the knob to
increase or to decrease. If a station is weak or noisy,
decrease the treble.
To adjust the bass, midrange, and treble to the middle
position, press and hold this knob when the tone
control is on the display. The level will change to the
middle position.
To adjust all tone and speaker controls to the middle
position, press and hold this knob when no tone
or speaker control is displayed. AUDIO SETTINGS
CENTERED will appear on the display.
AUTO EQ (Automatic Equalization):Press this button
to select customized equalization settings designed
for country/western, jazz, talk, pop, rock, and classical.
Selecting CUSTOM or changing bass or treble,
returns the EQ to the manual bass and treble settings.The radio will save separate AUTO EQ settings for each
preset and source.
If the radio is equipped with the Bose
®audio system,
the equalization settings are EQ1 through EQ7 and
CUSTOM.
Adjusting the Speakers (Balance/Fade)
e
(Balance/Fade):To adjust the balance between
the right and the left speakers, press this knob until
BALANCE appears on the display. Turn the knob
to move the sound toward the right or the left speakers.
To adjust the fade between the front and the rear
speakers, press this knob until FADE appears on the
display. Turn the knob to move the sound toward
the front or the rear speakers.
To adjust the balance and fade to the middle position,
press and hold this knob when the speaker control is on
the display. The level will change to the middle position.
To adjust all tone and speaker controls to the middle
position, press and hold this knob when no tone or
speaker control is displayed. AUDIO SETTINGS
CENTERED will appear on the display.
3-76
ProCarManuals.com
Page 222 of 446
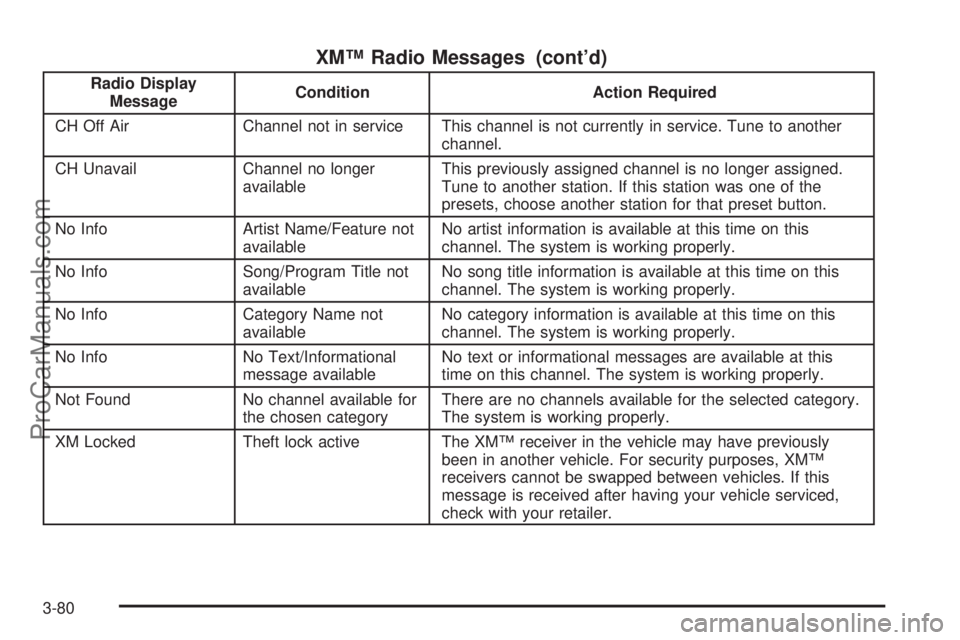
XM™ Radio Messages (cont’d)
Radio Display
MessageCondition Action Required
CH Off Air Channel not in service This channel is not currently in service. Tune to another
channel.
CH Unavail Channel no longer
availableThis previously assigned channel is no longer assigned.
Tune to another station. If this station was one of the
presets, choose another station for that preset button.
No Info Artist Name/Feature not
availableNo artist information is available at this time on this
channel. The system is working properly.
No Info Song/Program Title not
availableNo song title information is available at this time on this
channel. The system is working properly.
No Info Category Name not
availableNo category information is available at this time on this
channel. The system is working properly.
No Info No Text/Informational
message availableNo text or informational messages are available at this
time on this channel. The system is working properly.
Not Found No channel available for
the chosen categoryThere are no channels available for the selected category.
The system is working properly.
XM Locked Theft lock active The XM™ receiver in the vehicle may have previously
been in another vehicle. For security purposes, XM™
receivers cannot be swapped between vehicles. If this
message is received after having your vehicle serviced,
check with your retailer.
3-80
ProCarManuals.com
Page 226 of 446

To load more than one CD but less than six, complete
Steps 1 through 3. When �nished loading CDs,
press the load button to cancel the loading function.
The radio will begin to play the last CD loaded.
If more than one CD has been loaded, a number for
each CD will appear on the display.
Playing a Speci�c Loaded CD
For every CD loaded, a number will appear on the
display. To play a speci�c CD press the numbered
pushbutton that corresponds to the CD.
If an error appears on the display, see “CD Messages”
later in this section.
X(Eject):Press this button to eject CD(s).
To eject the CD that is currently playing, press and
release this button.
To eject multiple CDs, do the following:
1. Press and hold the eject button for two seconds.
You will hear a beep and EJECT ALL DISCS will
appear on the display.2. When REMOVE DISC appears on the display, the
CD will eject and can be removed.
To stop ejecting the CDs, press the load or the
eject button.
If the CD is not removed, after 25 seconds, the CD will
be automatically pulled back into the player. If CD is
pushed back into the player, before the 25 second time
period is complete, the player will sense an error
and will try to eject the CD several times before
stopping.
Do not repeatedly press the eject button to eject a CD
after you have tried to push it in manually. The
player’s 25-second eject timer will reset at each press of
eject, causing the player to not eject the CD until the
25-second time period has elapsed.
O/e(Tune):Turn this knob to go to the next or
previous track.
{(Reverse):Press and hold this button to reverse
within the current track.
|(Fast Forward):Press and hold this button to fast
forward through the current track.
3-84
ProCarManuals.com
Page 249 of 446
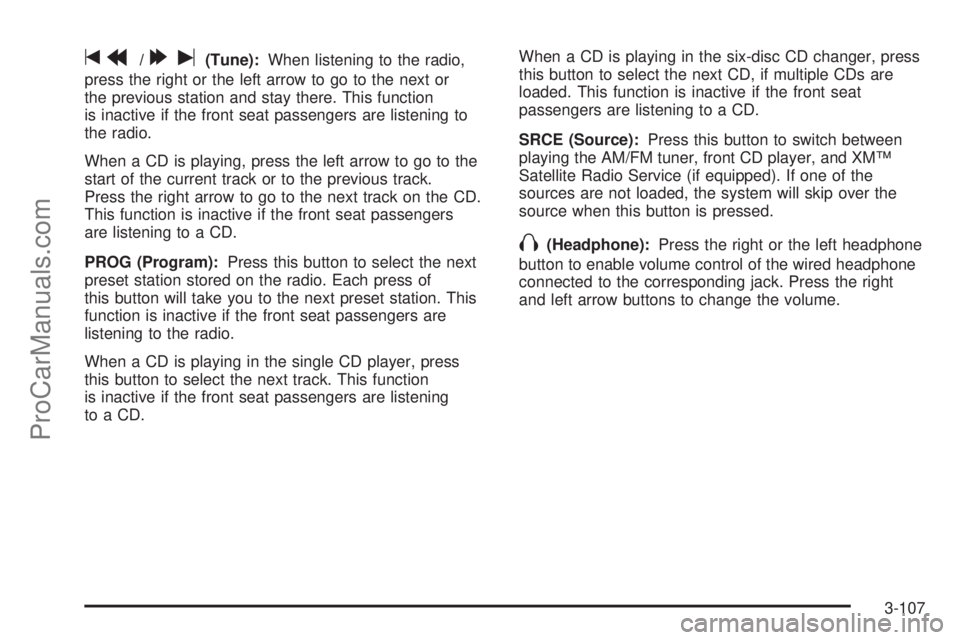
tr/[u(Tune):When listening to the radio,
press the right or the left arrow to go to the next or
the previous station and stay there. This function
is inactive if the front seat passengers are listening to
the radio.
When a CD is playing, press the left arrow to go to the
start of the current track or to the previous track.
Press the right arrow to go to the next track on the CD.
This function is inactive if the front seat passengers
are listening to a CD.
PROG (Program):Press this button to select the next
preset station stored on the radio. Each press of
this button will take you to the next preset station. This
function is inactive if the front seat passengers are
listening to the radio.
When a CD is playing in the single CD player, press
this button to select the next track. This function
is inactive if the front seat passengers are listening
to a CD.When a CD is playing in the six-disc CD changer, press
this button to select the next CD, if multiple CDs are
loaded. This function is inactive if the front seat
passengers are listening to a CD.
SRCE (Source):Press this button to switch between
playing the AM/FM tuner, front CD player, and XM™
Satellite Radio Service (if equipped). If one of the
sources are not loaded, the system will skip over the
source when this button is pressed.
X(Headphone):Press the right or the left headphone
button to enable volume control of the wired headphone
connected to the corresponding jack. Press the right
and left arrow buttons to change the volume.
3-107
ProCarManuals.com
Page 252 of 446

When a CD is playing, press either arrow to go to the
previous or next track, if more than eight seconds have
played. If either arrow is held or pressed more than
once, the player will continue moving backward
or forward through the CD.
BAND:Press this button to switch between FM1, FM2,
AM, or XM1 or XM2 (if equipped).
1-6:Press this button to scan the stations that are
programmed on the radio preset pushbuttons. The radio
will go to the next preset station stored on the
pushbuttons, play for a few seconds, then go on to the
next preset station. Press this button again to stop
scanning. The radio will only scan preset stations with a
strong signal that are in the selected band.
$(Mute):Press this button to silence the system.
Press this button again, to turn the sound on.
r(Play):When listening to the radio, press this
button to play a cassette tape or CD.
wux(Volume):Press the up or down arrow to
increase or decrease the volume.
Radio Reception
AM
The range for most AM stations is greater than for FM,
especially at night. The longer range can cause
station frequencies to interfere with each other. Static
can occur on AM stations caused by things like
storms and power lines. Try reducing the treble to
reduce this noise.
FM Stereo
FM stereo will give the best sound, but FM signals will
reach only about 10 to 40 miles (16 to 65 km). Tall
buildings or hills can interfere with FM signals, causing
the sound to fade in and out.
XM™ Satellite Radio Service
XM™ Satellite Radio Service gives digital radio
reception from coast to coast. Just as with FM, tall
buildings or hills can interfere with satellite radio signals,
causing the sound to fade in and out. The radio may
display NO SIGNAL to indicate interference.
3-110
ProCarManuals.com
Page 316 of 446
Notice:Use only engine oil identi�ed as meeting
GM Standard GM6094M and showing the American
Petroleum Institute Certi�ed For Gasoline Engines
starburst symbol. Failure to use the recommended
oil can result in engine damage not covered by
your warranty.
GM Goodwrench
®oil meets all the requirements for
your vehicle.
If you are in an area of extreme cold, where the
temperature falls below−20°F (−29°C), it is
recommended that you use either an SAE 5W-30
synthetic oil or an SAE 0W-30 oil. Both will provide
easier cold starting and better protection for your engine
at extremely low temperatures.
Engine Oil Additives
Do not add anything to your oil. The recommended oils
with the starburst symbol meet GM Standard GM6094M
are all you will need for good performance and engine
protection.
Engine Oil Life System
When to Change Engine Oil
Your vehicle has a computer system that lets you know
when to change the engine oil and �lter. This is based on
engine revolutions and engine temperature, and not on
mileage. Based on driving conditions, the mileage at
which an oil change will be indicated can vary
considerably. For the oil life system to work properly, you
must reset the system every time the oil is changed.
When the system has calculated that oil life has been
diminished, it will indicate that an oil change is
necessary. A CHANGE OIL SOON message will come
on. SeeDIC Warnings and Messages on page 3-49.
Change your oil as soon as possible within the
next 600 miles (1 000 km). It is possible that, if you are
driving under the best conditions, the oil life system
may not indicate that an oil change is necessary for over
a year. However, your engine oil and �lter must be
changed at least once a year and at this time the system
must be reset. Your retailer has trained people who
will perform this work using genuine Saturn parts and
reset the system. It is also important to check your
oil regularly and keep it at the proper level.
If the system is ever reset accidentally, you must
change your oil at 3,000 miles (5 000 km) since your
last oil change. Remember to reset the oil life system
whenever the oil is changed.
5-16
ProCarManuals.com
Page 317 of 446

How to Reset the Engine Oil Life
System
The Engine Oil Life System calculates when to change
your engine oil and �lter based on vehicle use.
Anytime your oil is changed, reset the system so it can
calculate when the next oil change is required. If a
situation occurs where you change your oil prior to a
CHANGE OIL SOON message being turned on,
reset the system.
1. With the ignition key in RUN but the engine off,
repeatedly push the set/reset button until OIL is
displayed on the Driver Information Center (DIC).
2. Once OIL is displayed, push and hold the set/reset
button for �ve seconds. The number will disappear
and be replaced by 100 (indicating 100% oil life
remaining).
3. Turn the key to LOCK.
If the CHANGE OIL SOON message comes back on
when you start your vehicle, the engine oil life system
has not reset. Repeat the procedure.
What to Do with Used Oil
Used engine oil contains certain elements that may be
unhealthy for your skin and could even cause cancer.
Do not let used oil stay on your skin for very long. Clean
your skin and nails with soap and water, or a good
hand cleaner. Wash or properly dispose of clothing or
rags containing used engine oil. See the manufacturer’s
warnings about the use and disposal of oil products.
Used oil can be a threat to the environment. If you
change your own oil, be sure to drain all the oil from the
�lter before disposal. Never dispose of oil by putting it
in the trash, pouring it on the ground, into sewers, or into
streams or bodies of water. Instead, recycle it by
taking it to a place that collects used oil. If you have a
problem properly disposing of your used oil, ask
your retailer, a service station, or a local recycling center
for help.
5-17
ProCarManuals.com