fuel cap SATURN RELAY 2005 Owners Manual
[x] Cancel search | Manufacturer: SATURN, Model Year: 2005, Model line: RELAY, Model: SATURN RELAY 2005Pages: 446, PDF Size: 3.03 MB
Page 1 of 446
Seats and Restraint Systems........................... 1-1
Front Seats
............................................... 1-2
Rear Seats
............................................... 1-6
Safety Belts
.............................................1-22
Child Restraints
.......................................1-43
Airbag System
.........................................1-64
Restraint System Check
............................1-79
Features and Controls..................................... 2-1
Keys
........................................................ 2-3
Doors and Locks
......................................2-10
Windows
.................................................2-23
Theft-Deterrent Systems
............................2-25
Starting and Operating Your Vehicle
...........2-30
Mirrors
....................................................2-41
OnStar
®System
......................................2-43
HomeLink®Wireless Control System
...........2-44
Storage Areas
.........................................2-49
Instrument Panel............................................. 3-1
Instrument Panel Overview
.......................... 3-4
Climate Controls
......................................3-24
Warning Lights, Gages, and Indicators
........3-29
Driver Information Center (DIC)
..................3-43
Audio System(s)
.......................................3-72Driving Your Vehicle....................................... 4-1
Your Driving, the Road, and Your Vehicle
..... 4-2
Towing
...................................................4-36
Service and Appearance Care.......................... 5-1
Service
..................................................... 5-3
Fuel
......................................................... 5-5
Checking Things Under the Hood
...............5-10
All-Wheel Drive
........................................5-45
Bulb Replacement
....................................5-47
Windshield Wiper Blade Replacement
.........5-51
Tires
......................................................5-52
Appearance Care
.....................................5-87
Vehicle Identi�cation
.................................5-96
Electrical System
......................................5-97
Capacities and Speci�cations
...................5-103
Maintenance Schedule..................................... 6-1
Maintenance Schedule
................................ 6-2
Customer Assistance and Information.............. 7-1
Customer Assistance and Information
........... 7-2
Reporting Safety Defects
............................ 7-8
Index................................................................ 1
2005 Saturn RELAY Owner ManualM
ProCarManuals.com
Page 167 of 446

Outside Air:This mode will be automatically selected
when your vehicle is in any mode except maximum
air conditioning.
9(Fan):Turn the left knob clockwise or
counterclockwise to increase or decrease the fan speed.
Turn the knob to 0 to turn off the fan. The fan must
be turned on for the air conditioning compressor
to operate.
Temperature Control:Turn the center knob clockwise
or counterclockwise to increase or decrease the air
temperature inside your vehicle.
#(Air Conditioning):Press this button to turn the
air-conditioning system on or off. When it is pressed, an
indicator light in the button will come on to let you
know that air conditioning is activated.
You may notice a slight change in engine performance
when the air conditioning compressor shuts off and
turns on again. This is normal. The system is designed
to make adjustments to help with fuel economy while
still maintaining the selected temperature.On hot days, open the windows to let hot inside air
escape; then close them. This helps to reduce the time
it takes for your vehicle to cool down. It also helps
the system to operate more efficiently.
The air conditioning system removes moisture from the
air, so you may sometimes notice a small amount of
water dripping underneath your vehicle while idling
or after turning off the engine. This is normal.
#MAX (Maximum Air Conditioning):Turn the right
knob to this position for maximum air conditioning.
This will select air conditioning and recirculation
for maximum cooling of your vehicle. This mode directs
air to the instrument panel outlets.
Recirculation:This mode keeps outside air from
coming in the vehicle. It can be used to prevent outside
air and odors from entering your vehicle or help heat
or cool the air inside your vehicle more quickly.
This mode will automatically be selected when you
select maximum air conditioning.
((Heated Seats):Press this button to turn on the
heated seats. The button on the left controls the driver’s
seat and the button on the right controls the passenger’s
seat. SeeHeated Seats on page 1-3for additional
information.
3-25
ProCarManuals.com
Page 181 of 446

If the Light Is Flashing
The following may prevent more serious damage to
your vehicle:
Reducing vehicle speed
Avoiding hard accelerations
Avoiding steep uphill grades
If you are towing a trailer, reduce the amount of
cargo being hauled as soon as it is possible
If the light stops �ashing and remains on steady, see “If
the Light Is On Steady” following.
If the light continues to �ash, when it is safe to do so,
stop the vehicle. Find a safe place to park your vehicle.
Turn the key off, wait at least 10 seconds and restart
the engine. If the light remains on steady, see “If
the Light Is On Steady” following. If the light is still
�ashing, follow the previous steps, and see your retailer
for service as soon as possible.
If the Light Is On Steady
You may be able to correct the emission system
malfunction by considering the following:
Did you recently put fuel into your vehicle?
If so, reinstall the fuel cap, making sure to fully install
the cap. SeeFilling the Tank on page 5-8. The
diagnostic system can determine if the fuel cap hasbeen left off or improperly installed. A loose or missing
fuel cap will allow fuel to evaporate into the atmosphere.
A few driving trips with the cap properly installed
should turn the light off.
Did you just drive through a deep puddle of water?
If so, your electrical system may be wet. The condition
will usually be corrected when the electrical system
dries out. A few driving trips should turn the light off.
Have you recently changed brands of fuel?
If so, be sure to fuel your vehicle with quality fuel. See
Gasoline Octane on page 5-5. Poor fuel quality will
cause your engine not to run as efficiently as designed.
You may notice this as stalling after start-up, stalling
when you put the vehicle into gear, mis�ring, hesitation
on acceleration, or stumbling on acceleration. (These
conditions may go away once the engine is warmed up.)
This will be detected by the system and cause the
light to turn on.
If you experience one or more of these conditions,
change the fuel brand you use. It will require at least
one full tank of the proper fuel to turn the light off.
If none of the above steps have made the light turn off,
your retailer can check the vehicle. Your retailer has
the proper test equipment and diagnostic tools to �x any
mechanical or electrical problems that may have
developed.
3-39
ProCarManuals.com
Page 184 of 446
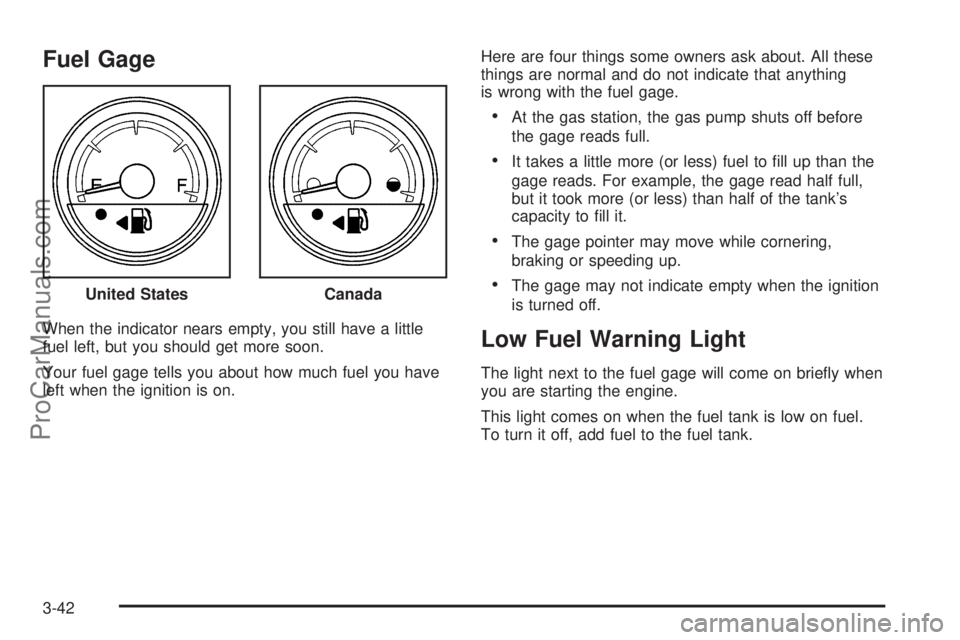
Fuel Gage
When the indicator nears empty, you still have a little
fuel left, but you should get more soon.
Your fuel gage tells you about how much fuel you have
left when the ignition is on.Here are four things some owners ask about. All these
things are normal and do not indicate that anything
is wrong with the fuel gage.
At the gas station, the gas pump shuts off before
the gage reads full.
It takes a little more (or less) fuel to �ll up than the
gage reads. For example, the gage read half full,
but it took more (or less) than half of the tank’s
capacity to �ll it.
The gage pointer may move while cornering,
braking or speeding up.
The gage may not indicate empty when the ignition
is turned off.
Low Fuel Warning Light
The light next to the fuel gage will come on brie�y when
you are starting the engine.
This light comes on when the fuel tank is low on fuel.
To turn it off, add fuel to the fuel tank. United States
Canada
3-42
ProCarManuals.com
Page 187 of 446
There is also a retroactive trip odometer function that
performs the following for each trip odometer:
If the vehicle’s speed has exceeded 3 mph (5 km/h)
during the current ignition cycle, this function will
set the trip odometer to the distance driven
during the current ignition cycle.
If the vehicle’s speed has not exceeded 3 mph
(5 km/h), this function will set the trip odometer
to the distance driven during the previous ignition
cycle plus the distance driven during the current
ignition cycle.
Press and hold the set/reset button for three seconds,
then release the button. The retroactive trip odometer
value will be set into the currently displayed trip
odometer.
Time Elapsed
Press the information button until TIME ELAPSED :00
displays. This mode is like a stopwatch, in that you can
clock the time it takes to get from one point to another.
Each of the �elds for the hours, minutes, and seconds
are two numeric digits.
Once TIME ELAPSED :00 is displayed, press the
set/reset button to start the timing feature. Press the
set/reset button again to stop it. If you will be starting
and stopping your vehicle, during a trip for instance, theTIME ELAPSED feature will automatically start timing
where it left off when you last stopped. To reset it, press
and hold the set/reset button for approximately
1.5 seconds. The display will return to zero.
Average Speed
Press the information button until AVERAGE SPEED
displays. This mode shows the average speed of the
vehicle in miles per hour (mph) or kilometers per
hour (km/h). This average is calculated based on the
various vehicle speed recorded since the last reset of this
value. To reset the value, press the information button to
display AVERAGE SPEED, then press and hold the
set/reset button. The display will return to zero.
Fuel Range
Press the information button until FUEL RANGE
displays. This mode shows the approximate number of
remaining miles or kilometers the vehicle can be
driven without refueling.
Fuel range is based on several factors, including
distance travelled, fuel used, fuel capacity, etc. This
estimate will change if driving conditions change.
For example, if driving in traffic and making frequent
stops, this mode may read one number, but if the vehicle
is driven on a freeway, the number may change even
though the same amount of fuel is in the fuel tank.
3-45
ProCarManuals.com
Page 288 of 446

Item Description Total
AVehicle Capacity Weight
for Example 3=1,000 lbs (453 kg)
BSubtract Occupant
Weight 200 lbs
(91 kg)×5=1,000 lbs (453 kg)
CAvailable Cargo
Weight=0 lbs (0 kg)
Refer to your vehicle’s tire and loading information label
for speci�c information about your vehicle’s capacity
weight and seating positions. The combined weight of
the driver, passengers, and cargo should never
exceed your vehicle’s capacity weight.
Certi�cation/Tire Label
A vehicle speci�c Certi�cation/Tire label is attached to
the rear edge of the driver’s door.
The label shows the gross weight capacity of your
vehicle. This is called the Gross Vehicle Weight
Rating (GVWR). The GVWR includes the weight of the
vehicle, all occupants, fuel, and cargo. Example 3
4-34
ProCarManuals.com
Page 292 of 446

Towing a Trailer
{CAUTION:
If you do not use the correct equipment and
drive properly, you can lose control when you
pull a trailer. For example, if the trailer is too
heavy, the brakes may not work well — or even
at all. You and your passengers could be
seriously injured. Pull a trailer only if you have
followed all the steps in this section. Ask your
retailer for advice and information about
towing a trailer with your vehicle.
Notice:Pulling a trailer improperly can damage
your vehicle and result in costly repairs that would
not be covered by your warranty. Always follow
the instructions in this section and check with your
retailer for more information about towing a
trailer with your vehicle.Your vehicle can tow a trailer. To identify what the
vehicle trailering capacity is for your vehicle, you should
read the information in “Weight of the Trailer” that
appears later in this section. But trailering is different
than just driving your vehicle by itself. Trailering means
changes in handling, acceleration, braking, durability,
and fuel economy. Successful, safe trailering takes
correct equipment, and it has to be used properly.
That is the reason for this section. In it are many
time-tested, important trailering tips and safety rules.
Many of these are important for your safety and that of
your passengers. So please read this section carefully
before you pull a trailer.
Load-pulling components such as the engine, transaxle,
wheel assemblies, and tires are forced to work harder
against the drag of the added weight. The engine
is required to operate at relatively higher speeds and
under greater loads, generating extra heat. The
trailer also adds considerably to wind resistance,
increasing the pulling requirements.
4-38
ProCarManuals.com
Page 301 of 446
Service............................................................5-3
Doing Your Own Service Work.........................5-4
Adding Equipment to the Outside of
Your Vehicle..............................................5-5
Fuel................................................................5-5
Gasoline Octane............................................5-5
Gasoline Speci�cations....................................5-5
California Fuel...............................................5-6
Additives.......................................................5-6
Fuels in Foreign Countries...............................5-7
Filling the Tank..............................................5-8
Filling a Portable Fuel Container.....................5-10
Checking Things Under the Hood....................5-10
Hood Release..............................................5-11
Engine Compartment Overview.......................5-12
Engine Oil...................................................5-13
Engine Oil Life System..................................5-16
Engine Air Cleaner/Filter................................5-18
Automatic Transaxle Fluid..............................5-19
Engine Coolant.............................................5-22
Radiator Pressure Cap..................................5-25
Engine Overheating.......................................5-25
Overheated Engine Protection
Operating Mode........................................5-27
Cooling System............................................5-28
Power Steering Fluid.....................................5-34Windshield Washer Fluid................................5-35
Brakes........................................................5-36
Battery........................................................5-39
Jump Starting...............................................5-40
All-Wheel Drive..............................................5-45
Bulb Replacement..........................................5-47
Halogen Bulbs..............................................5-47
Headlamps and Sidemarker Lamps.................5-47
Front Turn Signal, Parking and Daytime
Running Lamps (DRL)................................5-49
Taillamps, Turn Signal, Stoplamps and
Back-up Lamps.........................................5-49
Replacement Bulbs.......................................5-50
Windshield Wiper Blade Replacement..............5-51
Tires..............................................................5-52
Tire Sidewall Labelling...................................5-53
Tire Terminology and De�nitions.....................5-55
In�ation - Tire Pressure.................................5-58
Tire Inspection and Rotation...........................5-59
When It Is Time for New Tires.......................5-60
Buying New Tires.........................................5-61
Uniform Tire Quality Grading..........................5-62
Wheel Alignment and Tire Balance..................5-63
Wheel Replacement......................................5-64
Section 5 Service and Appearance Care
5-1
ProCarManuals.com
Page 308 of 446
Filling the Tank
{CAUTION:
Fuel vapor burns violently and a fuel �re can
cause bad injuries. To help avoid injuries to
you and others, read and follow all the
instructions on the pump island. Turn off your
engine when you are refueling. Do not smoke
if you are near fuel or refueling your vehicle.
Keep sparks, �ames, and smoking materials
away from fuel. Do not leave the fuel pump
unattended when refueling your vehicle — this
is against the law in some places. Keep
children away from the fuel pump; never let
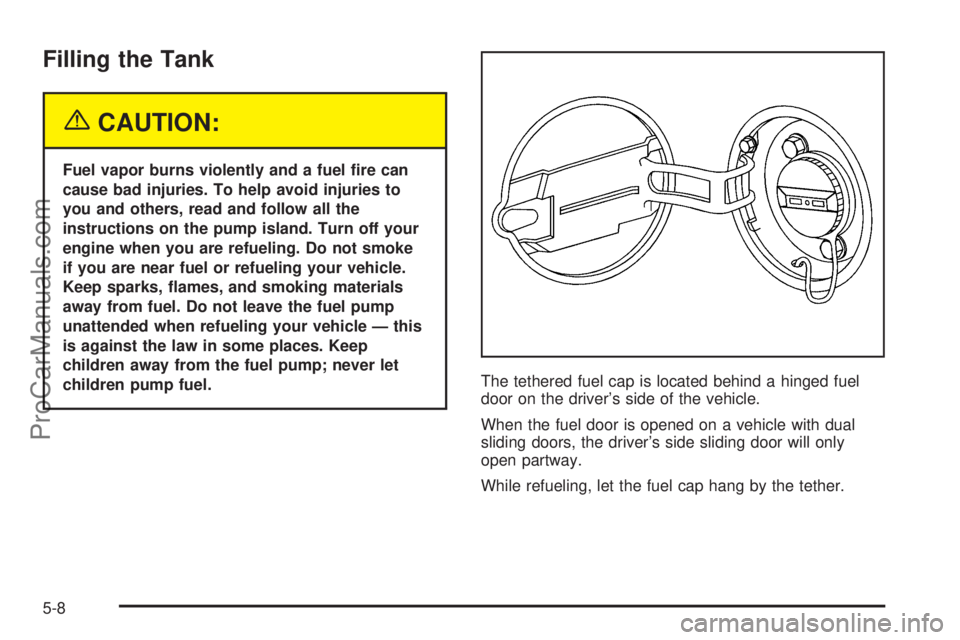
children pump fuel.The tethered fuel cap is located behind a hinged fuel
door on the driver’s side of the vehicle.
When the fuel door is opened on a vehicle with dual
sliding doors, the driver’s side sliding door will only
open partway.
While refueling, let the fuel cap hang by the tether.
5-8
ProCarManuals.com
Page 309 of 446

{CAUTION:
If you spill fuel and then something ignites it,
you could be badly burned. Fuel can spray out
on you if you open the fuel cap too quickly.
This spray can happen if your tank is nearly
full, and is more likely in hot weather. Open
the fuel cap slowly and wait for any hiss noise
to stop. Then unscrew the cap all the way.
Be careful not to spill fuel. Do not top off or over�ll the
tank and wait a few seconds after you have �nished
pumping before removing the nozzle. Clean fuel
from painted surfaces as soon as possible. See
Washing Your Vehicle on page 5-91.
When replacing the fuel cap, turn it clockwise until it
clicks. Make sure the cap is fully installed. The
diagnostic system can determine if the fuel cap has
been left off or improperly installed. This would allow fuel
to evaporate into the atmosphere. SeeMalfunction
Indicator Lamp on page 3-38.The CHECK GAS CAP message will be displayed in the
Driver Information Center (DIC) if the fuel cap is not
properly installed. SeeDIC Warnings and Messages on
page 3-49for more information.
{CAUTION:
If a �re starts while you are refueling, do not
remove the nozzle. Shut off the �ow of fuel by
shutting off the pump or by notifying the
station attendant. Leave the area immediately.
Notice:If you need a new fuel cap, be sure to get
the right type. Your dealer can get one for you.
If you get the wrong type, it may not �t properly.
This may cause your malfunction indicator lamp to
light and may damage your fuel tank and emissions
system. SeeMalfunction Indicator Lamp on
page 3-38.
5-9
ProCarManuals.com