change time SATURN RELAY 2007 User Guide
[x] Cancel search | Manufacturer: SATURN, Model Year: 2007, Model line: RELAY, Model: SATURN RELAY 2007Pages: 570, PDF Size: 3.41 MB
Page 238 of 570
Average Fuel Economy
Press the information button until AVG ECONOMY
displays. This mode shows the approximate
average miles per gallon (mpg) or liters per
100 kilometers (L/100 km). This number is
calculated based on the number of mpg (L/100 km)
recorded since the last time this menu item was
reset. To reset AVG ECONOMY, press and hold
the set/reset button. The display will return to zero.
Battery
Press the information button until BATTERY
displays. This mode shows the current battery
voltage.
Your vehicle’s charging system regulates voltage
based on the state of the battery. The battery
voltage may �uctuate when viewing this
information on the DIC. This is normal.
If there is a problem with the battery charging
system, a DIC message will display. See
DIC Warnings and Messages on page 241for
more information.
Oil Life
Press the information button until OIL LIFE
displays. This mode shows an estimate of the oil’s
remaining useful life. If you see OIL LIFE 99%
on the display, that means 99% of the current oil
life remains. The engine oil life system will
alert you to change your oil on a schedule
consistent with your driving conditions.
When the remaining oil life is low, the CHANGE
OIL SOON message will appear on the display.
You should change your oil as soon as possible.
SeeEngine Oil on page 423. In addition to the
engine oil life system monitoring the oil life,
additional maintenance is recommended in the
Maintenance Schedule in this manual. See
Scheduled Maintenance on page 522for more
information.
Remember, you must reset the OIL LIFE yourself
after each oil change. It will not reset itself.
Also, be careful not to reset the OIL LIFE
accidentally at any time other than when the oil
has just been changed. It cannot be reset
accurately until the next oil change. To reset the
engine oil life system, seeEngine Oil Life
System on page 426. The display will show 100%
when the system is reset.
238
ProCarManuals.com
Page 241 of 570
To adjust for compass variance, use the following
procedure:
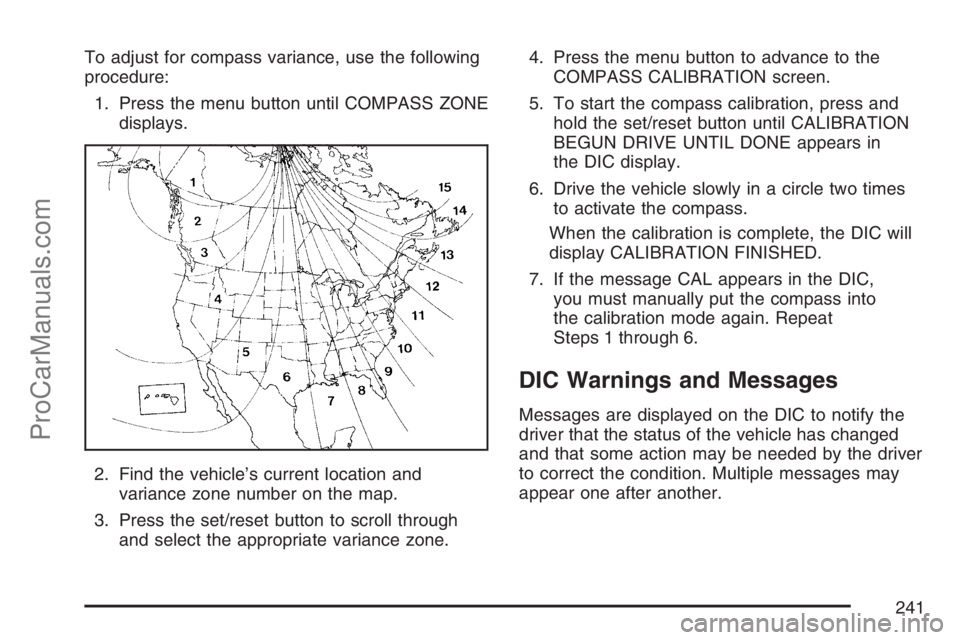
1. Press the menu button until COMPASS ZONE
displays.
2. Find the vehicle’s current location and
variance zone number on the map.
3. Press the set/reset button to scroll through
and select the appropriate variance zone.4. Press the menu button to advance to the
COMPASS CALIBRATION screen.
5. To start the compass calibration, press and
hold the set/reset button until CALIBRATION
BEGUN DRIVE UNTIL DONE appears in
the DIC display.
6. Drive the vehicle slowly in a circle two times
to activate the compass.
When the calibration is complete, the DIC will
display CALIBRATION FINISHED.
7. If the message CAL appears in the DIC,
you must manually put the compass into
the calibration mode again. Repeat
Steps 1 through 6.
DIC Warnings and Messages
Messages are displayed on the DIC to notify the
driver that the status of the vehicle has changed
and that some action may be needed by the driver
to correct the condition. Multiple messages may
appear one after another.
241
ProCarManuals.com
Page 259 of 570
This message displays only while the ignition is in
RUN. This message stays on until road conditions
change and StabiliTrak
®is not active.
This message cannot be acknowledged and
cleared from the screen.
STABILITY CONTROL OFF
If your vehicle has StabiliTrak®, this message
displays any time the system turns off. When this
message has been displayed, StabiliTrak
®is
no longer available to assist you with directional
control of the vehicle. Adjust your driving
accordingly. SeeStabiliTrak
®System on page 367.
This message displays only while the ignition is
in RUN.
Any of the following conditions may cause the
StabiliTrak
®system to turn off:
The battery is low.
There is a StabiliTrak®system failure. See
your retailer for service.
STARTING DISABLED
This message displays if the starting of the engine
is disabled due to the electronic throttle control
system or vehicle theft-deterrent system.
Have your vehicle serviced by your retailer
immediately.
This message only appears while the ignition is in
RUN and will not disappear until the problem is
resolved.
This message cannot be acknowledged.
TRACTION CONTROL ACTIVE
If your vehicle has the Traction Control System
(TCS), this message displays when the system is
on. Slippery road conditions may exist if this
message is displayed, so adjust your driving
accordingly. SeeTraction Control System (TCS)
on page 365for more information.
This message only displays while the ignition is in
RUN and will not disappear until driving conditions
change and the TCS is no longer active.
This message cannot be acknowledged or cleared
from the screen.
259
ProCarManuals.com
Page 272 of 570
Setting the Time
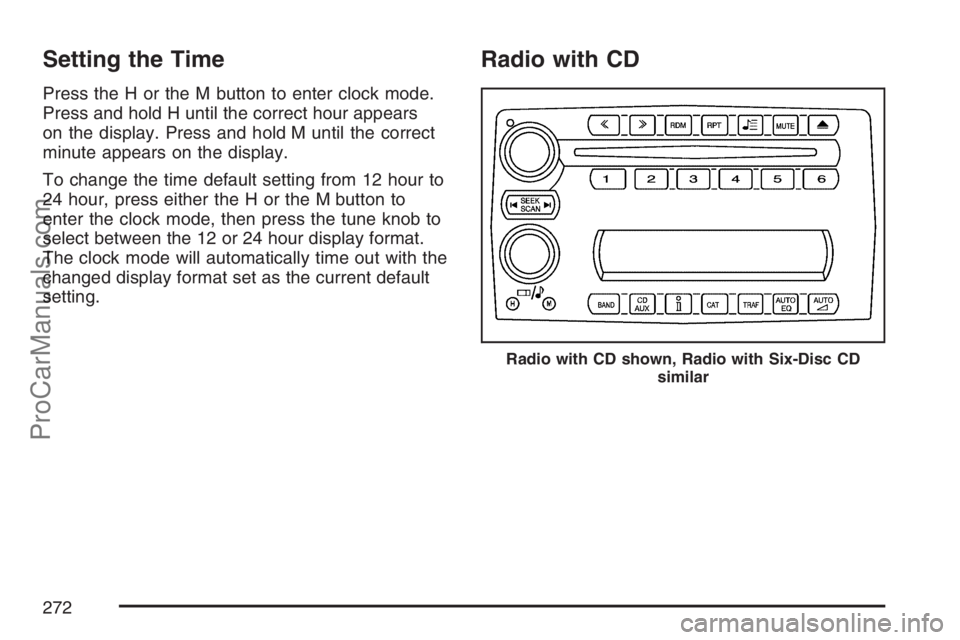
Press the H or the M button to enter clock mode.
Press and hold H until the correct hour appears
on the display. Press and hold M until the correct
minute appears on the display.
To change the time default setting from 12 hour to
24 hour, press either the H or the M button to
enter the clock mode, then press the tune knob to
select between the 12 or 24 hour display format.
The clock mode will automatically time out with the
changed display format set as the current default
setting.
Radio with CD
Radio with CD shown, Radio with Six-Disc CD
similar
272
ProCarManuals.com
Page 273 of 570
Radio Data System (RDS)
The audio system has a Radio Data System
(RDS). RDS features are available for use only on
FM stations that broadcast RDS information.
With RDS, the radio can do the following:
Seek to stations broadcasting the selected
type of programming
Receive announcements concerning local and
national emergencies
Display messages from radio stations
Seek to stations with traffic announcements
This system relies upon receiving speci�c
information from these stations and only works
when the information is available. In rare cases, a
radio station may broadcast incorrect information
that causes the radio features to work improperly.
If this happens, contact the radio station.
While the radio is tuned to an RDS station, the
station name or call letters appear on the display.
RDS stations may also provide the time of day,
a program type (PTY) for current programming,
and the name of the program being broadcast.
XM™ Satellite Radio Service
XM™ is a satellite radio service that is based in
the 48 contiguous United States and Canada.
XM™ offers a large variety of coast-to-coast
channels including music, news, sports, talk,
traffic/weather (U.S. subscribers), and children’s
programming. XM™ provides digital quality
audio and text information that includes song title
and artist name. A service fee is required in
order to receive the XM™ service. For more
information, contact XM™; In the U.S. at
www.xmradio.com or call 1-800-852-XMXM (9696)
or in Canada at www.xmradio.ca or call
1-877-GET-XMSR (438-9677).
Playing the Radio
Top Knob (Power/Volume):Press this knob to
turn the system on and off. Turn this knob to
increase or to decrease the volume.
4(Information):For RDS, press this button to
change what appears on the display while
using RDS. The display options are station name,
RDS station frequency, PTY, and the name of
the program (if available).
273
ProCarManuals.com
Page 296 of 570
If you move too far forward or step out of the
vehicle, the headphones will lose the audio signal.
DVD and auxiliary audio will always be found
on channel (CHA or CH1) of the wireless
headphones. RSA audio is dedicated to CHB or
CH2 of the wireless headphones.
To adjust the volume on the wireless headphones,
use the volume control.
Notice:Do not store the headphones in heat
or direct sunlight. This could damage the
headphones and repairs will not be covered by
your warranty. Keep the headphones stored
in a cool, dry place.
If there is a decreased audio signal during CD,
MP3, or DVD play, there may be a low hissing
noise through the speakers and/or headphones.
If the hissing sound in the wireless headphones
seems excessive, make sure that the headphone
batteries are fully charged. Some amount of
hissing is normal.
Both sets of rear seat headphones may include
foam ear pads that can be replaced.Foam ear pads on these headphones may become
worn or damaged. The headphone foam ear pads
can become damaged if they are not handled or
stored properly. If the foam ear pads do become
damaged or worn out, the pads can be replaced
separately from the headphone set. It is not
necessary to replace the complete headphone set.
The headphone replacement foam ear pads can
be ordered in pairs. See your dealer for more
information.
Battery Replacement
To change the batteries, do the following:
1. Loosen the screw on the battery compartment
door located on the left side of the headphone
earpiece.
2. Replace the two AAA batteries in the
compartment. Make sure that they are
installed correctly using the diagram on the
inside of the battery compartment.
3. Tighten the screw on the battery
compartment door.
If the headphones are to be stored for a long
period of time, remove the batteries, and keep
them in a cool, dry place.
296
ProCarManuals.com
Page 305 of 570
To use the RSE OSD menu when using a CD or
an MP3, do the following:
Make sure that a CD or an MP3 is loaded in the
RSE system and that the system is not in auxiliary,
then press the display button on the remote
control. Once the menu is on the screen, use the
directional arrows and the enter button to
navigate the screen. This menu will let you select
default preferences for language and playback
settings. To exit this menu, press the display or the
return button on the remote control or wait for
the menu to time out.
Battery Replacement
To change the remote control batteries, do the
following:
1. Slide the battery door, located on the back of
the remote control, down.
2. Replace the two AA batteries in the
compartment. Make sure that they are
installed correctly, using the diagram on the
inside of the battery compartment.
3. Close the battery door.If the remote control is to be stored for a long
period of time, remove the batteries and keep them
in a cool, dry place.
Tips and Troubleshooting Chart
Problem Recommended Action
No power. The ignition may not be
in ACCESSORY, RUN,
or RAP.
Disc will not play. The system might be off.
The parental control
button might have been
pressed. The power
indicator lights will �ash.
The system might be in
auxiliary source mode.
Press the AUX button to
switch between the DVD
player and the auxiliary
source. The disc is upside
down or is not compatible.
No sound — Wireless
HeadphonesTurn the headphones on.
Make sure the correct
channel is selected on the
wireless headphones.
Check the batteries.
The volume on the
headphones could be too
low, adjust the volume.
305
ProCarManuals.com
Page 311 of 570
To adjust the volume on the wireless headphones,
use the volume control located on the
headphones.
If there is a decreased audio signal during CD,
MP3, or DVD play, there may be a low hissing
noise through the speakers and/or headphones.
If the hissing sound in the wireless headphones
seems excessive, make sure that the headphone
batteries are fully charged. Some amount of
hissing is normal.
Both sets of rear seat headphones may include
foam ear pads that can be replaced.
Foam ear pads on these headphones may
become worn or damaged. The headphone foam
ear pads can become damaged if they are not
handled or stored properly. If the foam ear pads do
become damaged or worn out, the pads can be
replaced separately from the headphone set.
It is not necessary to replace the complete
headphone set.
The headphone replacement foam ear pads can
be ordered in pairs. See your retailer for more
information.Battery Replacement
To change the batteries, do the following:
1. Loosen the screw on the battery compartment
door located on the left side of the headphone
earpiece.
2. Replace the two batteries in the compartment.
Make sure that they are installed correctly
using the diagram on the inside of the battery
compartment.
3. Tighten the screw on the battery
compartment door.
If the headphones are to be stored for a long
period of time, remove the batteries, and keep
them in a cool, dry place.
Wired Headphones
There is a right and left wired headphone jack.
To adjust the volume, do the following:
1. Plug the headphone into the corresponding
jack, located behind the video screen, next
to the auxiliary jacks.
311
ProCarManuals.com
Page 321 of 570
Battery Replacement
To change the remote control batteries, do the
following:
1. Slide the battery door, located on the back of
the remote control, down.
2. Replace the two batteries in the compartment.
Make sure that they are installed correctly,
using the diagram on the inside of the battery
compartment.
3. Close the battery door.
If the remote control is to be stored for a long
period of time, remove the batteries and keep them
in a cool, dry place.
Tips and Troubleshooting Chart
Problem Recommended Action
No power. The ignition may not be
in ACCESSORY, RUN,
or RAP.
Disc will not play. The system might be off.
The parental control
button might have been
pressed. The power
indicator lights will �ash.
The system might be in
auxiliary source mode.
Press the DVD AUX
button on the player
faceplate or the AUX
button on the remote to
switch between the DVD
player and the auxiliary
sources. The disc is
upside down or is not
compatible.
No sound — Wireless
HeadphonesTurn the headphones on.
Make sure the correct
channel is selected on the
wireless headphones.
Check the batteries.
The volume on the
headphones could be too
low, adjust the volume.
321
ProCarManuals.com
Page 336 of 570
Modes Overview
The numbered preset buttons one through four
are used to change the order tracks are grouped
and played. For example, in artist mode, all
tracks are grouped by artist names. Artist names
are listed alphabetically.
The SEEK/SCAN arrows are used to change the
mode item. For example, in Album Mode this will
change to the next or previous album. The mode list
name will display for �ve seconds, time-out, then
update to show which list the GM Mobile Digital
Media system is currently playing.
The tune knob is used to change the song within
the current category. For example, while in a
playlist (Playlist Mode) turning the tune knob to
the right will change from track 1 to track 2.
tSEEK/SCANu:Once a mode has been set,
navigate through the categories within that mode
by pressing the right or left SEEK/SCAN arrow.
The category items will display for �ve seconds,
time-out, then update to show which category the
Digital Media system is currently playing.
To change the song that is currently playing, press
the right or left SEEK/SCAN arrow to navigate
through the songs.
Setting the Browse Mode Using Voice
Index™
The system automatically organizes all of the
songs on the DMS (digital media storage)
cartridge for you. With Voice Index™ browsing,
the six numbered pushbuttons are used as mode
buttons to browse as the system reads album,
artist, genre and playlist names to you while
you drive.
1-6 (Pushbuttons):The GM Digital Media system
uses the numbered station preset buttons to
switch through the browse modes. Press one of
the pushbuttons to set the browse mode. The
selected browse mode will be announced and the
browse mode name will appear on the display.
The preset pushbuttons and the modes associated
with those numbers are:
(1) Album
(2) Artist
(3) Genre
(4) Playlist
(5) Not Used
(6) Not Used
336
ProCarManuals.com