display SATURN RELAY 2007 User Guide
[x] Cancel search | Manufacturer: SATURN, Model Year: 2007, Model line: RELAY, Model: SATURN RELAY 2007Pages: 570, PDF Size: 3.41 MB
Page 216 of 570
qg(Decrease Setting):Press this button to
decrease the fan or temperature setting when
arrows are active in the display.
rl(Increase Setting):Press this button to
increase the fan or temperature setting when
arrows are active in the display.
9(Fan)b(Temperature):Press this button once
to enable adjustment of the fan speed. After
pressing this button, the current fan speed setting
will be highlighted and appear in the on screen
display. The arrows indicate that to increase
or decrease fan speed, you need to press either
the left or right arrow button. The on screen display
will disappear after a few seconds.
Press this button twice to enable temperature
adjustment. After pressing this button, the current
temperature settings will be highlighted and
appear in the on screen display. The arrows
indicate that to increase or decrease temperature,
you need to press either the left or right arrow
button. The on screen display will disappear after
a few seconds.Pressing this button a third time will turn off the on
screen display.
QR:Press the up and down arrows to toggle
between the fan and temperature settings.
Rear Air Outlets
The outlet behind the left rear seat is the cold air
return outlet. Be sure to keep it free from
obstructions. Also, keep the area around the base
of the center instrument panel console, between
and under the front seats, free of objects that could
also obstruct air�ow to the rear seating area.
For more information on how to use the main
climate control system, seeDual Climate Control
System on page 209. For information on
ventilation, seeOutlet Adjustment on page 212.
216
ProCarManuals.com
Page 221 of 570

Speedometer and Odometer
Your speedometer lets you see your speed in both
miles per hour (mph) and kilometers per hour
(km/h). Your odometer shows how far your vehicle
has been driven, in either miles (used in the
United States) or kilometers (used in Canada).
Your vehicle has a tamper-resistant odometer.
You may wonder what happens if your vehicle
needs a new odometer installed. The new one can
be set to the mileage total of the old odometer.
Trip Odometer
The trip odometer can display how far you have
driven since you last reset it.
For more information seeDIC Operation and
Displays on page 235.
Tachometer
The tachometer displays
the engine speed in
revolutions per
minute (rpm).
221
ProCarManuals.com
Page 234 of 570

Here are four things some owners ask about.
All these things are normal and do not indicate that
anything is wrong with the fuel gage.
At the gas station, the gas pump shuts off
before the gage reads full.
It takes a little more (or less) fuel to �ll up
than the gage reads. For example, the
gage read half full, but it took more (or less)
than half of the tank’s capacity to �ll it.
The gage pointer may move while cornering,
braking or speeding up.
The gage may not indicate empty when the
ignition is turned off.
Low Fuel Warning Light
The light next to the fuel gage will come on brie�y
when you are starting the engine.
This light comes on when the fuel tank is low on
fuel. To turn it off, add fuel to the fuel tank.
Driver Information Center (DIC)
Your vehicle has a Driver Information Center (DIC).
All messages will appear in the DIC display
located in the instrument panel cluster, below the
tachometer. The DIC buttons are located on
the center of the instrument panel, below the
center outlets.
The DIC comes on when the ignition is on. After a
short delay, the DIC will display WELCOME
DRIVER (1 or 2) if a personalized key 1 or 2 is
used, and then the information that was last
displayed before the engine was turned off. The
driver number also corresponds to the numbers,
1 or 2, on the back of the remote keyless entry
transmitters.
The DIC displays the odometer, trip odometers,
fuel economy, trip computer, vehicle system
information, and compass display, if equipped.
It also displays warning messages if a system
problem is detected. In addition, the DIC displays
phone numbers that are called using the
OnStar
®system, if equipped. SeeOnStar®
System on page 154.
234
ProCarManuals.com
Page 235 of 570

If equipped, the outside air temperature
automatically appears in the bottom right corner of
the DIC display when viewing all of the information
screens, except for the oil life screens. If the
outside air temperature is at or below 37°F (3°C),
the temperature reading will toggle between
displaying the outside temperature and the word
ICE for two minutes. If there is a problem with the
system that controls the temperature display,
the letters OC (open circuit) or SC (short circuit)
will appear on the display. If this occurs, have the
vehicle serviced by your retailer.
The DIC also allows some features to be
customized or personalized, if equipped. SeeDIC
Vehicle Personalization (Uplevel Only) on
page 261for more information.DIC Operation and Displays
The DIC has different modes which can be
accessed by pressing the DIC buttons located on
the center of the instrument panel. The buttons
are the information, set/reset, and menu buttons.
The button functions are detailed in the following
pages.
DIC Buttons
Q4R(Information):Press this button to display
the odometer, trip distance, time elapsed,
average speed, fuel economy, battery voltage, oil
life, and to turn off the DIC.
r(Set/Reset):Press this button to set or reset
certain functions and to turn off or acknowledge
messages on the DIC.
235
ProCarManuals.com
Page 236 of 570
q(Menu):Press this button to display the units,
language, personalization, if equipped, compass
zone and compass calibration, if equipped.
SeeDIC Vehicle Personalization (Uplevel Only) on
page 261andDIC Compass (Uplevel Only) on
page 240for more information.
Information Button Items
Q4R
(Information):Press this button to scroll
through the following items:
Odometer
Press the information button until the odometer
displays. This mode shows the distance the
vehicle has been driven in either miles or
kilometers.
Trip A and Trip B
Press the information button until A or B displays.
This mode shows the current distance traveled
in either miles or kilometers since the last reset for
each trip odometer. Both trip odometers can be
used at the same time.The display will show the odometer on the top line
and the trip odometer information, either A or B,
on the bottom line.
Each trip odometer can be reset to zero separately
by pressing the set/reset button while the desired
trip odometer is displayed.
There is also a retroactive trip odometer function
that performs the following for each trip
odometer:
If the vehicle’s speed has exceeded 3 mph
(5 km/h) during the current ignition cycle,
this function will set the trip odometer to the
distance driven during the current ignition
cycle.
If the vehicle’s speed has not exceeded 3 mph
(5 km/h), this function will set the trip odometer
to the distance driven during the previous
ignition cycle plus the distance driven during
the current ignition cycle.
Press and hold the set/reset button for
three seconds, then release the button. The
retroactive trip odometer value will be set into the
currently displayed trip odometer.
236
ProCarManuals.com
Page 237 of 570

Time Elapsed
Press the information button until TIME
ELAPSED :00 displays. This mode is like a
stopwatch, in that you can clock the time it takes
to get from one point to another. Each of the
�elds for the hours, minutes, and seconds are
two numeric digits.
Once TIME ELAPSED :00 is displayed, press the
set/reset button to start the timing feature.
Press the set/reset button again to stop it. If you
will be starting and stopping your vehicle, during a
trip for instance, the TIME ELAPSED feature
will automatically start timing where it left off when
you last stopped. To reset it, press and hold
the set/reset button for approximately 1.5 seconds.
The display will return to zero.
Average Speed
Press the information button until AVERAGE
SPEED displays. This mode shows the average
speed of the vehicle in miles per hour (mph)
or kilometers per hour (km/h). This average is
calculated based on the various vehicle speed
recorded since the last reset of this value. To reset
the value, press the information button to display
AVERAGE SPEED, then press and hold the
set/reset button. The display will return to zero.
Fuel Range
Press the information button until FUEL RANGE
displays. This mode shows the approximate
number of remaining miles or kilometers the
vehicle can be driven without refueling.
Fuel range is based on several factors, including
distance travelled, fuel used, fuel capacity,
etc. This estimate will change if driving conditions
change. For example, if driving in traffic and
making frequent stops, this mode may read
one number, but if the vehicle is driven on a
freeway, the number may change even though the
same amount of fuel is in the fuel tank. This is
because different driving conditions produce
different fuel economies. Generally, freeway
driving produces better fuel economy than city
driving. Fuel range cannot be reset.
If your vehicle is low on fuel, FUEL RANGE LOW
will display followed by the LOW FUEL message.
See “LOW FUEL” underDIC Warnings and
Messages on page 241for more information.
237
ProCarManuals.com
Page 238 of 570
Average Fuel Economy
Press the information button until AVG ECONOMY
displays. This mode shows the approximate
average miles per gallon (mpg) or liters per
100 kilometers (L/100 km). This number is
calculated based on the number of mpg (L/100 km)
recorded since the last time this menu item was
reset. To reset AVG ECONOMY, press and hold
the set/reset button. The display will return to zero.
Battery
Press the information button until BATTERY
displays. This mode shows the current battery
voltage.
Your vehicle’s charging system regulates voltage
based on the state of the battery. The battery
voltage may �uctuate when viewing this
information on the DIC. This is normal.
If there is a problem with the battery charging
system, a DIC message will display. See
DIC Warnings and Messages on page 241for
more information.
Oil Life
Press the information button until OIL LIFE
displays. This mode shows an estimate of the oil’s
remaining useful life. If you see OIL LIFE 99%
on the display, that means 99% of the current oil
life remains. The engine oil life system will
alert you to change your oil on a schedule
consistent with your driving conditions.
When the remaining oil life is low, the CHANGE
OIL SOON message will appear on the display.
You should change your oil as soon as possible.
SeeEngine Oil on page 423. In addition to the
engine oil life system monitoring the oil life,
additional maintenance is recommended in the
Maintenance Schedule in this manual. See
Scheduled Maintenance on page 522for more
information.
Remember, you must reset the OIL LIFE yourself
after each oil change. It will not reset itself.
Also, be careful not to reset the OIL LIFE
accidentally at any time other than when the oil
has just been changed. It cannot be reset
accurately until the next oil change. To reset the
engine oil life system, seeEngine Oil Life
System on page 426. The display will show 100%
when the system is reset.
238
ProCarManuals.com
Page 239 of 570
Menu Button Items
q
(Menu):Press this button to scroll through the
following items:
Units
Press the menu button until UNITS displays. This
mode allows you to select between English or
Metric units of measurement. Once in this mode,
press the set/reset button to select between
ENGLISH or METRIC.
Language
Press the menu button until the language screen
displays. This mode allows you to select the
language in which the DIC messages will appear.
Once in this mode, press the set/reset button
to select among the following choices:
English
Francais (French)
Espanol (Spanish)
Personalization (Uplevel Only)
Press the menu button until PERSONAL
PROGRAM displays. Your vehicle may have
personalization capabilities that allow you
to program certain features to a preferred setting
for up to two drivers.
Your vehicle may also have customization
capabilities that allow you to program certain
features to one preferred setting. Customization
features can only be programmed to one setting on
the vehicle and cannot be programmed to a
preferred setting for up to two drivers. SeeDIC
Vehicle Personalization (Uplevel Only) on
page 261for additional information on personal
programming.
Compass Zone (Uplevel Only)
Under certain circumstances, such as during a
long distance cross-country trip, it will be
necessary to compensate for compass variance
and reset the zone. To change the compass zone
through the DIC, seeDIC Compass (Uplevel
Only) on page 240.
239
ProCarManuals.com
Page 240 of 570

Compass Calibration (Uplevel Only)
The compass can be manually calibrated. To
calibrate the compass through the DIC, seeDIC
Compass (Uplevel Only) on page 240.
DIC Compass (Uplevel Only)
Your vehicle may have a compass in the Driver
Information Center (DIC).
Compass Zone
Press the menu button until COMPASS ZONE
displays. Press the set/reset button to change the
compass zone. Zones 1 through 15 are available.
The direction the vehicle is moving will be
displayed in the top right corner of the DIC display.
Compass Calibration
Under certain circumstances, such as during a
long distance cross-country trip, it will be
necessary to compensate for compass variance
and reset the zone through the DIC.
Compass variance is the difference between the
earth’s magnetic north and true geographic
north. If not adjusted to account for compass
variance, the compass in the vehicle could give
false readings.
In order to do this, the compass must be set or
calibrated to the variance zone in which the vehicle
is traveling.
240
ProCarManuals.com
Page 241 of 570
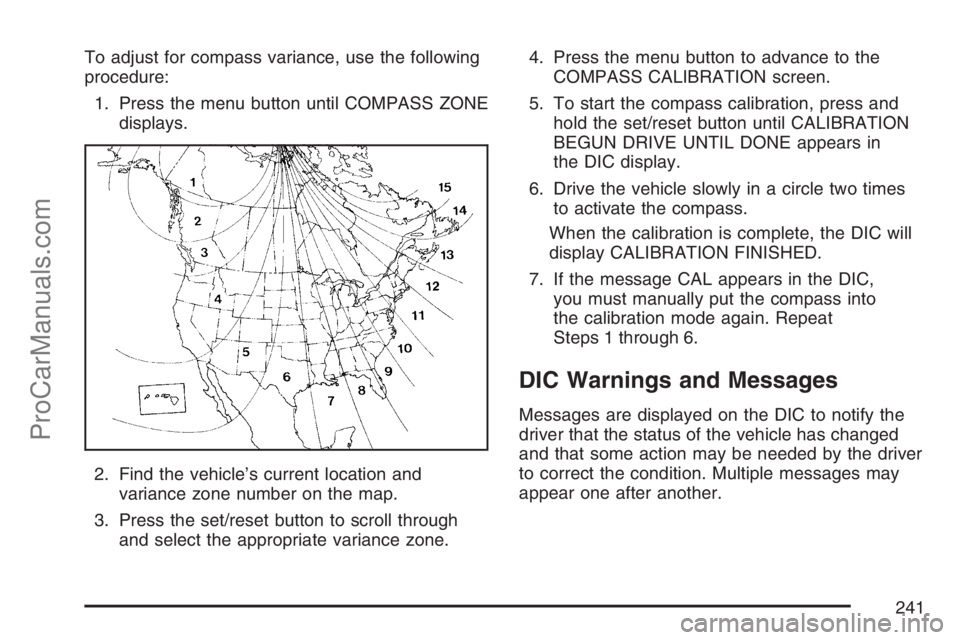
To adjust for compass variance, use the following
procedure:
1. Press the menu button until COMPASS ZONE
displays.
2. Find the vehicle’s current location and
variance zone number on the map.
3. Press the set/reset button to scroll through
and select the appropriate variance zone.4. Press the menu button to advance to the
COMPASS CALIBRATION screen.
5. To start the compass calibration, press and
hold the set/reset button until CALIBRATION
BEGUN DRIVE UNTIL DONE appears in
the DIC display.
6. Drive the vehicle slowly in a circle two times
to activate the compass.
When the calibration is complete, the DIC will
display CALIBRATION FINISHED.
7. If the message CAL appears in the DIC,
you must manually put the compass into
the calibration mode again. Repeat
Steps 1 through 6.
DIC Warnings and Messages
Messages are displayed on the DIC to notify the
driver that the status of the vehicle has changed
and that some action may be needed by the driver
to correct the condition. Multiple messages may
appear one after another.
241
ProCarManuals.com