manual radio set SATURN RELAY 2007 Owner's Manual
[x] Cancel search | Manufacturer: SATURN, Model Year: 2007, Model line: RELAY, Model: SATURN RELAY 2007Pages: 570, PDF Size: 3.41 MB
Page 328 of 570
Rear Seat Audio (RSA)
(Option B, Uplevel)
Your vehicle may have this type of rear seat audio
(RSA) system, if it has this feature, it will allow
rear seat passengers to listen to and control any of
the following audio sources: AM/FM tuner, front
CD player, and XM™ Satellite Radio Service
(if equipped). However, the rear seat passengers
can only control the sources that the front seat
passengers are not listening to. For example, rear
seat passengers may listen to a CD in the front
radio and control it while the driver listens to
the radio through the front speakers. The rear seat
passengers have control of the volume for each
set of headphones.
The front seat audio controls always have priority
over the RSA controls. If the front seat
passengers switch the source for the main radio to
a remote source, the RSA will not be able to
control the remote source. You can operate the
RSA when the main radio is off.
The DVD or auxiliary device will always be available
on channel (CHA or CH1) of the wireless
headphones. All other RSA sources are availableon channel (CHB or CH2) of the wireless
headphones, as well as the wired headphones. If
the RSA is off, the wired headphones will provide
DVD or auxiliary device audio. The rear seat
passengers will not be able to listen to XM, on
channel (CHB or CH2), if the front passenger is
listening to a DVD or auxiliary device.
The remote control will not operate any of the
RSA features.
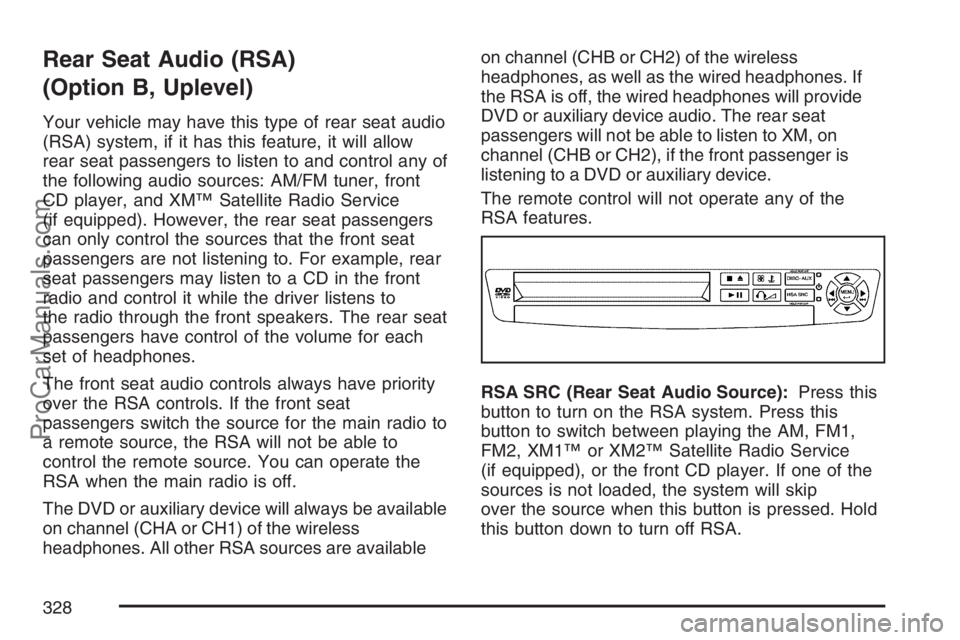
RSA SRC (Rear Seat Audio Source):Press this
button to turn on the RSA system. Press this
button to switch between playing the AM, FM1,
FM2, XM1™ or XM2™ Satellite Radio Service
(if equipped), or the front CD player. If one of the
sources is not loaded, the system will skip
over the source when this button is pressed. Hold
this button down to turn off RSA.
328
ProCarManuals.com
Page 329 of 570
Q,R,q,r, (Directional Arrows): Up
Arrow– Press this button while in AM/FM tuner,
or XM™ Satellite Radio Service to switch
between the station presets. Press this button
while sourcing the single CD player to go to the
next track. Press this button while sourcing
the six-disc CD player to go to the next disc.
Down Arrow– Press this button while in AM/FM
tuner to change the BAND from AM/FM tuner
to the front CD player or to the XM™ Satellite
Radio Service.
Left Arrow– Press this button while in AM/FM
tuner, or XM™ Satellite Radio Service to
seek down. Press this button while sourcing the
single CD player, or the six-disc CD player to go to
the previous track.
Right Arrow– Press this button while in AM/FM
tuner, or XM™ Satellite Radio Service to seek
up. Press this button while sourcing the single
CD player, or the six-disc CD player to go to the
next track.43(Wired Headphone Volume):Press this
button to select the correct headphone. Then press
the left or right arrow buttons to increase or
decrease the headphone volume.
rj(Parental Control):This button is located
behind the video screen next to the auxiliary
and headphone jacks. Press this button while
using RSA, or when a DVD or CD is playing
to blank the video screen and to mute the audio.
The power indicator lights on the DVD player
will �ash. Turning on the parental control will also
disable all other button operations from the
remote control and the DVD player, except for the
eject button. Press this button again to restore
operation of the RSA, DVD player, and remote
control.
This button may also be used to turn the DVD
player power on and automatically resume play if
the vehicle is on and a disc is in the player. If
no disc is in the player then the system will power
up in auxiliary mode.
329
ProCarManuals.com
Page 333 of 570
Quick Start Guide
Selecting Your Mobile Digital Media as the
Active Source
Your radio and rear seat entertainment system
communicate with the GM Mobile Digital
Media system, as one compact unit that can be
accessed by everyone seated inside the vehicle.
The GM Mobile Digital Media system can hold
thousands of songs, hours of videos, and
hundreds of games.
To help use this system, see the following “Quick
Start” information:
Front seat driver and passenger, use the radio
and steering wheel controls to access the
music collection with PhatNoise Voice Index™
technology. The preset buttons can be used
to select the browsing category. The Next,
Previous, and Seek buttons can be used to
browse within a browsing category. Browse the
music collection by artist, album, genre, or
custom playlist as the system uses the voice
mode to announce these selections. See
“Using the GM Mobile Digital Media System
for Front Seat Audio Entertainment” later
in this manual.
Rear seat passengers, use the wireless DVD
remote control to navigate the menu displayed
on the overhead DVD video screen, then
select to play music, videos, or games.
A dedicated game controller is included with
the Mobile Digital Media package. See
“Using the GM Mobile Digital Media System
for Rear Seat Entertainment” later in this
manual.
Your vehicle may have audio steering wheel
controls. Some audio controls can be adjusted at
the steering wheel. SeeAudio Steering Wheel
Controls on page 353in your owner manual.
If your vehicle has the OnStar
®/Mute audio
steering wheel control, read the following
instructions.
333
ProCarManuals.com
Page 352 of 570
Tips and Troubleshooting Chart (cont’d)
Problem Cause and Solution
Voice prompts are missing in the vehicle. Check your voice prompt settings on your desktop
computer:
Insert the DMS.
Open the Device view and select the DMS.
Press the Hardware Options button.
Open the DMS Database/Voice Prompts tab
and click Fix Voice Prompts.
Customer Assistance Center
For customer assistance in the United States, call
1-877-GM-PHATN (877-467-4286) or contact
the Customer Assistance Center through
the internet at gmmobilemediasupportgedas.com
For customer assistance in Canada, see the
Customer Assistance Offices in the index of your
vehicle’s owner manual.
Theft-Deterrent Feature
THEFTLOCK®is designed to discourage theft of
your vehicle’s radio. The feature works
automatically by learning a portion of the Vehicle
Identi�cation Number (VIN). If the radio is
moved to a different vehicle, it will not operate and
LOCKED will appear on the display.
With THEFTLOCK
®activated, the radio will not
operate if stolen.
352
ProCarManuals.com
Page 353 of 570
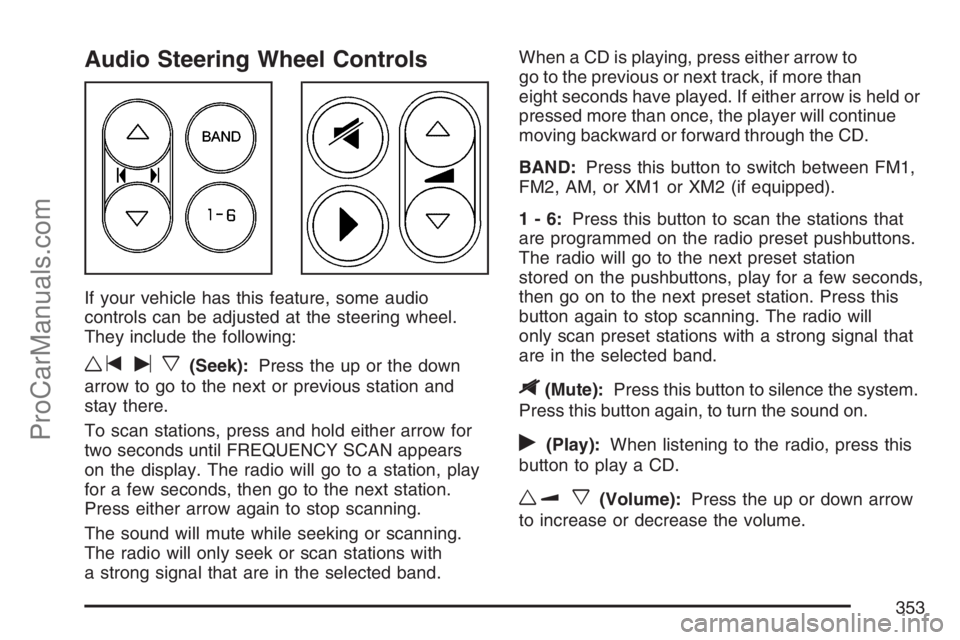
Audio Steering Wheel Controls
If your vehicle has this feature, some audio
controls can be adjusted at the steering wheel.
They include the following:
wtux(Seek):Press the up or the down
arrow to go to the next or previous station and
stay there.
To scan stations, press and hold either arrow for
two seconds until FREQUENCY SCAN appears
on the display. The radio will go to a station, play
for a few seconds, then go to the next station.
Press either arrow again to stop scanning.
The sound will mute while seeking or scanning.
The radio will only seek or scan stations with
a strong signal that are in the selected band.When a CD is playing, press either arrow to
go to the previous or next track, if more than
eight seconds have played. If either arrow is held or
pressed more than once, the player will continue
moving backward or forward through the CD.
BAND:Press this button to switch between FM1,
FM2, AM, or XM1 or XM2 (if equipped).
1-6:Press this button to scan the stations that
are programmed on the radio preset pushbuttons.
The radio will go to the next preset station
stored on the pushbuttons, play for a few seconds,
then go on to the next preset station. Press this
button again to stop scanning. The radio will
only scan preset stations with a strong signal that
are in the selected band.
$(Mute):Press this button to silence the system.
Press this button again, to turn the sound on.
r(Play):When listening to the radio, press this
button to play a CD.
wux(Volume):Press the up or down arrow
to increase or decrease the volume.
353
ProCarManuals.com
Page 356 of 570

XM™ Satellite Radio Antenna
System
The XM™ Satellite Radio antenna is located on
the roof of your vehicle. Keep this antenna clear of
snow and ice build up for clear radio reception.
Loading items onto the roof of your vehicle
can interfere with the performance of the XM™
system. Make sure that the XM™ satellite antenna
is not obstructed.
Chime Level Adjustment
The radio is used to adjust the vehicle’s chime
level. To change the volume level of the chime,
press and hold pushbutton 6 with the ignition
on and the radio power off. The volume level will
change from the normal level to loud, and
LOUD will appear on the radio display. To change
back to the default or normal setting, press and
hold pushbutton 6 again. The volume level
will change from the loud level to normal, and
NORMAL will appear on the radio display.
Removing the radio and not replacing it with a
factory radio or chime module will disable vehicle
chimes.
356
ProCarManuals.com
Page 451 of 570

Trying to start your vehicle by pushing or
pulling it will not work, and it could damage
your vehicle.
1. Check the other vehicle. It must have a
12-volt battery with a negative ground system.
Notice:If the other vehicle’s system is not a
12-volt system with a negative ground,
both vehicles can be damaged. Only use
vehicles with 12-volt systems with negative
grounds to jump start your vehicle.
2. Get the vehicles close enough so the jumper
cables can reach, but be sure the vehicles are
not touching each other. If they are, it could
cause a ground connection you do not
want. You would not be able to start your
vehicle, and the bad grounding could damage
the electrical systems.
To avoid the possibility of the vehicles rolling,
set the parking brake �rmly on both vehicles
involved in the jump start procedure. Put
an automatic transaxle in PARK (P) or
a manual transaxle in NEUTRAL before
setting the parking brake.Notice:If you leave your radio or other
accessories on during the jump starting
procedure, they could be damaged. The repairs
would not be covered by your warranty.
Always turn off your radio and other
accessories when jump starting your vehicle.
3. Turn off the ignition on both vehicles.
Unplug unnecessary accessories plugged into
the cigarette lighter or the accessory power
outlet. Turn off the radio and all lamps that are
not needed. This will avoid sparks and help
save both batteries. And it could save
the radio!
4. Open the hoods and locate the batteries.
Find the positive (+) and negative (−)
terminal locations on each vehicle.
You will not need to access your battery for
jump starting. Your vehicle has a remote
positive (+) jump starting terminal for
that purpose.
451
ProCarManuals.com
Page 556 of 570

Appearance Care (cont.)
Washing Your Vehicle.............................. 505
Weatherstrips........................................... 504
Windshield, Backglass, and
Wiper Blades........................................ 506
Audio System(s).......................................... 270
Audio Steering Wheel Controls................. 353
Care of Your CD and DVD Player............ 355
Care of Your CDs and DVDs................... 355
Chime Level Adjustment........................... 356
Fixed Mast Antenna................................. 355
Mobile Digital Media System.................... 330
Navigation/Radio System, see
Navigation Manual................................ 294
Radio with CD......................................... 272
Rear Seat Audio (RSA)...................325, 328
Setting the Time...................................... 272
Theft-Deterrent Feature............................ 352
Understanding Radio Reception............... 354
XM™ Satellite Radio Antenna System...... 356
Automatic Door Lock................................... 117
Automatic Transaxle
Fluid........................................................ 430
Operation................................................. 143B
Battery........................................................ 449
Electric Power Management..................... 198
Run-Down Protection............................... 199
Before Leaving on a Long Trip.................... 382
Brake
Anti-Lock Brake System (ABS)................. 363
Emergencies............................................ 365
Parking.................................................... 147
System Warning Light.............................. 226
Brakes........................................................ 445
Braking....................................................... 362
Braking in Emergencies............................... 365
Break-In, New Vehicle................................. 138
Bucket Seats, Rear....................................... 14
Bulb Replacement....................................... 455
Front Turn Signal, Parking and Daytime
Running Lamps.................................... 457
Halogen Bulbs......................................... 455
License Plate Lamps................................ 459
Replacement Bulbs.................................. 460
Taillamps, Turn Signal, Stoplamps and
Back-up Lamps..................................... 458
Buying New Tires........................................ 474
556
ProCarManuals.com
Page 565 of 570

P
Paint, Damage............................................ 508
Park Aid...................................................... 200
Park (P)
Shifting Into............................................. 148
Shifting Out of......................................... 149
Parking
Assist....................................................... 200
Brake....................................................... 147
Over Things That Burn............................ 150
Passenger Airbag Status Indicator............... 224
Passenger Compartment Air Filter............... 217
Passenger Sensing System........................... 93
Passing....................................................... 372
PASS-Key
®III ............................................. 135
PASS-Key®III Operation............................. 136
Power
Accessory Outlet(s).................................. 203
Door Locks.............................................. 116
Electrical System..................................... 511
Outlet 115 Volt Alternating Current........... 204
Rear Quarter Windows............................. 132
Retained Accessory (RAP)....................... 139
Seat.......................................................... 10Power (cont.)
Sliding Door............................................. 121
Steering Fluid.......................................... 443
Windows.................................................. 131
Pretensioners, Safety Belt............................. 55
Programmable Automatic Door Unlock......... 118
Q
Questions and Answers About Safety Belts ... 37
R
Radiator Pressure Cap................................ 435
Radios........................................................ 270
Care of Your CD and DVD Player............ 355
Care of Your CDs and DVDs................... 355
Navigation/Radio System, see
Navigation Manual................................ 294
Radio with CD......................................... 272
Rear Seat Audio.............................325, 328
Setting the Time...................................... 272
Theft-Deterrent......................................... 352
Understanding Reception......................... 354
Rear Climate Control System.............212, 215
565
ProCarManuals.com