display SATURN VUE 2008 Owners Manual
[x] Cancel search | Manufacturer: SATURN, Model Year: 2008, Model line: VUE, Model: SATURN VUE 2008Pages: 412, PDF Size: 2.78 MB
Page 97 of 412
ACC (ACC/ACCESSORY):This position operates
some of the electrical accessories, such as the radio,
but not the climate control system.
Use ACC/ACCESSORY if you must have your vehicle
in motion while the engine is off, for example, if your
vehicle is being pushed or towed.
ON/RUN:This is the position the switch returns after
you start the engine and release the key. The switch
stays in ON/RUN when the engine is running. But even
when the engine is not running, you can use ON/RUN
to operate the electrical accessories, and to display
some instrument panel warning lights.
The battery could be drained if you leave the key in
the ACC/ACCESSORY or ON/RUN position with
the engine off. You may not be able to start your
vehicle if the battery is allowed to drain for an
extended period of time.
START:This position starts the engine. When the
engine starts, release the key. The switch returns to
ON/RUN for normal driving. Do not turn the key to
START if the engine is running.
Even if the engine is not running, ACC/ACCESSORY
and ON/RUN allow you to operate electrical accessories,
such as the radio.Key In the Ignition
Never leave your vehicle with the keys inside, as it is
an easy target for joy riders or thieves. If you leave
the key in the ignition and park your vehicle, a chime
will sound, when you open the driver’s door. Always
remember to remove your key from the ignition and take
it with you. This will lock your ignition and transmission.
Also, always remember to lock the doors.
The battery could be drained if you leave the key in the
ignition while your vehicle is parked. You may not be
able to start your vehicle after it has been parked for
an extended period of time.
Retained Accessory Power (RAP)
These vehicle accessories may be used for up to
10 minutes after the ignition key is turned off:
Outside Mirror
Power Windows
Radio
All these features work when the ignition key is in
the ON/RUN or ACC/ACCESSORY positions, until a
door is opened.
2-19
ProCarManuals.com
Page 102 of 412

MANUAL (M):This position allows you to change
gears similar to a manual transmission. If your vehicle
has this feature, see Manual Shift Mode.
Notice:Spinning the tires or holding the vehicle
in one place on a hill using only the accelerator
pedal may damage the transmission. The repair will
not be covered by your warranty. If you are stuck,
do not spin the tires. When stopping on a hill,
use the brakes to hold the vehicle in place.
Manual Shift Mode (MSM)
(Automatic Transmission)
To use this feature, do the following:
1. Move the shift lever from DRIVE (D) rearward to
the MANUAL MODE (M).
The six-speed transmission will downshift to a
lower gear and the instrument panel will display
the gear range selected. If equipped with a
4-speed transmission it will display a three (3) for
third gear range.
When coming to a stop in the manual position, the
vehicle will automatically shift to FIRST (1) gear.
2. Press the plus (+) button to upshift or the minus (−)
button to downshift.While using the MSM feature the vehicle will have
sportier performance. You can use this when driving
hilly roads to stay in gear longer or to downshift for
more power or engine braking.
The transmission will only allow you to shift into a gear
range appropriate for the vehicle speed.
The transmission will not automatically shift to
the next higher gear range without pressing
the button on the shifter handle.
The transmission will not allow shifting to the next
lower gear if the vehicle speed is too high.
If the vehicle does not respond to a gear change,
or detects a problem with the transmission, the range
of gears may be reduced and the Malfunction Indicator
Lamp will come on. SeeMalfunction Indicator Lamp
on page 3-41.
2-24
ProCarManuals.com
Page 105 of 412

Downshifting the transmission in slippery road conditions
could result in skidding, see “Skidding” underLoss of
Control on page 4-13.
Notice:Spinning the tires or holding the vehicle
in one place on a hill using only the accelerator
pedal may damage the transmission. The repair
will not be covered by your warranty. If you
are stuck, do not spin the tires. When stopping on
a hill, use the brakes to hold the vehicle in place.
Manual Shift Mode (MSM)
(Automatic Transmission)
To use this feature, do the following:
1. Move the shift lever from DRIVE (D) to the left into
the manual gate.
While driving in manual shift mode, the transmission
will remain in the driver gear selected. When coming
to a stop in the manual position, the vehicle will
automatically shift to FIRST (1) gear.
2. Push the shift lever forward toward the plus (+) to
upshift or rearward toward the minus (−) to downshift.
The instrument panel will display the actual gear
selected.In manual shift mode all six forward gears can be
selected.
While using the MSM feature the vehicle will have
operation similar to a manual transmission. You can use
this for sport driving or when driving hilly roads to stay in
gear longer or to downshift for more power or engine
braking.
The transmission will only allow you to shift into gears
appropriate for the vehicle speed:
The transmission will not automatically shift to the
next higher gear without moving the shift lever.
The transmission will not allow shifting to the next
lower gear if the vehicle speed is too high.
If the vehicle does not respond to a gear change, or
detects a problem with the transmission, the range
of gears may be reduced and the Malfunction Indicator
Lamp will come on. SeeMalfunction Indicator Lamp
on page 3-41.
2-27
ProCarManuals.com
Page 130 of 412
Low Oil Level Light.......................................3-44
Change Engine Oil Light................................3-44
Security Light...............................................3-44
Fog Lamp Light............................................3-45
Cruise Control Light......................................3-45
Reduced Engine Power Light.........................3-45
Highbeam On Light.......................................3-46
Low Washer Fluid Warning Light.....................3-46
All-Wheel Drive Disabled Light........................3-46
Gate Ajar Light.............................................3-46
Door Ajar Light.............................................3-47
Service Vehicle Soon Light............................3-47
Fuel Gage...................................................3-47
Low Fuel Warning Light.................................3-48Driver Information Center (DIC).......................3-49
DIC Operation and Displays...........................3-49
DIC Compass..............................................3-50
Audio System(s).............................................3-52
Setting the Clock..........................................3-53
Radio(s)......................................................3-55
Using an MP3..............................................3-64
XM Radio Messages.....................................3-68
Navigation/Radio System...............................3-69
Audio Steering Wheel Controls.......................3-70
Radio Reception...........................................3-70
Fixed Mast Antenna......................................3-71
XM™ Satellite Radio Antenna System.............3-71
Section 3 Instrument Panel
3-2
ProCarManuals.com
Page 133 of 412
The main components of the instrument panel are the following:
A. Air Outlets. SeeOutlet Adjustment on page 3-28.
B. Instrument Panel Brightness Control. SeeInstrument
Panel Brightness on page 3-16.
C. Turn Signal/Multifunction Lever. SeeTurn
Signal/Multifunction Lever on page 3-7.
D. Instrument Panel Cluster. SeeInstrument Panel
Cluster on page 3-31.
E. Windshield Wiper Lever. SeeWindshield Wipers on
page 3-8.
F. Audio System. SeeAudio System(s) on page 3-52.
G. Auxiliary Input Jack. SeeRadio(s) on page 3-55.
H. Exterior Lamps Control. SeeExterior Lamps
on page 3-14. Fog Lamp Button (If Equipped). See
Fog Lamps on page 3-16.
I. Instrument Panel Storage Area. SeeInstrument
Panel Storage on page 2-44.
J. Hood Release. SeeHood Release on page 5-11.
K. Cruise Control Buttons. SeeCruise Control on
page 3-11.L. Tilt Wheel Lever. SeeTilt Wheel on page 3-6.
M. Horn. SeeHorn on page 3-6.
N. Audio Steering Wheel Controls. SeeAudio Steering
Wheel Controls on page 3-70.
O. Rear Window Wiper/Washer. SeeRear Window
Wiper/Washer on page 3-11.
P. Traction Control System Button. SeeTraction
Control System (TCS) on page 4-7.
Q. Shift Lever. SeeAutomatic Transmission Operation
(Base) on page 2-22orAutomatic Transmission
Operation (Uplevel) on page 2-25.
R. Climate Control. SeeClimate Control System on
page 3-19.
S. Hazard Warning Flasher Button. SeeHazard
Warning Flashers on page 3-6.
T. Passenger Air Bag Status Indicator. SeePassenger
Airbag Status Indicator on page 3-34.
U. Passenger Safety Belt Reminder Display.
SeeSafety Belt Reminders on page 3-32.
V. Glove Box. SeeGlove Box on page 2-43.
3-5
ProCarManuals.com
Page 160 of 412

Speedometer and Odometer
The speedometer lets you see your speed in both miles
per hour (mph) and kilometers per hour (km/h).
The odometer shows how far your vehicle has been
driven, in either miles or kilometers.
If your vehicle needs a new odometer installed, the new
one will be set to the mileage total of the old odometer.
If it cannot, it will be set at zero and a label must be
put on the driver’s door to show the old mileage reading
when the new odometer was installed. If the mileage
is unknown, the label should then indicate “previous
mileage unknown.”
Trip Odometer
The trip odometer can record the number of miles, used
in the United States, or kilometers, used in Canada,
traveled for up to two trips.
You can cycle between the odometer and trip
odometers A and B by pressing the reset button
located in the lower right area of the speedometer.
By pressing the reset button, you can tell how many miles
or kilometers have been recorded on either Trip A or
Trip B since you last set the trip odometer back to zero.
To reset each trip odometer to zero, press and hold
the reset button. The reset button resets only the
trip odometer that is being displayed. Each trip
odometer must be reset individually.
Tachometer
The tachometer displays the engine speed in revolutions
per minute (rpm).
Safety Belt Reminders
Safety Belt Reminder Light
When the engine is started, a chime will come on for
several seconds to remind people to fasten their safety
belts, unless the driver’s safety belt is already buckled.
The safety belt light will
also come on and stay
on for several seconds,
then it will �ash for
several more.
This chime and light is repeated if the driver remains
unbuckled and the vehicle is in motion. If the driver’s belt
is already buckled, neither the chime nor the light will
come on.
3-32
ProCarManuals.com
Page 173 of 412

Fog Lamp Light
The fog lamp light will
come on when the fog
lamps are in use.
The light will go out when the fog lamps are turned off.
SeeFog Lamps on page 3-16for more information.
Cruise Control Light
This light comes on
whenever the cruise
control is set.
The light goes out when the cruise control is turned off.
SeeCruise Control on page 3-11for more information.
Reduced Engine Power Light
This light will come on
brie�y when you start the
engine.
This light, along with the service engine soon light
will be displayed when a noticeable reduction in the
vehicle’s performance may occur. Stop the vehicle and
turn off the ignition. Wait for 10 seconds and restart
your vehicle. This may correct the condition.
The vehicle may be driven at a reduced speed when
the reduced engine power light is on but acceleration
and speed may be reduced. The performance may
be reduced until the next time you drive your vehicle.
If this light stays on, see your dealer/retailer as soon as
possible for diagnosis and repair.
3-45
ProCarManuals.com
Page 177 of 412
Driver Information Center (DIC)
Your vehicle has a Driver Information Center (DIC).
All information appears in the DIC display located in the
instrument panel cluster.
The DIC comes on when the ignition is on. After a short
delay, the DIC displays the information that was last
displayed before the engine was turned off.
The DIC displays the odometer, trip odometers, outside
air temperature, compass information, and shift lever
position indicator.
To change the outside air temperature units from
English to metric, turn the reset stem on the instrument
panel cluster clockwise or counterclockwise until the
unit changes. This also changes the units displayed
in the navigation system, if your vehicle has this feature.
If there is a problem with the system that controls the
temperature display, the numbers will be replaced with
dashes. If this occurs, have the vehicle serviced by your
dealer/retailer. If an abnormal temperature reading is
displayed for an extended period of time, consult your
dealer/retailer. Under certain circumstances, especially
when the engine is idling, a delay updating the
temperature display is normal.
SeeAutomatic Transmission Operation (Base) on
page 2-22orAutomatic Transmission Operation
(Uplevel) on page 2-25for more information.
DIC Operation and Displays
The Driver Information Center (DIC) has different modes
which can be accessed by pressing the reset stem on
the instrument panel cluster. These modes are explained
in the following section. To scroll through the available
functions, press and release the reset stem.
Odometer
Press and release the reset stem until the odometer
appears on the DIC. The odometer shows the total
distance the vehicle has been driven in either miles
for the United States or kilometers for Canada.
Trip Odometer
Press and release the reset stem until TRIP A or
TRIP B appears on the DIC. The trip odometer shows
the current distance traveled since the last reset of
the trip odometer in either miles for the United States
or kilometers for Canada.
To reset the trip odometer, press and hold the reset
stem until the display returns to zero.
3-49
ProCarManuals.com
Page 178 of 412
DIC Compass
Your vehicle has a compass in the Driver Information
Center (DIC).
Compass Zone
The zone is set to zone eight upon leaving the factory.
Your dealer/retailer will set the correct zone for your
location.
Under certain circumstances, such as during a long
distance cross-country trip or moving to a new state or
province, it will be necessary to compensate for compass
variance by resetting the zone through the DIC if the zone
is not set correctly.
Compass variance is the difference between the earth’s
magnetic north and true geographic north. If the compass
is not set to the zone where you live, the compass may
give false readings. The compass must be set to the
variance zone in which the vehicle is traveling.
To adjust for compass variance, use the following
procedure:
Compass Variance (Zone) Procedure
1. Do not set the compass zone when the vehicle is
moving. Only set it when the vehicle is in PARK (P).
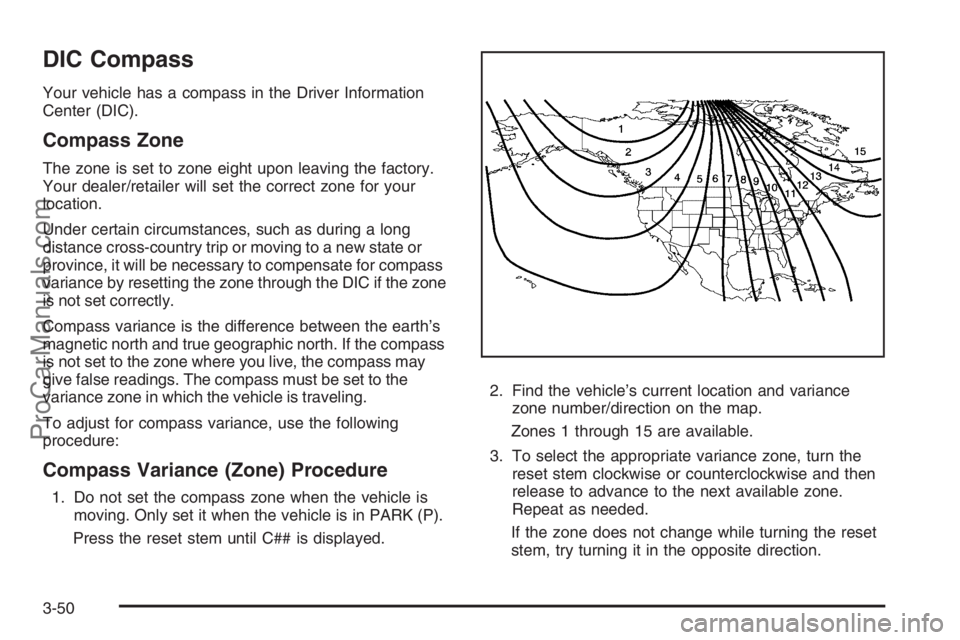
Press the reset stem until C## is displayed.2. Find the vehicle’s current location and variance
zone number/direction on the map.
Zones 1 through 15 are available.
3. To select the appropriate variance zone, turn the
reset stem clockwise or counterclockwise and then
release to advance to the next available zone.
Repeat as needed.
If the zone does not change while turning the reset
stem, try turning it in the opposite direction.
3-50
ProCarManuals.com
Page 179 of 412
4. Press the reset stem until the vehicle heading, for
example, N for North, is displayed in the DIC.
5. If calibration is necessary, calibrate the compass.
See “Compass Calibration Procedure” following.
Compass Calibration
The compass can be manually calibrated. Only calibrate
the compass in a magnetically clean and safe location,
such as an open parking lot, where driving the vehicle
in circles is not a danger. It is suggested to calibrate
away from tall buildings, utility wires, manhole covers,
or other industrial structures, if possible.
If CAL should ever appear in the DIC display, the
compass should be calibrated.
If the DIC display does not show a heading, for
example, N for North, or the heading does not change
after making turns, there may be a strong magnetic �eld
interfering with the compass. Such interference may be
caused by a magnetic CB or cell phone antenna mount, a
magnetic emergency light, magnetic note pad holder, or
any other magnetic item. Turn off the vehicle, move the
magnetic item, then turn on the vehicle and calibrate the
compass.To calibrate the compass, use the following procedure:
Compass Calibration Procedure
1. Before calibrating the compass, make sure the
compass is set to the variance zone in which
the vehicle is located. See “Compass Variance
(Zone) Procedure” earlier in this section.
Do not operate any switches such as window,
sunroof, climate controls, seats, etc. during
the calibration procedure.
2. Press the reset stem until the C ## is displayed.
3. Once the appropriate variance zone is selected,
press the reset stem. A �ashing C will display.
4. Drive the vehicle in tight circles at less than
5 mph (8 km/h) to complete the calibration.
When the calibration is complete, the vehicle
heading, for example, N for North, displays instead
of the C.
3-51
ProCarManuals.com