buttons SATURN VUE 2010 User Guide
[x] Cancel search | Manufacturer: SATURN, Model Year: 2010, Model line: VUE, Model: SATURN VUE 2010Pages: 398, PDF Size: 4.02 MB
Page 155 of 398
Instruments and Controls 5-45
EXIT FEATURE SETTINGS
This feature allows you to exit the
feature settings menu.
Press the customization button until
PRESS
VTO EXIT FEATURE
SETTINGS appears in the DIC
display. Press the set/reset button
once to exit the menu.
If you do not exit, pressing the
customization button again will
return you to the beginning of the
feature settings menu.
Exiting the Feature
Settings Menu
The feature settings menu will be
exited when any of the following
occurs:
.The vehicle is no longer in
ON/RUN.
.The trip/fuel or vehicle
information DIC buttons are
pressed.
.The end of the feature settings
menu is reached and exited.
.A 40 second time period has
elapsed with no selection made.
Universal Remote
System
See Radio Frequency Statementon
page 13‑16for information
regarding Part 15 of the Federal
Communications Commission (FCC)
Rules and RSS-210/211 of Industry
and Science Canada.
ProCarManuals.com
Page 156 of 398
5-46 Instruments and Controls
Universal Remote System
Programming
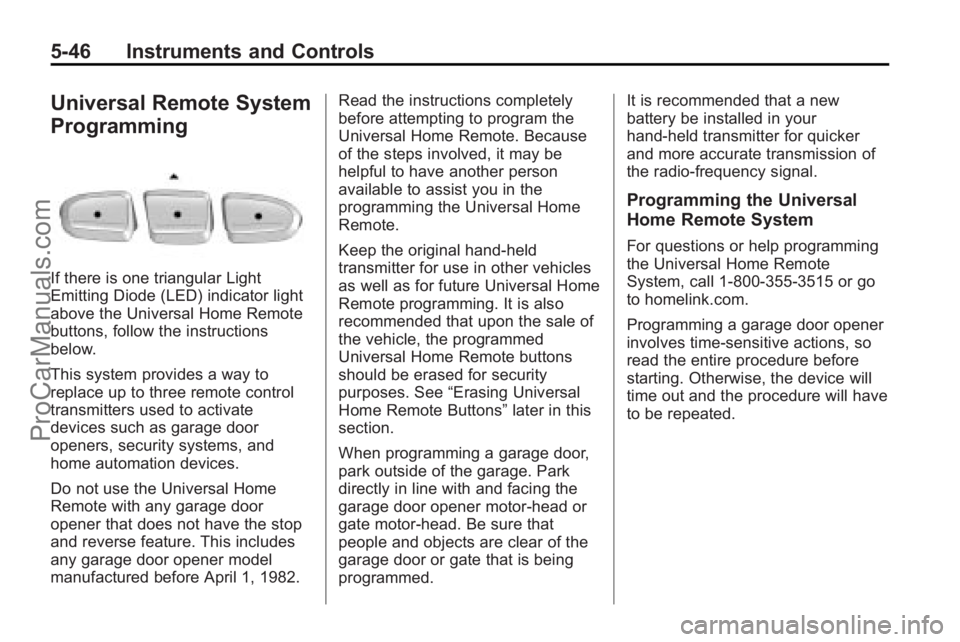
If there is one triangular Light
Emitting Diode (LED) indicator light
above the Universal Home Remote
buttons, follow the instructions
below.
This system provides a way to
replace up to three remote control
transmitters used to activate
devices such as garage door
openers, security systems, and
home automation devices.
Do not use the Universal Home
Remote with any garage door
opener that does not have the stop
and reverse feature. This includes
any garage door opener model
manufactured before April 1, 1982.Read the instructions completely
before attempting to program the
Universal Home Remote. Because
of the steps involved, it may be
helpful to have another person
available to assist you in the
programming the Universal Home
Remote.
Keep the original hand-held
transmitter for use in other vehicles
as well as for future Universal Home
Remote programming. It is also
recommended that upon the sale of
the vehicle, the programmed
Universal Home Remote buttons
should be erased for security
purposes. See
“Erasing Universal
Home Remote Buttons” later in this
section.
When programming a garage door,
park outside of the garage. Park
directly in line with and facing the
garage door opener motor-head or
gate motor-head. Be sure that
people and objects are clear of the
garage door or gate that is being
programmed. It is recommended that a new
battery be installed in your
hand-held transmitter for quicker
and more accurate transmission of
the radio-frequency signal.
Programming the Universal
Home Remote System
For questions or help programming
the Universal Home Remote
System, call 1‐800‐355‐3515 or go
to homelink.com.
Programming a garage door opener
involves time-sensitive actions, so
read the entire procedure before
starting. Otherwise, the device will
time out and the procedure will have
to be repeated.
ProCarManuals.com
Page 157 of 398

Instruments and Controls 5-47
To program up to three devices:
1. From inside the vehicle, pressand hold down the two outside
buttons at the same time,
releasing only when the
Universal Home Remote
indicator light begins to flash,
after 20 seconds. This step will
erase the factory settings or all
previously programmed buttons.
Do not hold down the buttons for
longer than 30 seconds and do
not repeat this step to program
the remaining two Universal
Home Remote buttons. 2. Hold the end of your hand-held
transmitter about 1 to 3 inches
(3 to 8 cm) away from the
Universal Home Remote buttons
while keeping the indicator light
in view. The hand-held
transmitter was supplied by the
manufacturer of your garage
door opener receiver (motor
head unit).
3. At the same time, press and hold both the Universal Home
Remote button to be used to
control the garage door and the
hand-held transmitter button. Do
not release the Universal Home
Remote button or the hand-held
transmitter button until Step 4
has been completed.
Some entry gates and garage
door openers may require
substitution of Step 3 with the
procedure noted in “Gate
Operator and Canadian
Programming” later in this
section. 4. The indicator light on the
Universal Home Remote will
flash slowly at first and then
rapidly after Universal Home
Remote successfully receives
the frequency signal from the
hand-held transmitter. Release
both buttons.
5. Press and hold the newly-trained Universal Home Remote button
and observe the indicator light.
If the indicator light stays on
continuously, the programming is
complete and the garage door
should move when the Universal
Home Remote button is pressed
and released. There is no need
to continue programming
Steps 6 through 8.
If the Universal Home Remote
indicator light blinks rapidly for
two seconds and then turns to a
constant light, continue with the
programming Steps 6 through 8.
It may be helpful to have another
person assist with the remaining
steps.
ProCarManuals.com
Page 158 of 398

5-48 Instruments and Controls
6. After Steps 1 through 5 havebeen completed, locate inside
the garage the garage door
opener receiver (motor-head
unit). Locate the “Learn”or
“Smart” button. The name and
color of the button may vary by
manufacturer.
7. Firmly press and release the “Learn” or“Smart” button. After
you press this button, you will
have 30 seconds to complete
Step 8. 8. Immediately return to the
vehicle. Firmly press and hold
the Universal Home Remote
button, chosen in Step 3 to
control the garage door, for
two seconds, and then release
it. If the garage door does not
move, press and hold the same
button a second time for
two seconds, and then release
it. Again, if the door does not
move, press and hold the same
button a third time for
two seconds, and then release.
The Universal Home Remote
should now activate the
garage door.
To program the remaining two
Universal Home Remote buttons,
begin with Step 2 of “Programming
the Universal Home Remote
System.” Do not repeat Step 1, as
this will erase all previous
programming from the Universal
Home Remote buttons.
Gate Operator and Canadian
Programming
If you have questions or need help
programming the Universal Home
Remote System, call 1‐800‐355‐
3515 or go to homelink.com.
Canadian radio-frequency laws
require transmitter signals to time
out or quit after several seconds of
transmission. This may not be long
enough for Universal Home Remote
to pick up the signal during
programming. Similarly, some U.S.
gate operators are manufactured to
time out in the same manner.
If you live in Canada, or you are
having difficulty programming a gate
operator or garage door opener by
using the “Programming Universal
Home Remote” procedures,
regardless of where you live,
replace Step 3 under “Programming
Universal Home Remote” with the
following:
Continue to press and hold the
Universal Home Remote button
while you press and release every
ProCarManuals.com
Page 159 of 398
Instruments and Controls 5-49
two seconds (cycle) the hand-held
transmitter button until the
frequency signal has been
successfully accepted by the
Universal Home Remote. The
Universal Home Remote indicator
light will flash slowly at first and then
rapidly. Proceed with Step 4 under
“Programming Universal Home
Remote”to complete.
Universal Remote System
Operation
Using Universal Home Remote
Press and hold the appropriate
Universal Home Remote button for
at least half of a second. The
indicator light will come on while the
signal is being transmitted.
Erasing Universal Home
Remote Buttons
The programmed buttons should be
erased when the vehicle is sold or
the lease ends.
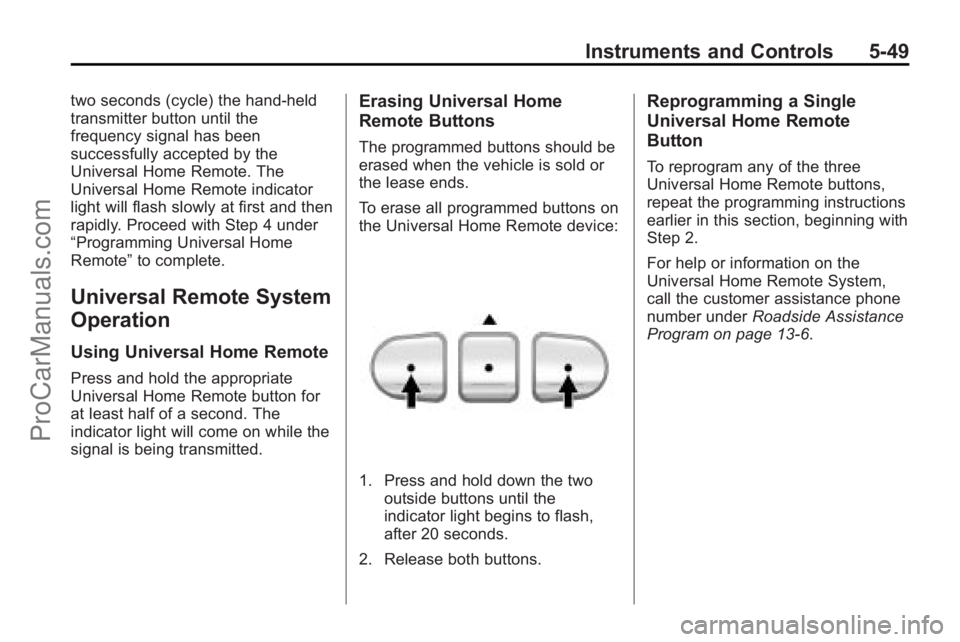
To erase all programmed buttons on
the Universal Home Remote device:
1. Press and hold down the two
outside buttons until the
indicator light begins to flash,
after 20 seconds.
2. Release both buttons.
Reprogramming a Single
Universal Home Remote
Button
To reprogram any of the three
Universal Home Remote buttons,
repeat the programming instructions
earlier in this section, beginning with
Step 2.
For help or information on the
Universal Home Remote System,
call the customer assistance phone
number under Roadside Assistance
Program on page 13‑6.
ProCarManuals.com
Page 171 of 398
Infotainment System 7-5
©SEEK¨:Press to go to the
previous or to the next station.
To scan stations, press and hold
either arrow for a few seconds until
a beep sounds. The radio goes to a
station, plays for a few seconds,
then goes to the next station. Press
either arrow again to stop scanning.
The radio only seeks and scans
stations with a strong signal that are
in the selected band.
4(Information) (XM™ Satellite
Radio Service, MP3, and RDS
Features): Press to display
additional text information related to
the current FM-RDS station, XM
station, or MP3 song. If information
is available, the song title
information displays on the top line
of the display and artist information
displays on the bottom line. When
information is not available, “NO
INFO” displays.
Storing a Radio Station as a
Favorite
Drivers are encouraged to set up
their radio station favorites while the
vehicle is in P (Park). Tune to
favorite stations using the presets,
favorites button, and steering wheel
controls. See Steering Wheel
Controls on page 5‑3.
FAV (Favorites): A maximum of
36 stations can be programmed as
favorites using the six pushbuttons
positioned below the radio station
frequency labels and by using the
radio favorites page button (FAV
button). Press to go through up to
six pages of favorites, each having
six favorite stations available per
page. Each page of favorites can
contain any combination of AM, FM,
or XM stations, if equipped. The balance/fade and tone settings
that were previously adjusted, are
stored with the favorite stations.
To store a station as a favorite:
1. Tune to a radio station.
2. Press FAV to display the page
where to store the station.
3. Press and hold one of the six pushbuttons until a beep
sounds. When that pushbutton is
pressed and released, the
station that was set, returns.
4. Repeat the steps for each radio station to be stored as a favorite.
ProCarManuals.com
Page 174 of 398
7-8 Infotainment System
Storing a Radio Station as a
Favorite
Drivers are encouraged to set up
their radio station favorites while the
vehicle is in P (Park). Tune to
favorite stations using the presets,
favorites button, and steering wheel
controls. SeeSteering Wheel
Controls on page 5‑3.
FAV (Favorites): A maximum of
36 stations can be programmed as
favorites using the six pushbuttons
positioned below the radio station
frequency labels and by using the
radio favorites page button (FAV
button). Press to go through up to
six pages of favorites, each having
six favorite stations available per
page. Each page of favorites can
contain any combination of AM, FM,
or XM stations.
The balance/fade and tone settings
that were previously adjusted, are
stored with the favorite stations. To store a station as a favorite:
1. Tune to a radio station.
2. Press FAV to display the page
where to store the station.
3. Press and hold one of the six pushbuttons until a beep
sounds. When that pushbutton is
pressed and released, the
station that was set, returns.
4. Repeat the steps for each radio station to be stored as a favorite.
To setup the number of favorites
pages:
1. Press MENU to display the radio setup menu.
2. Press the pushbutton located below the FAV 1-6 label.
3. Select the desired number of favorites pages by pressing the
pushbutton located below the
displayed page numbers. 4. Press FAV, or let the menu time
out, to return to the original main
radio screen showing the
radio station frequency labels
and to begin the process of
programming favorites for the
chosen amount of numbered
pages.
XM™ Radio Messages
XL (Explicit Language
Channels): These channels, or any
others, can be blocked at a
customer's request, by calling
1-800-852-XMXM (9696).
XM Updating: The encryption code
in the receiver is being updated, and
no action is required. This process
should take no longer than
30 seconds.
No XM Signal: The system is
functioning correctly, but the vehicle
is in a location that is blocking the
XM™ signal. When the vehicle is
moved into an open area, the signal
should return.
ProCarManuals.com
Page 180 of 398

7-14 Infotainment System
.Create a folder structure that
makes it easy to find songs
while driving. Organize songs by
albums using one folder for each
album. Each folder or album
should contain 18 songs or less.
.Avoid subfolders. The
system can support up to
eight subfolders deep, however,
keep the total number of folders
to a minimum in order to reduce
the complexity and confusion in
trying to locate a particular folder
during playback.
.Make sure playlists have a .m3u
or .wpl extension, other file
extensions may not work.
.Minimize the length of the file,
folder or playlist names. Long
file, folder, or playlist names,
or a combination of a large
number of files and folders,
or playlists can cause the player
to be unable to play up to themaximum number of files,
folders, playlists, or sessions. To
play a large number of files,
folders, playlists or sessions,
minimize the length of the file,
folder, or playlist name. Long
names also take up more space
on the display, potentially getting
cut off.
.Finalize the audio disc before
burning it. Trying to add music to
an existing disc can cause the
disc not to function in the player.
Playlists can be changed by using
the previous and next folder
buttons, the tune knob, or the SEEK
arrows. An MP3 CD-R or CD-RW
that was recorded using no file
folders can also be played. If a
CD-R or CD-RW contains more
than the maximum of 50 folders,
50 playlists, and 255 files, the
player can access and navigate up
to the maximum, but all items over
the maximum are not accessible. Root Directory
The root directory of the CD-R or
CD-RW is treated as a folder. If the
root directory has compressed
audio files, the directory displays
as F1 ROOT. All files contained
directly under the root directory are
accessed prior to any root directory
folders. However, playlists (Px) are
always accessed before root folders
or files.
Empty Directory or Folder
If a root directory or a folder exists
somewhere in the file structure that
contains only folders/subfolders and
no compressed files directly
beneath them, the player advances
to the next folder in the file structure
that contains compressed audio
files. The empty folder does not
display.
ProCarManuals.com
Page 181 of 398

Infotainment System 7-15
No Folder
When the CD contains only
compressed files, the files are
located under the root folder. The
next and previous folder functions
do not display on a CD that was
recorded without folders or playlists.
When displaying the name of the
folder the radio displays ROOT.
When the CD contains only playlists
and compressed audio files, but no
folders, all files are located under
the root folder. The folder down and
up buttons searches playlists (Px)
first and then go to the root folder.
When the radio displays the name
of the folder the radio
displays ROOT.Order of Play
Tracks recorded to the CD-R or
CD-RW are played in the following
order:
.Play begins from the first track in
the first playlist and continues
sequentially through all tracks in
each playlist. When the last
track of the last playlist has
played, play continues from the
first track of the first playlist.
.Play begins from the first track in
the first folder and continues
sequentially through all tracks in
each folder. When the last track
of the last folder has been
played, play continues from the
first track of the first folder.
When play enters a new folder, the
display does not automatically show
the new folder name unless the
folder mode is chosen as the default
display. The new track name
displays. File System and Naming
The song name that is displayed is
the song name that is contained in
the ID3 tag. If the song name is not
present in the ID3 tag, then the
radio displays the file name without
the extension (such as .mp3) as the
track name.
Track names longer than
32 characters or four pages are
shortened. Parts of words on the
last page of text and the extension
of the filename does not display.
Preprogrammed Playlists
Preprogrammed playlists that
were created by WinAmp™,
MusicMatch™, or Real Jukebox™
software can be accessed, however,
they cannot be edited using the
radio. These playlists are treated as
special folders containing
compressed audio song files.
ProCarManuals.com
Page 183 of 398

Infotainment System 7-17
located below either arrow button.
The disc goes to the next or
previous artist in alphabetical order.
Continue pressing either button until
the desired artist is displayed.
To change from playback by artist to
playback by album, press the
pushbutton located below the Sort
By label. From the sort screen, push
one of the buttons below the album
button. Press the pushbutton below
the back label to return to the main
music navigator screen. Now the
album name is displayed on the
second line between the arrows and
songs from the current album
begins to play. Once all songs from
that album are played, the player
moves to the next album in
alphabetical order on the CD-R/
CD-RW and begins playing MP3
files from that album.
To exit music navigator mode, press
the pushbutton below the Back label
to return to normal MP3 playback.Auxiliary Devices
The radio system has an auxiliary
input jack located on the lower right
side of the faceplate. This is not an
audio output; do not plug the
headphone set into the front
auxiliary input jack. An external
audio device such as an iPod™,
laptop computer, MP3 player, CD
changer, etc. can be connected to
the auxiliary input jack for use as
another audio source.
Drivers are encouraged to set up
any auxiliary device while the
vehicle is in P (Park). seeDefensive
Driving
on page 9‑3for more
information on driver distraction.
To use a portable audio player,
connect a 3.5 mm (1/8 inch) cable
to the radio's front auxiliary input
jack. When a device is connected,
press the radio CD/AUX button to
begin playing audio from the device
over the vehicle speakers.
O(Power/Volume): Turn to
increase or decrease the volume of
the portable player. Additional
volume adjustments might have to
be made from the portable device if
the volume is not loud or soft
enough.
BAND: Press to listen to the radio
when a portable audio device is
playing. The portable audio device
continues playing.
CD/AUX (CD/Auxiliary): Press to
play a CD when a portable audio
device is playing. Press again and
the system begins playing audio
from the connected portable audio
player. If a portable audio player is
not connected, “No Input Device
Found” displays.
ProCarManuals.com