roof SATURN VUE 2010 User Guide
[x] Cancel search | Manufacturer: SATURN, Model Year: 2010, Model line: VUE, Model: SATURN VUE 2010Pages: 398, PDF Size: 4.02 MB
Page 75 of 398

Seats and Restraints 3-31
What Makes an Airbag
Inflate?
In a deployment event, the sensing
system sends an electrical signal
triggering a release of gas from the
inflator. Gas from the inflator fills the
airbag causing the bag to break out
of the cover and deploy. The inflator,
the airbag, and related hardware are
all part of the airbag module.
Frontal airbag modules are located
inside the steering wheel and
instrument panel. For vehicles with
seat-mounted side impact airbags,
there are airbag modules in the side
of the front seatbacks closest to the
door. For vehicles with roof-rail
airbags, there are airbag modules in
the ceiling of the vehicle, near the
side windows that have occupant
seating positions.
How Does an Airbag
Restrain?
In moderate to severe frontal or
near frontal collisions, even belted
occupants can contact the steering
wheel or the instrument panel. In
moderate to severe side collisions,
even belted occupants can contact
the inside of the vehicle.
Airbags supplement the protection
provided by safety belts. Frontal
airbags distribute the force of
the impact more evenly over the
occupant's upper body, stopping
the occupant more gradually.
Seat‐mounted side impact and
roof-rail airbags distribute the force
of the impact more evenly over the
occupant's upper body.Rollover capable roof-rail airbags
are designed to help contain the
head and chest of occupants in the
outboard seating positions in the
first and second rows. The rollover
capable roof-rail airbags are
designed to help reduce the risk of
full or partial ejection in rollover
events, although no system can
prevent all such ejections.
But airbags would not help in many
types of collisions, primarily
because the occupant's motion is
not toward those airbags. See
When
Should an Airbag Inflate?
on
page 3‑29for more information.
Airbags should never be regarded
as anything more than a supplement
to safety belts.
ProCarManuals.com
Page 76 of 398

3-32 Seats and Restraints
What Will You See After
an Airbag Inflates?
After the frontal airbags and
seat-mounted side impact airbags
inflate, they quickly deflate, so
quickly that some people may not
even realize an airbag inflated.
Roof-rail airbags may still be at least
partially inflated for some time after
they deploy. Some components of
the airbag module may be hot for
several minutes. For location of the
airbag modules, seeWhat Makes
an Airbag Inflate? on page 3‑31. The parts of the airbag that come
into contact with you may be warm,
but not too hot to touch. There may
be some smoke and dust coming
from the vents in the deflated
airbags. Airbag inflation does not
prevent the driver from seeing out of
the windshield or being able to steer
the vehicle, nor does it prevent
people from leaving the vehicle.
{WARNING
When an airbag inflates, there
may be dust in the air. This dust
could cause breathing problems
for people with a history of
asthma or other breathing trouble.
To avoid this, everyone in the
vehicle should get out as soon as
it is safe to do so. If you have
breathing problems but cannot
get out of the vehicle after an
(Continued)
WARNING (Continued)
airbag inflates, then get fresh air
by opening a window or a door.
If you experience breathing
problems following an airbag
deployment, you should seek
medical attention.
The vehicle has a feature that may
automatically unlock the doors, turn
on the interior lamps and hazard
warning flashers, and shut off the
fuel system after the airbags inflate.
ProCarManuals.com
Page 78 of 398

3-34 Seats and Restraints
Passenger Sensing
System
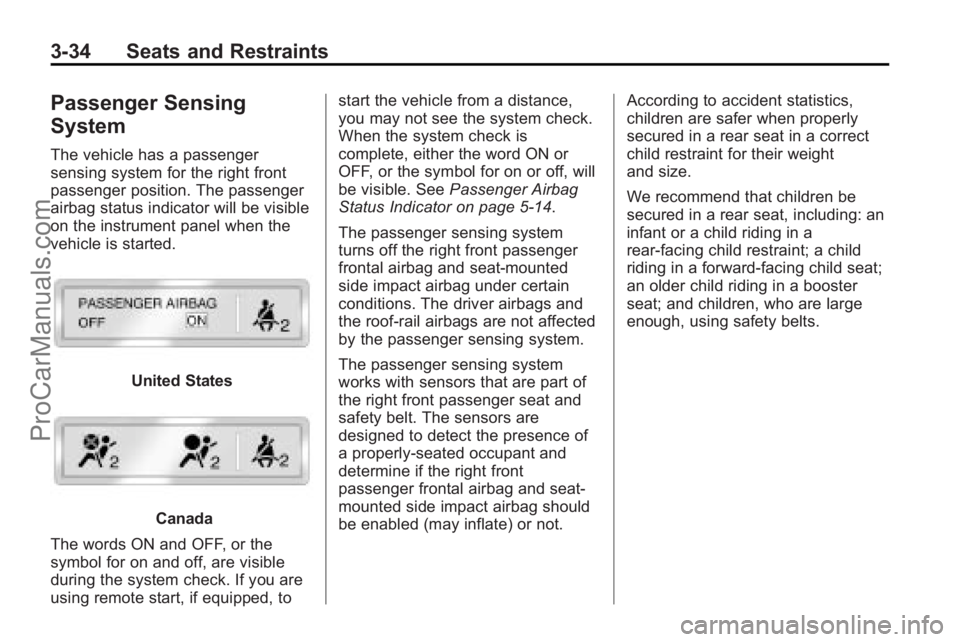
The vehicle has a passenger
sensing system for the right front
passenger position. The passenger
airbag status indicator will be visible
on the instrument panel when the
vehicle is started.
United States
Canada
The words ON and OFF, or the
symbol for on and off, are visible
during the system check. If you are
using remote start, if equipped, to start the vehicle from a distance,
you may not see the system check.
When the system check is
complete, either the word ON or
OFF, or the symbol for on or off, will
be visible. See
Passenger Airbag
Status Indicator on page 5‑14.
The passenger sensing system
turns off the right front passenger
frontal airbag and seat-mounted
side impact airbag under certain
conditions. The driver airbags and
the roof-rail airbags are not affected
by the passenger sensing system.
The passenger sensing system
works with sensors that are part of
the right front passenger seat and
safety belt. The sensors are
designed to detect the presence of
a properly-seated occupant and
determine if the right front
passenger frontal airbag and seat‐
mounted side impact airbag should
be enabled (may inflate) or not. According to accident statistics,
children are safer when properly
secured in a rear seat in a correct
child restraint for their weight
and size.
We recommend that children be
secured in a rear seat, including: an
infant or a child riding in a
rear-facing child restraint; a child
riding in a forward-facing child seat;
an older child riding in a booster
seat; and children, who are large
enough, using safety belts.
ProCarManuals.com
Page 84 of 398

3-40 Seats and Restraints
Adding Equipment to the
Airbag-Equipped Vehicle
Q: Is there anything I might addto or change about the vehicle
that could keep the airbags
from working properly?
A: Yes. If you add things that
change the vehicle's frame,
bumper system, height, front end
or side sheet metal, they may
keep the airbag system from
working properly. Changing or
moving any parts of the front
seats, safety belts, the airbag
sensing and diagnostic module,
steering wheel, instrument
panel, roof-rail airbag modules,
ceiling headliner or pillar garnish
trim, overhead console, front
sensors, side impact sensors,
rollover sensor module, or airbag
wiring can affect the operation of
the airbag system.
In addition, the vehicle has a
passenger sensing system for
the right front passenger
position, which includes sensors that are part of the passenger
seat. The passenger sensing
system may not operate properly
if the original seat trim is
replaced with non-GM covers,
upholstery or trim, or with GM
covers, upholstery or trim
designed for a different vehicle.
Any object, such as an
aftermarket seat heater or a
comfort enhancing pad or
device, installed under or on top
of the seat fabric, could also
interfere with the operation of
the passenger sensing system.
This could either prevent proper
deployment of the passenger
airbag(s) or prevent the
passenger sensing system from
properly turning off the
passenger airbag(s). See
Passenger Sensing System
on
page 3‑34.
If you have questions, call
Customer Assistance. The
phone numbers and addresses
for Customer Assistance are in Step Two of the Customer
Satisfaction Procedure in this
manual.
If the vehicle has rollover
roof-rail airbags, see
Different
Size Tires and Wheels
on
page 10‑61for additional
important information.
Q: Because I have a disability, I have to get my vehicle
modified. How can I find out
whether this will affect my
airbag system?
A: If you have questions, call
Customer Assistance. The
phone numbers and addresses
for Customer Assistance are in
Step Two of the Customer
Satisfaction Procedure in this
manual.
In addition, your dealer/retailer and
the service manual have information
about the location of the airbag
sensors, sensing and diagnostic
module and airbag wiring.
ProCarManuals.com
Page 105 of 398

Storage 4-1
Storage
Storage Compartments
Instrument Panel Storage . . . . 4-1
Glove Box . . . . . . . . . . . . . . . . . . . . 4-1
Cupholders . . . . . . . . . . . . . . . . . . . 4-1
Front Storage . . . . . . . . . . . . . . . . . 4-2
Sunglasses Storage . . . . . . . . . . 4-2
Armrest Storage . . . . . . . . . . . . . . 4-2
Center Console Storage . . . . . . 4-2
Additional Storage Features
Cargo Cover . . . . . . . . . . . . . . . . . . 4-3
Cargo Tie Downs . . . . . . . . . . . . . 4-3
Cargo ManagementSystem . . . . . . . . . . . . . . . . . . . . . . 4-3
Convenience Net . . . . . . . . . . . . . 4-4
Roof Rack System
Roof Rack System . . . . . . . . . . . . 4-4
Storage
Compartments
Instrument Panel Storage
Your vehicle has a storage area
located to left of the steering wheel.
Pull down on the handle to access.
Glove Box
To open the glove box, lift up on the
lever. If the glove box has a lock
use the key to lock and unlock it.
The glove box divider can be
removed. The slots on the left side
are for storing the divider.
Cupholders
There are cupholders located in
front of and behind the center
console.
To access the cupholders behind
the center console, push the button.
ProCarManuals.com
Page 108 of 398

4-4 Storage
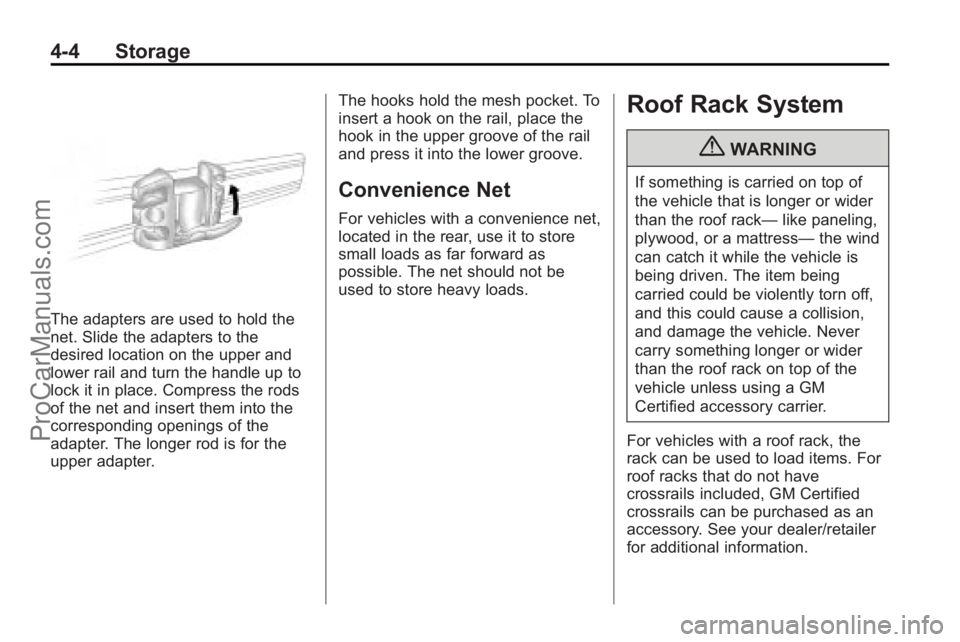
The adapters are used to hold the
net. Slide the adapters to the
desired location on the upper and
lower rail and turn the handle up to
lock it in place. Compress the rods
of the net and insert them into the
corresponding openings of the
adapter. The longer rod is for the
upper adapter.The hooks hold the mesh pocket. To
insert a hook on the rail, place the
hook in the upper groove of the rail
and press it into the lower groove.
Convenience Net
For vehicles with a convenience net,
located in the rear, use it to store
small loads as far forward as
possible. The net should not be
used to store heavy loads.
Roof Rack System
{WARNING
If something is carried on top of
the vehicle that is longer or wider
than the roof rack—
like paneling,
plywood, or a mattress— the wind
can catch it while the vehicle is
being driven. The item being
carried could be violently torn off,
and this could cause a collision,
and damage the vehicle. Never
carry something longer or wider
than the roof rack on top of the
vehicle unless using a GM
Certified accessory carrier.
For vehicles with a roof rack, the
rack can be used to load items. For
roof racks that do not have
crossrails included, GM Certified
crossrails can be purchased as an
accessory. See your dealer/retailer
for additional information.
ProCarManuals.com
Page 109 of 398

Storage 4-5
Notice:Loading cargo on the
roof rack that weighs more than
75 kg (165 lbs) or hangs over the
rear or sides of the vehicle may
damage the vehicle. Load cargo
so that it rests evenly between
the crossrails, making sure to
fasten cargo securely.
To prevent damage or loss of cargo
when driving, check to make sure
crossrails and cargo are securely
fastened. Loading cargo on the roof
rack will make the vehicle’ s center
of gravity higher. Avoid high speeds,
sudden starts, sharp turns, sudden
braking or abrupt maneuvers,
otherwise it may result in loss of
control. If driving for a long distance,
on rough roads, or at high speeds,
occasionally stop the vehicle to
make sure the cargo remains in its
place Do not exceed the maximum vehicle
capacity when loading your vehicle.
For more information on vehicle
capacity and loading, see
Vehicle
Load Limits on page 9‑22.
Check that all cargo is securely
fastened to prevent damage or loss
while driving.
ProCarManuals.com
Page 117 of 398

Instruments and Controls 5-7
If the DIC display does not show a
heading, for example, N for North,
or the heading does not change
after making turns, there may be a
strong magnetic field interfering with
the compass. Such interference
may be caused by a magnetic CB or
cell phone antenna mount, a
magnetic emergency light, magnetic
note pad holder, or any other
magnetic item. Turn off the vehicle,
move the magnetic item, then turn
on the vehicle and calibrate the
compass.To calibrate the compass, use the
following procedure:
Compass Calibration Procedure
1. Before calibrating the compass,
make sure the compass is set to
the variance zone in which the
vehicle is located. See
“Compass Variance (Zone)
Procedure” earlier in this
section.
Do not operate any switches
such as window, sunroof,
climate controls, seats, etc.
during the calibration procedure.
2. Press the vehicle information button until PRESS
VTO
CALIBRATE COMPASS
displays. 3. Press the set/reset button to
start the compass calibration.
4. The DIC will display CALIBRATING COMPASS :
TURN IN CIRCLES. Drive the
vehicle in tight circles at less
than 5 mph (8 km/h) to complete
the calibration. The DIC will
display COMPASS
CALIBRATION COMPLETE
for a few seconds when the
calibration is complete. The DIC
display will then return to the
previous menu.
ProCarManuals.com
Page 177 of 398

Infotainment System 7-11
Fixed Mast Antenna
The fixed mast antenna can
withstand most car washes without
being damaged as long as it is
securely attached to the base. If the
mast becomes slightly bent,
straighten it out by hand. If the mast
is badly bent, replace it.
Occasionally check to make sure
the antenna is tightened to its base.
If tightening is required, tighten
by hand.
Satellite Radio Antenna
The XM Satellite Radio antenna is
located on the roof of the vehicle.
Keep the antenna clear of
obstructions for clear radio
reception.
If the vehicle has a sunroof, the
performance of the XM system may
be affected if the sunroof is open.
Audio Players
CD Player
Playing a CD
Insert a CD partway into the slot,
label side up. The player pulls it in
and the CD should begin playing.
ZEJECT :Press to eject the disc
that is currently playing. A beep
sounds and Ejecting Disc displays.
Once the disc is ejected, Remove
Disc displays. The disc can be
removed. If the disc is not removed,
after several seconds, the disc
automatically pulls back into the
player.
f(Tune): Turn to select tracks on
the CD that is currently playing.
©SEEK¨: Press©to go to
the start of the current track, if more
than ten seconds on the CD have
played. Press
¨to go to the next
track. If either arrow is held, or pressed
multiple times, the player continues
moving backward or forward
through the tracks on the CD.
sREV (Fast Reverse):
Press
and hold to reverse playback quickly
within a track. Sound will be heard
at a reduced volume. Release to
resume playing the track. The
elapsed time of the track displays.
\FWD (Fast Forward): Press
and hold to advance playback
quickly within a track. Sound will be
heard at a reduced volume. Release
to resume playing the track. The
elapsed time of the track displays.
RDM (Random): CD tracks can be
listened to in random, rather than
sequential order with the random
setting. To use random, press the
pushbutton positioned under the
RDM label until Random Current
Disc displays. Press the pushbutton
again to turn off random play.
ProCarManuals.com
Page 213 of 398

Driving and Operating 9-9
Loading Your Vehicle for
Off-Road Driving
{WARNING
.Cargo on the load floor piled
higher than the seatbacks
can be thrown forward during
a sudden stop. You or your
passengers could be injured.
Keep cargo below the top of
the seatbacks.
.Unsecured cargo on the load
floor can be tossed about
when driving over rough
terrain. You or your
passengers can be struck by
flying objects. Secure the
cargo properly.(Continued)
WARNING (Continued)
.Heavy loads on the roof raise
the vehicle's center of gravity,
making it more likely to roll
over. You can be seriously or
fatally injured if the vehicle
rolls over. Put heavy loads
inside the cargo area, not on
the roof. Keep cargo in the
cargo area as far forward and
low as possible.
There are some important things to
remember about how to load your
vehicle.
.The heaviest things should be
on the floor, forward of the rear
axle. Put heavier items as far
forward as you can.
.Be sure the load is properly
secured, so things are not
tossed around. You will find other important
information under
Vehicle Load
Limits
on page 9‑22and Tireson
page 10‑43.
Environmental Concerns
Off-road driving can provide
wholesome and satisfying
recreation. However, it also raises
environmental concerns. We
recognize these concerns and urge
every off-roader to follow these
basic rules for protecting the
environment:
.Always use established trails,
roads, and areas that have been
specially set aside for public
off-road recreational driving and
obey all posted regulations.
.Avoid any driving practice that
could damage shrubs, flowers,
trees, or grasses or disturb
wildlife. This includes
wheel-spinning, breaking down
trees, or unnecessary driving
through streams or over soft
ground.
ProCarManuals.com