cooling Seat Alhambra 2007 Owner's Manual
[x] Cancel search | Manufacturer: SEAT, Model Year: 2007, Model line: Alhambra, Model: Seat Alhambra 2007Pages: 291, PDF Size: 9.13 MB
Page 5 of 291
Contents3
ContentsThe structure of this manual
. . . . .
Content
. . . . . . . . . . . . . . . . . . . . . . . . . . . . . . . .
Safety First
. . . . . . . . . . . . . . . . . . . . . . . . . . .
Safe driving
. . . . . . . . . . . . . . . . . . . . . . . . . . . . . .
Brief introduction . . . . . . . . . . . . . . . . . . . . . . . .
Proper sitting position for occupants . . . . . . . . .
Pedal area . . . . . . . . . . . . . . . . . . . . . . . . . . . . . .
Stowing luggage . . . . . . . . . . . . . . . . . . . . . . . . .
Seat belts
. . . . . . . . . . . . . . . . . . . . . . . . . . . . . . . .
Introduction . . . . . . . . . . . . . . . . . . . . . . . . . . . . .
Why wear seat belts? . . . . . . . . . . . . . . . . . . . . . .
Seat belts . . . . . . . . . . . . . . . . . . . . . . . . . . . . . . .
Belt tension devices . . . . . . . . . . . . . . . . . . . . . .
Airbag system
. . . . . . . . . . . . . . . . . . . . . . . . . . . .
Brief introduction . . . . . . . . . . . . . . . . . . . . . . . .
Front airbags . . . . . . . . . . . . . . . . . . . . . . . . . . . .
Side airbags . . . . . . . . . . . . . . . . . . . . . . . . . . . . .
Curtain airbags . . . . . . . . . . . . . . . . . . . . . . . . . .
Deactivating airbags* . . . . . . . . . . . . . . . . . . . . .
Child safety
. . . . . . . . . . . . . . . . . . . . . . . . . . . . . .
Brief introduction . . . . . . . . . . . . . . . . . . . . . . . .
Child seats . . . . . . . . . . . . . . . . . . . . . . . . . . . . . .
Installation of child seats in vehicle seats . . . . .
Integrated child seat . . . . . . . . . . . . . . . . . . . . . .
Operating instructions
. . . . . . . . . . . .
Cockpit
. . . . . . . . . . . . . . . . . . . . . . . . . . . . . . . . . . .
Overview . . . . . . . . . . . . . . . . . . . . . . . . . . . . . . .
Instruments . . . . . . . . . . . . . . . . . . . . . . . . . . . . .
Display in the instrument panel . . . . . . . . . . . . .
Warning lamps . . . . . . . . . . . . . . . . . . . . . . . . . . .
On board computer with multifunction display*
Navigation system * . . . . . . . . . . . . . . . . . . . . . .
Steering wheel controls
. . . . . . . . . . . . . . . . . . .
Steering wheel . . . . . . . . . . . . . . . . . . . . . . . . . . .
Unlocking and locking
. . . . . . . . . . . . . . . . . . . .
Keys . . . . . . . . . . . . . . . . . . . . . . . . . . . . . . . . . . .
Central locking . . . . . . . . . . . . . . . . . . . . . . . . . . .
Key with remote control . . . . . . . . . . . . . . . . . . .
Anti-theft alarm system . . . . . . . . . . . . . . . . . . . .
Tailgate . . . . . . . . . . . . . . . . . . . . . . . . . . . . . . . . .
Windows . . . . . . . . . . . . . . . . . . . . . . . . . . . . . . .
Sliding/tilting sun roof . . . . . . . . . . . . . . . . . . . .
Lights and visibility
. . . . . . . . . . . . . . . . . . . . . . .
Lights . . . . . . . . . . . . . . . . . . . . . . . . . . . . . . . . . .
Visibility . . . . . . . . . . . . . . . . . . . . . . . . . . . . . . . .
Windscreen washers . . . . . . . . . . . . . . . . . . . . . .
Mirrors . . . . . . . . . . . . . . . . . . . . . . . . . . . . . . . . .
Seats and stowage
. . . . . . . . . . . . . . . . . . . . . . .
The importance of correct seat adjustment . . . .
Head restraints . . . . . . . . . . . . . . . . . . . . . . . . . .
Front seats . . . . . . . . . . . . . . . . . . . . . . . . . . . . . .
Rear seats . . . . . . . . . . . . . . . . . . . . . . . . . . . . . .
Stowage compartments . . . . . . . . . . . . . . . . . . .
Ashtrays, cigarette lighter and electrical sockets
Hazard warning triangles and first aid kit . . . . .
Luggage compartment . . . . . . . . . . . . . . . . . . . . Roof carrier . . . . . . . . . . . . . . . . . . . . . . . . . . . . . .
Cooling and heating box* . . . . . . . . . . . . . . . . . .
Heating, Ventilation and Air conditioning
. .
Climatronic . . . . . . . . . . . . . . . . . . . . . . . . . . . . . .
Driving
. . . . . . . . . . . . . . . . . . . . . . . . . . . . . . . . . . .
Steering . . . . . . . . . . . . . . . . . . . . . . . . . . . . . . . .
Safety . . . . . . . . . . . . . . . . . . . . . . . . . . . . . . . . . .
Ignition lock . . . . . . . . . . . . . . . . . . . . . . . . . . . . .
Starting and stopping the engine . . . . . . . . . . .
Manual gearbox . . . . . . . . . . . . . . . . . . . . . . . . . .
Automatic gearbox . . . . . . . . . . . . . . . . . . . . . . .
Handbrake . . . . . . . . . . . . . . . . . . . . . . . . . . . . . .
Parking distance warning system . . . . . . . . . . . .
Cruise control system (CCS) . . . . . . . . . . . . . . . .
Tips and Maintenance
. . . . . . . . . . . . .
Intelligent technology
. . . . . . . . . . . . . . . . . . . . .
Brakes . . . . . . . . . . . . . . . . . . . . . . . . . . . . . . . . .
Driving and the environment
. . . . . . . . . . . . . .
Running-in . . . . . . . . . . . . . . . . . . . . . . . . . . . . . .
Exhaust gas emission control system . . . . . . . .
Driving abroad . . . . . . . . . . . . . . . . . . . . . . . . . . .
Trailer towing . . . . . . . . . . . . . . . . . . . . . . . . . . . .
Driving economically and with respect for the
environment . . . . . . . . . . . . . . . . . . . . . . . . . . . . .
Cleaning and caring for your vehicle
. . . . . . .
General notes . . . . . . . . . . . . . . . . . . . . . . . . . . .
Care of the vehicle exterior . . . . . . . . . . . . . . . . .
Care of the vehicle interior . . . . . . . . . . . . . . . . .
5
6
7
7
7
9
14
14
17
17
19
22
30
32
32
36
39
41
43
45
45
47
49
52 61
61
61
62
67
70
79
83
84
84
86
86
87
93
95
97
100
104
108
108
114
116
118
121
121
122
124
126
133
139
142
142 147
148
151
151
159
159
160
161
163
165
166
172
173
175
179
179
179
185
185
186
187
188
191
193
193
194
199
alhambra ingles.book Seite 3 Donnerstag, 19. April 2007 4:04 16
Page 66 of 291
Cockpit
64the combi-instrument display. Stop the car and switch off the engine. Allow
the engine to cool and check the coolant level ⇒.
Even if the coolant level is correct do not continue driving. You should obtain
technical assistance.
WARNING
Read and observe the warnings “Working in the engine compartment”
before opening the bonnet to carry out work in the engine compartment.
Caution
Accessories in front of the air inlet reduce the cooling effect of the coolant. At
high outside temperatures and high engine loads, there is a risk of the
engine overheating.
Fuel gauge
The fuel tank has a capacity of approx. 70 litres.
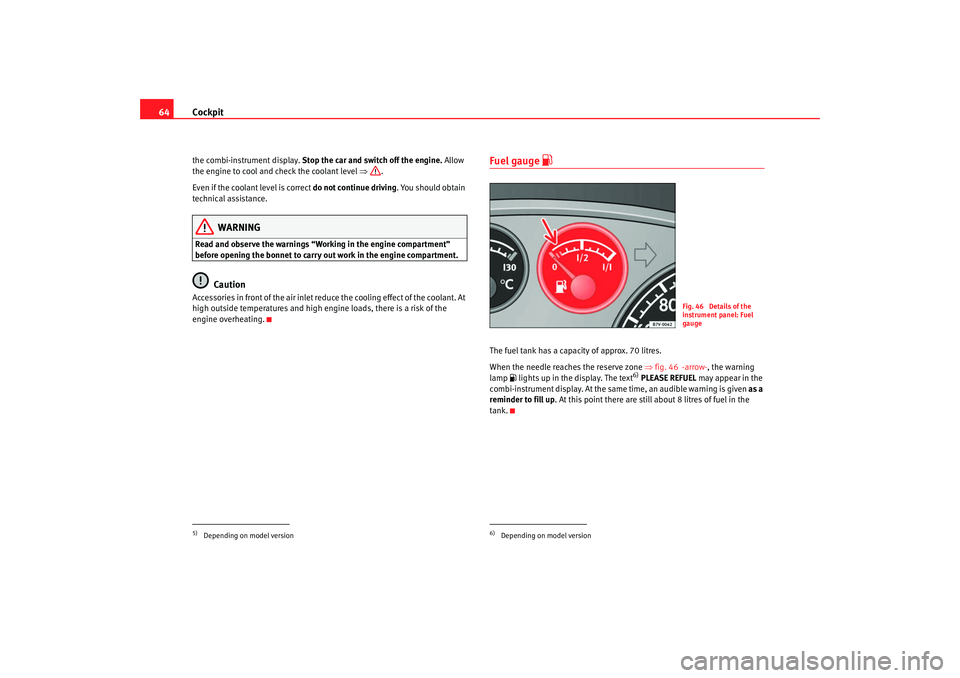
When the needle reaches the reserve zone ⇒fig. 46 -arrow- , the warning
lamp lights up in the display. The text
6) PLEASE REFUEL may appear in the
combi-instrument display. At the same time, an audible warning is given as a
reminder to fill up . At this point there are still about 8 litres of fuel in the
tank.
5)Depending on model version
6)Depending on model version
Fig. 46 Details of the
instrument panel: Fuel
gauge
alhambra ingles.book Seite 64 Donnerstag, 19. April 2007 4:04 16
Page 135 of 291
Seats and stowage133
Safety First
Operating instructions
Tips and Maintenance
Te c h n i c a l D a t a
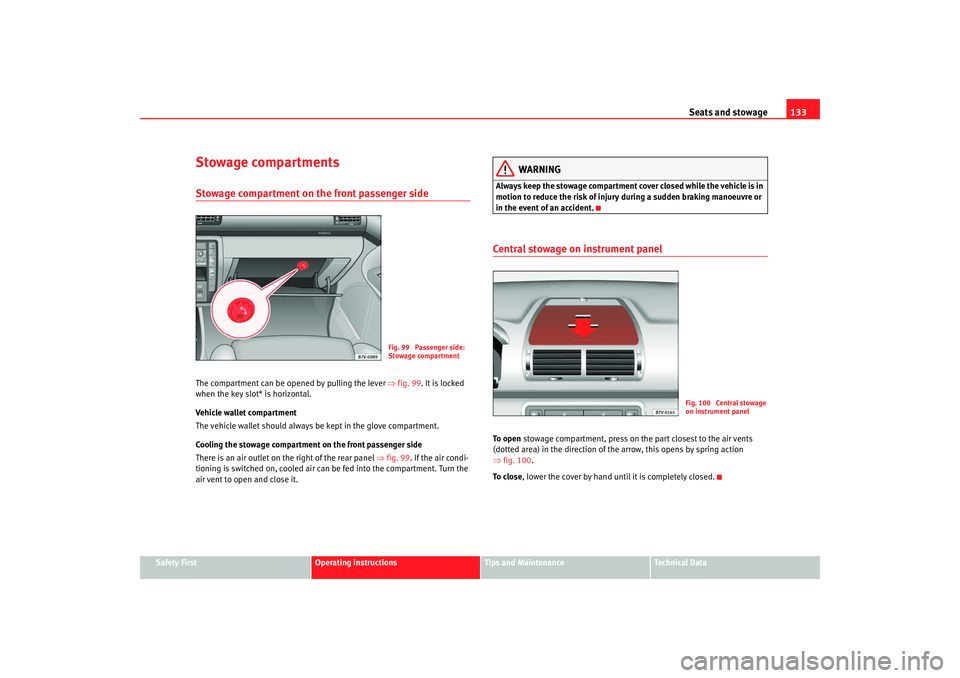
Stowage compartmentsStowage compartment on the front passenger sideThe compartment can be opened by pulling the lever ⇒fig. 99 . It is locked
when the key slot* is horizontal.
Vehicle wallet compartment
The vehicle wallet should always be kept in the glove compartment.
Cooling the stowage compartmen t on the front passenger side
There is an air outlet on the right of the rear panel ⇒fig. 99 . If the air condi-
tioning is switched on, cooled air can be fed into the compartment. Turn the
air vent to open and close it.
WARNING
Always keep the stowage compartment cover closed while the vehicle is in
motion to reduce the risk of injury during a sudden braking manoeuvre or
in the event of an accident.Central stowage on instrument panelTo o p e n stowage compartment, press on the part closest to the air vents
(dotted area) in the direction of the arrow, this opens by spring action
⇒ fig. 100 .
To c l o s e , lower the cover by hand until it is completely closed.
Fig. 99 Passenger side:
Stowage compartment
Fig. 100 Central stowage
on instrument panel
alhambra ingles.book Seite 133 Donnerstag, 19. April 2007 4:04 16
Page 150 of 291
Seats and stowage
148•
Damage to the vehicle caused by incorrect installation of mounts or roof
carrier systems not approved by the factory are excluded from the vehicle
warranty.
Securing the load
Loads transported on the roof carrier must be securely
attached. The car's handling is affected when transporting
loads.The maximum permissible roof load for your vehicle is 75 kg. The load limit
applies to the combined weight of the carrier system and the load itself.
Distribute the load evenly. However, if you are using a roof carrier with a lower
weight rating, you will not be able to carry the maximum roof load. Do not
exceed the maximum weight limit for the roof carrier which is listed in the
fitting instructions.
WARNING
•
If damaged, fine or inadequate securing straps are used to fasten
objects carried on the roof, they could break in the event of sharp braking.
This could cause an accident and serious injury.
•
Always use appropriate securing straps to secure objects on the roof
carrier against sliding or flying off.,This could cause an accident. The load
must be correctly secured.
•
Always respect the maximum authorised weight for the roof, the
maximum authorised weight on the axles and the total maximum author-
ised weight of the vehicle. Otherwise there is danger of causing an acci-
dent.
•
The risk of an accident is increased by transporting heavy or bulky
loads on the roof, which affects the car's handling by shifting the centre of
gravity and increasing susceptibility to cross winds. Both circumstances increase the risk of accident. Therefore you must adapt your driving style
and speed to the prevailing conditions - avoid sudden braking or driving
manoeuvres when there is a load on the roof carrier.
Caution
Please take extra care not to let the tailga
te or rear window strike the roof load
when open – there is a risk of damage to the vehicle.
For the sake of the environment
The roof carrier is often left on the roof for convenience even if it is not being
used. However, increased air resistance means that the vehicle uses more
fuel. For this reason you should always ta ke off the roof carrier when it is not
in use.Cooling and heating box*Notes on usage
The cooling and heating box may on ly be i nstalled in the p osi -
tion of rear left seat in the third row.Power can be supplied by any of the 12 Volt sockets in the vehicle. It
consumes approximately 33 watts and has a capacity of approximately 32
litres.
The battery will discharge if the cooling and heating box is used for a long
period while the engine is switched off.
WARNING (continued)
alhambra ingles.book Seite 148 Donnerstag, 19. April 2007 4:04 16
Page 151 of 291
Seats and stowage149
Safety First
Operating instructions
Tips and Maintenance
Te c h n i c a l D a t a
Before using the cooling and heating bo
x for the first time, you should clean
it using a household detergent.
Disconnect the power supply and clean th e box if you do not plan to use the
cooling and heating box for a long peri od. Place a folded towel between the
box and its lid. This prevents mould and damp stains forming in the cooling
and heating box.
Whenever possible, food and drinks should be stored in air-tight containers
in the box.
Do not overfill the box - this would prevent air circulation within the box.
Place crumpled paper (or similar) between bottles and other containers in the
box to prevent clanking noises.
Do not fill the interior of the box with liquid or ice.
Caution
•
Do not place objects, blankets, or clothes on top of the cooling/heating
box, as the air intake and output may be obstructed and the box will discon-
nect itself.
•
Do not place any containers, food items or other objects into the box if
they are warmer than +50 °C. This could damage the cooling and heating box.
•
The cold/hot box is not suitable for transporting corrosive material or
material containing solvents.
•
Never leave the cold/hot box in the rain or damp.Note
•
The cooling and heating box is not design ed to heat or cool the interior of
the vehicle. The cooling and heating box should be used only for cooling and
warming food and drinks and for transporting heat-sensitive items on short
journeys.
•
A corresponding manual for the installation and use of the cooling and
heating box is included by the manufacturer and should be kept with the
vehicle wallet.
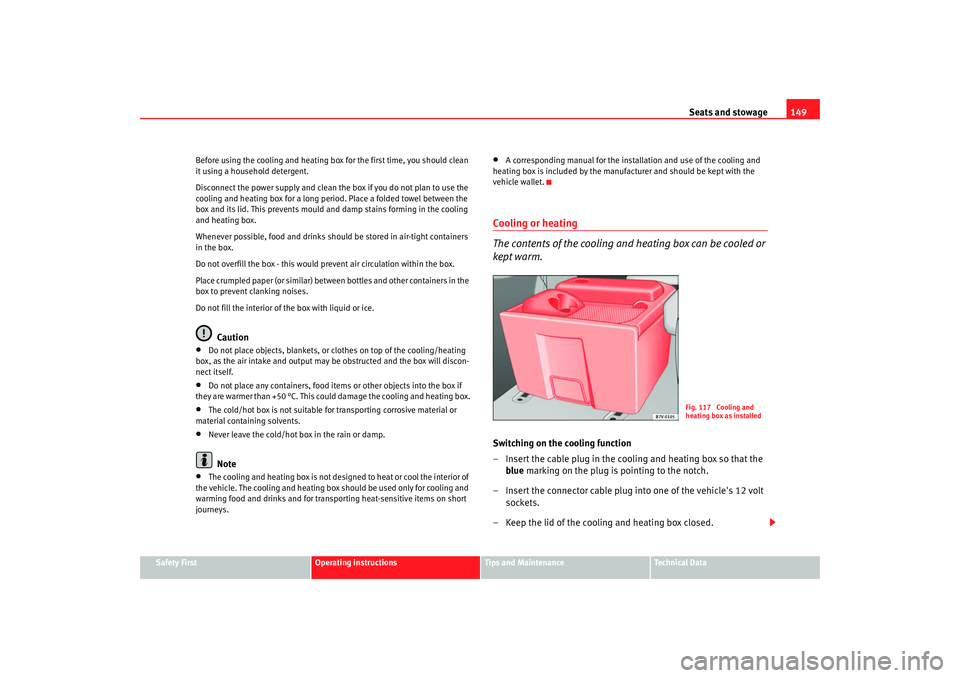
Cooling or heating
The contents of the cooling and heating box can be cooled or
kept warm.Switching on the cooling function
– Insert the cable plug in the cooling and heating box so that the blue marking on the plug is pointing to the notch.
– Insert the connector cable plug into one of the vehicle's 12 volt sockets.
– Keep the lid of the cooling and heating box closed.
Fig. 117 Cooling and
heating box as installed
alhambra ingles.book Seite 149 Donnerstag, 19. April 2007 4:04 16
Page 152 of 291
Seats and stowage
150
Switching on the heating function
– Insert the cable plug in the cooling and heating box so that the red marking on the plug is pointing to the notch.
– Insert the connector cable plug into one of the vehicle's 12 volt sockets.
– Keep the lid of the cooling and heating box closed.
Switching the cooling and heating box off fully
– Disconnect the power supply to the 12 Volt socket.The internal temperature of the cooling and heating box is dependent on the
temperature in the vehicle. In cooling mode, the internal temperature can be
max. 20 degrees below the temperature in the vehicle. In heating mode it can
be max. 35 degrees above the temperature in the vehicle ⇒ in “Safety
notes on using the cooling and heating box” on page 150.
If you switch directly from cooling to heating (or vice versa) it will take a rela-
tively long time for the interior to reach the desired temperature.
Faults
If the cooling and heating box does not work, proceed as follows:•
Check whether there is power and whether the plug is securely in the
socket.
•
Make sure the power cable is not damaged.
•
Check the fuse for the power supply to the 12 Volt socket.
•
Run the engine to recharge the battery.
If these steps do not help, co ntact a qualified dealership.
Safety notes on using the cooling and heating box
WARNING
•
For reasons of safety, the cooling and heating box lid must always be
closed and latched when the vehicle is in motion. The cooling and heating
box must always be firmly secured in the correct floor anchorings.
•
If the temperature in the vehicle is too low, the temperature in the box
may fall below +2 degrees and the cont ents may freeze. Bottles and other
containers could burst. Risk of injury.
•
For reasons of safety, the cooling and heating box lid mu st not be used
as a table or shelf when the vehicle is in motion.
•
Always close the lid of the cooling and heating box before the vehicle
moves off. If the flap is open, it could drop down when the vehicle moves
off. Risk of injury.
alhambra ingles.book Seite 150 Donnerstag, 19. April 2007 4:04 16
Page 153 of 291
Heating, Ventilation and Air conditioning 151
Safety First
Operating instructions
Tips and Maintenance
Te c h n i c a l D a t a
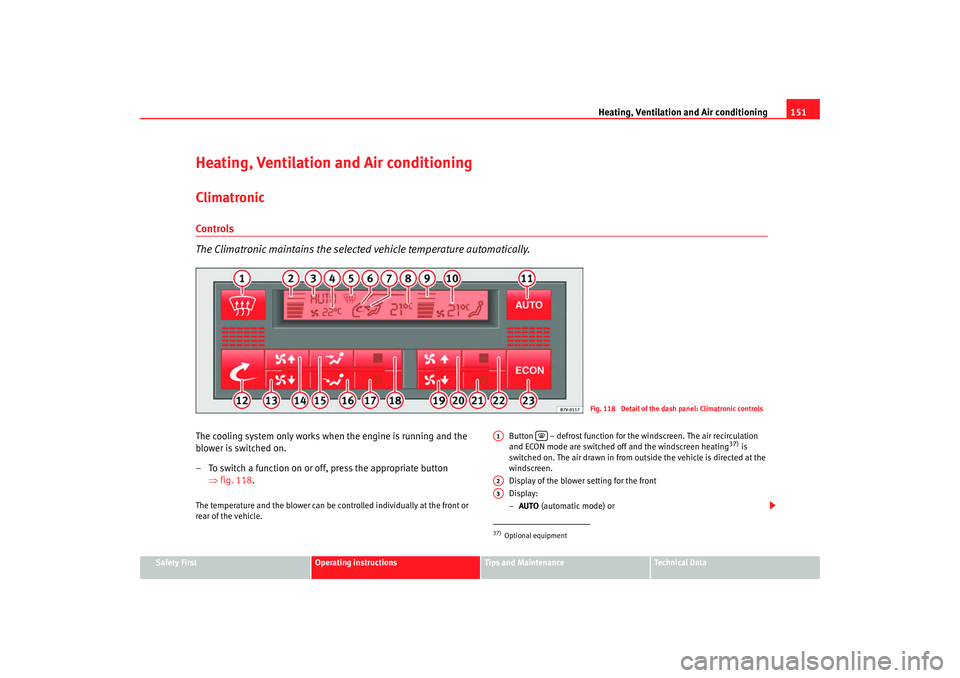
Heating, Ventilation and Air conditioningClimatronicControls
The Climatronic maintains the selected vehicle temperature automatically.The cooling system only works when the engine is running and the
blower is switched on.
– To switch a function on or off, press the appropriate button
⇒fig. 118 .The temperature and the blower can be co ntrolled individually at the front or
rear of the vehicle. Button – defrost function for th
e windscreen. The air recirculation
and ECON mode are switched off and the windscreen heating
37) is
switched on. The air drawn in from outside the vehicle is directed at the
windscreen.
Display of the blower setting for the front
Display:
− AUTO (automatic mode) or
Fig. 118 Detail of the dash panel: Climatronic controls
37)Optional equipmentA1
A2A3
alhambra ingles.book Seite 151 Donnerstag, 19. April 2007 4:04 16
Page 154 of 291
Heating, Ventilation and Air conditioning
152
− ECON (cooling system off) or
− OFF (entire system off)
Outside temperature display
Display for windscreen defrosting – lights up when the windscreen
defrosting function is switched on
Display for air recirculation mode
Display for air flow
Display of the selected interior temperature front
Display of the blower setting rear
Display of the selected interior temperature rear
Button for the automatic mode
Button for air recirculation mode
Button for reducing the blower speed front
Button for raising the blower speed front
Button for directing th e air flow to the chest
Button for directing the air flow to the footwell
Button for reducing the temperature front
Button for raising the temperature front
Button for reducing the blower speed rear
Button for raising the blower speed rear
Button for reducing the temperature rear
Button for raising the temperature rear
Button for switching the cooling system off
Switching between Celsius and Fahrenheit
Press and hold the button and press the button.
The selected temperature unit is then displayed.
WARNING
For road safety all windows must be clear of ice, snow, and condensation.
This is essential to ensure good visibility. Please familiarise yourself with
the correct operation of the heating and ventilation system, including the
demist/defrost functions for the windows.
Note
Please observe the general notes ⇒page 157.Automatic mode
In automatic mode air temperature, flow, and distribution are
automatically regulated so that a specified temperature is
attained as quickly as possible and then maintained.Switching on automatic mode
– Press the button .
– Select the desired temperature. We recommend 22°C (72°F).A comfortable interior climate is quickly reached when a temperature of
+22°C (72°F) is set in automatic mode. It can be changed as necessary to suit
individual preferences or particular cir cumstances. It is possible to select
interior temperatures from +18°C (64° F) to +29°C (86°F). These are approxi-
mate temperatures and the actual temperature may be slightly higher or
lower depending on the outside conditions.
If a temperature below +18°C (17.78°C) is selected, the display switches to
LO The temperature is not controlled and in AUTO mode, the system runs at
maximum cooling output.
A4A5A6A7A8A9A10A11
AUTO
A12
A13
A14
A15
A16
A17
A18
A19
A20
A21
A22
A23
ECON
ECON
AUTO
AUTO
alhambra ingles.book Seite 152 Donnerstag, 19. April 2007 4:04 16
Page 155 of 291
Heating, Ventilation and Air conditioning 153
Safety First
Operating instructions
Tips and Maintenance
Te c h n i c a l D a t a
If a temperature above +29°C (86°F) is selected, the display switches to
HI In
this setting the system runs at maximum heating output and the temperature
is not controlled.
Climatronic maintains a constant temperature level fully automatically. This is
done by automatically adjusting the temperature of the air supplied to the
interior, the blower setting, and the air distribution. The system also allows
for the effect of strong sunlight, so th ere is no need for manual adjustment.
Therefore, automatic mode provides the best comfort for the vehicle occu-
pants in virtually all conditions throughout the year. Automatic mode is switched off whenever an adjustment is made using the
buttons for air distribution or blower. The temperature continues to be regu-
lated.
Note
In the automatic mode, at least one outlet in the instrument panel must be
open. The cooling system could otherwise ice over.
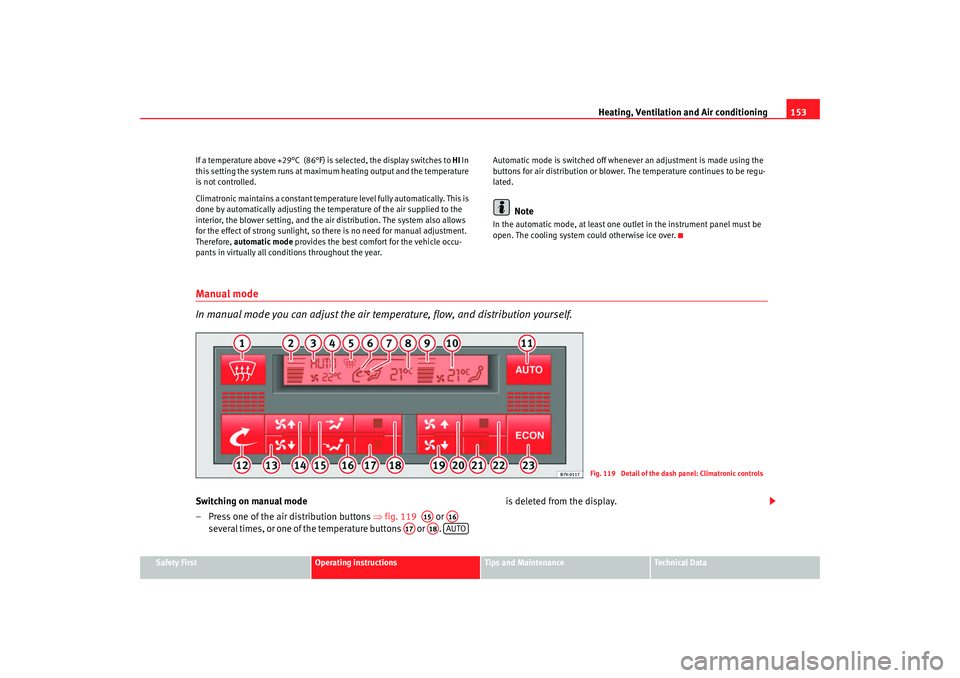
Manual mode
In manual mode you can adjust the air temp
erature, flow, and distribution yourself.Switching on manual mode
– Press one of the air distribution buttons ⇒fig. 119 or
several times, or one of the temperature buttons or . is deleted from the display.
Fig. 119 Detail of the dash panel: Climatronic controls
A15
A16
A17
A18
AUTO
alhambra ingles.book Seite 153 Donnerstag, 19. April 2007 4:04 16
Page 156 of 291
Heating, Ventilation and Air conditioning
154Temperature
The selected temperature setting is shown on the display. It is possible to
select interior temperatures from +18°C (64°F) to +29°C (86°F). These are
approximate temperatures and the actual temperature may be slightly higher
or lower depending on the outside conditions.
If a temperature below +18°C (17.78°C) is selected, the display switches to
LO The temperature is not controlled and in AUTO mode, the system runs at
maximum cooling output.
If a temperature above +29°C (86°F) is selected, the display switches to HI In
this setting the system runs at maximum heating output and the temperature
is not controlled.
Blower
The blower can be adjusted gradually using the controls y . Always
have the blower running at a low setting to ensure a constant flow of fresh air
into the vehicle. If the blower is set to 0, the Climatronic is switched off.
Air distribution
The air distribution is adjusted using the buttons and . It is also
possible to open and close some of the air outlets separately.
Switching off the cooling system
Pressing the button switches off th e air cooling system to save fuel.
The temperature continues to be controll ed, but the air cannot be cooled. The
set temperature can then only be reached if it is higher than the outside
temperature.
Switching the Climatronic on/off
Press button until OFF is shown on display . The Climatronic is switched
off. This function should be used in ce rtain situations only (e. g. if the system
develops a fault).
The Climatronic is switched back on by pressing button .
WARNING
When the Climatronic is off open a window to ensure an adequate supply of
fresh air in the vehicle. Otherwise, when the Climatronic is switched off, no
fresh air enters the vehicle. Stale or contaminated air inside the vehicle
may cause drowsiness, increasing the risk of accident.Air recirculation mode
Air recirculation mode prevents fumes or unpleasant smells
from entering the vehicle.– Press the button ⇒page 153, fig. 119 to switch air recircula-
tion mode on or off. This is ON if the symbol is displayed
on the screen.Air recirculation mode pr events strong odours in the ambient air from
entering the vehicle interior, for example when passing through a tunnel or in
queuing traffic.
When the outside temperature is low, us ing air recirculation mode provides
more effective heating by heating air from the vehicle interior instead of cold
air from outside.
When the outside temperature is high, using air recirculation mode provides
more effective cooling by cooling air fr om the vehicle interior instead of warm
air from outside.
ECON
A13
A3
AUTO
A12
A6
alhambra ingles.book Seite 154 Donnerstag, 19. April 2007 4:04 16