Engine Seat Alhambra 2008 Owner's Guide
[x] Cancel search | Manufacturer: SEAT, Model Year: 2008, Model line: Alhambra, Model: Seat Alhambra 2008Pages: 295, PDF Size: 7.83 MB
Page 83 of 295
Cockpit81
Safety First
Operating instructions
Tips and Maintenance
Te c h n i c a l D a t a
An audible signal is also given if the car is driven faster than 6 km/h (approx.
4 mph) with the handbrake applied.
Coolant temperature/level gauge
The corresponding warning is:
STOP CHECK LEVEL COOLANT
SERVICE MANUAL.
If the symbol flashes while driving, this means that either the coolant temper-
ature is too high or the coolant level is too low. Stop immediately, switch off
the engine and check the level. Top up coolant if necessary.
If the coolant level is correct, the overheating may be caused by a malfunction
of the radiator fan. In this case, check the radiator fan fuse, and replace if
necessary.
If the warning light does not go out, although the coolant level is correct and
the fan fuse is correct, do not continue driving. Obtain technical assistance.
If the fault is only in the radiator fan, it is possible to continue driving as far
as the nearest Technical Service Centre, as long as the coolant level is correct
and the display light is off.
Alternator
The corresponding warning is:
ALTERNATOR WORKSHOP!
The warning lamp lights up when the ignition is switched on. It should go out
when the engine is started.
The alternator is operated by a long-lasting drive belt.
If the warning light lights up while driving, stop, switch off the engine and
check the drive belt. If the belt is loose or broken, do not continue driving, as
the coolant pump will not be driven. The belt should be checked or replaced.
If the warning light comes on even though the belt is neither loose nor
broken, it is usually possible to continue driving to the nearest Technical
Service Centre.
As the vehicle battery will discharge, it is advisable to switch off all non-vital
electrical consumers.
Seat belt warning lamp
The corresponding warning is:
FASTEN SEAT BELT
This warning light (only in some countries) lights up for approximately 6
seconds when the ignition is switched on to remind occupants to fasten seat-
belts. If the seat belts are not fastened, a sound signal is emitted when the
ignition is switched on which will stop when the seat belts are fastened or
after approximately 6 seconds.
WARNING
•
If the brake fluid level is below the “MIN” mark, you should wait for
assistance from specialised personnel before continuing to drive.
•
If the fluid level is correct, the fault may lie in the ABS. If the ABS control
system fails, the rear wheels may block rapidly on braking. This, in certain
circumstances, could cause the vehicle to skid.
•
Never open the bonnet if you see steam or coolant escaping from the
engine compartment. Risk of burns. Wait until you can no longer see or
hear escaping steam or coolant.
•
Do not touch the fan, as it could suddenly start to operate, even if the
ignition is switched off.
•
To prevent burns from boiling coolant, the following should be
observed:
•
Take care when opening the coolant expansion tank!. When the engine
is warm or hot, the system is pressurised! Therefore wait until the engine
cools before opening the cap.
alhambra_ingles_0708 Seite 81 Mittwoch, 10. September 2008 10:55 10
Page 84 of 295

Cockpit
82•
To protect your face, hands and arms from hot steam or fluid, cover the
fan cap with a large cloth in order to open it.
•
Take care to avoid coolant spilling on the exhaust pipe or any other hot
component as antifreeze is inflammable.
Priority 2 (yellow symbols)If a yellow symbol appears, a sound signal is emitted. The symbols indicate
a dangerous situation. The function shown should be controlled as fast as
possible. If various faults occur at the same time, the symbols will be
displayed one by one for approx. 2 seconds.
Oil level too low
The corresponding warning is:
CHECK LEVEL OIL
If the symbol lights up: stop, switch off the engine and check the oil level,
topping up where necessary.
Oil level too low
The corresponding warning is:
OIL SENSOR WORKSHOP!
If the symbol flashes this probably means that the oil level sensor is defec-
tive. The vehicle should immediately be taken to a Technical Service Centre.
It is possible to continue driving, but the oil level should be continually moni-
tored, e.g. every time the vehicle is refuelled.
Engine fault
- Petrol engine
- Diesel engine
The corresponding warning is:
ENGINE FAULT WORKSHOP!
If a fault in the running of the engine arises while driving, the corresponding
light will come on (petrol engine) or flash (diesel engine). In this case the
engine should be checked immediately by a Technical Service Centre.
Anti-lock brake system (ABS)
The corresponding warning is:
ABS FAULT
A fault in the ABS system is shown in the following manner:
If the ABS warning light comes on separately, it is possible to brake the
vehicle using the normal brake system (without ABS). Consult a Technical
Service Centre as soon as possible.
Electronic immobiliser
The corresponding warning is:
IMMOBILIS.ACTIVE
When the ignition is switched on, the vehicle key data is automatically
consulted. The warning light will flash to confirm that the data is being
checked
If an unauthorised key is used, the warning light will flash constantly. It will
not be possible to start the vehicle.
Tailgate/bonnet open display *
The corresponding warning is:
TA ILGATE OPEN
This warning light only indicates that the tailgate is open.
WARNING (continued)
alhambra_ingles_0708 Seite 82 Mittwoch, 10. September 2008 10:55 10
Page 89 of 295
Unlocking and locking87
Safety First
Operating instructions
Tips and Maintenance
Te c h n i c a l D a t a
Unlocking and lockingKeysKey set
The set of keys includes a remote control, a key without a
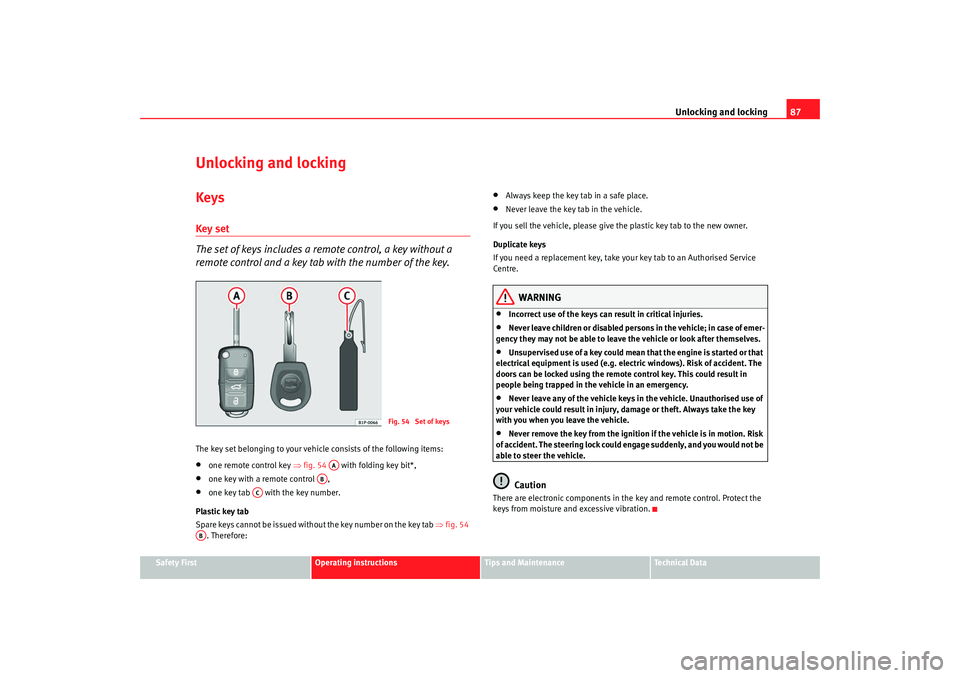
remote control and a key tab with the number of the key.The key set belonging to your vehicle consists of the following items:•
one remote control key ⇒fig. 54 with folding key bit*,
•
one key with a remote control ,
•
one key tab with the key number.
Plastic key tab
Spare keys cannot be issued without the key number on the key tab ⇒fig. 54
. Therefore:
•
Always keep the key tab in a safe place.
•
Never leave the key tab in the vehicle.
If you sell the vehicle, please give the plastic key tab to the new owner.
Duplicate keys
If you need a replacement key, take your key tab to an Authorised Service
Centre.
WARNING
•
Incorrect use of the keys can result in critical injuries.
•
Never leave children or disabled persons in the vehicle; in case of emer-
gency they may not be able to leave the vehicle or look after themselves.
•
Unsupervised use of a key could mean that the engine is started or that
electrical equipment is used (e.g. electric windows). Risk of accident. The
doors can be locked using the remote control key. This could result in
people being trapped in the vehicle in an emergency.
•
Never leave any of the vehicle keys in the vehicle. Unauthorised use of
your vehicle could result in injury, damage or theft. Always take the key
with you when you leave the vehicle.
•
Never remove the key from the ignition if the vehicle is in motion. Risk
of accident. The steering lock could engage suddenly, and you would not be
able to steer the vehicle.Caution
There are electronic components in the key and remote control. Protect the
keys from moisture and excessive vibration.
Fig. 54 Set of keys
AA
AB
AC
AB
alhambra_ingles_0708 Seite 87 Mittwoch, 10. September 2008 10:55 10
Page 92 of 295
Unlocking and locking
90•
The deadlock mechanism, the interior monitoring system
10) and the anti-
theft alarm
10) will be activated immediately if the key is turned once in the
lock. The activation is confirmed by the turn signals flashing briefly.
•
The deadlock mechanism, the interior monitoring system and the anti-
theft alarm will not be activated if the key is turned in the lock twice within
one second. All the doors and the tailgate will, however, be locked. The doors
can be unlocked from the inside if the deadlock mechanism has not been
activated. To do this, operate the door opening lever on the door in question.
The alarm will go off.
•
When locking the vehicle, the interior lights in the courtesy switch posi-
tion will be switched off
•
A warning lamp in the driver door flashes to indicate the deadlock is
working. The warning lamp will switch off after 14 days. This is to prevent the
vehicle battery from discharging completely when the vehicle is not used for
a longer period. The system is still active.
•
Windows, or the sliding roof, which are still open can be closed automat-
ically on vehicles equipped with electric windows and electric vent windows
or with an electric sliding roof. To do this, the key must be kept held in the
locking position until all windows and the sliding roof are fully closed.
WARNING
If the vehicle is locked, children and disabled people may be trapped
inside.•
Never leave children or disabled persons in the vehicle; in case of emer-
gency they may not be able to leave the vehicle or look after themselves.
•
Always take you car keys with you when you leave the vehicle. Misuse
of the keys, for example, by children, may result in serious damage and
accident.
−The engine may accidentally be started and be out of control.
− If the ignition is switched on, the electric equipment could be acti-
vated with risk of injury, for example, in the electric windows. −
The doors can be locked using the remote control key. This could
result in people being trapped in the vehicle in an emergency.
− Always take the key with you when you leave the vehicle.
•
Never remove the key from the ignition if the vehicle is in motion. Risk
of accident. The steering lock could engage suddenly, and you would not be
able to steer the vehicle.Caution
Each key contains electronic components. Protect the keys from moisture and
excessive vibration.
Note
•
Any SEAT Service centre can programme the central locking system so that
only the driver's door is unlocked when the key is turned once to open.WARNING (continued)
alhambra_ingles_0708 Seite 90 Mittwoch, 10. September 2008 10:55 10
Page 97 of 295
Unlocking and locking95
Safety First
Operating instructions
Tips and Maintenance
Te c h n i c a l D a t a
WARNING
•
Never leave children or disabled persons in the vehicle; in case of emer-
gency they may not be able to leave the vehicle or look after themselves.
•
Always take you car keys with you when you leave the vehicle. Misuse
of the keys, for example, by children, may result in serious damage and
accident.
−The engine may accidentally be started and be out of control.
− If the ignition is switched on, the electric equipment could be acti-
vated with risk of injury, for example, in the electric windows.
− The doors can be locked using the remote control key. This could
result in people being trapped in the vehicle in an emergency.
− Always take the key with you when you leave the vehicle.
•
Never remove the key from the ignition if the vehicle is in motion. Risk
of accident. The steering lock could engage suddenly, and you would not be
able to steer the vehicle.Note
•
An Authorised SEAT Service Centre can programme the individual
opening of doors. In this case, when the unlock button on the remote
control is pressed once, only the driver's door is unlocked ⇒page 89. When
the button is pressed once more, all doors and the tailgate will be unlocked.
Seat Service will be happy to provide more information on the activation of
this function.
•
The remote control transmitter and the batteries are integrated in the
remote control. The receiver is in the interior of the vehicle. Obstacles
between the remote control and the vehicle, bad weather conditions and
discharged batteries can considerably reduce the range of the remote control.
•
The remote control only locks and unlocks the vehicle when it is used
within range.
•
The vehicle will be locked again automatically if you do not open one of
the doors or the tailgate 30 seconds after unlocking the car. This function prevents the vehicle from remaining unlocked if the unlocking button is
pressed by mistake.
•
If it is not possible to open or close the vehicle using the remote control,
this should be re-synchronised ⇒page 95 or change the battery ⇒page 95.
•
The working of the remote control may be momentarily affected if there is
transmitter using the same waveband (e.g. radiotelephone, mobile tele-
phone, etc) in the vicinity of the vehicle.
Synchronising the remote control keySynchronising the remote control key
– Briefly press the open button ⇒page 94, fig. 61 once.
– Then open or close the vehicle using the key bit within one minute ⇒page 89.The vehicle can no longer be opened and closed with the remote control if you
press button ⇒page 94, fig. 61 a long way outside the effective range
of the radio wave remote control. The remote control key will have to be resyn-
chronised.
Spare remote control keys are available from SEAT Service. They must be
matched to the locking system.
Up to four remote control keys can be used.Replacing the batteryIf the battery indicator on the remote control ⇒page 94, fig. 61 does not
flash when the buttons are pushed, the battery must be replaced.
A1
A1
A4
alhambra_ingles_0708 Seite 95 Mittwoch, 10. September 2008 10:55 10
Page 98 of 295
Unlocking and locking
96We recommend having the batteries changed by a qualified workshop if
required.
Caution
Use of inappropriate batteries may damage the remote control. For this
reason, always replace the dead battery with another of the same size and
power.
For the sake of the environment
The flat batteries must be disposed of in accordance with regulations
governing the protection of the environment.
Anti-theft alarm systemDescription of anti-theft alarm system
The anti-theft alarm triggers an alarm if unauthorised move-
ments are detected around the vehicle.Activating the anti-theft alarm
– Blocking the engine.
Deactivating the alarm
– Unblock the vehicle using the unlock button on the remote
control or switch on ignition.
Opening the doors mechanically (emergency opening)
– If the remote control function fails, you will have to use the key to unlock the car. This is done as follows:
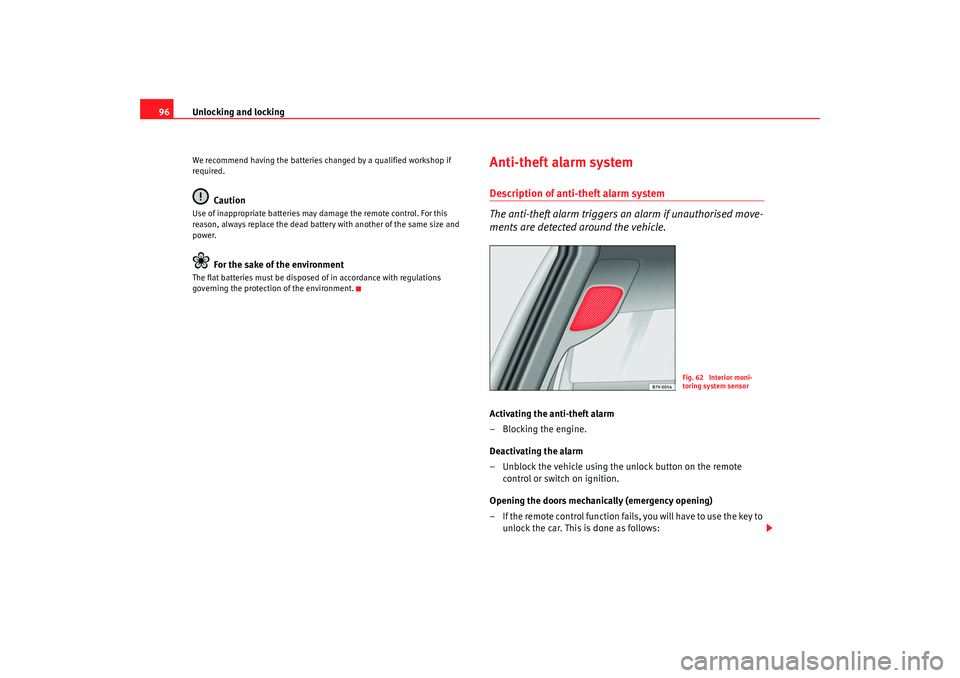
Fig. 62 Interior moni-
toring system sensor
alhambra_ingles_0708 Seite 96 Mittwoch, 10. September 2008 10:55 10
Page 103 of 295
Unlocking and locking101
Safety First
Operating instructions
Tips and Maintenance
Te c h n i c a l D a t a
WindowsOpening and closing the windows electrically
All electric windows can be operated using the controls in the
driver door. The other doors each have a switch for their own
window.Opening and closing the windows
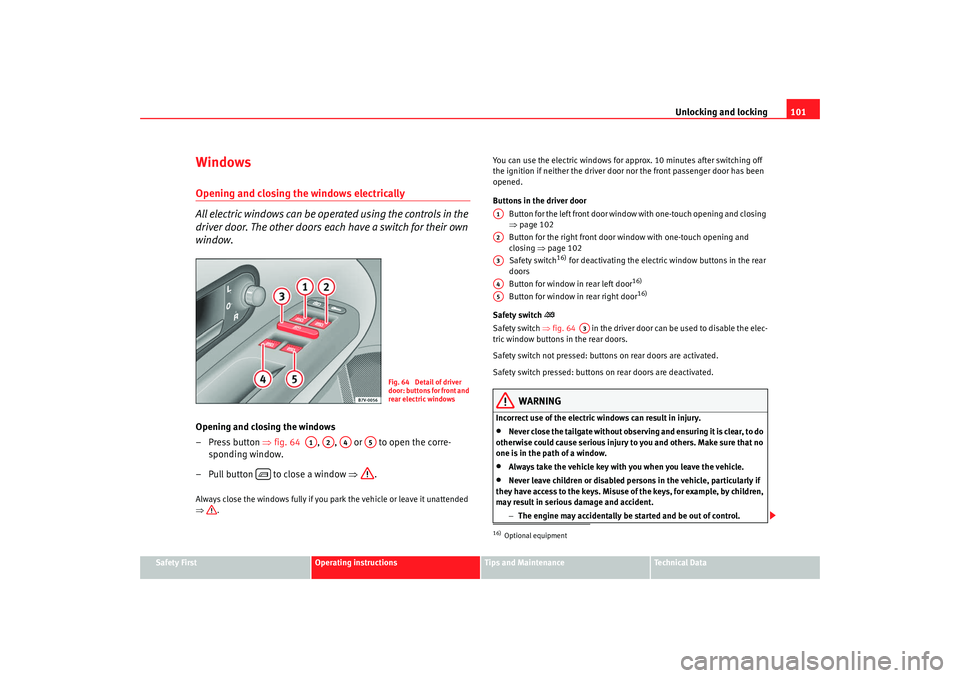
– Press button ⇒fig. 64 , , or to open the corre-
sponding window.
– Pull button to close a window ⇒.Always close the windows fully if you park the vehicle or leave it unattended
⇒. You can use the electric windows for approx. 10 minutes after switching off
the ignition if neither the driver door nor the front passenger door has been
opened.
Buttons in the driver door
Button for the left front door window with one-touch opening and closing
⇒page 102
Button for the right front door window with one-touch opening and
closing ⇒page 102
Safety switch
16) for deactivating the electric window buttons in the rear
doors
Button for window in rear left door
16)
Button for window in rear right door
16)
Safety switch
Safety switch ⇒fig. 64 in the driver door can be used to disable the elec-
tric window buttons in the rear doors.
Safety switch not pressed: buttons on rear doors are activated.
Safety switch pressed: buttons on rear doors are deactivated.
WARNING
Incorrect use of the electric windows can result in injury.•
Never close the tailgate without observing and ensuring it is clear, to do
otherwise could cause serious injury to you and others. Make sure that no
one is in the path of a window.
•
Always take the vehicle key with you when you leave the vehicle.
•
Never leave children or disabled persons in the vehicle, particularly if
they have access to the keys. Misuse of the keys, for example, by children,
may result in serious damage and accident.
−The engine may accidentally be started and be out of control.
Fig. 64 Detail of driver
door: buttons for front and
rear electric windows
A1
A2
A4
A5
16)Optional equipmentA1A2A3A4A5
A3
alhambra_ingles_0708 Seite 101 Mittwoch, 10. September 2008 10:55 10
Page 107 of 295
Unlocking and locking105
Safety First
Operating instructions
Tips and Maintenance
Te c h n i c a l D a t a
Always close the sliding/tilting roof fully if you park the vehicle or leave it
unattended
⇒.
If you wish to tilt the roof when the sliding roof is open, press surface until
the function has been carried out. If the sliding roof is to be opened directly
from the tilted position, press surface to carry out the required function.
Once the ignition has been switched off, the sliding/tilting sun roof can no
longer be opened or closed.
Sunroof blind
The sunroof blind is opened together with the sliding/tilting roof. If required,
it can be closed by hand when the sunroof is closed.
WARNING
Incorrect use of the sliding/tilting sunroof can result in injury.•
Never close the sliding/tilting sunroof without observing and ensuring
it is clear, to do otherwise could cause serious injury to you and others.
Make sure that no one is in the path of the sliding/tilting sunroof.
•
Always take the vehicle key with you when you leave the vehicle.
•
Never leave children or disabled persons in the vehicle, particularly if
they have access to the keys. Unsupervised use of a key could mean that
the engine is started or that electrical equipment is used (e.g. electric
windows). Risk of accident. The doors can be locked using the remote
control key. This could result in peop le being trapped in the vehicle in an
emergency.
•
The sliding/tilting sunroof operates as long as the ignition is switched
on.Note
The roof can be closed by hand if the system is defective.
Convenience closing*– Using the door lock: keep the key in the driver's door lock in the
close position until the sliding/tilting sunroof has closed.
– Release the key to interrupt this function.During convenience closing, first the windows and then the sliding roof will
be closed.
WARNING
Never close the sliding/tilting sunroof without observing and ensuring it is
clear, to do otherwise could cause serious injury to you and others. The
sliding/tilting sunroof closes with the roll-back function activated.
However, always make sure that no one is in the path of the sliding/tilting
sunroof.
Note
The sliding/tilting sunroof rotary button remains in the last position selected
if the roof is closed using convenience closing from outside the vehicle and
will have to be re-positioned the next time you drive.
A2
A1
alhambra_ingles_0708 Seite 105 Mittwoch, 10. September 2008 10:55 10
Page 110 of 295
Lights and visibility
108Lights and visibilityLightsSwitching lights on and off
Switching on the daylight driving light (only available in some
countries)
– To switch on the daylight driving lights, leave the light switch in
position O when you turn on the ignition.
Switching on the side lights
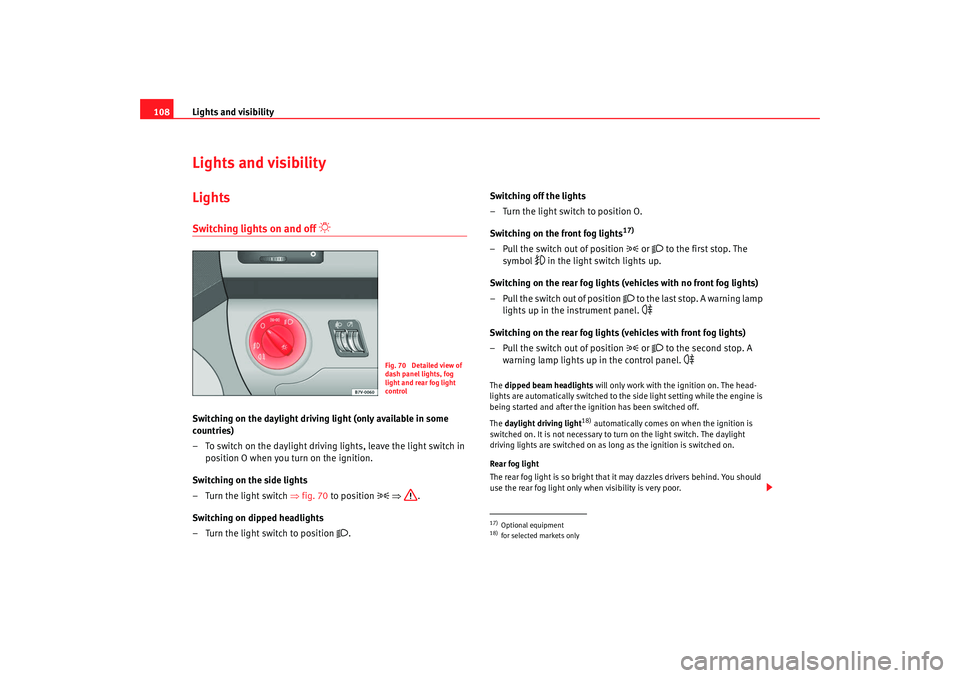
– Turn the light switch ⇒fig. 70 to position
⇒ .
Switching on dipped headlights
– Turn the light switch to position
. Switching off the lights
– Turn the light switch to position O.
Switching on the front fog lights
17)
– Pull the switch out of position
or
to the first stop. The
symbol
in the light switch lights up.
Switching on the rear fog lights (vehicles with no front fog lights)
– Pull the switch out of position
to the last stop. A warning lamp
lights up in the instrument panel.
Switching on the rear fog lights (vehicles with front fog lights)
– Pull the switch out of position
or
to the second stop. A
warning lamp lights up in the control panel.
The dipped beam headlights will only work with the ignition on. The head-
lights are automatically switched to the side light setting while the engine is
being started and after the ignition has been switched off.
The daylight driving light
18) automatically comes on when the ignition is
switched on. It is not necessary to turn on the light switch. The daylight
driving lights are switched on as long as the ignition is switched on.
Rear fog light
The rear fog light is so bright that it may dazzles drivers behind. You should
use the rear fog light only when visibility is very poor.
Fig. 70 Detailed view of
dash panel lights, fog
light and rear fog light
control
17)Optional equipment18)for selected markets only
alhambra_ingles_0708 Seite 108 Mittwoch, 10. September 2008 10:55 10
Page 113 of 295
Lights and visibility111
Safety First
Operating instructions
Tips and Maintenance
Te c h n i c a l D a t a
3. Switch the engine off.
4. Apply the handbrake firmly.
5. On a manual gearbox engage 1st gear. On an automatic move
the selector lever to P .
6. Use the warning triangle to draw the attention of other road users to your vehicle.
7. Always take the key with you when you leave the vehicle.You should switch on the hazard warning lights to warn other road users, for
instance when:•
reaching the tail end of a traffic jam
•
there is an emergency
•
your vehicle breaks down due to a technical defect
•
you are towing another vehicle or your vehicle is being towed.
All turn signals flash simultaneously when the hazard warning lights are
switched on. The turn signal lights
and the button warning light
will
also flash. The hazard warning lights also work when the ignition is switched
off.
WARNING
•
The risk of an accident increases if your vehicle breaks down. Always
use the hazard warning lights and a warning triangle to draw the attention
of other road users to your stationary vehicle.
•
Never park where the catalytic converter could come into contact with
inflammable materials under the vehicle, for example dry grass or spilt
petrol. This could start a fire!
Note
•
The battery will run down if the hazard warning lights are left on for a long
time - even if the ignition is switched off.
•
If the hazard warning lights are not working, you must use an alternative
method of drawing attention to your vehicle. This method must comply with
traffic legislation.
•
The use of the hazard warning lights described here is subject to the rele-
vant statutory requirements.
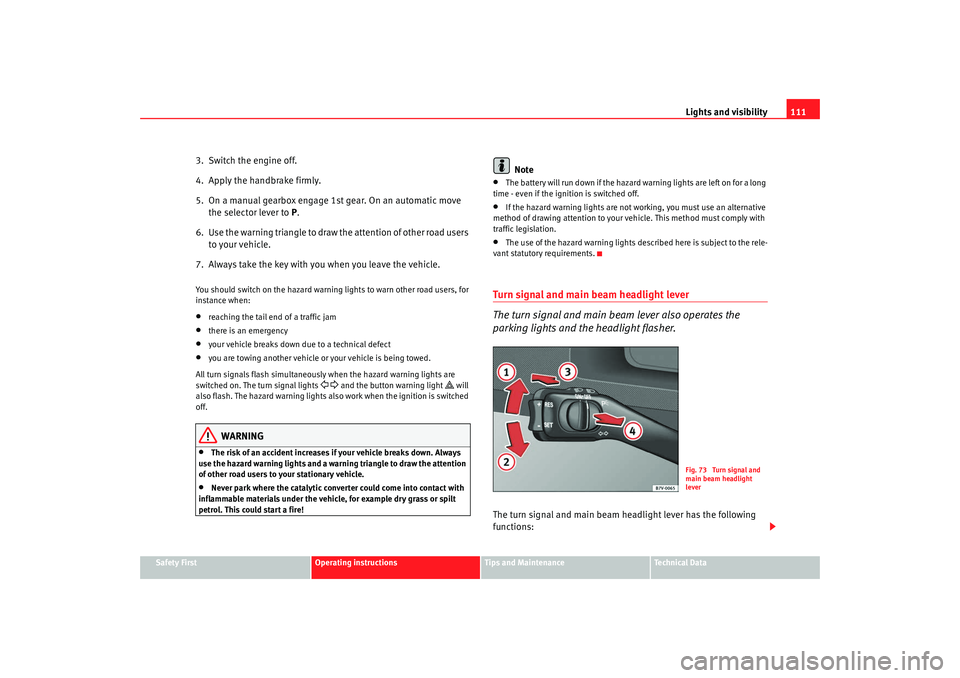
Turn signal and main beam headlight lever
The turn signal and main beam lever also operates the
parking lights and the headlight flasher.The turn signal and main beam headlight lever has the following
functions:
Fig. 73 Turn signal and
main beam headlight
lever
alhambra_ingles_0708 Seite 111 Mittwoch, 10. September 2008 10:55 10