technical data Seat Alhambra 2016 Owner's Manual
[x] Cancel search | Manufacturer: SEAT, Model Year: 2016, Model line: Alhambra, Model: Seat Alhambra 2016Pages: 324, PDF Size: 5.93 MB
Page 267 of 324
Checking and refilling levels
●
Never ent er the
vehicle while refuelling. If it
is absolutely necessary to enter, close the
door and touch a metal surface before touch-
ing the filler nozzle again. This will prevent
the generation of static electricity. Sparks
could cause a fire when refuelling.
● Never handle fuel close to flames, sparks or
obj
ects with slow combustion (e.g. ciga-
rettes).
● Avoid static electricity and electro-magnet-
ic ra
diation when refuelling.
● Observe the safety regulations of the serv-
ice st
ation.
● Never spill fuel on the vehicle or in the lug-
gage c
ompartment. WARNING
For safety reasons, SEAT does not recommend
carr y
ing a spare fuel canister in the vehicle.
Fuel could be spilled and catch fire, above all
in case of an accident and this applies to a
full container as well as empty containers.
This could lead to explosions, fires and inju-
ries.
● Observe the following if you exceptionally
have t
o carry fuel in a canister:
– Never place a fuel container to fill it in-
side the vehicle or on the vehicle, for ex-
ample, in the boot or on the hatch. Filling
in these circumstances could create an
electrostatic charge and spark that could
ignite fuel fumes. –
Alw a
ys place the canister on the ground
to fill it.
– Insert the fuel nozzle into the neck of the
canister as far as possible.
– If you are using a metal fuel canister, the
nozzle must always touch the canister
while it is being filled to avoid static elec-
tricity.
– Follow the legal requirements for the use,
storage and transport of spare fuel canis-
ters.
– Insure that the fuel container complies
with manufacturing standards, for exam-
ple, ANSI or ASTM F852-86. CAUTION
● Alw a
ys remove any fuel spilled on the vehi-
cle paintwork immediately to avoid damage
to the wheel housing, the tyre and vehicle
paintwork.
● Refuelling a petrol engine with diesel or a
diesel en
gine with petrol can cause serious
engine and fuel system damage; the resulting
malfunctions are not covered by the SEAT
warranty. If you refuel with the wrong type of
fuel, never start the engine. This applies to
even the smallest amount of the wrong fuel.
Seek specialist assistance. With the engine
running, the composition of the wrong fuel
could significantly damage the fuel system
and the engine itself.
● In vehicles with a diesel engine, under no
circ
umstances should you refuel or drive with petrol, kerosene, heating oil or any other
type of
diff
erent fuel. Other types of fuels
could cause serious damage to the engine
and to the fuel supply system and the result-
ing problems are not covered by the SEAT
warranty. For the sake of the environment
Fuels can contaminate the environment. Col-
l ect an
y spilt service fluids and allow a pro-
fessional to dispose of them. Note
There is no emergency mechanism for the
manua l
release of the fuel tank flap. If neces-
sary, request assistance from specialised per-
sonnel. 265
Technical data
Advice
Operation
Emergencies
Safety
Page 269 of 324
Checking and refilling levels
● Do not c
ontinue t
o refuel if it is turned off!
Otherwise, this will fill the expansion cham-
ber and fuel may leak out if the ambient con-
ditions are warm. WARNING
Do not continue refilling once the fuel nozzle
ha s
switched itself off. The fuel tank may be
filled too much. As a result, fuel may spurt
out and spill. This could lead to a fire, explo-
sion and severe injuries. CAUTION
● Alw a
ys remove any fuel spilled on the vehi-
cle paintwork immediately to avoid damage
to the wheel housing, the tyre and vehicle
paintwork. For the sake of the environment
Spilt fuel can contaminate the environment. Fuel
Intr oduction You will find a factory-fitted sticker containing
inf
orm
ation on the type of
fuel for your vehi-
cle on the inside of the fuel tank flap. WARNING
Refuelling or handling fuel carelessly can
cau se an e
xplosion or fire resulting in serious
burns and injuries.
● Fuel is a highly explosive, easily flammable
subs
tance.
● Observe current safety instructions and lo-
cal
regulations concerning the handling of
fuel. Types of fuel
The type of fuel to use when refilling will de-
pend on the
v
ehic
le's engine. You will find a
factory-fitted sticker containing information
on the type of fuel for your vehicle on the in-
side of the fuel tank flap.
SEAT recommends the use of sulphur-free or
low sulphur fuel to reduce consumption and
prevent engine damage.
Possible types of fuel
91 a)
RONNormal petrol, normal unleaded
petrol ››› page 267
95 a)
RONPremium unleaded petrol (95 RON)
››› page 267
98 a)
RONPremium unleaded petrol 98
››› page 267
Possible types of fuel
Diesel››› page 268
a)
RON = Regulation Octane Number
Petrol Petrol types
Vehic
l
es with petrol engines must refuel us-
ing unleaded petrol according to European
norm EN 228 ››› .
P etr
o
l types are categorised according to
their octane number (e.g. 91, 95, 98 or 99
RON (RON = “Research Octane Number”).
You may use petrol with a high octane num-
ber than the one recommended for your en-
gine. However, this has no advantage in
terms of fuel consumption and engine power.
SEAT recommends refuelling with a low sul-
phur content or sulphur-free petrol to reduce
fuel consumption for petrol engines.
Petrol additives
The quality of the fuel influences the behav-
iour, power and service life of the engine.
This is why the petrol you use should carry
suitable additives already included by the
petrol industry, free of metals. These addi-
tives will help to prevent corrosion, keep the
fuel system clean and prevent deposits from
building up in the engine. »
267
Technical data
Advice
Operation
Emergencies
Safety
Page 271 of 324
Checking and refilling levels
Auxiliary heater
V ehic
l
es with a diesel engine may be fitted
with an auxiliary heater. The heater runs off
the fuel from the fuel tank. On doing so,
smells and steam may be noticed outside the
vehicle for a short period. This is normal and
it is not an indication of a fault in the vehicle.
Whenever there is little fuel in the tank (re-
serve), the auxiliary heater automatically
switches off. WARNING
Never use start boosters. An aerosol start
boos t
er could explode or cause a sudden rise
in engine speed leading to engine damage
and serious injury. CAUTION
● The v ehic
le is not prepared for the use of
biodiesel. Never, under any circumstances re-
fuel with biodiesel. It could damage the fuel
system and subsequently lead to engine
faults!
● The addition of biodiesel to diesel by the
diesel pr
oducer according to Standard EN 590
or other equivalent (DIN 51628 in Germany,
for example) is authorised and causes no
type of damage to the engine or the fuel sys-
tem.
● The diesel engine has been designed for to
use diesel
fuel exclusively. Therefore, never
use petrol, fuel oil or other unsuitable fuels. The composition of these fuels may signifi-
cantly
d
amage the fuel system and the en-
gine.
● The use of diesel fuels with a high sulphur
percent
age could considerably reduce the
service life of the diesel particulate filter.
Your technical service centre will be able to
tell you which countries have diesel with a
high sulphur content. Information on fuel consumption
The consumption and emission values indi-
c
at
ed do not
refer to one specific vehicle.
They are only to be used to compare the val-
ues of the different vehicle versions. The fuel
consumption and CO 2 emissions of a vehicle
not only depend on the effective use of fuel.
They also depend on your driving style and
other non-technical factors.
Calculation of fuel consumption
Fuel consumption and emission values are
determined according to the current version
of the 715/2007/EC or 80/1268/EEC regula-
tion and are valid for the vehicle kerb weight.
The specifications do not refer to an individu-
al vehicle. Two measuring cycles are carried
out on a rolling road test bed to calculate fuel
consumption. The test criteria are as follows:
Urban cycle
Measurement of the urban cycle
starts with an engine cold start. City
driving is simulated below at be-
tween 0 and 50 km/h (31 mph).
Road cycle
In the road cycle simulation, the car
undergoes frequent acceleration and
braking in all gears, as in normal ev-
eryday driving. The road speed rang-
es from 0 to 120 km/h (0 to 75 mph).
Combined
The average combined consumption
is calculated with a weighting of
around 37 % for the urban cycle and
63 % for the road cycle.
CO 2 emissions
of the combina-
tion
The exhaust gases are collected dur-
ing both driving cycles to calculate
carbon dioxide emissions (urban and
road). The gas composition is then
analysed to evaluate the CO 2 content
and other emissions. Note
● The kerb w eight
may vary according to the
vehicle equipment. This could raise consump-
tion and the CO 2 emissions slightly.
● In practice, consumption values could be
different
to the values calculated based on
the 715/2007/EC or 80/1268/EEC regula-
tions. 269
Technical data
Advice
Operation
Emergencies
Safety
Page 273 of 324
Checking and refilling levels
WARNING
Observe the safety warnings ››› in Warning
and indication l amp
s on page 105. Information on AdBlue
A message will be displayed on the dash
panel
ar
ound 2,400 km before the next serv-
ice to indicate that AdBlue must be refilled
››› page 271. If you ignore this message and
do not refill, you will be unable to start the
engine afterwards ›››
page 270.
SEAT recommends contacting a specialised
workshop. If not possible, it should be parti-
ally filled with a minimum 5.0 litres of
AdBlue. Only refill using AdBlue expressly
approved by SEAT.
When the indicators and light simulta-
neously, there is a fault. SEAT recommends
visiting the closest specialised workshop.
AdBlue ®
is a registered trademark in the US,
Germany, the European Union and other
countries belonging to the German automo-
bile industry association (“"Verband der Au-
tomobilindustrie e. V."”, VDA). Refilling AdBlue
Fig. 237
At the rear left of the luggage com-
p ar
tment: AdBlue t
ank, behind a cover panel Fig. 238
AdBlue tank with filler neck cap and
r efi
l
ling bottle To refill AdBlue, the vehicle must be on flat
gr
ou
nd and not, f
or example, parked on a
kerb or slope. If the vehicle is not on flat
ground then the filling indicator cannot
measure the filling quantity. »
271
Technical data
Advice
Operation
Emergencies
Safety
Page 275 of 324
Checking and refilling levels
carried out by a specialised workshop if you
ar e u
nc
ertain. Negligent work can cause seri-
ous injury. WARNING
If the vehicle moves unexpectedly, this could
cau se seriou
s injury.
● Never work under the vehicle if it has not
been immobi
lized. If you must work under-
neath the vehicle with the wheels in contact
with the ground then it should be parked on
flat ground, the wheels should be prevented
from moving and the key should be removed
from the ignition.
● If you have to work underneath the vehicle,
you mus
t use suitable stands additionally to
support the vehicle, there is a risk of acci-
dent!. The jack is not intended for this kind of
work and its failure could lead to severe inju-
ries. WARNING
The engine compartment is a dangerous area
cap ab
le of causing serious injury.
● For all type of work, always take the utmost
precaution
s, work carefully and note the gen-
eral safety standards in force. Never take per-
sonal risks.
● Never work on the engine or in the engine
compar
tment if you are not familiar with the
necessary operations. If you are not sure
about procedures then visit a specialised
workshop to carry out the necessary work. Working incorrectly can cause serious inju-
ries.
●
Nev er open the bonnet
if you see steam or
cool
ant escaping from the engine compart-
ment. This may cause serious burns. Always
wait until you cannot see or hear the sound of
steam or coolant coming from the engine
compartment.
● Always allow the engine to cool down be-
fore openin
g the bonnet.
● Contact with hot elements of the engine
and the exhau
st system can cause burns.
● Once the engine has cooled, follow the in-
structions
below before opening the bonnet:
– Turn on the electronic parking brake and
place the gear selector lever in P or the
gearbox lever in neutral.
– Remove the key from the ignition.
– Keep children away from the engine com-
partment and never leave them unsuper-
vised.
● When the engine is warm or hot, the cool-
ing sys
tem is pressurised. Do not unscrew
the cap on the expansion tank when the en-
gine is hot. Otherwise, coolant may spray out
under pressure causing burns and serious in-
jury.
– Carefully and slowly unscrew the cap an-
ticlockwise, gently pressing down on it.
– Always protect your face, hands and arms
from hot coolant and steam using a large,
thick cloth. ●
When refi l
ling liquids, avoid spilling them
on parts of the engine and the exhaust sys-
tem. Spilled liquids could cause a fire. WARNING
The high voltages of the electrical system can
giv e el ectric
shocks as well as causing burns
and serious injury and possibly even death!
● Never cause short circuits in the electrical
syst
em. The battery could explode.
● To minimise the risk of electric shock and
serious c
onsequences while the engine is
running or starting the engine, note the fol-
lowing:
– Never touch the electrical wiring of the
ignition system.
– Never touch electric cables or the gas dis-
charge lamps. WARNING
In the engine compartment, there are rotat-
ing p ar
ts that could cause serious injury.
● Never place your hands on or near the radi-
ator fan.
Touching the rotor blades could seri-
ously harm you. The ventilator works accord-
ing to the engine temperature and could start
suddenly even when the ignition is turned off
and the key is removed.
● If any work has to be performed when the
engine is
started or with the engine running,
there is an additional, potentially fatal, safety » 273
Technical data
Advice
Operation
Emergencies
Safety
Page 277 of 324
Checking and refilling levels
● Bef
or
e opening the bonnet, make sure that
the windscreen wiper arms are in place
against the windscreen ››› .
● Open the driver door.
● Pull the release lever ››
›
Fig. 239 in the di-
rection of the arrow. The bonnet is released
from the lock carrier by a spring mechanism
››› .
● Lift the bonnet using the release lever
› ›
›
Fig. 240 (arrow) and open the bonnet fully.
The bonnet is held open thanks to the gas
strut.
Closing the bonnet
● To close the bonnet, pull it down to over-
come the ga
s strut pressure ››› .
● Allow the bonnet to fall into the lock carrier.
Do not pr
e
ss down.
If the bonnet is not correctly closed, open it
once again and close it correctly.
The bonnet is correctly closed when it is flush
with the corresponding parts on the body-
work. WARNING
If the bonnet is not correctly closed, it could
sud den
ly open while driving leaving the driv-
er without visibility. This could result in a se-
rious accident.
● After closing the bonnet, always check that
it is
properly secured by the locking mecha- nism in the lock carrier. The bonnet must be
flush w
ith the s
urrounding body panels.
● While driving, if you notice that the bonnet
is not
correctly closed then stop immediately
and close it correctly.
● Only open and close the bonnet when there
is no
body within its range. CAUTION
● To av oid d
amage to the bonnet and to the
windscreen wiper arms, only open it when
the windscreen wipers are in place against
the windscreen.
● Before driving, always lower the wiper
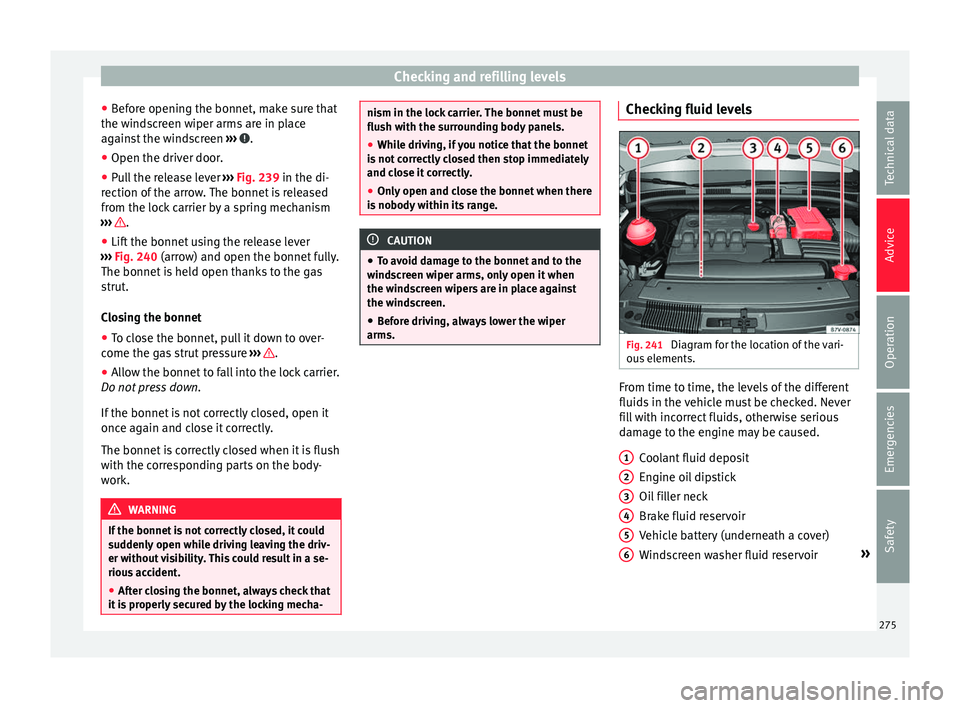
arms. Checking fluid levels
Fig. 241
Diagram for the location of the vari-
ou s
el
ements. From time to time, the levels of the different
fluid
s
in the
vehicle must be checked. Never
fill with incorrect fluids, otherwise serious
damage to the engine may be caused.
Coolant fluid deposit
Engine oil dipstick
Oil filler neck
Brake fluid reservoir
Vehicle battery (underneath a cover)
Windscreen washer fluid reservoir »
1 2
3
4
5
6
275
Technical data
Advice
Operation
Emergencies
Safety
Page 278 of 324
Advice
The checking and refilling of service fluids
ar e c
arried out
on the components men-
tioned above. These operations are descri-
bed in ››› page 272.
Overview
Further explanations, instructions and restric-
tions on the technical data are contained as
of ››› page 298
Engine oil Introduction WARNING
Incorrectly handling engine oil can cause in-
jury and seriou
s burns.
● Always protect your eyes when handling
engine oil
.
● Oil is toxic and must be kept out of the
reac
h of children.
● Engine oil should only be kept in its origi-
nal
packaging; the same goes for used oil un-
til it is disposed of.
● Never store engine oil in empty food con-
tainers
or bottles as other people may acci-
dentally drink it.
● Regular contact with engine oil can be bad
for the skin. If
you come into contact with en-
gine oil, wash your skin with soap and water. ●
With the en gine ru
nning, the engine oil
gets extremely hot and can cause severe skin
burns. Always wait until the engine has fully
cooled. For the sake of the environment
Similar to the other service liquids, spilled
en gine oi l
can be bad for the environment.
Collect these liquids in suitable containers
and dispose of them while respecting the en-
vironment. Warning and indication lamps
It lights up
Insufficient en-
gine oil.Switch the ignition off. Check the en-
gine oil level
››› page 277.
Flashes
Engine oil sen-
sor faulty.Contact a specialised workshop.
Have the engine oil sensor checked.
Meanwhile, check the oil level man-
ually.
Flashes
Engine oil pres-
sure too low.
Stop the vehicle!
Switch off the engine. Check the en-
gine oil level.
- If the warning lamp flashes al-
though the oil level is correct, do not
continue driving or leave the engine
running. Otherwise, the engine
could be damaged. Seek specialist
assistance. WARNING
Observe the safety warnings ›››
in Warning
and indication l amp
s on page 105. Engine oil specifications
Replacement engine oil must strictly comply
w
ith the s
pec
ifications.
The correct oil must be used to ensure the
correct operation and long service life of the
engine. The engine comes with a high-quality
multigrade oil that can generally be used all
year round.
Only use an engine oil that complies to SEAT
standards whenever possible ››› . If you
w i
sh t
o maintain the long-life service dura-
tion, only engine oils approved for this serv-
ice according to the corresponding VW stand-
ard ( ›››
table on page 40) may be used.
All oils indicated are synthetic multigrade
oils.
276
Page 279 of 324
Checking and refilling levels
Engine oils are being continuously further
dev eloped.
T
echnical services are constantly
updated with any modifications. SEAT there-
fore recommends that you have the engine
oil changed by a technical service. CAUTION
● Only u
se engine oils whose specifications
are expressly approved by SEAT. The use of
any other type of oil could cause engine dam-
age! Checking engine oil level
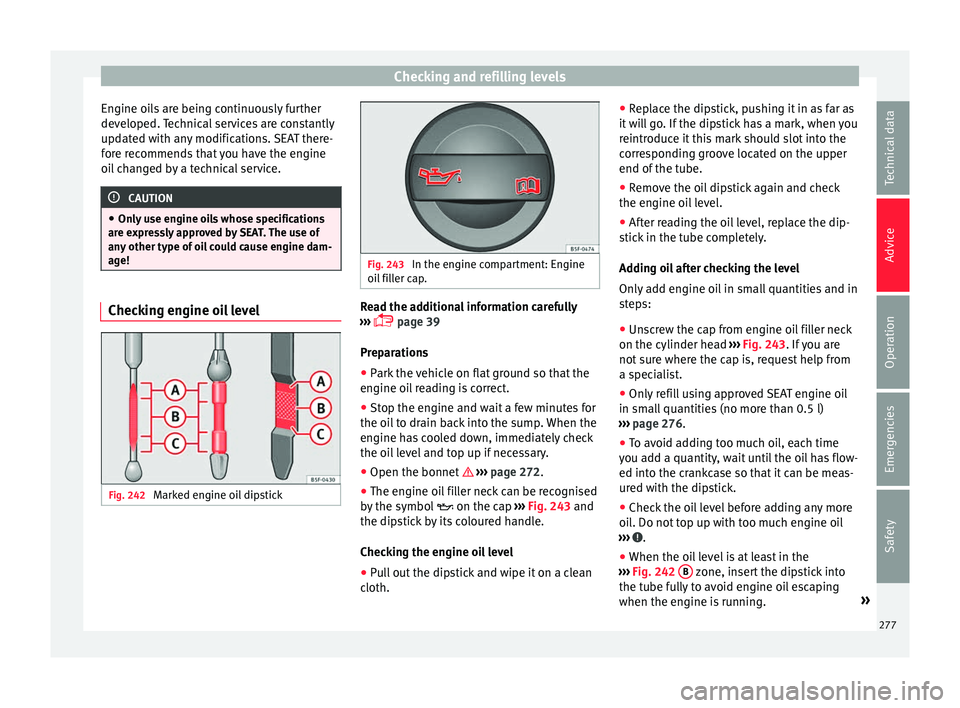
Fig. 242
Marked engine oil dipstick Fig. 243
In the engine compartment: Engine
oil fi
ller cap. Read the additional information carefully
› ›
›
page 39
Preparations ● Park the vehicle on flat ground so that the
engine oil
reading is correct.
● Stop the engine and wait a few minutes for
the oil t
o drain back into the sump. When the
engine has cooled down, immediately check
the oil level and top up if necessary.
● Open the bonnet ›››
page 272.
● The engine oil filler neck can be recognised
by the symbo
l on the cap ››› Fig. 243 and
the dipstick by its coloured handle.
Checking the engine oil level
● Pull out the dipstick and wipe it on a clean
cloth. ●
Repl
ace the dipstick, pushing it in as far as
it will go. If the dipstick has a mark, when you
reintroduce it this mark should slot into the
corresponding groove located on the upper
end of the tube.
● Remove the oil dipstick again and check
the engine oil
level.
● After reading the oil level, replace the dip-
stick
in the tube completely.
Adding oil after checking the level
Only add engine oil in small quantities and in
steps:
● Unscrew the cap from engine oil filler neck
on the cylinder head ›
›› Fig. 243. If you are
not sure where the cap is, request help from
a specialist.
● Only refill using approved SEAT engine oil
in small
quantities (no more than 0.5 l)
››› page 276.
● To avoid adding too much oil, each time
you ad
d a quantity, wait until the oil has flow-
ed into the crankcase so that it can be meas-
ured with the dipstick.
● Check the oil level before adding any more
oil. Do not
top up with too much engine oil
››› .
● When the oil level is at least in the
› ›
›
Fig. 242 B zone, insert the dipstick into
the t ube f
u
lly to avoid engine oil escaping
when the engine is running. »
277
Technical data
Advice
Operation
Emergencies
Safety
Page 281 of 324
Checking and refilling levels
Engine coolant Intr oduction WARNING
Engine coolant is toxic!
● Only keep engine coolant in its original
cont ainer
, tightly shut and in a safe place. ●
Never s t
ore engine coolant in empty food
containers or bottles as other people may ac-
cidentally drink it.
● Always keep engine coolant out of reach of
chil
dren.
● Ensure that the proportion of engine cool-
ant ad
ditive corresponds to the lowest out-
side temperature to which the vehicle will be
exposed.
● If the outside temperature is extremely low,
the engine coo
lant could freeze causing the vehicle to stop. As this would also cause the
heatin
g t
o stop working, passengers without
warm clothing could freeze. For the sake of the environment
Coolants and additives can contaminate the
en vir
onment. Collect any spilt fluids in suita-
ble containers and dispose of them in accord-
ance with legislation and with the utmost re-
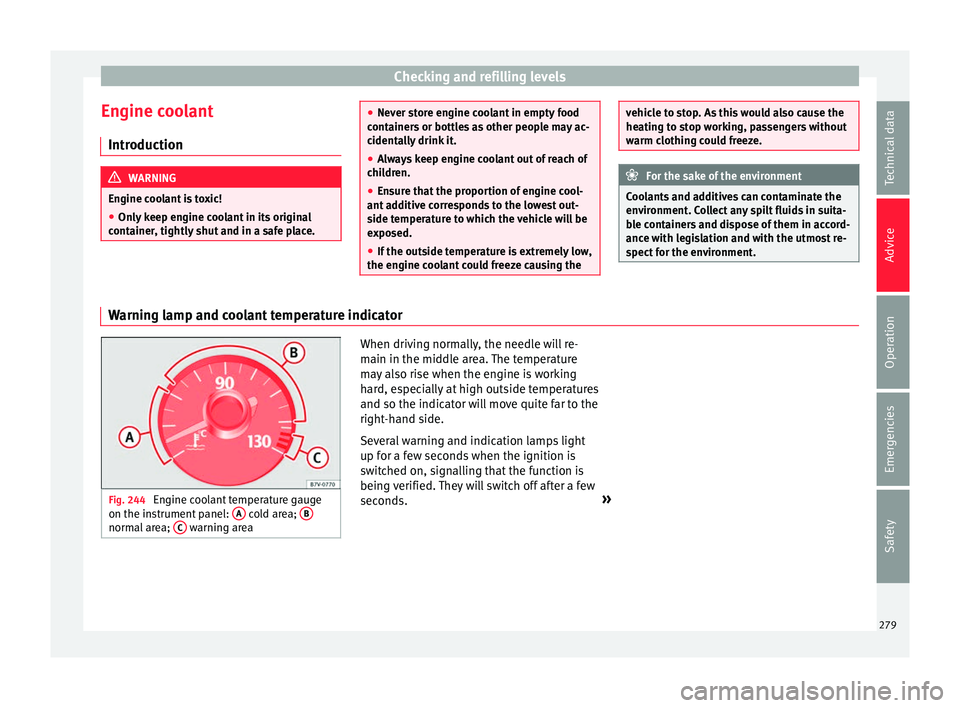
spect for the environment. Warning lamp and coolant temperature indicator
Fig. 244
Engine coolant temperature gauge
on the ins trument
panel: A cold area;
B normal area;
C warning area When driving normally, the needle will re-
m
ain in the mid
dl
e area. The temperature
may also rise when the engine is working
hard, especially at high outside temperatures
and so the indicator will move quite far to the
right-hand side.
Several warning and indication lamps light
up for a few seconds when the ignition is
switched on, signalling that the function is
being verified. They will switch off after a few
seconds. »
279
Technical data
Advice
Operation
Emergencies
Safety
Page 283 of 324
Checking and refilling levels
Checking the coolant level and top-
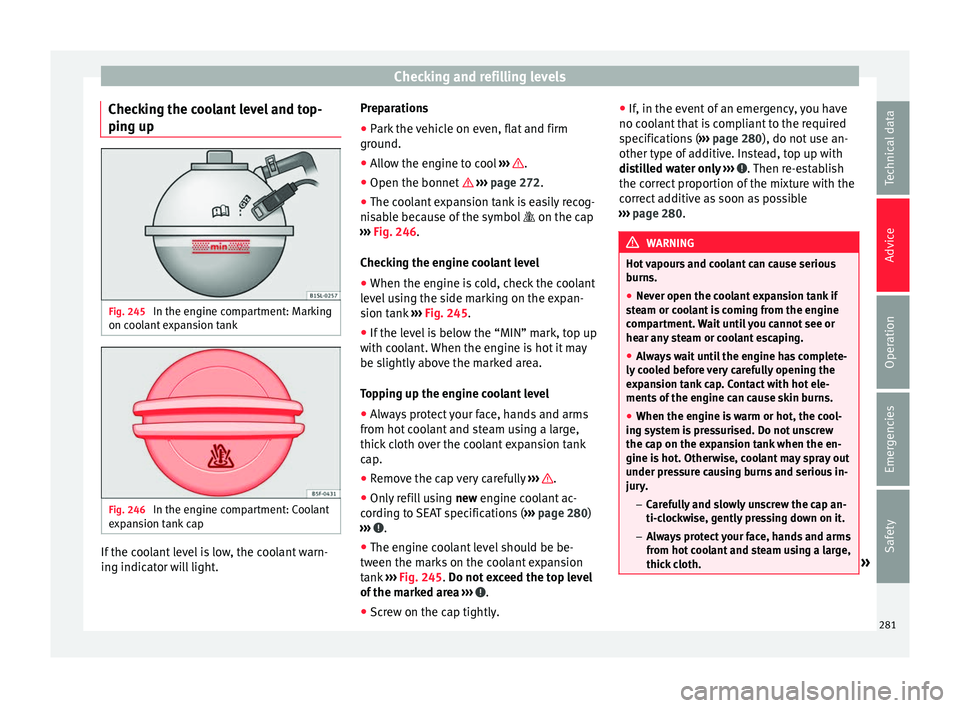
pin g up Fig. 245
In the engine compartment: Marking
on c oo
l
ant expansion tank Fig. 246
In the engine compartment: Coolant
e xp
an
sion tank cap If the coolant level is low, the coolant warn-
in
g indic
at
or will light. Preparations
● Park the vehicle on even, flat and firm
ground.
● A
llow the engine to cool ›››
.
● Open the bonnet › ›
›
page 272.
● The coolant expansion tank is easily recog-
nisab
le because of the symbol on the cap
››› Fig. 246.
Checking the engine coolant level ● When the engine is cold, check the coolant
level
using the side marking on the expan-
sion tank ››› Fig. 245.
● If the level is below the “MIN” mark, top up
with coo
lant. When the engine is hot it may
be slightly above the marked area.
Topping up the engine coolant level
● Always protect your face, hands and arms
from hot c
oolant and steam using a large,
thick cloth over the coolant expansion tank
cap.
● Remove the cap very carefully ›››
.
● Only refill using new engine c
oo
lant ac-
cording to SEAT specifications ( ››› page 280)
››› .
● The engine coolant level should be be-
tw een the m
ark
s on the coolant expansion
tank ››› Fig. 245. Do not exceed the top level
of the marked area ››› .
● Screw on the cap tightly. ●
If, in the ev
ent
of an emergency, you have
no coolant that is compliant to the required
specifications ( ››› page 280), do not use an-
other type of additive. Instead, top up with
distilled water only ››› . Then re-establish
the c orr
ect
proportion of the mixture with the
correct additive as soon as possible
››› page 280. WARNING
Hot vapours and coolant can cause serious
burn s.
● Nev
er open the coolant expansion tank if
ste
am or coolant is coming from the engine
compartment. Wait until you cannot see or
hear any steam or coolant escaping.
● Always wait until the engine has complete-
ly coo
led before very carefully opening the
expansion tank cap. Contact with hot ele-
ments of the engine can cause skin burns.
● When the engine is warm or hot, the cool-
ing sys
tem is pressurised. Do not unscrew
the cap on the expansion tank when the en-
gine is hot. Otherwise, coolant may spray out
under pressure causing burns and serious in-
jury.
– Carefully and slowly unscrew the cap an-
ti-clockwise, gently pressing down on it.
– Always protect your face, hands and arms
from hot coolant and steam using a large,
thick cloth. » 281
Technical data
Advice
Operation
Emergencies
Safety