reset Seat Alhambra 2017 Owner's Manual
[x] Cancel search | Manufacturer: SEAT, Model Year: 2017, Model line: Alhambra, Model: Seat Alhambra 2017Pages: 320, PDF Size: 6.88 MB
Page 30 of 320
The essentials
■ Aut oho
l
d
■ Service
■ Info
■ Reset
■ Default setting
Using the menus on the instrument
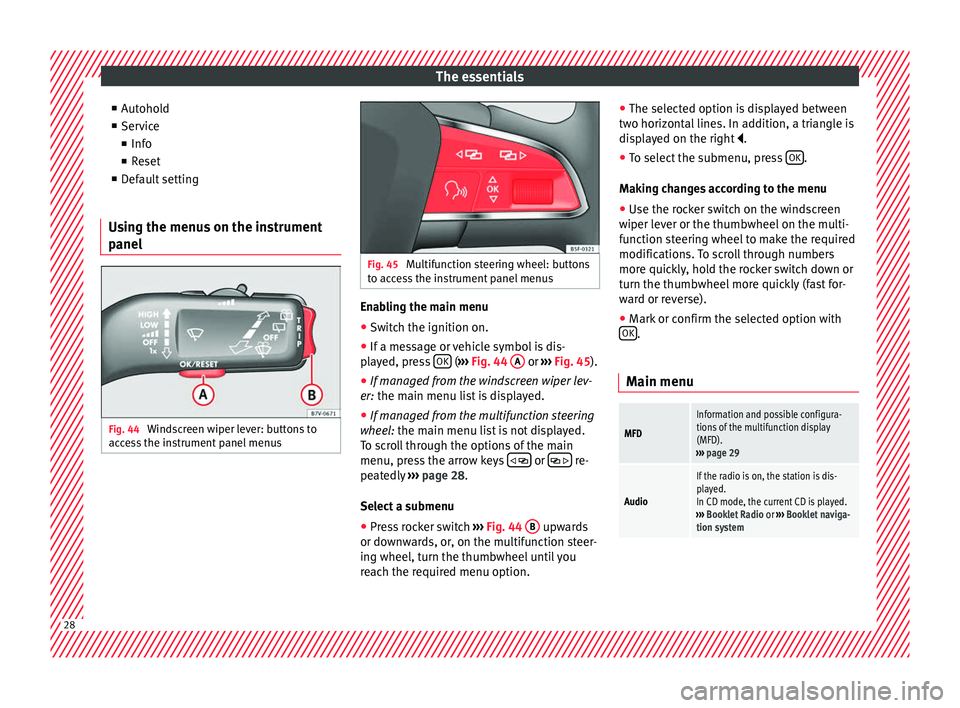
panel Fig. 44
Windscreen wiper lever: buttons to
ac c
e
ss the instrument panel menus Fig. 45
Multifunction steering wheel: buttons
to ac c
ess the instrument panel menus Enabling the main menu
● Switch the ignition on.
● If a message or vehicle symbol is dis-
p l
a
yed, press OK (
››
› Fig. 44 A or
››
› Fig. 45 ).
● If managed from the windscreen wiper lev-
er: the main menu lis
t is displayed.
● If managed from the multifunction steering
wheel:
the main menu list is not displayed.
To scroll through the options of the main
menu, press the arrow keys or
re-
pe at
edly
››› page 28.
Select a submenu ● Press rocker switch ›››
Fig. 44 B upwards
or do wn
w
ards, or, on the multifunction steer-
ing wheel, turn the thumbwheel until you
reach the required menu option. ●
The selected option i
s displayed between
two horizontal lines. In addition, a triangle is
displayed on the right .
● To select the submenu, press OK .
M ak
in
g changes according to the menu
● Use the rocker switch on the windscreen
wiper lev
er or the thumbwheel on the multi-
function steering wheel to make the required
modifications. To scroll through numbers
more quickly, hold the rocker switch down or
turn the thumbwheel more quickly (fast for-
ward or reverse).
● Mark or confirm the selected option with
OK .
Main menu
MFD
Information and possible configura-
tions of the multifunction display
(MFD).
››› page 29
Audio
If the radio is on, the station is dis-
played.
In CD mode, the current CD is played.
››› Booklet Radio or ››› Booklet naviga-
tion system 28
Page 32 of 320
The essentialsSpeed warn-
ing at --- km/hIf the stored speed is exceeded (be-
tween 30 - 250 km/h, or 18 -
155 mph), an audible warning is given
together with a visual warning.
Changing between display modes
● In vehicles without multifunction steering
whee l:
press the lever.
● Vehicles with a multifunction steering
wheel:
press or
.
Storin g a s
peed for the speed warning
● Select the display Speed warning at
--- km/h .
● Pr e
ss OK to store the current speed and
sw it
c
h off the warning.
● In addition, set the required speed by
pres
sing the rocker switch on the windscreen
wiper lever or
buttons on the multifunc-
tion s t
eerin
g wheel for 5 seconds. Next,
press OK again or wait a few seconds. The
s peed i
s
stored and the warning activated.
● To switch off , pres
s OK . The stored speed is
del et
ed.
M
anually erasing memory 1 or 2
● Select the memory that you wish to erase.
● Hold down OK for approximately 2 sec-
ond s. P
er
sonalising the displays
It is
possible to select which of the displays
in the multifunction display you wish to see
on the instrument panel in the settings
menu. The units of measurement can also be
modified ››› page 30.
Configuration Menu
Multifunc-
tion display
dataConfiguration of the multifunction dis-
play data that you wish to see on the in-
strument panel display ››› page 29.
Compass
Changing the magnetic region and cali-
bration of the compass. To calibrate the
compass, please follow the instructions
given on the instrument panel display.
ConvenienceChanging vehicle convenience functions
››› page 31.
Lights & vis-
ibilityConfiguration of vehicle lighting
››› page 31.
Time
Changing the hours and minutes of the
instrument panel clock and the naviga-
tion system. The time can be set here
and the choice can be made between
the 24-hour and 12-hour display. The S
in the upper part of the display indicates
that the clock is set to summer time.
Winter tyres
Changing the visual and audible speed
warnings. This function should only be
used when the vehicle is fitted with win-
ter tyres, which are not designed for
travel at high speeds.
LanguageChanging the language of the display
texts and the navigation system.
UnitsChanging the units of measurement for
the temperature, consumption and dis-
tance.
Second
speedSwitching second speed display on and
off.
ServiceCheck the service notifications or reset
the service intervals to zero.
Factory set-
tingsSome functions of the Configuration
menu will be reset to the factory value.
BackThe main menu is displayed again. 30
Page 33 of 320
The essentials
Submenu ConvenienceCentral lock-
ing
››› page 112
Auto. lock (Auto Lock): automatic
locking of all doors and boot when
reaching a speed of approximately
15 km/h (10 mph). In order to unlock
the vehicle when it is stopped, push the
central locking button, pull the door
handle or remove the key from the igni-
tion lock if the Auto unlock function
is enabled.
Auto unlock (Auto Lock): Unlocking
all doors and the boot by removing the
ignition lock key.
Door unlock : when unlocking the ve-
hicle with the key, the following doors
will unlock based on the setting:
– All : all of the doors are unlocked.
– One door : when unlocking the vehi-
cle with the key, only the driver's door
unlocks. Pressing the button
again
unlocks all doors and the boot.
– Vehicle side : the doors on the
driver's side unlock.
On vehicles fitted with the Keyless
Access ››› page 112 system, when using
the corresponding handle, all doors un-
lock on the side of the vehicle where the
key is.
Handling
windows
Adjusting the electric windows: this en-
ables the windows to be opened or
closed when the vehicle is unlocked or
locked respectively. The open function
can only be activated from the driver
door ››› page 125.
Rear vision
mirror ad-
justmentTilts passenger mirror downwards when
reverse gear is engaged. This enables
the driver to see the edge of the pave-
ment, for example ››› page 137.
Exterior mir-
ror adjust.If synchronised adjustment is selec-
ted, when the driver side exterior mirror
is adjusted, the passenger exterior mir-
ror is also moved.
Factory set-
tingsSome functions of the Convenience
submenu will be reset to the factory val-
ue.
BackThe Configuration menu is dis-
played again. Lights & visibility
submenu
Coming
HomeThis permits the adjustment of the time
the headlamps stay on after locking or
unlocking the vehicle, the function can
also be connected or disconnected here
››› page 131.
Leaving
Home
Footwell
lightThis permits the adjustment of the
brightness of the footwell lighting when
the doors are open, the function can al-
so be connected or disconnected here
Convenience
turn signals
Switching convenience turn signals on
and off When the convenience turn sig-
nals are connected,, these flash at least
three times when the turn signal is
switched on ››› page 128.
Factory set-
tingsAll the configurations in the submenu
Lights & visibility are reset to
the predefined factory values.
Tourist light
Headlamp adjustment for countries in
which vehicles are driven on the other
side of the road. When the mark is acti-
vated, the headlamps of a left-hand
drive vehicle are adjusted for driving on
the left. This function must only be used
for a short period.
BackThe Configuration menu is dis-
played again. Personal convenience settings
When two people use a vehicle, SEAT recom-
mend
s
th
at each person always uses “their”
own remote control key. When the ignition is
switched off, or the vehicle is locked, the per-
sonal convenience settings are stored and
automatically allocated to the vehicle key
››› page 26.
The values of the personalised convenience
settings of the following menu options are al-
located to the vehicle key: ■ Parking heating menu
■ Configuration Menu
■ Time
■ Language
■ Units
■ Convenience settings menu» 31
Page 103 of 320

General instrument panel
– To c
ontinue settin
g, press 0.0 / SET ›››
Fig. 118 7 . Hold button down to
s c
r
oll through the numbers quickly.
– Press button again to end the clock
settin g.
R ev
counter (with the engine running, in
thousands of revolutions per minute).
Together with the gear-change indicator,
the rev counter offers you the possibility
of using the engine of your vehicle at a
suitable speed. The start of the red area
››› Fig. 118 indicates the maximum en-
gine speed working at operating temper-
ature. However, it is advisable to change
up a gear or move the selector lever to D
(or lift your foot off the accelerator) before
the needle reaches the red zone ››› . We
r ec
ommend th
at you avoid high revs and
that you follow the recommendations on
the gear-change indicator. Consult the
additional information in ››› page 196.
Engine coolant temperature display
››› page 274.
Displays on the screen ››› page 101.
Fuel reserve display ››› page 261.
Speedometer.
Reset knob for trip recorder (trip ).
2
3
4
5
6
7 –
Pr e
s
s button 0.0 / SET to reset to zero.
WARNING
Any distraction may lead to an accident, with
the risk of
injury.
● Do not operate the instrument panel con-
trol
s when driving. CAUTION
To prevent damage to the engine, the rev
cou nt
er needle should only remain in the red
zone for a short period of time. For the sake of the environment
Changing up a gear in time reduces fuel con-
sumption and noi se. Indications on the display
A variety of information can be viewed on the
in
s
trument
panel display ›››
Fig. 118 4 , de-
pendin g on the
v
ehicle equipment:
● Warning and information text.
● Mileage.
● Time. ●
Outside temper
ature.
● Compass.
● Selector lever positions ›››
page 192.
● Recommended gear (manual gearbox)
›››
page 192.
● Multifunction display (MFD) and menus for
different
setting options ›››
page 26.
● Service interval display ›››
page 103 .
● Second speed display (menu Configura-
tion ) ›››
page 26.
● Start-Stop operation indicator ›››
page 102.
Warning and information texts
The system runs a check on certain compo-
nents and functions when the ignition is
switched on and while the vehicle is moving.
Faults in the operation are displayed on the
screen using red and yellow symbols and
messages on the instrument panel display
( ››› page 105) and, in some cases, with audi-
ble warnings. The display may vary according
to the type of instrument panel fitted. »1)
Depending on the vehicle equipment, it is also
pos s
ible to set the time using the settings menu
on the instrument panel display ›››
page 30.
101
Technical data
Advice
Operation
Emergencies
Safety
Page 104 of 320

OperationPriority 1 warning (red symbols)
Symbol flashing or lit; partly combined with audible
warnings.
Stop the vehicle!
It is dangerous ››› in Control and
warning lamps on page 105 !
Check the function that is faulty and repair it. If necessa-
ry, request assistance from specialised personnel.
Priority 2 warning (yellow symbols)
Symbol flashing or lit; partly combined with audible
warnings.
A function fault, or fluids which are below the correct
levels may cause damage to the vehicle ›››
in Control
and warning lamps on page 105 !
Check the faulty operation as soon as possible. If neces-
sary, request assistance from specialised personnel.
Informative text
Information relating to different vehicle processes. Mileage
The odomet
er
r
egisters the total distance
travelled by the car.
The odometer (trip ) shows the distance
travelled since the last odometer reset. The
last digit of the trip recorder indicates distan-
ces of 100 metres or one tenths of a mile.
Outside temperature display
When the outside temperature is below +4°C
(+39°F), the symbol “ice crystal” (warning of
risk of freezing) is also displayed next to the temperature. At first this symbol flashes and
then it rem
ains lit until the outside tempera-
ture rises above +6°C (+43°F) ››› .
When the v
ehic
le is at a standstill, with the
auxiliary heating on ( ››› page 177), or when
travelling at very low speeds, the tempera-
ture displayed may be higher than the true
outside temperature, as a result of the heat
produced by the engine.
The temperatures measured range from
-40°C to +50°C (-40°F to +122°F).
Compass
With the ignition on and the navigation sys-
tem on, the cardinal point corresponding to
the vehicle's direction of travel is displayed
on the instrument panel ››› page 103.
Selector lever positions
The range of engaged gears of the selector
lever is shown on the side of the lever, and
on the instrument panel display. In positions
D and S, and with the Tiptronic, the corre-
sponding gear is also displayed.
Recommended gear (manual gearbox)
The recommended gear in order to save fuel
is displayed on the instrument panel while
you are driving ›››
page 192. Second speed display (mph or km/h)
In addition t
o the speedometer, the speed
can also be displayed in a different unit of
measurement (in miles or in km per hour). To
change the units, in the Settings menu, se-
lect the option Second speed
››› page 26.
Vehicles without menu display on the instru-
ment panel
● Switch on the engine.
● Press button three times. The odometer
di s
p
lay flashes on the instrument panel dis-
play.
● Press button 0.0 / SET once. “mph”
or “km/h” i s
di
splayed briefly instead of the
odometer.
● This activates the second speed display. To
switc
h it off, repeat the procedure.
This option cannot be deactivated in models
destined for countries in which the second
speed must always be visible.
Start-Stop operating display.
Updated information relating to the status is
displayed on the instrument panel
››› page 205. WARNING
Observe the safety warnings ›››
in Control
and warnin g l
amps on page 105. 102
Page 106 of 320
Operation
other services (e.g. the next Inspection Serv-
ic e or c
h
ange of brake fluid) are listed on the
label attached to the door strut, or in the
Maintenance Programme.
In vehicles with Services established by time
or mileage, the service intervals are already
pre-defined.
In vehicles with LongLife Service , the inter-
vals are determined individually. Technical
progress has made it possible to considera-
bly reduce servicing requirements. The tech-
nology used by SEAT ensures that your vehi-
cle only has an Interval Service when it is
necessary. To establish when the Interval
Service is due (max. 2 years), the vehicle's
conditions of use and individual driving
styles are considered. The service pre-warn-
ing first appears 20 days before the date es-
tablished for the corresponding service. The
kilometres (miles) remaining until the next
service are always rounded up to the nearest
100 km (miles) and the time is given in com-
plete days. The current service message can-
not be viewed until 500 km after the last
service. Prior to this only lines are visible on
the display.
Inspection reminder
When the Service date is approaching, when
the ignition is switched on a Service remind-
er is displayed. In vehicles without text messages
, a sp anner
is displayed on the instrument panel with
a figure given in km . The number of kilome-
tres shown is the maximum number that may
be driven until the next service. After a few
seconds, the display mode changes. A clock
symbol appears and the number of days until
the next service appointment is due.
In vehicles with text messages , Service in
--- km (miles) or --- days is dis-
played on the instrument panel.
Service due
After the service date, an audible warning is
given when the ignition is switched on and
the spanner displayed on the screen flashes
for a few seconds . In vehicles with text
messages, Service in --- km or --- days is displayed on the instrument panel.
Reading a service notification
With the ignition switched on, the engine off
and the vehicle at a standstill, the current
service notification can be read: ● Press the button on the instrument pan-
el sev
er
al times until the spanner symbol is
displayed .
● OR: select the Settings menu.
● From the
Service submenu, sel ect
the op-
tion Info . When the serv
ic
e date has past, a minus sign
is displayed in front of the number of kilome-
tres or days. In vehicles with text messages
the following is displayed: Service ---
km (miles) or --- days ago .
Resetting service interval display
If the service was not carried out by a techni-
cal service centre, the display can be reset as
follows:
In vehicles with text messages:
Select the Settings menu.
In the submenu Service , select the option Reset.
Confirm with OK when requested to do so by the sys-
tem.
In vehicles without text messages:
Switch the ignition off.
Press and hold the 0.0 / SET button.
Switch the ignition back on.
Release the 0.0 / SET button and, press for the next
20 seconds. Do not r
eset the indicator to zero between
tw o int
ervals, otherwise the display will be
incorrect.
If you reset the display manually, the next
service interval will be indicated as in vehi-
cles with fixed service intervals. For this
104
Page 107 of 320
General instrument panel
reason we recommend that the service inter-
v al
di
splay be reset by a SEAT authorised
service ››› Booklet Maintenance schedule. Note
● The serv ic
e message disappears after a few
seconds, when the engine is started or when OK is pressed.
● In vehicles with the LongLife system in
which the b att
ery has been disconnected for
a long period of time, it is not possible to cal-
culate the date of the next service. Therefore
the service interval display may not be cor-
rect. In this case, bear in mind the maximum
service intervals permitted in the ››› Book-
let Maintenance Programme. Control lamps
C ontr
o
l and warning lamps Read the additional information carefully
› ›
›
page 32
The control and warning lamps are indicators
of warnings, ››› , faults
››
›
or certain func-
tion s.
Some c
ontrol and warning lamps come
on when the ignition is switched on, and
switch off when the engine starts running, or
while driving.
Depending on the model, additional text
messages may be viewed on the instrument panel display. These may be purely informa-
tive or they m
ay be advising of the need for
action ››› page 100, Instruments.
Depending upon the equipment fitted in the
vehicle, instead of a warning lamp, some-
times a symbol may be displayed on the in-
strument panel.
When certain control and warning lamps are
lit, an audible warning is also heard. WARNING
If the warning lamps and messages are ignor-
ed, the v ehic
le may stall in traffic, or may
cause accidents and severe injuries.
● Never ignore the warning lamps or text
mess
ages.
● Stop the vehicle safely as soon as possible.
● Park the vehicle away from traffic and en-
sure th
at there are no highly flammable ma-
terials under the vehicle that could come into
contact with the exhaust system (e.g. dry
grass, fuel).
● A faulty vehicle represents a risk of acci-
dent for the driv
er and for other road users. If
necessary, switch on the hazard warning
lamps and put out the warning triangle to ad-
vise other drivers.
● Before opening the bonnet, switch off the
engine and al
low it to cool.
● In any vehicle, the engine compartment is a
hazar
dous area and could cause severe inju-
ries ››› page 268. CAUTION
Failure to heed the control lamps and text
mes s
ages when they appear may result in
faults in the vehicle. 105
Technical data
Advice
Operation
Emergencies
Safety
Page 109 of 320

Communications and multimediaButtonRadioMedia (except AUX)AUXTelephone
a)Navigation a)
B
Short press:
access to the tele-
phone menu on the dash pan- ela)
.
Hold down: redial a)Short press:
access to the tele-
phone menu on the dash pan- ela)
.
Hold down: redial a)Short press:
access to the tele-
phone menu on the dash pan- ela)
.
Hold down: redial a)
Short press:
answer/hang up
calls, enable/open the tele- phone menu.
Hold down: reject incoming
call/switch to private mode or
return to hands-free mode/re- dial
Short press: access to the tele-
phone menu on the dash pan- ela)
.
Hold down: redial a)
CSearch for last stationShort press:
switch to the previ-
ous song
Hold down: quick rewindNo functionNo function b)Radio/media functionality (ex-
cept AUX )
DSearch for the next stationShort press: switch to the next
song
Hold down: fast forwardNo functionNo function b)Radio/media functionality (ex-
cept AUX )
E, FChange menu on instrument
panelChange menu on instrumentpanelChange menu on instrumentpanelChange menu on instrumentpanelChange menu on instrumentpanel
GEnable/disable voice control a)Enable/disable voice controla)Enable/disable voice controla)No functionb)Enable/disable voice control
H
Turn: Next/previous preset c)
Press: Acts on the MFD or con- firms the menu option of the
dash panel depending on the menu optionTurn: Next/previous song c)
Press: Acts on the MFD or con- firms the menu option of the
dash panel depending on the menu optionTurn: Acts upon the instrument
panel menu depending on posi- tion
Press: Acts on the MFD or con- firms the menu option of the
dash panel depending on the menu optionTurn: Acts upon the instrumentpanel menu depending on po- sition
Press: Acts on the MFD or con- firms the menu option of the
dash panel depending on the menu optionTurn: Acts upon the instrumentpanel menu depending on po- sition
Press: Acts on the MFD or con- firms the menu option of the
dash panel depending on the menu option
a)According to the vehicle's equipment package.
b) When a call is being made, radio/media functionality (except AUX).
c) Only if the dash panel is in audio menu.
107
Technical data
Advice
Operation
Emergencies
Safety
Page 126 of 320

Operation
Closing the rear lid
● Press and hold the button on the vehi-
c l
e k
ey for approximately 1 second.
● OR: press and hold the button on the
c entr
e c
onsole for approximately 1 second
››› Fig. 6.
● OR: press the ››
›
Fig. 7 boot hatch but-
ton (arrow).
● Press the button on the open rear lid
› ›
›
Fig. 138 ››› .
● Manually push the rear lid down to close it.
The r e
ar lid w
ill move down to the closed po-
sition to close and lock itself automatically
using the power-close feature ››› .
In c a
se of
difficulty or obstruction, automatic
closing of the rear lid is interrupted and it will
open slightly.
Check why the rear lid could not close.
Attempt to close it once more.
Interrupting the opening and closing process
Rear lid opening and closing can be stopped
by pressing one of the buttons. Each time
one of the buttons is pressed, the rear lid
mo v
e
s to its initial position.
Then, it can be opened or closed by hand. To
do this, apply a little more force. Memorising the opening angle
The rear lid mu
st be at least half open to
memorise an opening angle.
● Stop automatic opening in the opening po-
sition requir
ed ››› page 124.
● Hold down the button ›››
Fig. 138 with the
rear lid open for at least three seconds. The
opening angle is memorised.
Memorisation is confirmed by blinking of the
hazard warning lights and an audible warn-
ing.
To fully open the boot hatch again, the open-
ing angle must be memorised once more.
● Release the rear lid and open it to the
memorised height.
● P
ush the rear lid all the way up. To do this,
apply
a little more force.
● Hold down the button ›››
Fig. 138 with the
rear lid open for at least three seconds.
● The opening angle is reset to the original
factor
y setting. WARNING
Unsuitable or careless closing and locking of
the re ar lid c
ould cause serious injuries.
● Never leave the vehicle unattended, or al-
low chi
ldren to play inside or around the vehi-
cle without supervision, especially if the rear
lid is open. Children could enter the luggage compartment, close the rear lid and become
trap
ped. A loc
ked vehicle can be subjected to
extremely high and low temperatures, de-
pending on the time of year, resulting in seri-
ous injuries/illness or even death. WARNING
It is possible that the rear lid does not open
c omp l
etely or, if it is open, closes alone if a
large amount of snow has built up on it or if a
luggage rack is fitted. In this case, the rear lid
must be supported. CAUTION
● When us in
g a trailer, ensure that there is
sufficient space to open and close the rear
lid.
● Before opening the rear lid, any kind of
equipment carrier shou
ld be removed, for ex-
ample a bicycle carrier. CAUTION
In case of repeated short-term use, the sys-
tem i s
turned off to avoid overheating.
● When it has cooled, it may be used once
again. Durin
g this time, the rear lid may be
manually opened or closed applying a little
more effort.
● If the vehicle battery is disconnected or the
fuse b
lows when the rear lid is open, the rear
lid system must be re-initialised. To do this,
close the rear lid. 124
Page 127 of 320

Opening and closing
Note
Before closing the rear lid, make sure that the
key h
as not been left inside the luggage com-
partment. Electric windows
Electric w
indows: functionsRead the additional information carefully
›› ›
page 11
After turning off the ignition, the windows
can be opened and closed for a short time
using the buttons on the door as long as the
driver door or passenger side door is not
open. When the key is removed from the igni-
tion and the driver door is open, all of the
electric windows can be opened or closed at
the same time keeping the button on the
driver’s door pressed down. After a few sec-
onds, the convenience opening or closing
function will begin ›››
page 125.
One-touch opening and closing
The one-touch automatic opening and clos-
ing is used to open or close the windows
completely. It will not be necessary to hold
the button of the corresponding electric win-
dow. For the one-touch closing function: p
u
l
l the
button for the corresponding window up-
wards until it reaches the second position.
For the one-touch opening function: push the
button for the corresponding window down-
wards until it reaches the second position.
To stop the one touch function: push or pull
on the button of the corresponding window.
Resetting one-touch opening and closing
The one-touch opening and closing function
is not active after the vehicle battery has
been disconnected or is flat and will have to
be reset.
● Close all windows and doors.
● Pull the button of the corresponding win-
dow and hol
d it for one second in this posi-
tion.
● Release the button and pull upwards and
hold ag
ain. The one-touch function is now
ready for operation.
The automatic one-touch electric windows
can be reinitialised individually or several at
a time.
Convenience opening/closing
The electric windows can be opened or
closed from outside using the vehicle key: ●
Keep the v
ehicle unlocking or locking but-
ton pressed. All windows which function elec-
trically will be either opened or closed.
● To interrupt the function, release the lock-
ing or un
locking button.
During convenience closing, first the win-
dows and then the sliding sunroof will be
closed.
In the Configuration - convenience
menu, there are different settings for operat-
ing the windows ›››
page 26. WARNING
Careless use of the electric windows can
cau se seriou
s injury.
● Only operate the electric windows when
nobody i
s in the way.
● Never leave children or disabled people
alone in the v
ehicle if the doors are to be
locked. The windows cannot be opened in
case of an emergency.
● Always take all the keys with you whenever
you le
ave the vehicle. After turning off the ig-
nition, the windows can be opened and
closed for a short time using the buttons on
the door as long as the driver door or passen-
ger side door is not open.
● When transporting children in the rear
seats, a
lways deactivate the rear electric win-
dows with the child safety lock so that they
cannot be opened and closed. » 125
Technical data
Advice
Operation
Emergencies
Safety