third row Seat Alhambra 2018 User Guide
[x] Cancel search | Manufacturer: SEAT, Model Year: 2018, Model line: Alhambra, Model: Seat Alhambra 2018Pages: 324, PDF Size: 7.04 MB
Page 152 of 324
Operation
● Pu
sh the he
ad restraint down as far as it
will go ››› page 58.
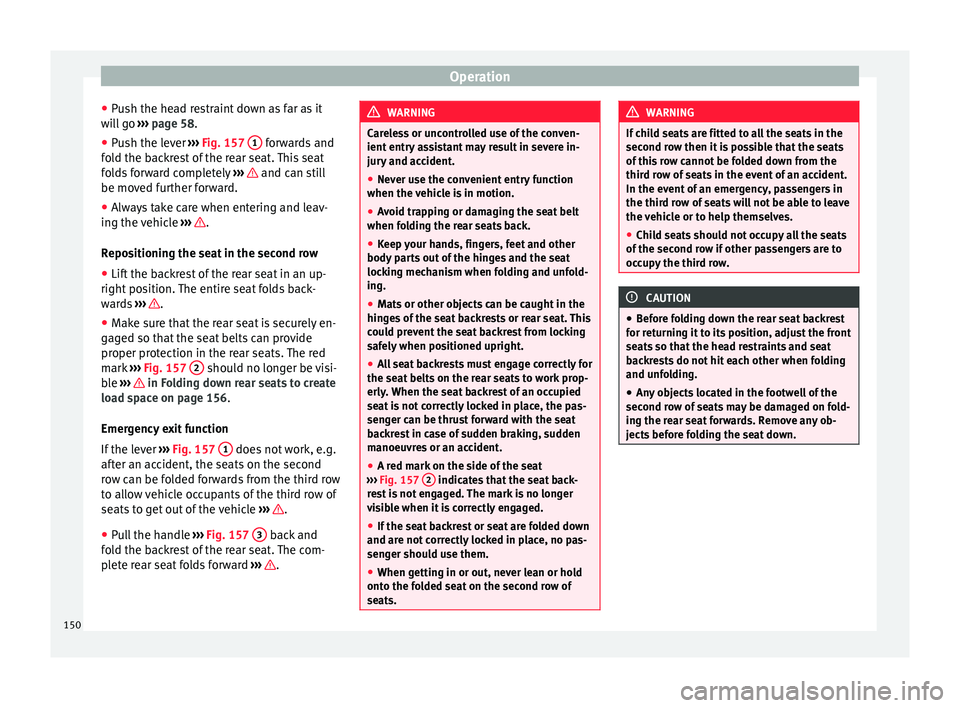
● Push the lever ›››
Fig. 157 1 forwards and
f o
l
d the backrest of the rear seat. This seat
folds forward completely ››› and can still
be mo v
ed f
urther forward.
● Always take care when entering and leav-
ing the v
ehicle ››› .
R epo
s
itioning the seat in the second row
● Lift the backrest of the rear seat in an up-
right pos
ition. The entire seat folds back-
wards ››› .
● Make sure that the rear seat is securely en-
g ag
ed so th
at the seat belts can provide
proper protection in the rear seats. The red
mark ››› Fig. 157 2 should no longer be visi-
b l
e ›
›› in Folding down rear seats to create
lo a
d s
pace on page 156.
Emergency exit function
If the lever ››› Fig. 157 1 does not work, e.g.
af t
er an ac
cident, the seats on the second
row can be folded forwards from the third row
to allow vehicle occupants of the third row of
seats to get out of the vehicle ››› .
● Pull the handle ››
›
Fig. 157 3 back and
f o
l
d the backrest of the rear seat. The com-
plete rear seat folds forward ››› . WARNING
Careless or uncontrolled use of the conven-
ient entr y
assistant may result in severe in-
jury and accident.
● Never use the convenient entry function
when the vehic
le is in motion.
● Avoid trapping or damaging the seat belt
when fol
ding the rear seats back.
● Keep your hands, fingers, feet and other
body par
ts out of the hinges and the seat
locking mechanism when folding and unfold-
ing.
● Mats or other objects can be caught in the
hinge
s of the seat backrests or rear seat. This
could prevent the seat backrest from locking
safely when positioned upright.
● All seat backrests must engage correctly for
the seat belt
s on the rear seats to work prop-
erly. When the seat backrest of an occupied
seat is not correctly locked in place, the pas-
senger can be thrust forward with the seat
backrest in case of sudden braking, sudden
manoeuvres or an accident.
● A red mark on the side of the seat
›››
Fig. 157 2 indicates that the seat back-
re s
t is not engaged. The mark is no longer
visible when it is correctly engaged.
● If the seat backrest or seat are folded down
and are not c
orrectly locked in place, no pas-
senger should use them.
● When getting in or out, never lean or hold
onto the fo
lded seat on the second row of
seats. WARNING
If child seats are fitted to all the seats in the
second r o
w then it is possible that the seats
of this row cannot be folded down from the
third row of seats in the event of an accident.
In the event of an emergency, passengers in
the third row of seats will not be able to leave
the vehicle or to help themselves.
● Child seats should not occupy all the seats
of the second r
ow if other passengers are to
occupy the third row. CAUTION
● Bef or
e folding down the rear seat backrest
for returning it to its position, adjust the front
seats so that the head restraints and seat
backrests do not hit each other when folding
and unfolding.
● Any objects located in the footwell of the
second ro
w of seats may be damaged on fold-
ing the rear seat forwards. Remove any ob-
jects before folding the seat down. 150
Page 157 of 324
Transport and practical equipment
●
Whil e driv
ing, always keep object compart-
ments closed.
● Do not place hard, heavy or sharp objects
inside the
vehicle interior, in open storage
compartments, the rear shelf or on the dash
panel.
● Remove hard, heavy and sharp objects from
clothes
and pockets inside the vehicle and
store securely. WARNING
The transport of heavy object changes vehi-
c le h
andling and increases braking distance.
Heavy loads that have not been stored or se-
cured correctly could cause loss of control
and result in serious injury.
● Vehicle handling changes when transport-
ing heavy
objects due to a change in the cen-
tre of gravity.
● Distribute the load as uniformly and as low
down on the v
ehicle as possible.
● Store heavy objects in the luggage com-
partment
as far from the rear axle as possi-
ble. CAUTION
● Hard o b
jects on the rear shelf could chafe
the wires of the heating element and antenna
of the rear window and cause damage.
● The side window antenna could be dam-
aged due to c
hafing from objects. Note
The ventilating slits between the heated rear
windo w and the shelf
must not be covered so
that used air can escape from the vehicle. Folding down rear seats to create load
sp
ac
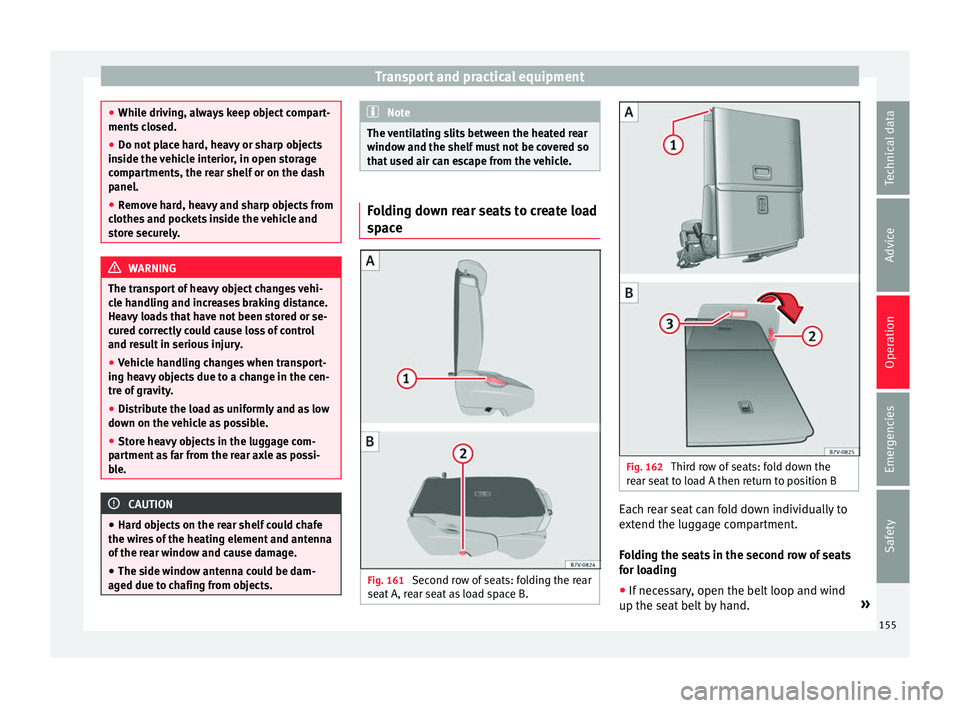
e Fig. 161
Second row of seats: folding the rear
se at
A
, rear seat as load space B. Fig. 162
Third row of seats: fold down the
r e
ar se
at to load A then return to position B Each rear seat can fold down individually to
e
xt
end the lug
gage compartment.
Folding the seats in the second row of seats
for loading
● If necessary, open the belt loop and wind
up the seat belt
by hand. »
155
Technical data
Advice
Operation
Emergencies
Safety
Page 158 of 324
Operation
● If r
equir
ed, remove the head restraints from
the integrated seats for children and refit
them ››› page 79.
● If necessary, raise the armrests.
● Remove objects from the footwell in front of
and behind the rear se
at ››› .
● Move the rear seat all the way back.
● Push the head restraint down as far as it
w i
l
l go ››› page 58.
● In the middle seat, close the drinks carrier
in the rear of
the centre console, if necessary.
● Pull lever ››› Fig. 161
1 back and fold the
se at
b
ackrest forwards. The complete rear
seat folds forward ››› .
● Fold the seat backrest forwards until it
loc k
s
into the load surface position
››› Fig. 161 B.
● If necessary, pull on the lever ›››
Fig. 162 2 to move the seat to the required position.
●
When the seat is folded down, no adults or
c hi
l
dren should travel in it ››› .
F o
l
ding the seats in the third row of seats for
loading
● If necessary, open the belt loop and wind
up the seat belt
by hand.
● Open the rear lid.
● Push the head restraint down as far as it
wi l
l go ››› page 58. ●
Remo v
e objects from the footwell in front of
and behind the rear seat ››› .
● Remove objects from the space below the
r e
ar se
at.
● Remove the attachment elements and sup-
ports f
or the net from the rail system.
● Pull lever ››› Fig. 162 1 back and fold the
se at
b
ackrest forwards. The rear seat folds
forward ››› and the cushion also moves for-
w ar
d.
● F
old the seat tray forward on top of the fol-
ded seat.
● When the se
at is folded down, no adults or
chil
dren should travel in it ››› .
P uttin
g the se
ats in the second row back in
place
● Pull lever ››› Fig. 161
1 upwards and place
the se at
b
ackrests in vertical position. The
entire seat folds backwards.
● Pull on the rear seats and the seat backrest
to ens
ure that they are correctly locked in
place and that the seat belt protection is
guaranteed for rear seat passengers.
Putting the seats in the third row back in
place
● Open the rear lid.
● Pull on the handle ›››
Fig. 162 2 to put the
se at
tr
ay back in position. ●
Pul
l the handle ››› Fig. 162 3 . The entire
se at
f
olds backwards.
● Press on the seat tray in the seat backrest
until
it is held in position by its magnets.
● Open the sliding door.
● Put the seat backrest into position and
pres
s firmly until it clicks into place.
● Pull on the rear seats and the seat backrest
to ens
ure that they are correctly locked in
place and that the seat belt protection is
guaranteed for rear seat passengers. WARNING
Folding and lifting the rear seats carelessly
without p
aying attention could cause serious
injury.
● Never fold or lift the seats while driving.
● Do no trap or damage seat belts when rais-
ing the seat
backrest.
● Keep your hands, fingers, feet and other
body par
ts out of the hinges and the seat
locking mechanism when folding and unfold-
ing.
● Mats or other objects can be caught in the
hinge
s of the seat backrests or rear seat. This
could prevent the seat or seat backrest from
locking securely in the vertical position.
● All seat backrests must engage correctly for
the seat belt
s on the rear seats to work prop-
erly. When the seat backrest of an occupied
seat is not correctly locked in place, the pas-
senger can be thrust forward with the seat 156
Page 159 of 324
Transport and practical equipment
backrest in case of sudden braking, sudden
manoeu
vr
es or an accident.
● No seat must be occupied if the seat back-
res
t or seat is folded or not correctly engag-
ed. CAUTION
● Bef or
e folding the rear seat backrest, ad-
just the front seats so that neither the head
restraint or backrest hit them when folded.
● Objects placed in the footrest area in front
of and behind the re
ar seats can be damaged
when seats are folded down or put back into
position. Remove any objects in the way be-
fore folding seats down or repositioning
them.
● Objects placed in the moulding on the back
of the third r
ow of seats can be damaged
when folding down the seats or putting them
back into position. Remove any objects in the
way before folding seats down or reposition-
ing them.
● The attachment elements and supports for
the net par
tition placed on the rail system
can be damaged when folding down seats
from the third row or putting them back into
position and these can also damage the seats
themselves. Before folding down or reposi-
tioning the seats, remove the attachment ele-
ments and supports for the net from the rail
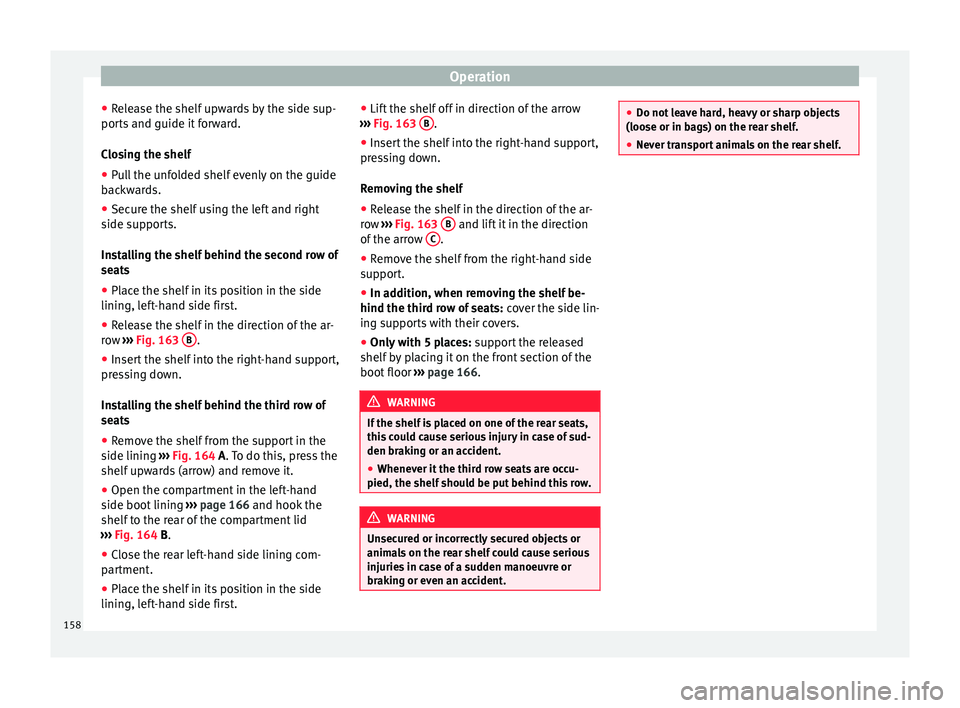
system. Shelf*
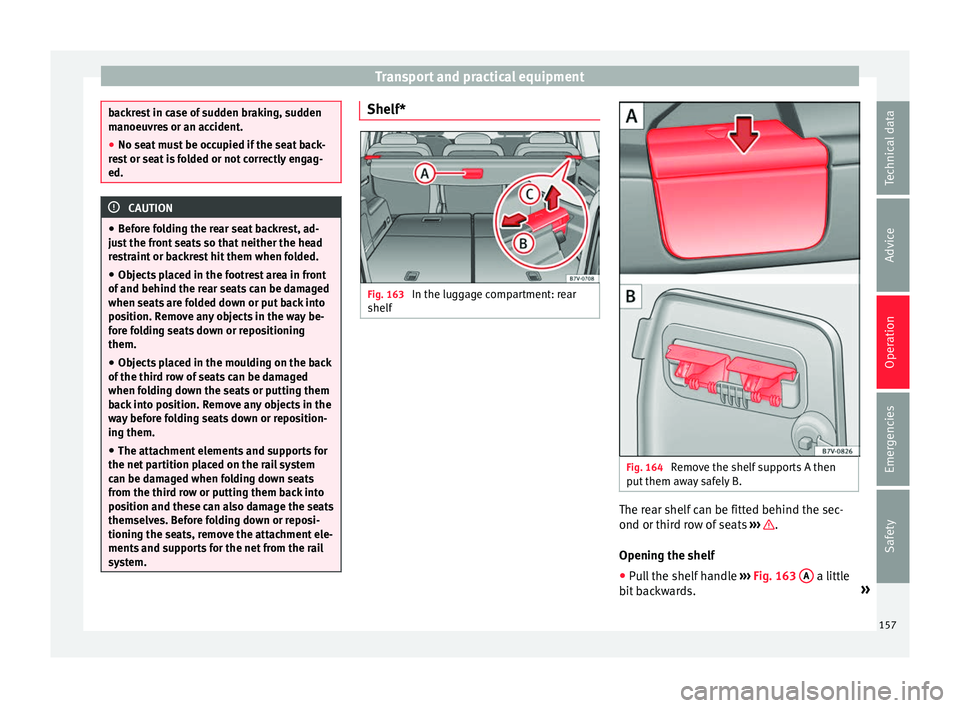
Fig. 163
In the luggage compartment: rear
shelf Fig. 164
Remove the shelf supports A then
p ut
them a
way safely B. The rear shelf can be fitted behind the sec-
ond or thir
d r
o
w of seats ››› .
Openin g the shelf
● Pu
ll the shelf handle ›››
Fig. 163 A a little
b it
b
ackwards. »
157
Technical data
Advice
Operation
Emergencies
Safety
Page 160 of 324
Operation
● Rel
e
ase the shelf upwards by the side sup-
ports and guide it forward.
Closing the shelf
● Pull the unfolded shelf evenly on the guide
back
wards.
● Secure the shelf using the left and right
side sup
ports.
Installing the shelf behind the second row of
seats
● Place the shelf in its position in the side
lining, lef
t-hand side first.
● Release the shelf in the direction of the ar-
row ›
›› Fig. 163 B .
● Insert the shelf into the right-hand support,
pr e
s
sing down.
Installing the shelf behind the third row of
seats
● Remove the shelf from the support in the
side lining ›
›› Fig. 164 A. To do this, press the
shelf upwards (arrow) and remove it.
● Open the compartment in the left-hand
side boot linin
g ››› page 166 and hook the
shelf to the rear of the compartment lid
››› Fig. 164 B.
● Close the rear left-hand side lining com-
partment
.
● Place the shelf in its position in the side
lining, lef
t-hand side first. ●
Lift the shelf
off in direction of the arrow
››› Fig. 163 B .
● Insert the shelf into the right-hand support,
pr e
s
sing down.
Removing the shelf
● Release the shelf in the direction of the ar-
row ›
›› Fig. 163 B and lift it in the direction
of the arr
o
w C .
● Remove the shelf from the right-hand side
s up
por
t.
● In addition, when removing the shelf be-
hind the third ro
w of seats: cover the side lin-
ing supports with their covers.
● Only with 5 places: suppor
t the released
shelf by placing it on the front section of the
boot floor ››› page 166. WARNING
If the shelf is placed on one of the rear seats,
this c
ould cause serious injury in case of sud-
den braking or an accident.
● Whenever it the third row seats are occu-
pied, the shelf shoul
d be put behind this row. WARNING
Unsecured or incorrectly secured objects or
anima l
s on the rear shelf could cause serious
injuries in case of a sudden manoeuvre or
braking or even an accident. ●
Do not l e
ave hard, heavy or sharp objects
(loose or in bags) on the rear shelf.
● Never transport animals on the rear shelf. 158
Page 163 of 324
Transport and practical equipment
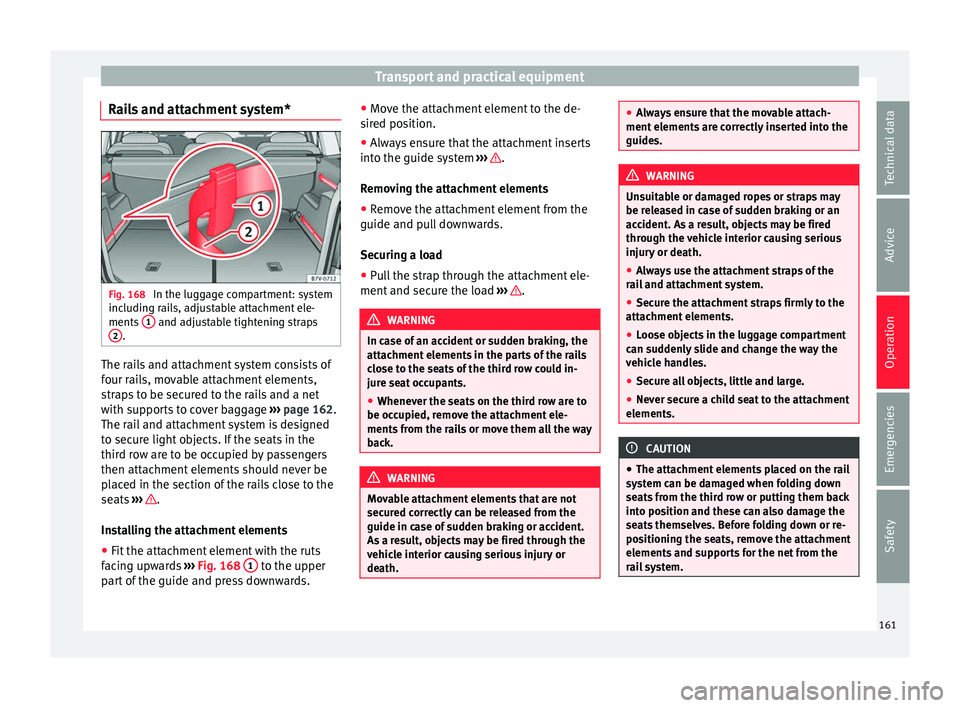
Rails and attachment system* Fig. 168
In the luggage compartment: system
inc ludin
g r
ails, adjustable attachment ele-
ments 1 and adjustable tightening straps
2 .
The rails and attachment system consists of
f
our r
ai
ls, movable attachment elements,
straps to be secured to the rails and a net
with supports to cover baggage ››› page 162.
The rail and attachment system is designed
to secure light objects. If the seats in the
third row are to be occupied by passengers
then attachment elements should never be
placed in the section of the rails close to the
seats ››› .
In s
t
alling the attachment elements
● Fit the attachment element with the ruts
facin
g upwards ››› Fig. 168 1 to the upper
p ar
t
of the guide and press downwards. ●
Move the att
achment element to the de-
sired position.
● Always ensure that the attachment inserts
into the guide sys
tem ››› .
R emo
v
ing the attachment elements
● Remove the attachment element from the
guide and pul
l downwards.
Securing a load
● Pull the strap through the attachment ele-
ment and secur
e the load ››› .
WARNING
In case of an accident or sudden braking, the
attac hment
elements in the parts of the rails
close to the seats of the third row could in-
jure seat occupants.
● Whenever the seats on the third row are to
be occupied, r
emove the attachment ele-
ments from the rails or move them all the way
back. WARNING
Movable attachment elements that are not
secur ed c
orrectly can be released from the
guide in case of sudden braking or accident.
As a result, objects may be fired through the
vehicle interior causing serious injury or
death. ●
Alw a
ys ensure that the movable attach-
ment elements are correctly inserted into the
guides. WARNING
Unsuitable or damaged ropes or straps may
be r ele
ased in case of sudden braking or an
accident. As a result, objects may be fired
through the vehicle interior causing serious
injury or death.
● Always use the attachment straps of the
rail
and attachment system.
● Secure the attachment straps firmly to the
attachment
elements.
● Loose objects in the luggage compartment
can sud
denly slide and change the way the
vehicle handles.
● Secure all objects, little and large.
● Never secure a child seat to the attachment
elements. CAUTION
● The attac hment
elements placed on the rail
system can be damaged when folding down
seats from the third row or putting them back
into position and these can also damage the
seats themselves. Before folding down or re-
positioning the seats, remove the attachment
elements and supports for the net from the
rail system. 161
Technical data
Advice
Operation
Emergencies
Safety
Page 164 of 324
Operation
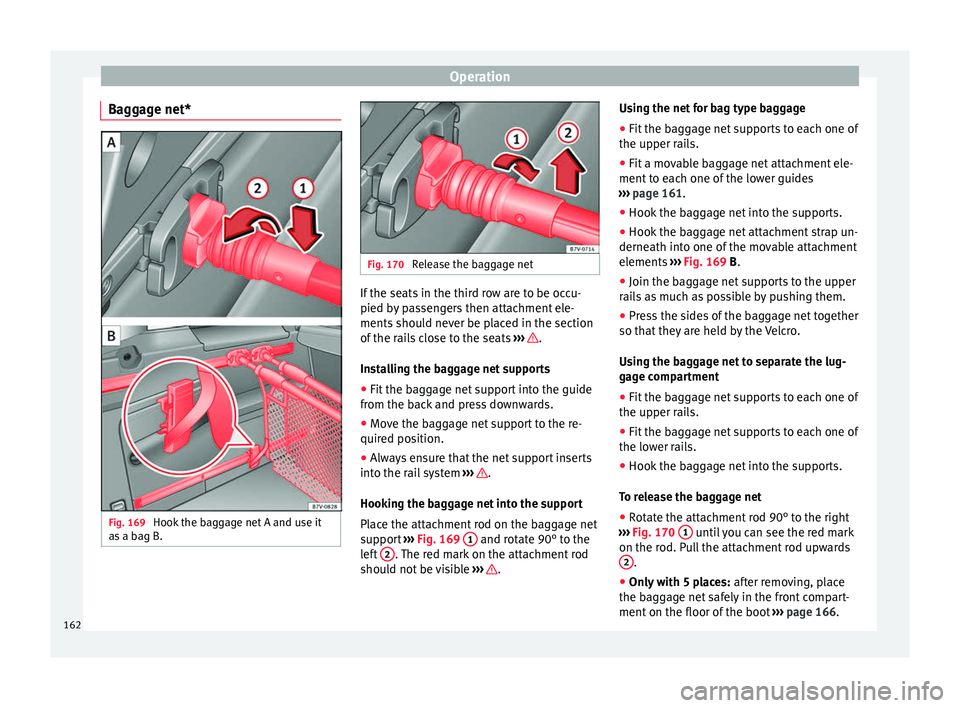
Baggage net* Fig. 169
Hook the baggage net A and use it
a s
a b
ag B. Fig. 170
Release the baggage net If the seats in the third row are to be occu-
pied b
y
p
assengers then attachment ele-
ments should never be placed in the section
of the rails close to the seats ››› .
In s
t
alling the baggage net supports
● Fit the baggage net support into the guide
from the bac
k and press downwards.
● Move the baggage net support to the re-
quired pos
ition.
● Always ensure that the net support inserts
into the rai
l system ››› .
Hook in
g the b
aggage net into the support
Place the attachment rod on the baggage net
support ››› Fig. 169 1 and rotate 90° to the
l ef
t
2 . The red mark on the attachment rod
shou ld not
be visible ››› .Using the net for bag type baggage
●
Fit the baggage net supports to each one of
the up per r
ai
ls.
● Fit a movable baggage net attachment ele-
ment to e
ach one of the lower guides
››› page 161.
● Hook the baggage net into the supports.
● Hook the baggage net attachment strap un-
derneath into one of
the movable attachment
elements ››› Fig. 169 B.
● Join the baggage net supports to the upper
rail
s as much as possible by pushing them.
● Press the sides of the baggage net together
so that they
are held by the Velcro.
Using the baggage net to separate the lug-
gage compartment
● Fit the baggage net supports to each one of
the upper rai
ls.
● Fit the baggage net supports to each one of
the lower r
ails.
● Hook the baggage net into the supports.
To rel
ease the baggage net
● Rotate the attachment rod 90° to the right
›››
Fig. 170 1 until you can see the red mark
on the r od. P
u
ll the attachment rod upwards
2 .
● Only with 5 places: af
ter r
emoving, place
the baggage net safely in the front compart-
ment on the floor of the boot ››› page 166.
162
Page 165 of 324
Transport and practical equipment
Removing the baggage net supports
● Remove the net attachment element from
the r ai
l
and pull it out downwards. WARNING
In case of an accident or sudden braking, the
net att ac
hment elements in the parts of the
rails close to the seats of the third row could
injure seat occupants.
● Whenever the seats on the third row are to
be occupied, r
emove the attachment ele-
ments from the rails or move them all the way
back. WARNING
Baggage net supports that are not secured
corr ectly
can be released from the guide in
case of the sudden braking or accident. As a
result, objects may be fired through the vehi-
cle interior causing serious injury or death.
● Always ensure that the baggage net sup-
ports
are correctly inserted into the rails; the
red mark should not be visible.
● Never secure a child seat to the baggage
net sup
ports. CAUTION
● The bag g
age net supports placed on the
rail system can be damaged when folding
down seats from the third row or putting
them back into position and these can also
damage the seats themselves. Before folding down or repositioning the seats, remove the
bag
g
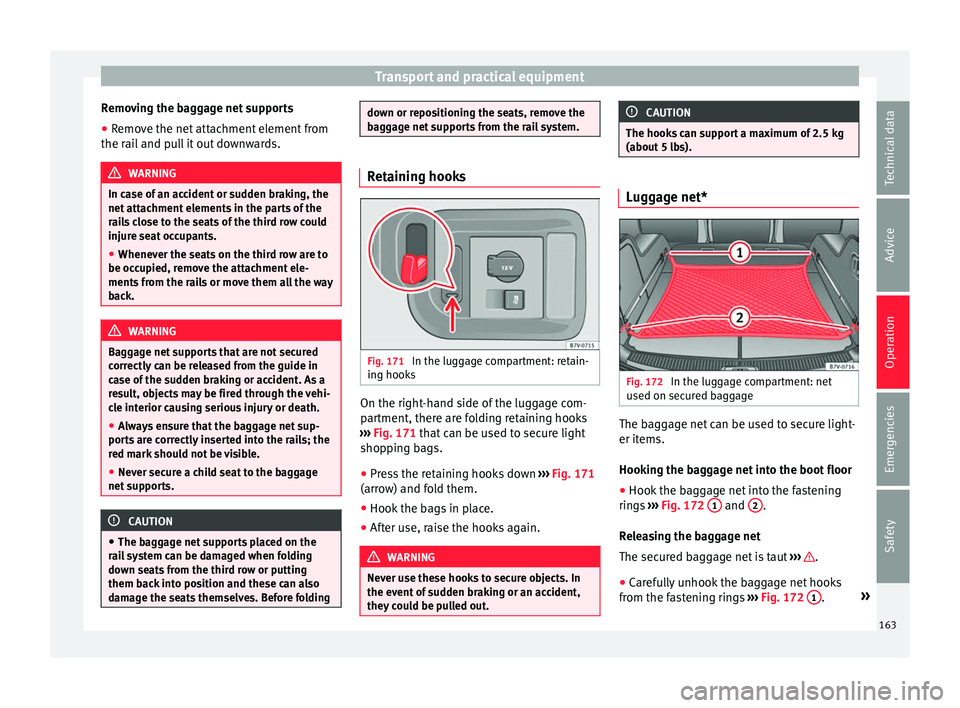
age net supports from the rail system. Retaining hooks
Fig. 171
In the luggage compartment: retain-
in g hook
s On the right-hand side of the luggage com-
p
ar
tment, ther
e are folding retaining hooks
››› Fig. 171 that can be used to secure light
shopping bags.
● Press the retaining hooks down ›››
Fig. 171
(arrow) and fold them.
● Hook the bags in place.
● After use, raise the hooks again. WARNING
Never use these hooks to secure objects. In
the event of
sudden braking or an accident,
they could be pulled out. CAUTION
The hooks can support a maximum of 2.5 kg
(about 5 l
bs). Luggage net*
Fig. 172
In the luggage compartment: net
u sed on sec
ur
ed baggage The baggage net can be used to secure light-
er it
ems.
Hook in
g the baggage net into the boot floor
● Hook the baggage net into the fastening
rings
››› Fig. 172 1 and
2 .
R el
e
asing the baggage net
The secured baggage net is taut ››› .
● Carefully unhook the baggage net hooks
fr om the f
a
stening rings ››› Fig. 172 1 .
»
163
Technical data
Advice
Operation
Emergencies
Safety
Page 174 of 324
Operation
Note
The drink holders can be removed for clean-
ing. Drink holders in front centre console
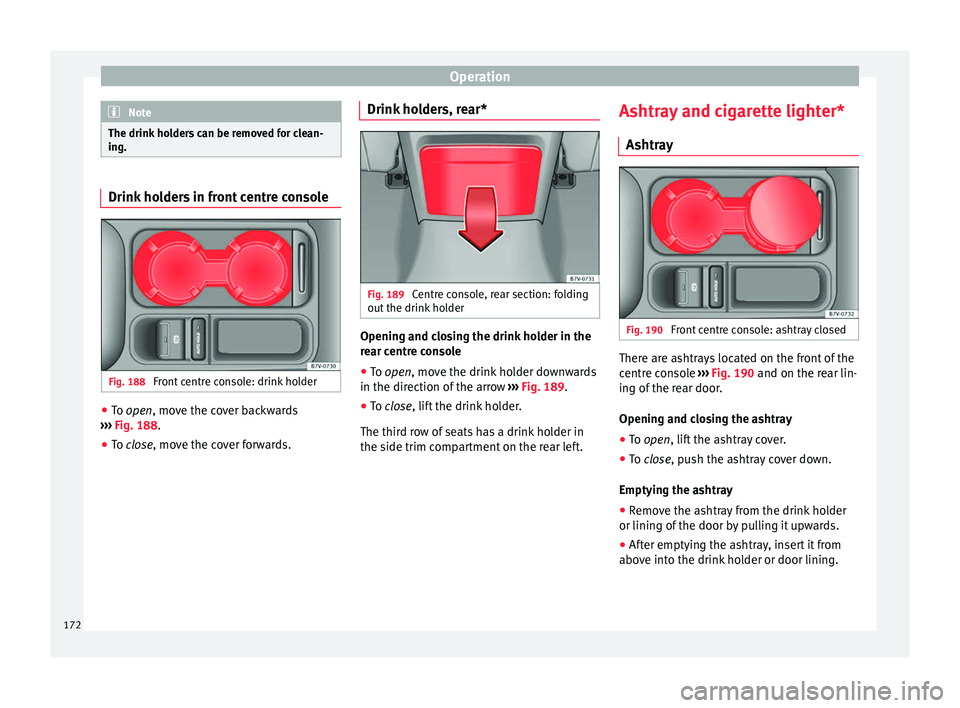
Fig. 188
Front centre console: drink holder ●
To open, mo v
e the c over backwards
››› Fig. 188.
● To close, move the cover forwards. Drink ho
lders, rear* Fig. 189
Centre console, rear section: folding
out the drink
ho
lder Opening and closing the drink holder in the
r
e
ar c
entre console
● To open, move the drink
holder downwards
in the direction of the arrow ››› Fig. 189.
● To close, lift the drink holder.
The third r
ow of seats has a drink holder in
the side trim compartment on the rear left. Ashtray and cigarette lighter*
Ashtray Fig. 190
Front centre console: ashtray closed There are ashtrays located on the front of the
c
entr
e c
onsole ››› Fig. 190 and on the rear lin-
ing of the rear door.
Opening and closing the ashtray
● To open, lift the ashtray cover.
● To
close, push the ashtray cover down.
Emptyin
g the ashtray
● Remove the ashtray from the drink holder
or lining of the door b
y pulling it upwards.
● After emptying the ashtray, insert it from
above int
o the drink holder or door lining.
172
Page 312 of 324
Index
lane assist system . . . . . . . . . . . . . . . . . . . . . . 223
lights . . . . . . . . . . . . . . . . . . . . . . . . . . . .
130, 131
loc
king the steering column . . . . . . . . . . . . . . 198
overview . . . . . . . . . . . . . . . . . . . . . . . . . . 34, 107
rear cross traffic alert (RCTA) . . . . . . . . . . . . . . 225
rear lid . . . . . . . . . . . . . . . . . . . . . . . . . . . . . . . . 125
refuelling . . . . . . . . . . . . . . . . . . . . . . . . . . . . . . 266
remote control . . . . . . . . . . . . . . . . . . . . . . . . . 181
tyre monitoring indicator . . . . . . . . . . . . . . . . . 235
vehicle battery . . . . . . . . . . . . . . . . . . . . . . . . . 284
windscreen washer fluid level . . . . . . . . . . . . . 137
Control of function rain sensor . . . . . . . . . . . . . . . . . . . . . . . . . . . . 139
Controls for the windows . . . . . . . . . . . . . . . 13, 127
Controls on the steering wheel operating the audio system and telephone . . 108
Control units . . . . . . . . . . . . . . . . . . . . . . . . . . . . . 250 reprogramming . . . . . . . . . . . . . . . . . . . . . . . . . 250
Convenience closing windows . . . . . . . . . . . . . . . . . . . . . . . . . . . . . . 127
Convenience functions reprogramming . . . . . . . . . . . . . . . . . . . . . . . . . 250
Convenience opening windows . . . . . . . . . . . . . . . . . . . . . . . . . . . . . . 127
Convenient entry function for the third row of seats . . . . . . . . . . . . . . . . . . . . . . . . . . . . . . . . . 149
Cooling system checking the coolant . . . . . . . . . . . . . . . . . . . . 277
topping up with coolant . . . . . . . . . . . . . . . . . . 277
Cornering lights see "Static cornering lights" . . . . . . . . . . . . . . 132
static . . . . . . . . . . . . . . . . . . . . . . . . . . . . . . . . . 132
Correct position . . . . . . . . . . . . . . . . . . . . . . . . . . . 58 driver . . . . . . . . . . . . . . . . . . . . . . . . . . . . . . . . . . 58
Counter steering assistance system . . . . . . . . . . 199
Crossing through water salt water . . . . . . . . . . . . . . . . . . . . . . . . . . . . . 205
Cruise control . . . . . . . . . . . . . . . . . . . . . . . . . . . . 221 Cruise Control System (CCS) . . . . . . . . . . . . 33, 221
contro l lamp . . . . . . . . . . . . . . . . . . . . . . . . . . . 221
operations . . . . . . . . . . . . . . . . . . . . . . . . . . . . . 221
warning lamp . . . . . . . . . . . . . . . . . . . . . . . . . . 221
D Dangers of not using a seat belt . . . . . . . . . . . . . . 64
Dash panel . . . . . . . . . . . . . . . . . . . . . . . . . . . . . . 101 airbag system . . . . . . . . . . . . . . . . . . . . . . . . . . 262
Data plate . . . . . . . . . . . . . . . . . . . . . . . . . . . . . . . 297
Data registry . . . . . . . . . . . . . . . . . . . . . . . . . . . . . 250
Data storage during the journey . . . . . . . . . . . . . 250
Daytime running lights . . . . . . . . . . . . . . . . . . . . 132
DCC see Dynamic chassis control . . . . . . . . . . . . . . 233
De-icing the locks . . . . . . . . . . . . . . . . . . . . . . . . . 258
Diagnostics connector . . . . . . . . . . . . . . . . . . . . . 251
Diesel refuelling . . . . . . . . . . . . . . . . . . . . . . . . . . . . . . 268
Diesel particulate filter . . . . . . . . . . . . . . . . . . . . 203 malfunction . . . . . . . . . . . . . . . . . . . . . . . . . . . . 203
recommended gear . . . . . . . . . . . . . . . . . . . . . 197
Differential lock see Brake assist system . . . . . . . . . . . . . . . . . . 206
Digital clock . . . . . . . . . . . . . . . . . . . . . . . . . . . . . 102
Dimensions . . . . . . . . . . . . . . . . . . . . . . . . . . . . . . 305
Directional tread pattern tyres . . . . . . . . . . . . . . . . . . . . . . . . . . . . . . . . . . . 50
Disconnecting devices . . . . . . . . . . . . . . . . . . . . . 286
Disconnecting the passenger front airbag . . . . . . 20
Display . . . . . . . . . . . . . . . . . . . . . . . . . . . . 102, 103
Disposal belt tension device . . . . . . . . . . . . . . . . . . . . . . . 69
Door . . . . . . . . . . . . . . . . . . . . . . . . . . . . . . . . . . . . 121 childproof lock . . . . . . . . . . . . . . . . . . . . . . . . . 123
emergency locking and unlocking . . . . . . . . . . . 10 opening and closing . . . . . . . . . . . . . . . . . . . . . 10
warning l
amp . . . . . . . . . . . . . . . . . . . . . . . . . . 121
Door handle . . . . . . . . . . . . . . . . . . . . . . . . . . . . . . 10
Door lock . . . . . . . . . . . . . . . . . . . . . . . . . . . . . . . . . 10
Door lock cylinder . . . . . . . . . . . . . . . . . . . . . . . . . 10
Door release lever . . . . . . . . . . . . . . . . . . . . . . . . 101
Drawbar load . . . . . . . . . . . . . . . . . . . . . . . . . . . . 237 loading the trailer . . . . . . . . . . . . . . . . . . . . . . . 242
Drawers . . . . . . . . . . . . . . . . . . . . . . . . . . . . . . . . . 169
Drink holder central console . . . . . . . . . . . . . . . . . . . . . . . . . 172
Drink holders . . . . . . . . . . . . . . . . . . . . . . . . . . . . 171 rear . . . . . . . . . . . . . . . . . . . . . . . . . . . . . . . . . . 172
Driving automatic gearbox . . . . . . . . . . . . . . . . . . . . . . 196
cross country . . . . . . . . . . . . . . . . . . . . . . . . . . . 57
data storage . . . . . . . . . . . . . . . . . . . . . . . . . . . 250
driving abroad . . . . . . . . . . . . . . . . . . . . . . . . . 204
driving through water . . . . . . . . . . . . . . . . . . . . 204
economical . . . . . . . . . . . . . . . . . . . . . . . . . . . . 200
fuel gauge . . . . . . . . . . . . . . . . . . . . . . . . . . . . . 266
fuel level too low . . . . . . . . . . . . . . . . . . . . . . . 266
parking downhill . . . . . . . . . . . . . . . . . . . . . . . . 191
parking uphill . . . . . . . . . . . . . . . . . . . . . . . . . . 191
safe . . . . . . . . . . . . . . . . . . . . . . . . . . . . . . . . . . . 57
towing . . . . . . . . . . . . . . . . . . . . . . . . . . . . . . . . . 90
trailer . . . . . . . . . . . . . . . . . . . . . . . . . . . . . . . . . 243
undercarriage guard . . . . . . . . . . . . . . . . . . . . . . 57
with a trailer . . . . . . . . . . . . . . . . . . . . . . . . . . . 237
Driving abroad headlights . . . . . . . . . . . . . . . . . . . . . . . . . . . . . 135
Driving in winter fuel consumption . . . . . . . . . . . . . . . . . . . . . . . 202
snow chains . . . . . . . . . . . . . . . . . . . . . . . . . . . . 50
tread depth . . . . . . . . . . . . . . . . . . . . . . . . . . . . 292
tyre pressures . . . . . . . . . . . . . . . . . . . . . . . . . . 291
windscreen washer reservoir . . . . . . . . . . . . . . 256
310