airbag disable Seat Alhambra 2018 Owner's Manual
[x] Cancel search | Manufacturer: SEAT, Model Year: 2018, Model line: Alhambra, Model: Seat Alhambra 2018Pages: 324, PDF Size: 7.04 MB
Page 36 of 324
The essentials
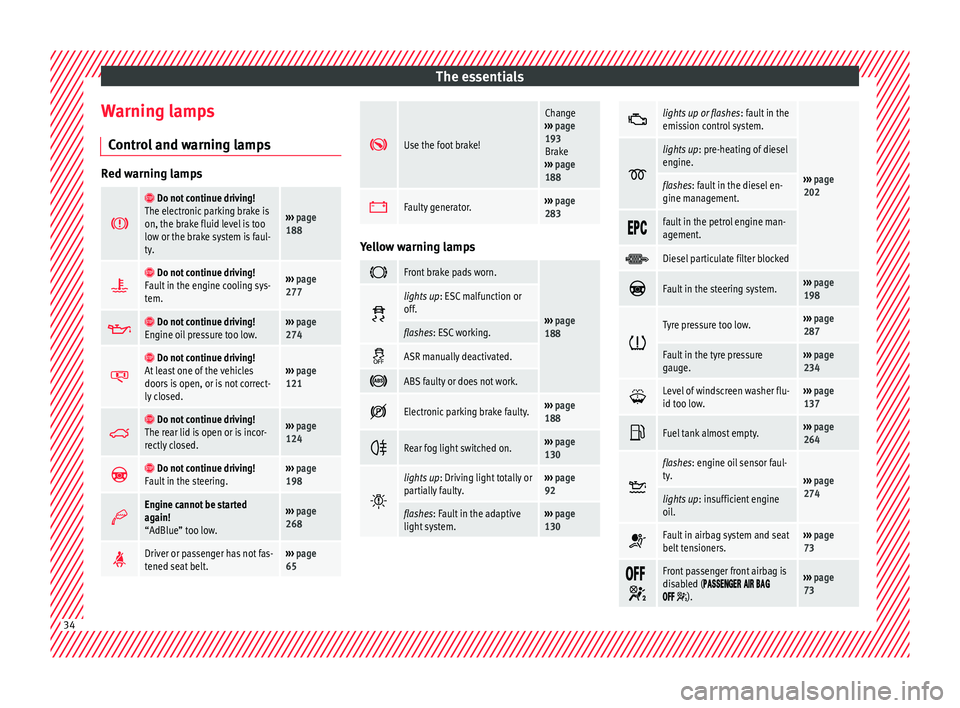
Warning lamps C ontr
o
l and warning lamps Red warning lamps
Do not continue driving!
The electronic parking brake is
on, the brake fluid level is too
low or the brake system is faul-
ty.
››› page
188
Do not continue driving!
Fault in the engine cooling sys-
tem.››› page
277
Do not continue driving!
Engine oil pressure too low.››› page
274
Do not continue driving!
At least one of the vehicles
doors is open, or is not correct-
ly closed.››› page
121
Do not continue driving!
The rear lid is open or is incor-
rectly closed.››› page
124
Do not continue driving!
Fault in the steering.››› page
198
Engine cannot be started
again!
“AdBlue” too low.›››
page
268
Driver or passenger has not fas-
tened seat belt.›››
page
65
Use the foot brake!
Change
››› page
193
Brake
››› page
188
Faulty generator.›››
page
283 Yellow warning lamps
Front brake pads worn.
›››
page
188
lights up
: ESC malfunction or
off.
flashes: ESC working.
ASR manually deactivated.
ABS faulty or does not work.
Electronic parking brake faulty.›››
page
188
Rear fog light switched on.›››
page
130
lights up
: Driving light totally or
partially faulty.››› page
92
flashes: Fault in the adaptive
light system.››› page
130
lights up or flashes
: fault in the
emission control system.
››› page
202
lights up
: pre-heating of diesel
engine.
flashes: fault in the diesel en-
gine management.
fault in the petrol engine man-
agement.
Diesel particulate filter blocked
Fault in the steering system.›››
page
198
Tyre pressure too low.›››
page
287
Fault in the tyre pressure
gauge.››› page
234
Level of windscreen washer flu-
id too low.›››
page
137
Fuel tank almost empty.›››
page
264
flashes: engine oil sensor faul-
ty.
›››
page
274
lights up : insufficient engine
oil.
Fault in airbag system and seat
belt tensioners.›››
page
73
Front passenger front airbag is
disabled (
).
››› page
73 34
Page 75 of 324
Airbag system
●
Gre at
forces must not be exerted on the
seat backrest bolsters because the side air-
bags might not deploy correctly, might not
deploy at all or might deploy unexpectedly.
● Any damage to the original seat upholstery
or around the se
ams of the side airbag units
must be repaired immediately by a special-
ised workshop. Curtain airbags*
Read the additional information carefully
› ›
›
page 21. WARNING
The airbag is deployed at high speed in frac-
tions of
a second.
● Always keep the deployment areas of the
head-pr
otection airbags free.
● Do not fix objects to the cover or in the de-
ployment
area of the curtain airbag.
● Vehicle occupants of the front and outer
rear se
ats must never carry any other people,
pets or objects in the deployment space be-
tween them and the airbags.
● The built-in coat hooks should be used only
for lightweight
clothing. Do not leave any
heavy or sharp-edged objects in the pockets.
● Do not mount accessories on the doors. ●
Do not fit c
urtains to the windows other
than those expressly approved for use in the
vehicle.
● Only turn the sun blinds towards the win-
dows
if there is no object, e.g. pens or garage
remote controls, secured to the sun blind. Deactivating airbags
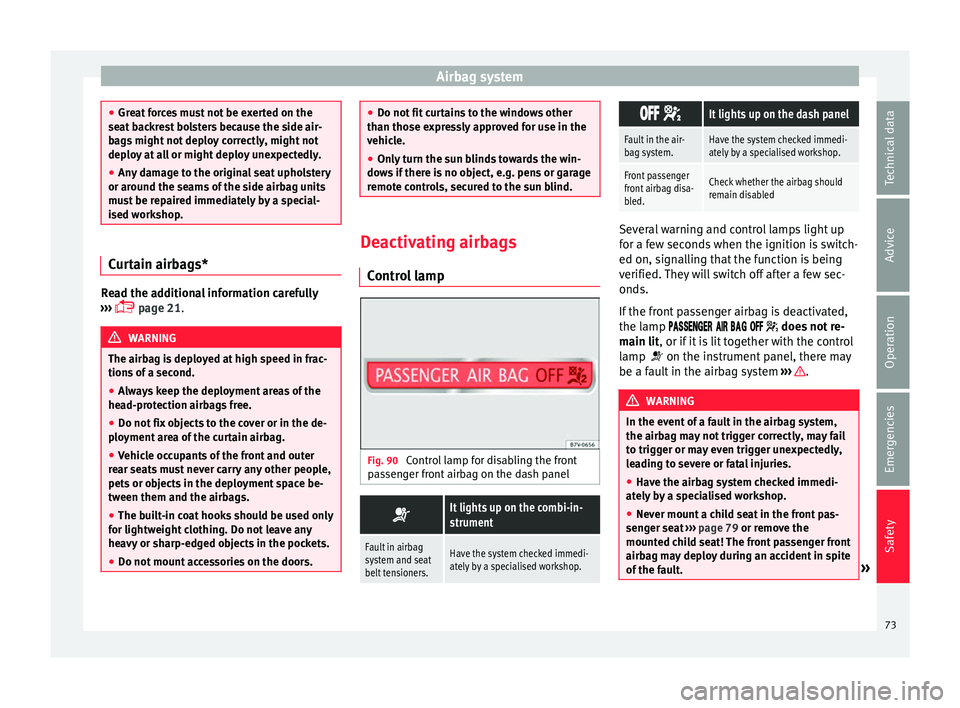
Contr o
l lamp Fig. 90
Control lamp for disabling the front
p a
s
senger front airbag on the dash panel
It lights up on the combi-in-
strument
Fault in airbag
system and seat
belt tensioners.Have the system checked immedi-
ately by a specialised workshop.
It lights up on the dash panel
Fault in the air-
bag system.Have the system checked immedi-
ately by a specialised workshop.
Front passenger
front airbag disa-
bled.Check whether the airbag should
remain disabled
Several warning and control lamps light up
for a f
ew sec
onds when the ignition is switch-
ed on, signalling that the function is being
verified. They will switch off after a few sec-
onds.
If the front passenger airbag is deactivated,
the lamp does not re-
main lit, or if it is lit together with the control
lamp on the instrument panel, there may
be a fault in the airbag system ››› .
WARNING
In the event of a fault in the airbag system,
the airbag m a
y not trigger correctly, may fail
to trigger or may even trigger unexpectedly,
leading to severe or fatal injuries.
● Have the airbag system checked immedi-
ately b
y a specialised workshop.
● Never mount a child seat in the front pas-
senger se
at ››› page 79 or remove the
mounted child seat! The front passenger front
airbag may deploy during an accident in spite
of the fault. » 73
Technical data
Advice
Operation
Emergencies
Safety
Page 76 of 324
Safety
CAUTION
Always pay attention to any lit control lamps
and to the c orr
esponding descriptions and in-
structions to avoid damage to the vehicle. Manual disabling and enabling of the
front
p
assenger front airbag with the
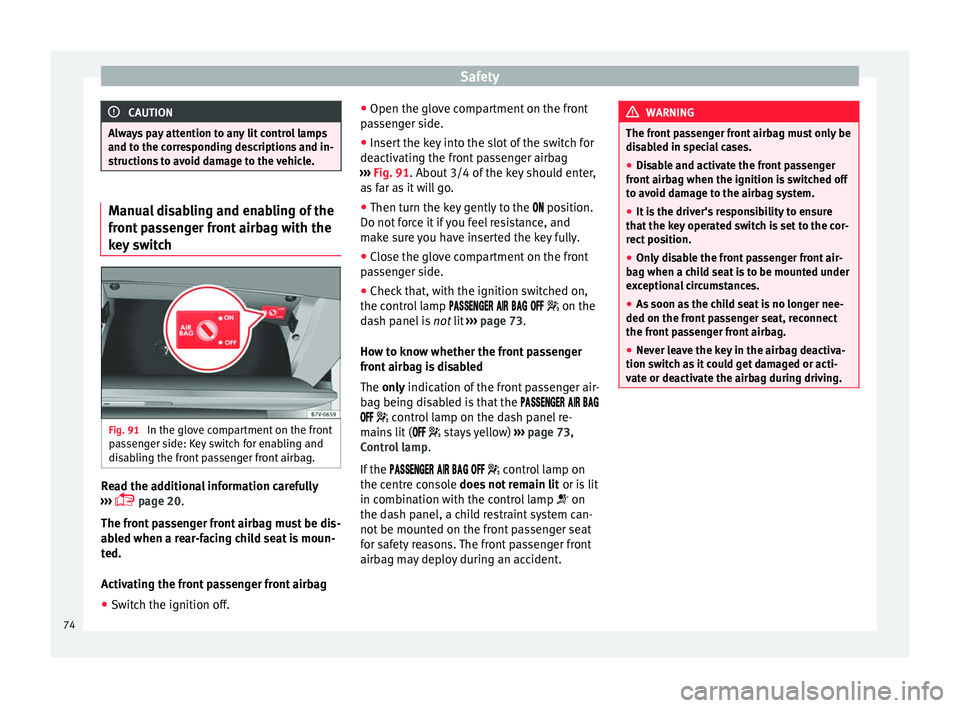
key switch Fig. 91
In the glove compartment on the front
p a
s
senger side: Key switch for enabling and
disabling the front passenger front airbag. Read the additional information carefully
› ›
›
page 20.
The front passenger front airbag must be dis-
abled when a rear-facing child seat is moun-
ted.
Activating the front passenger front airbag
● Switch the ignition off. ●
Open the glove c
ompartment on the front
passenger side.
● Insert the key into the slot of the switch for
deactivatin
g the front passenger airbag
››› Fig. 91. About 3/4 of the key should enter,
as far as it will go.
● Then turn the key gently to the position.
Do not
force it if you feel resistance, and
make sure you have inserted the key fully.
● Close the glove compartment on the front
pas
senger side.
● Check that, with the ignition switched on,
the contro
l lamp on the
dash panel is not lit ››› page 73.
How to know whether the front passenger
front airbag is disabled
The only indication of the front passenger air-
bag being disabled is that the
control lamp on the dash panel re-
mains lit ( stays yellow) ››› page 73,
Control lamp .
If the control lamp on
the centre console does not remain lit or is lit
in combination with the control lamp on
the dash panel, a child restraint system can-
not be mounted on the front passenger seat
for safety reasons. The front passenger front
airbag may deploy during an accident. WARNING
The front passenger front airbag must only be
dis ab
led in special cases.
● Disable and activate the front passenger
front airb
ag when the ignition is switched off
to avoid damage to the airbag system.
● It is the driver's responsibility to ensure
that the k
ey operated switch is set to the cor-
rect position.
● Only disable the front passenger front air-
bag when a chi
ld seat is to be mounted under
exceptional circumstances.
● As soon as the child seat is no longer nee-
ded on the front p
assenger seat, reconnect
the front passenger front airbag.
● Never leave the key in the airbag deactiva-
tion switc
h as it could get damaged or acti-
vate or deactivate the airbag during driving. 74
Page 77 of 324
Transporting children safely
Transporting children safely Saf ety
f
or children
Introduction Read the additional information carefully
›› ›
page 22.
Please read the information regarding the air-
bag system fully before transporting babies
and children in a child seat or other child re-
straint system installed on the front passen-
ger seat.
This information is extremely important for
driver and passenger safety, particularly that
of babies and children.
SEAT recommends the use of child seats from
the SEAT accessory programme. These child
seats have been designed and tested for use
in SEAT vehicles. You can purchase child
seats with different mountings from a techni-
cal service centre.
Using child restraint systems with a base or
foot
Some child retention systems are secured to
the seat using a base or support leg. For cer-
tain kinds of equipment the use of an addi-
tional accessory will be necessary (e.g. an ac-
cessory for the footwell) to fit the child reten-
tion system correctly and securely. WARNING
Make sure children are properly belted in and
corr ectly
secured to avoid severe or fatal inju-
ries while the vehicle is in motion.
● If a child seat is secured to the front pas-
senger se
at, the risk to the child of sustain-
ing critical or fatal injuries in the event of an
accident increases.
● An inflating front passenger airbag can
strike the r
ear-facing child seat and project it
with great force against the door, the roof or
the backrest.
● Never install a child seat facing backwards
on the front p
assenger seat unless the front
passenger front airbag has been disabled.
Risk of potentially fatal injuries to the child!
However, if it is necessary, in exceptional ca-
ses, to transport a child in the front passen-
ger seat, the front passenger front airbag
must always be disabled ››› page 73. If the
passenger seat has a height adjustment op-
tion, move it to the highest, most upright po-
sition. If you have a fixed seat, do not install
any child restraint system in this location.
● For those vehicles that do not include a key
lock sw
itch to deactivate the airbag, the vehi-
cle must be taken to a technical service.
● Children up to 12 years old should always
travel
on the rear seat.
● Children must always be protected with an
appro
ved child restraint system suited to
their height and weight. ●
Chil dr
en must assume the proper sitting
position and be properly belted in while trav-
elling.
● Ensure the seat backrest is upright when a
chil
d seat is being used on it.
● Do not allow the child's head or other part
of his
or her body to fall into the deployment
area of the side airbags.
● Make sure the belt webbing is correctly
positioned.
● Nev
er hold children or babies on your lap or
in your arms.
● On
ly one child may occupy a child seat.
● If you are using a child seat with a base or
foot, alw
ays install this base or foot correctly
and safely.
● If the vehicle has a storage compartment in
the footwel
l in front of the last row of seats,
this compartment cannot be used as de-
signed; on the contrary: It must be filled us-
ing the specially designed accessory so that
the base or foot is correctly supported by the
closed compartment and the child seat is se-
cured properly. If this compartment is not
suitably secured when using a child seat with
a base or foot then the compartment cover
could rupture in an accident and the child will
be ejected and suffer serious injury.
● Please read and observe the child seat
manufact
urer's handling instructions. » 75
Technical data
Advice
Operation
Emergencies
Safety
Page 80 of 324
Safety
Only use a rear-facing child seat on the front
p a
s
senger seat if the front passenger front
airbag is disabled. When it is disabled, the
yellow control lamp on the dash panel
will be lit up ››› page 73.
If you cannot disable the front passenger
front airbag and it remains activated, it is
forbidden to transport children on the front
passenger seat ››› .
Thin g
s
to note if using a child seat on the
front passenger seat:
● The front passenger front airbag must
be
disabled when using a rear-facing child
seat ››› page 74.
● The seat backrest of the front passenger
seat mu
st be upright.
● The front passenger seat must be moved as
far bac
k as possible.
● A height-adjustable front passenger seat
must
be raised to its highest point.
● The seat belt height adjustment must be as
high as po
ssible.
Suitable child seats
The child seat must be authorised by the
manufacturer especially for use on a front
passenger seat with a front or side airbag.
If the front passenger seat is equipped with
retaining rings, the child seat can be secured
using an approved retaining system provided
it is approved for this type of vehicle in ac- cordance with current regulations of the
countr
y in question.
Universal seats for children of groups 0, 0+,
1, 2 or 3 according to the standard ECE-R 44
can be mounted on the front passenger seat
and the rear seats. WARNING
If a child seat is mounted on the front passen-
ger se at, the ri
sk of the child sustaining se-
vere or fatal injuries in the event of an acci-
dent increases. Rear-facing child seats must
never be mounted on the front passenger
seat when the front passenger front airbag is
enabled. This is life-threatening to the child
should the front airbag deploy, as the child
seat would be struck by the inflated airbag
and thrown against the seat backrest. WARNING
If, in exceptional circumstances, a child must
be tran s
ported in a rear-facing child seat on
the front passenger seat, strictly observe the
following:
● Always disable the front passenger front
airbag and le
ave it disabled.
● The child seat must be approved by the
manufact
urer for use on a front passenger
seat with front and side airbag.
● Follow the installation instructions of the
chil
d seat manufacturer and observe the
warnings. ●
Mov e the fr
ont passenger seat as far back
as possible and adjust it to its highest posi-
tion to keep as far away as possible from the
front airbag.
● Move the seat backrest to the upright posi-
tion.
● The seat belt height adjustment must be as
high as po
ssible.
● Children must always be protected with an
appro
ved child restraint system suited to
their height and weight. Use of the child seat on the rear seat
If a child seat is mounted on the rear seat,
a
d
apt
the position of the front passenger
seat so that the child has enough space.
Therefore, adapt the front passenger seat to
the size of the child seat and the height of
the child. Ensure the passenger is in the cor-
rect position ››› page 58.
Move the second and third rows of seats fully
back and lock them. Place the seat backs in a
vertical position and fold the head restraints
down.
ISOFIX child seats approved for rear seats
The rear seats are suitable for child seats
with the ISOFIX system specially designed
for this type of vehicle in accordance with
regulation ECE-R 44.
78
Page 81 of 324
Transporting children safely
ISOFIX child seats are divided into “specific
c at
e
gories for the vehicle”, “limited” or
“semi-universal”.
Child seat manufacturers supply a list of ve-
hicles with each ISOFIX seat, which includes
the models for which the ISOFIX child seat in
question is approved. If the vehicle is inclu-
ded in the manufacturer's list and the ISOFIX
child seat belongs to a seat category inclu-
ded in the list, then it can be used in your ve-
hicle. If necessary, contact the child seat
manufacturer for an updated list of vehicles.
Group
(weight
category)ISOFIX child
seat categorySeat position in the rear seats
Group 0:to 10 kgEIUF a)
Group 0+:
to 13 kgEIUF a)
DIUFa)
CIUFa)
Group 1:
9 to 18 kg
DIUF a)
CIUFa)
BIUFa)
B1IUFa)
AIUFa)
a)
IUF: suitable for “universal” ISOFIX child seats authorised for
use in this group. WARNING
If child seats are fitted to all the seats in the
second r o
w then it is possible that the seats
of this row cannot be folded down from the
third row of seats in case of an accident. In
the event of an emergency, passengers in the
third row of seats will not be able to leave the
vehicle or to help themselves.
● Child seats should never occupy all the
seats
of the second row if other passengers
are to occupy the third row of seats. Integrated child seat
Intr oduction The integrated child seat is only suitable for
c
hi
l
dren in Group 2 (15-25 kg) and Group 3
(22-36 kg), according to the ECE-R44 regula-
tion. WARNING
Child travelling without their seat belt fas-
tened or not sec
ured using a suitable re-
straint system may sustain fatal injuries if
the airbag is deployed.
● Children up to 12 years old should always
travel
on the rear seat.
● Always disable the front passenger front
airbag if, in e
xceptional cases, you have no
alternative but to transport a child in a rear- facing child safety seat on the front passen-
ger se
at
.
● Children must always be protected with a
chil
d restraint system suited to their height
and weight.
● Always fasten children's seat belts correct-
ly. WARNING
Children must travel in a child seat appropri-
at e t o their w
eight and height while the vehi-
cle is in motion.
● Children must always be protected with a
chil
d restraint system suited to their height
and weight.
● Children must assume the proper sitting
position and be pr
operly belted in while trav-
elling.
● The shoulder part of the seat belt must lie
appro
ximately on the centre of the shoulder,
never across the neck or the arm.
● The seat belt must lie close to the upper
part
of the body.
● The lap belt part must lie across the pelvis,
not acr
oss the stomach, and always fit close-
ly.
● Allow the belt to retract until it fits tightly
over the c
hild's seat.
● Never hold children or babies on your lap. » 79
Technical data
Advice
Operation
Emergencies
Safety
Page 117 of 324
Opening and closing
Description of the central locking sys-
t em The central locking system allows all doors
and the re
ar lid t
o be locked and unlocked
centrally.
● From outside, using the vehicle key.
● From outside with the Keyless Access sys-
tem ››
› page 117,
● From inside, by pushing the central locking
button ›
›› page 116.
In the submenu Convenience in the Con-
figuration menu, or by visiting a special-
ised workshop, special functions of the cen-
tral locking system can be switched on or off
››› page 27.
In case of a vehicle key fault or central lock-
ing system fault, all doors can be locked or
unlocked manually.
Automatic locking (Auto Lock)
In this instance, the vehicle locks automati-
cally when moving at speeds above approx.
15 km/h (10 mph) ›››
page 27. When the
vehicle is locked, the control lamp on the
central locking button lights up in yellow
››› Fig. 129. Automatic unlocking (Auto Unlock)
When the key
i
s removed from the ignition
slot, here the vehicle unlocks all doors and
the boot automatically ›››
page 27.
Locking the vehicle after the airbags have
been deployed
If the airbags are deployed due to an acci-
dent, the vehicle will be automatically and
completely unlocked. Depending on the
amount of damage, it can be locked follow-
ing an accident in the following ways:
FunctionAction
Lock the vehicle
by pushing the
central locking
button:– Switch off the ignition.
– Open a door of the vehicle and
close it again.
– Push the central locking button
.
Lock the vehicle
with the vehicle
key:– Disconnect the ignition button.
OR: remove the key from the igni-
tion.
– Open a door once.
– Lock the vehicle with the key. Note
If the vehicle key buttons are pressed
›› ›
Fig. 128 or one of the central locking but-
tons is pressed ››› Fig. 129 several times in
quick succession, the central locking feature
is disabled briefly to protect from overload-
ing. The vehicle will then remain unlocked for
around 30 seconds. If no door nor the boot is opened during this time, the vehicle will then
autom
atic
ally unlock. Unlocking and locking the vehicle
from out
s
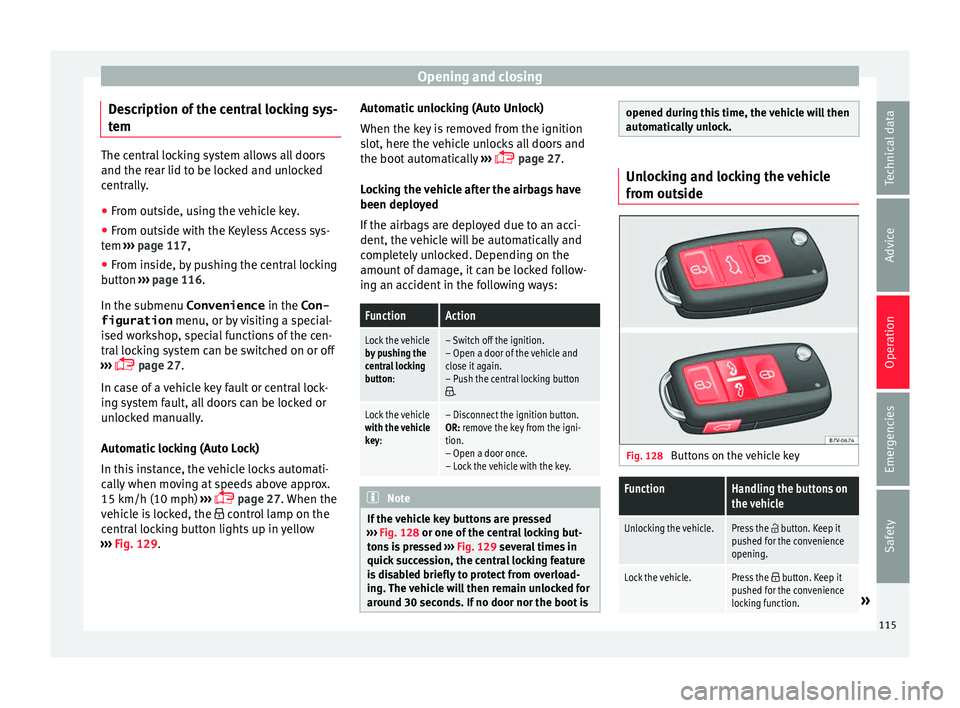
ide Fig. 128
Buttons on the vehicle key
FunctionHandling the buttons on
the vehicle
Unlocking the vehicle.Press the button. Keep it
pushed for the convenience
opening.
Lock the vehicle.Press the button. Keep it
pushed for the convenience
locking function.
» 115
Technical data
Advice
Operation
Emergencies
Safety
Page 145 of 324
Seats and head restraints
Seats and head restraints
Adju s
tin
g the seats and headr-
ests
Manual adjustment of the seats Read the additional information carefully
›› ›
page 15 WARNING
The safe driving chapter contains important
inform ation, tip
s, suggestions and warnings
that you should read and observe for your
own safety and the safety of your passengers
››› page 57. WARNING
● Adjus t
the front seats only when the vehi-
cle is stationary. Failure to follow this instruc-
tion could result in an accident.
● Be careful when adjusting the seat height.
Carel
ess or uncontrolled adjustment can
cause injuries.
● The front seat backrests must not be re-
clined for driv
ing. Otherwise, seat belts and
the airbag system might not protect as they
should in the case of an accident, increasing
risk of injury. Electric driver's seat adjustment*
Read the additional information carefully
›› ›
page 16 WARNING
Using the front electric seats in a careless or
unc ontr
olled manner may lead to severe inju-
ries.
● The front seats can also be electrically ad-
just
ed when the ignition is switched off. Nev-
er leave children or disabled people alone in
the vehicle.
● In the event of an emergency, stop electri-
cal
adjustment by pressing any button. CAUTION
So as not the damage the electrical compo-
nents of
the front seats, do not kneel on the
seats or apply specific pressure to one point
of the seat or seat backrest. Note
● It m a
y not be possible to electrically adjust
the seat if the vehicle battery is very low.
● Seat adjustment is stopped when the en-
gine is s
tarted. Adjusting the rear seats
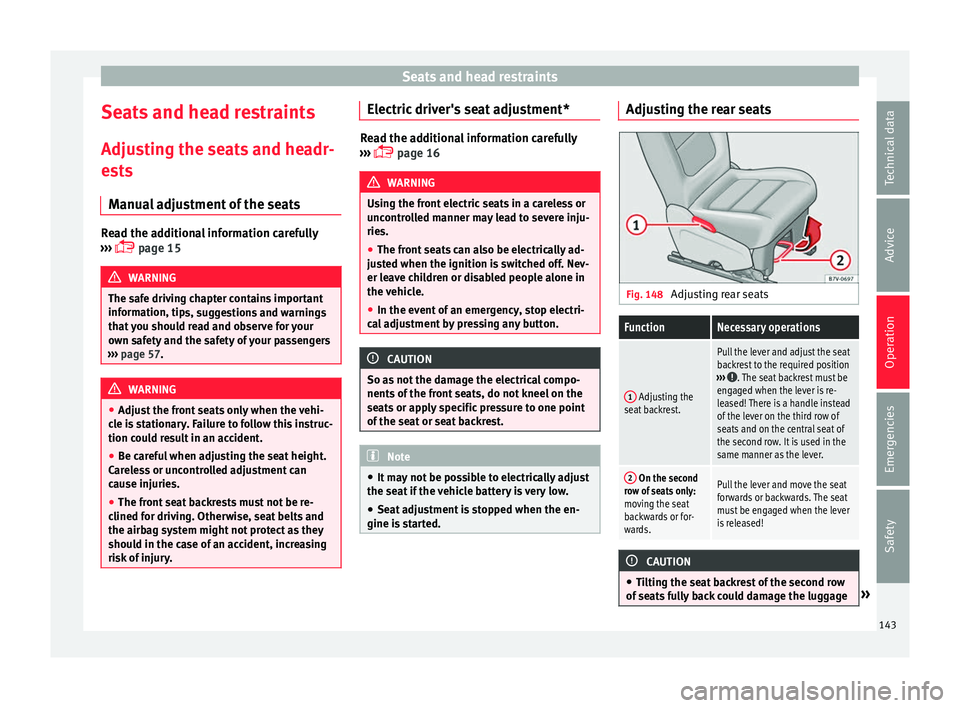
Fig. 148
Adjusting rear seats
FunctionNecessary operations
1 Adjusting the
seat backrest.
Pull the lever and adjust the seat
backrest to the required position
›››
. The seat backrest must be
engaged when the lever is re-
leased! There is a handle instead
of the lever on the third row of
seats and on the central seat of
the second row. It is used in the
same manner as the lever.
2 On the second
row of seats only:
moving the seat
backwards or for-
wards.Pull the lever and move the seat
forwards or backwards. The seat
must be engaged when the lever
is released! CAUTION
● Tiltin g the se
at backrest of the second row
of seats fully back could damage the luggage » 143
Technical data
Advice
Operation
Emergencies
Safety
Page 189 of 324
Driving
●
When the engine i s
started cold, there may
be strong vibrations for a few moments for
technical reasons. This is quite normal, and
no cause for concern.
● At temperatures below +5°C (+41°F),
smoke ma
y be given off below the vehicle
when the additional heater is turned on. Stopping the engine
Complete operations only in the sequence
given:
Vehicles without
Keyless AccessVehicles with
Keyless Access
1.Bring the vehicle to a full stop ››› .
2.Press and hold the brake pedal until the step 4 is
performed.
3.If the vehicle has an automatic gearbox, place theselector lever in position P.
4.Connect the electronic parking brake ››› page 188.
5.Turn the vehicle key in
the ignition lock to po-
sition ››› Fig. 197 1
.
Briefly press the start-
up button
››› Fig. 198. If
the engine fails to
switch off, perform an
emergency disconnect
››› page 185.
6.If the vehicle is equipped with a manual gearbox,
put it into 1st or reverse. WARNING
Never switch off the engine while the vehicle
is mo
ving. You may lose control of the vehicle
and there is a risk of serious accident.
● The airbags and belt tensioners do not
work when the ignition i
s switched off.
● The brake servo does not work with the en-
gine off. T
o stop, the brake pedal must be
pressed with more force.
● As the power steering does not work if the
engine is
not running, you will need more
strength to steer than normally.
● If the key is removed from the ignition, the
steerin
g may lock and it will not be possible
to steer the vehicle. CAUTION
● If the v
ehicle is stopped and the Start-Stop
system* switches off the engine, the ignition
remains switched on. Make sure that the igni-
tion is switched off before leaving the vehi-
cle, otherwise the battery could discharge.
● If the engine has been driven at high speed
for a pro
longed period of time, it may over-
heat when turned off. To avoid engine dam-
age, allow the engine to run for approximate-
ly two minutes in neutral before switching it
off. Note
● In v ehic
les with automatic gearbox, the key
can only be removed when the selector lever
is in position P.
● After stopping the engine, the engine com-
partment
fan may continue running for a few
minutes, even when the ignition has been
switched off or the key removed. The radiator
fan is automatically switched off. Electronic immobiliser
The gear lock prevents the engine from being
s
t
ar
ted with an unauthorised key and the ve-
hicle being moved.
The vehicle key has a chip that automatically
disables the immobilizer when the key is
placed in the ignition lock.
The electronic immobiliser will be activated
again automatically as soon as you pull the
key out of the ignition lock. For vehicles with
the Keyless Access system, the key has to be
outside the vehicle ›››
page 117.
For this reason, the vehicle can only be used
with a genuine SEAT key with the correct
code. Coded keys can be purchased from
your technical service centre ›››
page 112.
If an unauthorised key is used, the message SAFE or Immobiliser active is displayed
on the instrument panel. The vehicle cannot
be started in this case »
187
Technical data
Advice
Operation
Emergencies
Safety