roof Seat Alhambra 2018 Owner's Manual
[x] Cancel search | Manufacturer: SEAT, Model Year: 2018, Model line: Alhambra, Model: Seat Alhambra 2018Pages: 324, PDF Size: 7.04 MB
Page 7 of 324
Table of Contents
Table of Contents
The e s
senti
als . . . . . . . . . . . . . . . . . . . . . . . . 7
Exterior view . . . . . . . . . . . . . . . . . . . . . . . . . . . . 7
Exterior view . . . . . . . . . . . . . . . . . . . . . . . . . . . . 8
Interior view (left-hand drive) . . . . . . . . . . . . . . 9
How it works . . . . . . . . . . . . . . . . . . . . . . . . . . . . 10
Unlocking and locking . . . . . . . . . . . . . . . . . . . . 10
Before driving . . . . . . . . . . . . . . . . . . . . . . . . . . . 15
Airbags . . . . . . . . . . . . . . . . . . . . . . . . . . . . . . . . 19
Child seats . . . . . . . . . . . . . . . . . . . . . . . . . . . . . 22
Starting the vehicle . . . . . . . . . . . . . . . . . . . . . . 25
Lights and visibility . . . . . . . . . . . . . . . . . . . . . . 25
SEAT information system . . . . . . . . . . . . . . . . . . 27
Cruise control . . . . . . . . . . . . . . . . . . . . . . . . . . . 33
Warning lamps . . . . . . . . . . . . . . . . . . . . . . . . . . 34
Gearbox lever . . . . . . . . . . . . . . . . . . . . . . . . . . . 35
Air conditioning . . . . . . . . . . . . . . . . . . . . . . . . . 37
Fluid Level control . . . . . . . . . . . . . . . . . . . . . . . 40
Emergencies . . . . . . . . . . . . . . . . . . . . . . . . . . . . 43
Fuses . . . . . . . . . . . . . . . . . . . . . . . . . . . . . . . . . . 43
Bulbs . . . . . . . . . . . . . . . . . . . . . . . . . . . . . . . . . . 44
Action in the event of a puncture . . . . . . . . . . . 45
Changing a wheel . . . . . . . . . . . . . . . . . . . . . . . 46
Snow chains . . . . . . . . . . . . . . . . . . . . . . . . . . . . 50
Emergency towing of the vehicle . . . . . . . . . . . 51
How to jump start . . . . . . . . . . . . . . . . . . . . . . . . 52
Changing windscreen wipers . . . . . . . . . . . . . . 55
Safety . . . . . . . . . . . . . . . . . . . . . . . . . . . . . . . . 57
Safe driving . . . . . . . . . . . . . . . . . . . . . . . . . . . . 57
Safety first! . . . . . . . . . . . . . . . . . . . . . . . . . . . . . 57
Advice about driving . . . . . . . . . . . . . . . . . . . . . 57
Correct position of the vehicle occupants . . . . 58
Pedal area . . . . . . . . . . . . . . . . . . . . . . . . . . . . . . 61 Seat belts
. . . . . . . . . . . . . . . . . . . . . . . . . . . . . . 62
Why wear a seat belt . . . . . . . . . . . . . . . . . . . . . 62
How to properly adjust your seatbelt . . . . . . . . 65
Seat belt tensioners . . . . . . . . . . . . . . . . . . . . . . 68
Airbag system . . . . . . . . . . . . . . . . . . . . . . . . . . 69
Brief introduction . . . . . . . . . . . . . . . . . . . . . . . . 69
Airbag safety instructions . . . . . . . . . . . . . . . . . 72
Deactivating airbags . . . . . . . . . . . . . . . . . . . . . 73
Transporting children safely . . . . . . . . . . . . . . . 75
Safety for children . . . . . . . . . . . . . . . . . . . . . . . 75
Child seats . . . . . . . . . . . . . . . . . . . . . . . . . . . . . 76
Integrated child seat . . . . . . . . . . . . . . . . . . . . . 79
Emergencies . . . . . . . . . . . . . . . . . . . . . . . . . . 83
Self-help . . . . . . . . . . . . . . . . . . . . . . . . . . . . . . . 83
In case of emergency . . . . . . . . . . . . . . . . . . . . . 83
Vehicle tool kit* . . . . . . . . . . . . . . . . . . . . . . . . . 83
Changing a wheel* . . . . . . . . . . . . . . . . . . . . . . . 85
Tyre repair . . . . . . . . . . . . . . . . . . . . . . . . . . . . . . 86
Changing the windscreen wiper blades . . . . . . 88
Tow-starting and towing . . . . . . . . . . . . . . . . . . 88
Emergency locking and unlocking . . . . . . . . . . 90
Fuses and bulbs . . . . . . . . . . . . . . . . . . . . . . . . . 91
Fuses . . . . . . . . . . . . . . . . . . . . . . . . . . . . . . . . . . 91
Changing bulbs . . . . . . . . . . . . . . . . . . . . . . . . . 92
Operation . . . . . . . . . . . . . . . . . . . . . . . . . . . . . 101
General instrument panel . . . . . . . . . . . . . . . . . 101
Instrument panel . . . . . . . . . . . . . . . . . . . . . . . . 100
Instruments . . . . . . . . . . . . . . . . . . . . . . . . . . . . 102
Control lamps . . . . . . . . . . . . . . . . . . . . . . . . . . . 107
Communications and multimedia . . . . . . . . . . . 108
Steering wheel controls* . . . . . . . . . . . . . . . . . . 108
Multimedia . . . . . . . . . . . . . . . . . . . . . . . . . . . . . 110
Three button unit in headliner . . . . . . . . . . . . . . 110
Opening and closing . . . . . . . . . . . . . . . . . . . . . 112
Vehicle key set . . . . . . . . . . . . . . . . . . . . . . . . . . 112
Central locking and locking system . . . . . . . . . 114 Doors . . . . . . . . . . . . . . . . . . . . . . . . . . . . . . . . . . 121
Sliding doors . . . . . . . . . . . . . . . . . . . . . . . . . . . 122
Rear lid . . . . . . . . . . . . . . . . . . . . . . . . . . . . . . . . 124
Controls for the windows . . . . . . . . . . . . . . . . . . 127
Panoramic sliding sunroof* . . . . . . . . . . . . . . . . 129
Lights and visibility
. . . . . . . . . . . . . . . . . . . . . . 130
Lights . . . . . . . . . . . . . . . . . . . . . . . . . . . . . . . . . 130
Visibility . . . . . . . . . . . . . . . . . . . . . . . . . . . . . . . 136
Windscreen wiper and window wiper sys-
tems . . . . . . . . . . . . . . . . . . . . . . . . . . . . . . . . . . 137
R
ear vision mirror . . . . . . . . . . . . . . . . . . . . . . . . 140
Seats and head restraints . . . . . . . . . . . . . . . . . 143
Adjusting the seats and headrests . . . . . . . . . . 143
Seat functions . . . . . . . . . . . . . . . . . . . . . . . . . . 147
Transport and practical equipment . . . . . . . . . 152
Transporting objects . . . . . . . . . . . . . . . . . . . . . 152
Luggage compartment . . . . . . . . . . . . . . . . . . . . 154
Roof carrier* . . . . . . . . . . . . . . . . . . . . . . . . . . . . 164
Storage compartments . . . . . . . . . . . . . . . . . . . 166
Drink holders . . . . . . . . . . . . . . . . . . . . . . . . . . . 171
Ashtray and cigarette lighter* . . . . . . . . . . . . . . 172
Power sockets . . . . . . . . . . . . . . . . . . . . . . . . . . . 173
Air conditioning . . . . . . . . . . . . . . . . . . . . . . . . . 176
Air conditioning . . . . . . . . . . . . . . . . . . . . . . . . . 176
Auxiliary heater* (additional heater) . . . . . . . . 180
Driving . . . . . . . . . . . . . . . . . . . . . . . . . . . . . . . . 183
Stopping and starting the engine . . . . . . . . . . . 183
Braking and parking . . . . . . . . . . . . . . . . . . . . . 188
Gearbox . . . . . . . . . . . . . . . . . . . . . . . . . . . . . . . . 193
Address . . . . . . . . . . . . . . . . . . . . . . . . . . . . . . . . 198
Run-in and economical driving . . . . . . . . . . . . . 199
Engine management and exhaust gas purifica-
tion syst
em . . . . . . . . . . . . . . . . . . . . . . . . . . . . . 202
Driving tips . . . . . . . . . . . . . . . . . . . . . . . . . . . . . 204
Driver assistance systems . . . . . . . . . . . . . . . . . 205
Braking and stability systems . . . . . . . . . . . . . . 205
Start assist systems . . . . . . . . . . . . . . . . . . . . . . 208
Parking distance warning system* . . . . . . . . . . 211 5
Page 16 of 324
The essentials
Press the button for the electronic
child safety lock to deactivate the con-
trols for the electric windows on the
sliding doors and to lock these doors
››› page 122. The indicator on the but-
ton will light up.
››› in Controls for the windows: func-
tions on page 128
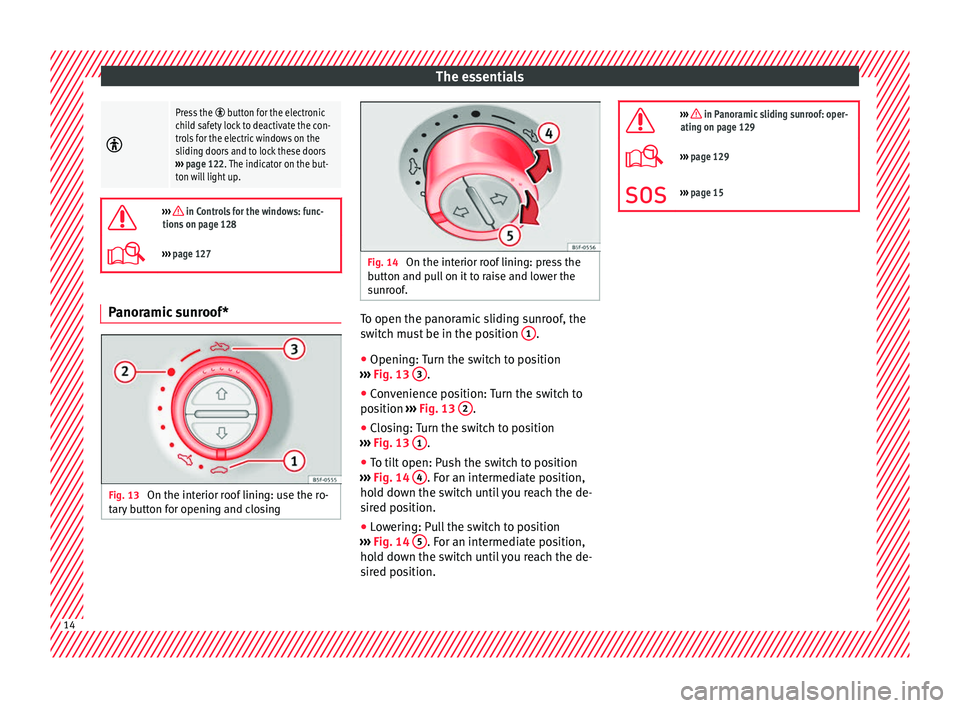
››› page 127 Panoramic sunroof*
Fig. 13
On the interior roof lining: use the ro-
t ar
y
button for opening and closing Fig. 14
On the interior roof lining: press the
b utt
on and p
ull on it to raise and lower the
sunroof. To open the panoramic sliding sunroof, the
sw
it
c
h must be in the position 1 .
● Opening: Turn the switch to position
› ›
›
Fig. 13 3 .
● Convenience position: Turn the switch to
po s
ition ›
›› Fig. 13 2 .
● Closing: Turn the switch to position
› ›
›
Fig. 13 1 .
● To tilt open: Push the switch to position
› ›
›
Fig. 14 4 . For an intermediate position,
ho l
d do
wn the switch until you reach the de-
sired position.
● Lowering: Pull the switch to position
›››
Fig. 14 5 . For an intermediate position,
ho l
d do
wn the switch until you reach the de-
sired position.
››› in Panoramic sliding sunroof: oper-
ating on page 129
››› page 129
››› page 15 14
Page 17 of 324
The essentials
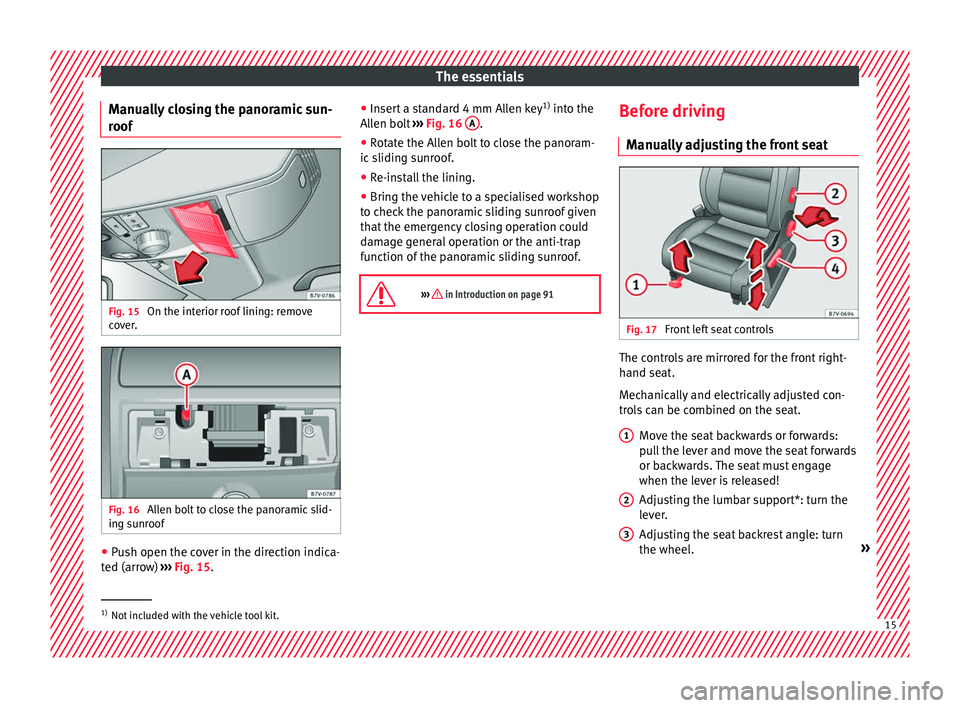
Manually closing the panoramic sun-
r oof Fig. 15
On the interior roof lining: remove
c o
v
er. Fig. 16
Allen bolt to close the panoramic slid-
in g s
u
nroof ●
Push open the cover in the direction indica-
t ed (arr
o
w) ››› Fig. 15. ●
Insert
a standard 4 mm Allen key 1)
into the
Allen bolt ››› Fig. 16 A .
● Rotate the Allen bolt to close the panoram-
ic s
lidin
g sunroof.
● Re-install the lining.
● Bring the vehicle to a specialised workshop
to chec
k the panoramic sliding sunroof given
that the emergency closing operation could
damage general operation or the anti-trap
function of the panoramic sliding sunroof.
››› in Introduction on page 91 Before driving
M anua
l
ly adjusting the front seat Fig. 17
Front left seat controls The controls are mirrored for the front right-
h
and se
at
.
Mechanically and electrically adjusted con-
trols can be combined on the seat.
Move the seat backwards or forwards:
pull the lever and move the seat forwards
or backwards. The seat must engage
when the lever is released!
Adjusting the lumbar support*: turn the
lever.
Adjusting the seat backrest angle: turn
the wheel. »
1 2
3
1)
Not included with the vehicle tool kit. 15
Page 77 of 324
Transporting children safely
Transporting children safely Saf ety
f
or children
Introduction Read the additional information carefully
›› ›
page 22.
Please read the information regarding the air-
bag system fully before transporting babies
and children in a child seat or other child re-
straint system installed on the front passen-
ger seat.
This information is extremely important for
driver and passenger safety, particularly that
of babies and children.
SEAT recommends the use of child seats from
the SEAT accessory programme. These child
seats have been designed and tested for use
in SEAT vehicles. You can purchase child
seats with different mountings from a techni-
cal service centre.
Using child restraint systems with a base or
foot
Some child retention systems are secured to
the seat using a base or support leg. For cer-
tain kinds of equipment the use of an addi-
tional accessory will be necessary (e.g. an ac-
cessory for the footwell) to fit the child reten-
tion system correctly and securely. WARNING
Make sure children are properly belted in and
corr ectly
secured to avoid severe or fatal inju-
ries while the vehicle is in motion.
● If a child seat is secured to the front pas-
senger se
at, the risk to the child of sustain-
ing critical or fatal injuries in the event of an
accident increases.
● An inflating front passenger airbag can
strike the r
ear-facing child seat and project it
with great force against the door, the roof or
the backrest.
● Never install a child seat facing backwards
on the front p
assenger seat unless the front
passenger front airbag has been disabled.
Risk of potentially fatal injuries to the child!
However, if it is necessary, in exceptional ca-
ses, to transport a child in the front passen-
ger seat, the front passenger front airbag
must always be disabled ››› page 73. If the
passenger seat has a height adjustment op-
tion, move it to the highest, most upright po-
sition. If you have a fixed seat, do not install
any child restraint system in this location.
● For those vehicles that do not include a key
lock sw
itch to deactivate the airbag, the vehi-
cle must be taken to a technical service.
● Children up to 12 years old should always
travel
on the rear seat.
● Children must always be protected with an
appro
ved child restraint system suited to
their height and weight. ●
Chil dr
en must assume the proper sitting
position and be properly belted in while trav-
elling.
● Ensure the seat backrest is upright when a
chil
d seat is being used on it.
● Do not allow the child's head or other part
of his
or her body to fall into the deployment
area of the side airbags.
● Make sure the belt webbing is correctly
positioned.
● Nev
er hold children or babies on your lap or
in your arms.
● On
ly one child may occupy a child seat.
● If you are using a child seat with a base or
foot, alw
ays install this base or foot correctly
and safely.
● If the vehicle has a storage compartment in
the footwel
l in front of the last row of seats,
this compartment cannot be used as de-
signed; on the contrary: It must be filled us-
ing the specially designed accessory so that
the base or foot is correctly supported by the
closed compartment and the child seat is se-
cured properly. If this compartment is not
suitably secured when using a child seat with
a base or foot then the compartment cover
could rupture in an accident and the child will
be ejected and suffer serious injury.
● Please read and observe the child seat
manufact
urer's handling instructions. » 75
Technical data
Advice
Operation
Emergencies
Safety
Page 92 of 324
Emergencies
Note the instructions for towing
› ›
›
page 51.
Fitting the towline anchorage to the rear for
vehicles without factory fitted tow hitch
● Take the towline anchorage from the vehi-
cle t
ool kit in the luggage compartment
››› page 83.
● Press on the upper cover and carefully re-
move it
back. This may require some
strength. Allow the cover to hang.
● Screw in the towline anchorage into its po-
sition antic
lockwise as far as it will go ››› .
U se a s
uit
able tool to firmly tighten the tow-
line anchorage in its location.
● After towing, remove the towline anchorage
by t
urning it clockwise and put the cover
back in place. CAUTION
● The to wline anc
horage must always be
completely and firmly tightened. Otherwise,
it could be released while towing and tow-
starting.
● Vehicles with a factory fitted towing brack-
et, can only
be used for towing with a tow
bar, specially designed to fit on a tow hitch
ball. Otherwise, the tow hitch ball and the ve-
hicle may be damaged. Otherwise, a tow rope
should be used. Towing advice
Towing requires some expertise and experi-
ence, e
s
pecially when using a tow rope. Both
drivers should be familiar with the technique
required for towing. For this reason, inexper-
ienced drivers should abstain.
While driving, avoid excessive traction forces
and jerking. When towing on an unpaved
road, there is always a risk of overloading
and damaging the anchorage points.
If the vehicle is towed, with the hazard warn-
ing lights on and the ignition switched on,
the turn signal may be used to indicate
changes of direction. Simply operate the turn
signal lever as usual. Meanwhile, the hazard
warning lights will go off. When the turn sig-
nal lever is returned to the rest position, the
hazard warning lights will be turned on auto-
matically.
Notes for the driver of the towed vehicle
● Leave the ignition on to avoid locking the
st eerin
g wheel, to release the electronic
parking brake and to activate the turn sig-
nals, the horn as well as the window wipers
and window washers.
● As the power assisted steering does not
work if
the engine is not running, you will
need more strength to steer than normally. ●
The brake mu
st be depressed must harder
as the brake servo does not operate. Avoid
hitting the towing vehicle.
● Note the instructions and information con-
tained in the Ins
truction Manual for the vehi-
cle to be towed.
Notes for the driver of the towing vehicle
● Accelerate gently and carefully. Avoid sud-
den manoeuvr
es.
● Brake well in advance than usual and brake
gently.
● Not
e the instructions and information con-
tained in the Ins
truction Manual for the vehi-
cle to be towed.
Emergency locking and unlock-
ing
Introduction Read the additional information carefully
› ›
›
page 10,
›››
page 12,
››› page 15
The doors, rear lid and panoramic sliding
sunroof can be locked manually and partially
opened, for example if the key or the central
locking is damaged.
90
Page 93 of 324
Fuses and bulbs
WARNING
Opening and closing doors carelessly can
cau se seriou
s injury.
● If the vehicle is locked from outside, the
doors and w
indows cannot be opened from
the inside.
● Never leave children or disabled people
alone in the car
. They could be trapped in the
car in an emergency and will not be able to
get themselves to safety.
● Depending on the time of the year, temper-
ature
s inside a locked and closed vehicle can
be extremely high or extremely low resulting
in serious injuries and illness or even death,
particularly for young children. WARNING
Getting in the way of the doors and the pan-
oramic s
liding sunroof is dangerous and can
lead to serious injury.
● Open and close the doors and the panor-
amic slidin
g sunroof only when nobody is in
the way. CAUTION
When opening and closing in an emergency,
car ef
ully disassemble components and then
reassemble them carefully to avoid damage
to the vehicle. Fuses and bulbs
F u
se
s
Vehicle fuses Read the additional information carefully
›› ›
page 43
Due to the constant updating of vehicles,
fuse assignments based on equipment and
the use of the same fuse for various electrical
components, it is not possible to provide an
up-to-date summary of the fuse positions for
the electrical components at the time of
printing this manual. For detailed information
about the fuse positions, please consult a
technical service.
In general, a fuse can be assigned to various
electrical components. Likewise, an electrical
component can be protected by several
fuses.
Only replace fuses when the cause of the
problem has been solved. If a newly inserted
fuse blows after a short time, you must have
the electrical system checked by a special-
ised workshop as soon as possible. WARNING
The high voltages in the electrical system can
give seriou s
electrical shocks, causing burns
and even death! ●
Never t ouc
h the electrical wiring of the igni-
tion system.
● Take care not to cause short circuits in the
electrica
l system. WARNING
Using unsuitable fuses, repairing fuses or
bridgin g a curr
ent circuit without fuses can
cause a fire and serious injury.
● Never use a fuse with a higher value. Only
repl
ace fuses with a fuse of the same amper-
age (same colour and markings) and size.
● Never repair a fuse.
● Never replace a fuse by a metal strip, staple
or simil
ar. CAUTION
● To pr ev
ent damage to the vehicle's electric
system, before replacing a fuse always turn
off the ignition, the lights and all electrical
elements and remove the key from the igni-
tion.
● If you replace a fuse with higher-rating
fuse,
you could cause damage to another part
of the electrical system.
● Protect the fuse boxes when open to pre-
vent the entr
y of dust or humidity as they can
damage the electrical system.
● Always carefully remove the fuse box cov-
ers and r
efit them correctly to avoid problems
with your vehicle. » 91
Technical data
Advice
Operation
Emergencies
Safety
Page 104 of 324

Operation
Lever for:
– Manual
g
earbox . . . . . . . . . . . . . . . . 193
– Automatic
gearbox . . . . . . . . . . . . . 193
12 volt power socket . . . . . . . . . . . . . .173
Auto Hold switch
. . . . . . . . 208
Electronic parking brake switch
. . . . . . . . . . . . . . . . . . . . . . . . . . . . . . . 188
Start-up push button (Keyless Ac-
ces
s closing and start-up system)
Ignition lock . . . . . . . . . . . . . . . . . . . . . . 183
22 23
24
25
26
27 Pedals
. . . . . . . . . . . . . . . . . . . . . . . . . . . 193
Steering column adjustment lev-
er . . . . . . . . . . . . . . . . . . . . . . . . . . . . . . . . 58
Fuse box cover . . . . . . . . . . . . . . . . . . . 91
Lever for: – Crui
se C
ontrol System (CCS) –
– – – – . .221
Open bonnet lever . . . . . . . . . . . . . . . . 271
Controls for: – Electric w
indows . . . . . . . . . . . . 127
28 29
30
31
32
33 –
Chi l
d
proof locks . . . . . . . . . . . . . 121 Note
● Some of the it ems
of equipment listed here
are fitted only on certain model versions or
are optional extras.
● In versions with the steering wheel on the
right, the lay
out of the control elements is
somewhat different. But the symbols as-
signed to the controls correspond to the sym-
bols used in the versions with the steering
wheel on the left Instruments
V iew of
in
strument panel Fig. 117
Instrument panel, on dash panel. Details of the instruments
››
›
Fig. 117: Clock set button1)
.
1 –
Pr e
s
s the button to select the hour
or minute display.
102
Page 118 of 324
OperationFunctionHandling the buttons on
the vehicle
Unlocking the rear lid.Press the button.
Open the sliding door.›››
page 122. Please note: depending on the c
entr
al lock-
ing function selected in the Convenience submenu, you may have to push the but-
ton twice ›››
page 27 to unlock all doors
and the rear lid.
The vehicle key only locks and unlocks the
vehicle if it is within range of the vehicle and
if the batteries have enough power. When
locking, the vehicle's turn signals will blink.
If the driver door is open, the vehicle cannot
be locked with the key. If you unlock the vehi-
cle without opening any doors or the rear lid,
it will lock again automatically after a few
seconds. This function prevents the vehicle
from remaining unlocked if the unlocking
button is pressed by mistake.
Convenience open/close function
● See ››
›
page 127, Controls for the win-
dows: functions.
● See ›››
page 129, Panoramic sliding sun-
roof: operating. Unlocking and locking the vehicle
from ins
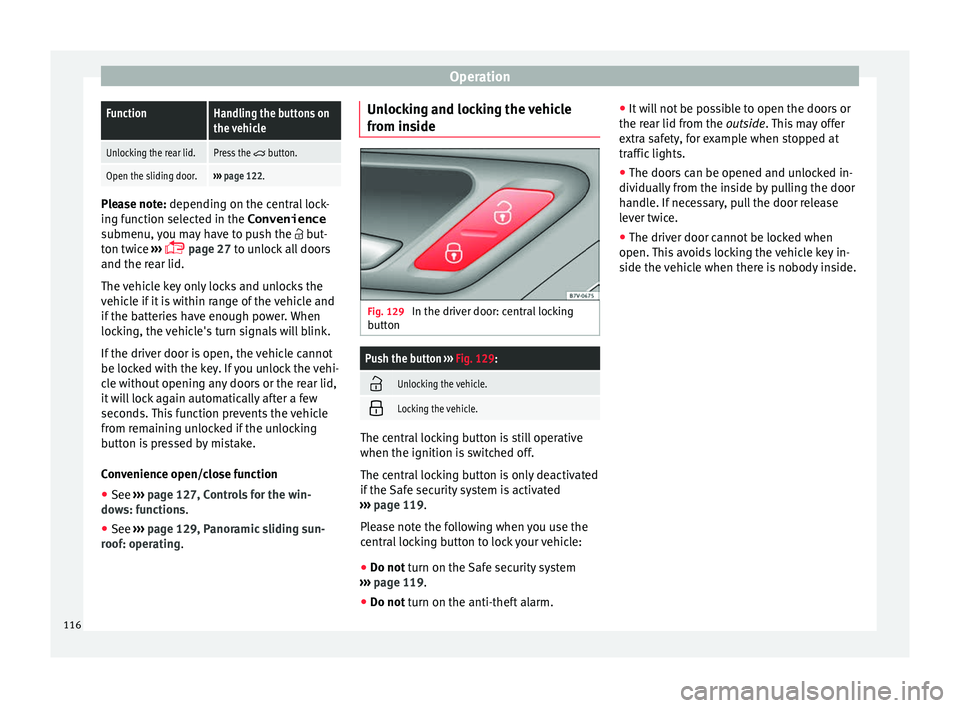
ide Fig. 129
In the driver door: central locking
b utt
on
Push the button ››› Fig. 129:
Unlocking the vehicle.
Locking the vehicle.
The central locking button is still operative
when the ignition i
s
sw
itched off.
The central locking button is only deactivated
if the Safe security system is activated
››› page 119.
Please note the following when you use the
central locking button to lock your vehicle:
● Do not turn on the Safe security system
› ›
› page 119.
● Do not turn on the anti-theft alarm. ●
It w i
ll not be possible to open the doors or
the rear lid from the outside. This may offer
extra safety, for example when stopped at
traffic lights.
● The doors can be opened and unlocked in-
dividually
from the inside by pulling the door
handle. If necessary, pull the door release
lever twice.
● The driver door cannot be locked when
open. This
avoids locking the vehicle key in-
side the vehicle when there is nobody inside.
116
Page 120 of 324
Operation
● Touc
h
the sensor surface B twice (arrow)
on the door h andl
e t
o lock the vehicle with-
out the Safe security system ››› page 119.
Unlocking and locking the boot hatch
When the vehicle is locked, the hatch auto-
matically unlocks on opening if ››› Fig. 130
there is a valid vehicle key in the proximity.
Open or close the hatch normally
››› page 124.
After closing, the hatch locks automatically.
In the following instances, the rear lid does
not lock automatically after closing:
● If the entire vehicle is unlocked.
● If the key used last is inside the vehicle. All
vehicl
e indicator lights flash four times. The
vehicle will lock again after a few seconds if
no door or boot hatch are opened.
Locking the vehicle with a second key
If there is a vehicle key inside the vehicle and
it is locked from the outside with a second
vehicle key, the key inside the vehicle is
blocked for engine ignition ››› page 183. In
order to enable engine ignition, the button
on the key inside the vehicle needs to be
pressed ››› Fig. 128.
Automatically disabling sensors
If the vehicle is not locked or unlocked for a
long period of time, the proximity sensor on the passenger door is automatically disa-
bled.
If
the exterior sensor on the door handle is
often activated unusually with the vehicle
locked (e.g. by the branches of a bush rub-
bing against it), all proximity sensors are dis-
abled for a time. If this only happens with the
exterior sensor on the driver's door, only this
sensor is disabled.
Sensors will again be enabled:
● After a time.
● OR: if the vehicle is unlocked with the
butt
on on the key.
● OR: if the boot is opened.
Keyl
ess Access temporary disconnection
function*
You can deactivate the vehicle's Keyless Ac-
cess unlocking for a locking and unlocking
cycle.
● Move the gear lever to position P (if the v
e-
hicle has automatic gearbox), since other-
wise the vehicle cannot be locked.
● Close the door.
● Push the central locking button on the
remote c
ontrol and touch the locking sensor
surface ›››
Fig. 131 B on the driver door han-
dl e onc e w
ithin the following 5 seconds. Do
not grip the door handle, otherwise the vehi-
cle will not lock. Deactivation is also possible if the vehicle is locked through the driver’s
door lock.
●
To c
heck that the function has been deacti-
vated, w
ait at least 10 seconds, grip and pull
on the door handle. The door should not
open.
The next time the door can only be unlocked
via the remote control or the lock cylinder.
The next time the door is locked/unlocked,
Keyless Access will be active again.
Convenience functions
To close all electric windows, the sun roof
and electric tilting panoramic roof with the
convenience feature, keep your finger for a
few seconds on the lock sensor surface B located on the exterior part of the driver or
p
a
s
senger door handle until the windows
and roof close.
Opening the doors by touching the sensor
surface on the handle takes places in accord-
ance with the settings activated on the menu
Configuration - Convenience
››› page 27. CAUTION
The sensor surfaces on the door handles
cou l
d engage if hit with a water jet or high
pressure steam if there is a valid vehicle key
in the nearby area. If at least one of the win-
dows is open and the sensor surface B on
one of the h andl
e permanently activates, all 118
Page 122 of 324
Operation
When does the system trigger an alarm?
The anti-thef t
al
arm siren will be triggered for
about 30 seconds accompanied by optical
warning signals for about five minutes when
the vehicle is locked and the following unau-
thorised actions are taken:
● When the door is mechanically unlocked
usin
g the vehicle key without turning the ig-
nition within the following 15 seconds.
● A door is opened.
● The bonnet is opened.
● The rear lid is opened.
● When the ignition is switched on with a
non-authorised k
ey.
● When the vehicle battery is disconnected.
● When there is movement inside the vehicle
(vehicl
es with interior monitoring).
● When the vehicle is towed (vehicles with
anti-tow sy
stem)
● When the vehicle is lifted (vehicles with an-
ti-tow sy
stem).
● Transporting the vehicle on a ferry or by
railr
oad (vehicles with an anti-tow system or
interior monitoring).
● Unhitch a trailer connected to the anti-theft
alarm ››
› page 237.
How to turn OFF the alarm
Unlock the vehicle with the unlocking button
on the key or turn on the ignition with a valid key. On vehicles with the Keyless Access sys-
tem, the alarm c
an also be disabled by grasp-
ing the door handle ››› page 117. Note
● The al arm w
ill be triggered once more when
anybody enters the same zone of surveillance
or any other zone. If, for example, after open-
ing a door, the rear lid is also opened.
● The anti-theft alarm is not activated when
the vehic
le is locked from within using the
central locking button .
● If the driver door is unlocked mechanically
with the key
, only the driver door is unlocked,
the rest of the doors remain locked. Only
when the ignition has been turned on will the
other doors be available - but not unlocked -
and the central locking button will be activa-
ted.
● If the vehicle battery is run down or flat
then the anti-theft a
larm will not operate cor-
rectly. Vehicle interior monitoring system
and anti-t
o
w sy
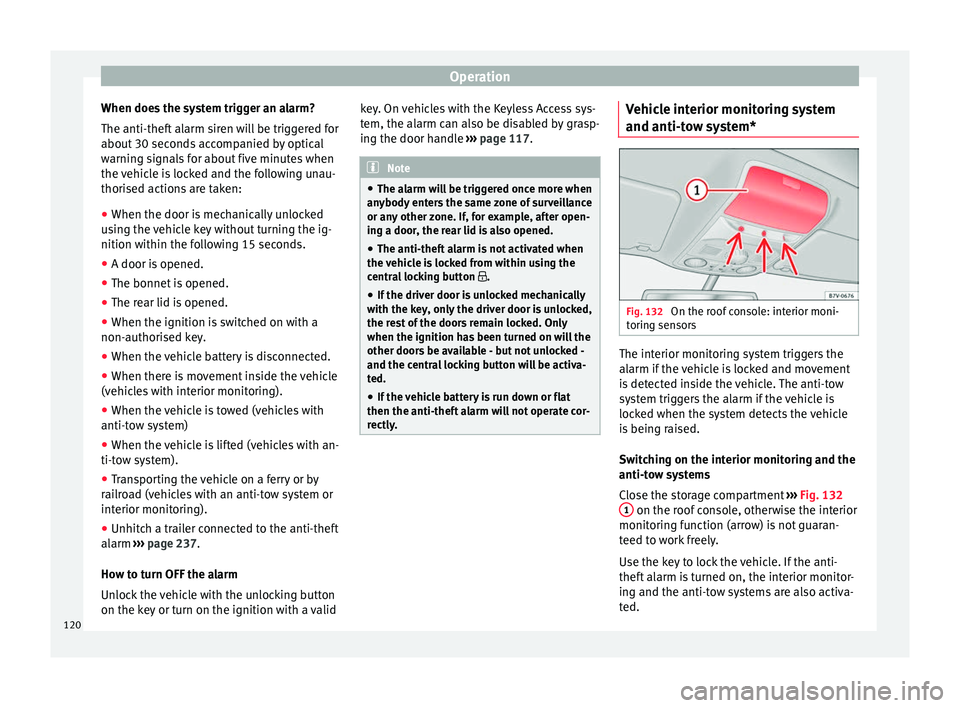
stem* Fig. 132
On the roof console: interior moni-
t orin
g sen
sors The interior monitoring system triggers the
al
arm if
the
vehicle is locked and movement
is detected inside the vehicle. The anti-tow
system triggers the alarm if the vehicle is
locked when the system detects the vehicle
is being raised.
Switching on the interior monitoring and the
anti-tow systems
Close the storage compartment ››› Fig. 132
1 on the roof console, otherwise the interior
monit orin
g f
unction (arrow) is not guaran-
teed to work freely.
Use the key to lock the vehicle. If the anti-
theft alarm is turned on, the interior monitor-
ing and the anti-tow systems are also activa-
ted.
120