LED lamp Seat Altea 2006 Owner's Manual
[x] Cancel search | Manufacturer: SEAT, Model Year: 2006, Model line: Altea, Model: Seat Altea 2006Pages: 288, PDF Size: 8.61 MB
Page 33 of 288
Airbag system31
Safety First
Operating instructions
Tips and Maintenance
Te c h n i c a l D a t a
•
Always properly adjust the front seats.
The danger of fitting a child seat on the front passenger seat
Rear-facing child seats must never be used on the front
passenger seat when the front passenger airbag is enabled.An enabled front airbag on the front passenger side is potentially a major
danger to a child. The front passenger seat is life threatening to a child if you
transport the child in a rear-facing child seat. You should always transport all
children up to 12 years of age on the rear seat.
If a rear-facing child seat is secured to the front passenger seat, an inflating
airbag can strike it with such great force that critical or fatal injuries may
result.
Therefore we urgently recommend that you transport children on the rear
seats. That is the safest place in the vehicle for children. Alternatively, the
front passenger airbag can be disabled with a key-operated switch
⇒page 44. When transporting children, use a child seat appropriate to the
age and size of each child ⇒ page 46.
For those vehicles that do not include a key lock switch to turn the airbag off,
an Authorised Service Centre must be consulted.
WARNING
•
If a child seat is secured to the front passenger seat, the risk to the child
of sustaining critical or fatal injuries in the event of an accident increases.
•
Never secure a rear-facing child seat to the front passenger seat if the
front passenger airbag is enabled. The child can suffer critical or fatal inju-
ries when the front passenger airbag is triggered.
•
An inflating front passenger airbag can strike the rear-facing child seat
and hurl it with great force against the door, the roof or the backrest.
•
If, under special circumstances, it should be necessary to transport a
child in a rear-facing child seat on the front passenger seat, it is absolutely
essential that you observe the following safety measures:
−Disable the front passenger airbag ⇒page 44, “Deactivating
airbags*”.
− The child seat must be approved by the child seat manufacturer for
use on a front passenger seat with front or side airbag.
− Follow the installation instructio ns of the child seat manufacturer
and absolutely observe the warnings ⇒page 46, “Child safety”.
− Before properly installing the child seat, push the front passenger
seat all the way to the rear so that the greatest possible distance to the
front passenger airbag is ensured.
− Ensure that no objects prevent the front passenger seat from being
pushed completely back.
− The backrest of the front passenger seat must be in an upright
position.
Warning lamp for airbag and belt tension device system
This warning lamp monitors the airbag and belt tension
device system.The warning lamp monitors all airbags and belt tension devices in the
vehicle, including control units and wiring connections.
WARNING (continued)
WARNING (continued)
altea_ingles Seite 31 Dienstag, 4. Oktober 2005 6:57 18
Page 34 of 288

Airbag system
32Monitoring of airbag and belt tension device system
The functionality of the airbag and belt tension device system is constantly
monitored electronically. Each time th e ignition is switched on, the warning
lamp
lights for several seconds (self diagnosis) and the display in the
instrument panel* shows AIRBAG / TENSIONER.
The system must be checked when the warning lamp
:
•
does not come on when the ignition is switched on,
•
does not go out about 4 seconds after the ignition is switched on,
•
goes out and then comes on again after the ignition is switched on,
•
or if it comes on or flickers while the car is moving.
In the event of a malfunction, the warning lamp remains on continuously. In
addition, depending on the malfunctio n, a fault message appears in the
display of the combi-instrument for approx. 10 seconds and a short acoustic
signal is given. In this event, you should have a qualified workshop check the
system immediately.
If one airbag has been disconnected by the Authorised Service Centre, the
indicator flashes for some seconds after the self diagnosis and will turn off if
there is no fault.
WARNING
•
If there is a malfunction, the air bag and belt tension device system
cannot properly perform its protective function.
•
If a malfunction should occur, have the system checked immediately by
a qualified workshop. Otherwise there is a risk that, in the event of an acci-
dent, the airbag system and belt tension devices may not be triggered, or
may not be triggered correctly.
Repair, care and disposal of the airbagsThe parts of the airbag system are installed in various places in your vehicle.
If you work on the airbag system or remove and install parts of the system
when performing other repair work, parts of the airbag system may be
damaged. The consequence may be that, in the event of an accident, the
airbag inflates incorrectly or does not inflate at all.
The relevant safety requirements must be observed when the vehicle or
components of the airbag are scrapped . The specialist workshops and the
Vehicle disposal centres are familiar with these requirements.
WARNING
•
If repairs are not carried out by a professional, or if the airbags are used
incorrectly, the risk of severe or fatal injuries is increased. The airbags may
fail to inflate, or could inflate in the wrong circumstances.
•
Do not cover or stick anything on the steering wheel hub or the soft
plastic surface of the airbag unit on the passenger side of the dashboard,
and do not obstruct or modify them in any way.
•
It is important not to attach any objects such as cup holders or tele-
phone mountings to the surfaces covering the airbag units.
•
To clean the steering wheel or dash panel, you may use only a dry cloth
or one moistened with water. Never clean the dash panel and surface of the
airbag module with cleansers containing solvents. Solvents cause the
surface to become porous. If the airbag inflates, disintegrating plastic
parts can cause substantial injuries.
•
Never attempt to repair, adjust, remove or install parts of the airbag
system.
•
Any work on the airbag system or re moval and installation of the airbag
components for other repairs (such as repairs to the steering wheel) should
be performed only by a qualified workshop. Qualified workshops have the
necessary tools, repair information and qualified personnel.
altea_ingles Seite 32 Dienstag, 4. Oktober 2005 6:57 18
Page 46 of 288
Airbag system
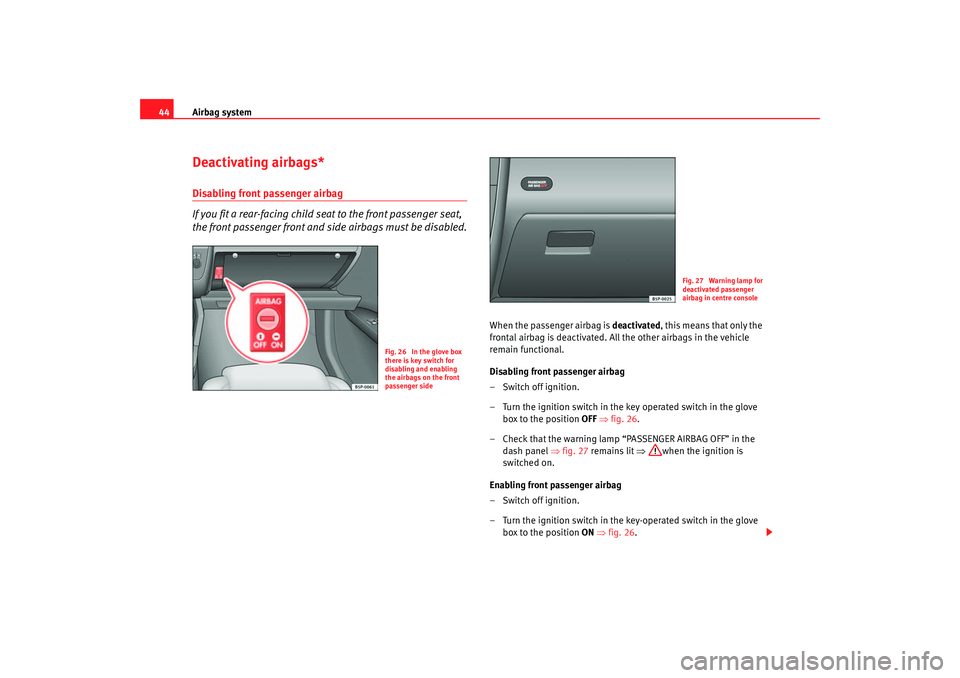
44Deactivating airbags*Disabling front passenger airbag
If you fit a rear-facing child seat to the front passenger seat,
the front passenger front and side airbags must be disabled.
When the passenger airbag is deactivated, this means that only the
frontal airbag is deactivated. All the other airbags in the vehicle
remain functional.
Disabling front passenger airbag
– Switch off ignition.
– Turn the ignition switch in the key operated switch in the glove box to the position OFF ⇒ fig. 26 .
– Check that the warning lamp “PASSENGER AIRBAG OFF” in the dash panel ⇒fig. 27 remains lit ⇒ when the ignition is
switched on.
Enabling front passenger airbag
– Switch off ignition.
– Turn the ignition switch in the key-operated switch in the glove box to the position ON ⇒fig. 26 .
Fig. 26 In the glove box
there is key switch for
disabling and enabling
the airbags on the front
passenger side
Fig. 27 Warning lamp for
deactivated passenger
airbag in centre console
altea_ingles Seite 44 Dienstag, 4. Oktober 2005 6:57 18
Page 47 of 288
Airbag system45
Safety First
Operating instructions
Tips and Maintenance
Te c h n i c a l D a t a
– Check that the warning lamp “PASSENGER AIRBAG OFF” in the
dash panel does ⇒ page 44, fig. 27 not light u p
when the igni-
tion is switched on ⇒.
WARNING
•
The driver is responsible for the proper position of the key-operated
switch.
•
You should deactivate the front passenger airbag only if you have to use
a rear-facing child seat in exceptional cases. ⇒ page 46, “Child safety”.
•
Never install a rear-facing child seat on the front passenger seat unless
the front passenger airbag has been disabled. Risk of potentially fatal inju-
ries to the child! However, if it is necessary in exceptional circumstances to
transport a child in a rear-facing child seat on the front passenger seat, you
must always disable the front passenger airbag.
•
As soon as the child seat is no longer needed on the front passenger
seat, enable the front passenger airbag again.
•
Only deactivate the passenger airbag when the ignition is off, other-
wise a fault may occur in the airbag system, this will create a danger that
in case of an accident, the airbag do es not deploy properly or does not
deploy at all.
•
If the passenger airbag is disabled the monitor indicatorPASSENGER
AIRBAG OFF does not remain lit, the airbag system may be faulty:
−Have the airbag system inspected immediately by a qualified work-
shop.
− Do not use a child seat on the front passenger seat! The front
passenger airbag could be triggered despite the fact that there is a fault
in the system and, as a result, a child could sustain serious or fatal inju-
ries.
− It is not certain whether the front passenger airbag will deploy
during an accident! Inform your passengers of this.
•
When using the ignition key to activate / deactivate the passenger
frontal airbag, only the passenger frontal airbag will be activated / deacti-
vated. The side airbag and head airbag on the passenger side will remain
active.WARNING (continued)
altea_ingles Seite 45 Dienstag, 4. Oktober 2005 6:57 18
Page 65 of 288
Cockpit63
Safety First
Operating instructions
Tips and Maintenance
Te c h n i c a l D a t a
Miles - Distance travelled
The display shows the distance travelled since the ignition was switched on.
The maximum display value in both memories is 9999 miles. The memory will
automatically be deleted once this value has been reached.
Miles - Fuel range
The fuel range is calculated using the fi gures for tank content and current fuel
consumption. It shows how far the vehicle can travel using the same condi-
tions as a reference.
Ø litre/100km - Average fuel consumption
The average fuel consumption will be shown ⇒page 62, fig. 42 after a
distance of approximately 100 metres has been travelled. Dashes will appear
in the display until that time. The display will be updated every 5 seconds
whilst the vehicle is in motion. The am ount of fuel used will not be shown.
ltr/100km or ltr/hr - Current fuel consumption
The display will show the current fuel consumption in litre/km whilst the
vehicle is in motion or in litre/hour when the vehicle is in a stationary position
with the engine running.
Using this display you can see how your driving style affects fuel consump-
tion ⇒page 185.
Ambient temperature display
The measurement margin extends from -45° C to +58° C. At temperatures
lower than +4° C, an “ice crystal symbol” is displayed and a “warning”
sounds if the vehicle is moving at more than 20 km/h (ice warning). This
symbol will flash for about 10 seconds and remains lit until the exterior
temperature rises above +4° C or 6° C if it was already lit.
WARNING
There could be black ice on the road surface even if the “snowflake symbol”
is not shown. You should, for this reason, not rely exclusively on this
display - Risk of accident!
Note
When the vehicle is stationary or travelling at very low speeds, the tempera-
ture displayed may be slightly higher than the actual ambient temperature as
a result of the heat radiated from the engine.Warning or information text in the display
Faults are shown in the display with warning lamps and
warning/information reports.The system runs a check on certain components and functions when the igni-
tion is switched on and while the vehicle is moving. Functional faults are indi-
cated by symbols with warnings and information texts in the display. An
audible warning is gi ven in certain cases.
Warning symbols
There are red warning symbols (priority 1) and yellow warning symbols
(priority 2)
Information text
In addition to warning messages given on a fault, you will receive information
in the display on procedures or will be asked to carry out certain tasks.
altea_ingles Seite 63 Dienstag, 4. Oktober 2005 6:57 18
Page 75 of 288
Cockpit73
Safety First
Operating instructions
Tips and Maintenance
Te c h n i c a l D a t a
WARNING
•
Failure to observe warning lamps and warning messages can result in
serious personal injury or damage to your vehicle.
•
The risk of an accident increases if your vehicle breaks down. Use a
warning triangle to draw the attention of other road users to your
stationary vehicle so that it does not represent a danger.
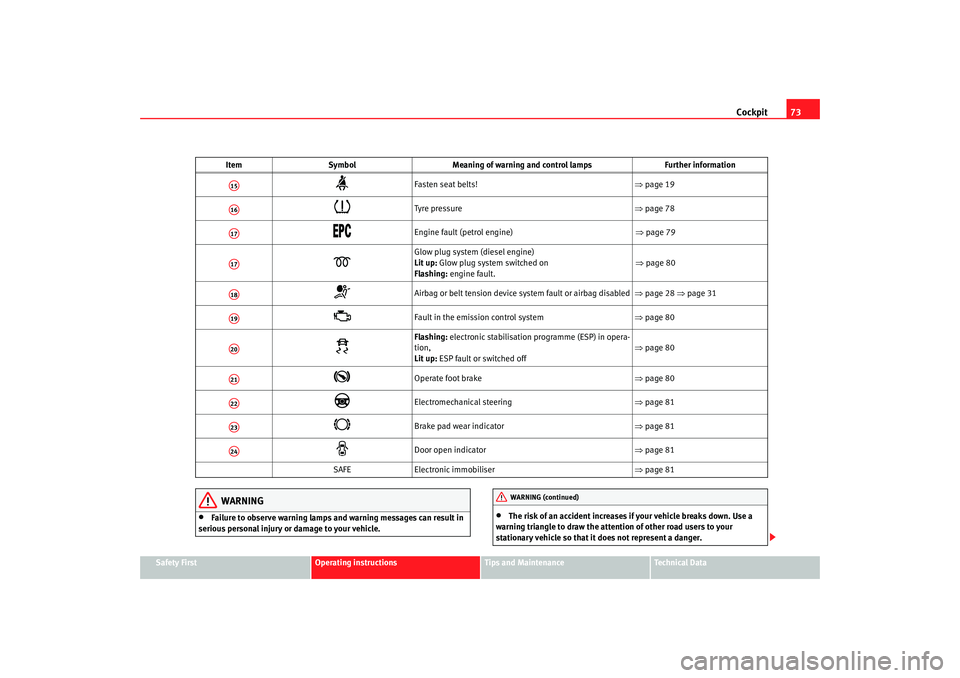
Fasten seat belts! ⇒page 19
Tyre pressure ⇒page 78
Engine fault (petrol engine) ⇒ page 79
Glow plug system (diesel engine)
Lit up: Glow plug system switched on
Flashing: engine fault.
⇒ page 80
Airbag or belt tension device system fault or airbag disabled ⇒page 28 ⇒page 31
Fault in the emission control system ⇒page 80
Flashing: electronic stabilisation programme (ESP) in opera-
tion,
Lit up: ESP fault or switched off ⇒
page 80
Operate foot brake ⇒page 80
Electromechanical steering ⇒page 81
Brake pad wear indicator ⇒page 81
Door open indicator ⇒page 81
SAFE Electronic immobiliser ⇒page 81
Item
Symbol Meaning of warning and control lamps Further information
A15A16A17A17A18A19A20A21A22A23A24
WARNING (continued)
altea_ingles Seite 73 Dienstag, 4. Oktober 2005 6:57 18
Page 83 of 288
Cockpit81
Safety First
Operating instructions
Tips and Maintenance
Te c h n i c a l D a t a
Power steering system*
For vehicles with power steering, the level of steering assistance depends on
the vehicle's speed and on the steering angle.
The warning lamp should light up for a few seconds when the ignition is
switched on. It should go out when the engine has started running.
If the battery is disconnected, the indicator remains lit, even with the engine
running. The warning light only goes of f after a distance of approx. 50 m.
There is a fault in the electromechanica l steering system if the lamp does not
go out or lights up whilst the vehicle is in motion. The indicator may appear
in two different colours to indicate faults. If it lights yellow, this indicates a
minor fault. If it lights red, seek wo rkshop assistance immediately, if no
assistance is available stop driving. Stop the vehicle and seek technical
assistance. The power steering does not work if the battery is flat or if the
engine is off (for example, for towing). You should take into account that you
will need considerably more power than normal to steer the vehicle if the
steering assistance is reduced or has failed completely.
For those vehicles fitted with ESP* the function “Recommended steering
manoeuv r
e” is included. S e e ⇒ page 177Brake pad wear indicator*
As the brake pad wear indicator only monitors the front brake pads, it is advis-
able to have the rear brake pads inspected at the same time.
The information text displayed in the instrument panel display is
15) : CHECK
BRAKE PADS .
WARNING
Have the brake pads inspected immediately by a qualified dealership if the
warning display
lights up.
Indicator for open doors or tailgate
This indicator lights if one of th e doors or the tailgate is open.The warning light
should go off when all the doors are closed correctly.
The system also works when the ignition is switched off. It should go off
about 15 seconds after the vehicle is locked.
Electronic immobiliser* “Safe”
This warning lamp flashes if an unauthorised key is used.Inside the key there is a chip that deactivates the electronic immobiliser auto-
matically when the key is inserted into the ignition. The immobiliser will be
activated again automatically as soon as you pull the key out of the ignition
lock.
The message displayed in the instrument panel display is
16) : SAFE. The
vehicle cannot be used in that case ⇒page 160.
The engine can, however, be started if the appropriate coded SEAT genuine
key is used.
15)Depending on the model version
16)Depending on the model version
altea_ingles Seite 81 Dienstag, 4. Oktober 2005 6:57 18
Page 121 of 288

Lights and visibility119
Safety First
Operating instructions
Tips and Maintenance
Te c h n i c a l D a t a
The light turns off about 20 seconds afte
r the closure of the doors. The inte-
rior lights are switched off when the vehicle is locked or when the ignition is
switched on.
Interior lights or both reading lights switched on
Turn the control to position .
Note
If not all the vehicle doors are closed, the interior lights will be switched off
after approx. 10 minutes, providing the key has been removed and the cour-
tesy light position selected. This prevents the battery discharging.VisibilitySun visors
The sun visors for the driver and the front passenger can be pulled out of their
mountings in the centre of the vehicle and turned towards the doors
⇒ fig. 84 .
The make-up mirrors in the sun visors have covers. When you open the cover , a lamp in the roof lights up.
The lamp* in the roof lining will go out when the vanity mirror cover is pushed
back or the sun visor is pushed back up.
Note
The roof lamp will turn off about 10 mi nutes following the removal of the igni-
tion key. This prevents the battery discharging.
A5
Fig. 84 Sun visor on the
driver side
A1
A2
altea_ingles Seite 119 Dienstag, 4. Oktober 2005 6:57 18
Page 126 of 288

Lights and visibility
124Headlight washer system
The headlight washers clean the headlight lenses.The headlight washers are activated automatically when the windscreen
washer is used and the windscreen wiper lever is pulled towards the steering
wheel for at least 1.5 seconds – provided the dipped headlights or main
beams are switched on. Clean off stubborn dirt (insects, etc.) from the head-
lights at regular intervals, for in stance when filling the fuel tank.
Note
•
To ensure that the headlight washers work properly in winter, keep the
nozzle holders in the bumper free of snow and remove any ice with a de-icer
spray.
•
To remove water, the windscreen wiper s will be activated from time to
time, the headlight wipers will be activated every three cycles.
MirrorsInterior mirror
It is dangerous to drive if you cannot see clearly through the
rear window.Manual anti-dazzle function for interior mirror
In the basic mirror position, the lever at the bottom edge of the mirror should
be at the front. Pull the lever to the back to select the anti-dazzle function.
Automatic anti-dazzle interior mirror*
The automatic anti-dazzle function can be switched on and off
as desired.Switching off anti-dazzle function
– Press button ⇒fig. 89 . Warning lamp goes out:
Switching on anti-dazzle function
– Press button ⇒fig. 89 . Warning lamp is lit.Anti-dazzle function
The anti-dazzle function is activated every time the ignition is switched on.
The green indicator lamp ligh ts up in the mirror housing.
When the anti-dazzle function is acti vated the interior mirror will darken auto-
matically according to the amount of light it receives (for example from the
headlights of a vehicle behind). The anti-dazzle function is cancelled if
reverse gear is engaged.
Fig. 89 Automatic anti-
dazzle interior mirror.
AA
AB
AA
altea_ingles Seite 124 Dienstag, 4. Oktober 2005 6:57 18
Page 180 of 288
Intelligent technology
178
Caution•
In order to ensure that ESP functions correctly, all four wheels must be
fitted with the same tyres. Any differences in the rolling radius of the tyres can
cause the system to reduce engine power when this is not desired.
•
Modifications to the vehicle (e.g. to the engine, the brake system, running
gear or any components affecting the wheels and tyres) could affect the effi-
ciency of the ABS, EDL, ESP and TCS.Note
To disconnect using the ESP button ⇒ page 15
8.
Anti-lock brake system (ABS)The anti-lock brake system prevents the wheels locking during
braking ⇒ page 176.Electronic differential lock (EDL)*
The electronic differential lock helps prevent the loss of trac-
tion caused if one of the driven wheels starts spinning.EDL helps the vehicle to start moving, accelerate and climb a gradient in slip-
pery conditions where this may otherwise be difficult or even impossible.
The system will control the revolutions of the drive wheels using the ABS
sensors (in case of an EDL fault the warning lamp for ABS lights up)
⇒page 77.
At speeds of up to approximately 80 km/h, it is able to balance out differ-
ences in the speed of the driven wheel s of approximately 100 rpm caused by a slippery road surface on
one side of the vehicle. It does this by braking the
wheel which has lost traction and distributing more driving force to the other
driven wheel via the differential.
To prevent the disc brake of the braked wheel from overheating, the EDL cuts
out automatically if subjected to excessive loads. The vehicle will continue to
function normally without EDL. For this reason, the driver is not informed that
the EDL has been switched off.
The EDL will switch on again automatically when the brake has cooled down.
WARNING
•
When accelerating on a slippery surface, for example on ice and snow,
press the accelerator carefully. Despite EDL, the driven wheels may start to
spin. This could impair the vehicles stability.
•
Always adapt your driving style to su it road conditions and the traffic
situation. Do not let the extra safety afforded by EDL tempt you into taking
any risks when driving, this can cause accidents.Caution
Modifications to the vehicle (e. g. to the engine, the brake system, running
gear or any components affecting the wh eels and tyres) could affect the oper-
ation of the EDL ⇒ page 196.The traction control system (TCS)The traction control system prevents the drive wheels from spinning when the
car is accelera ting ⇒
page 176.
altea_ingles Seite 178 Dienstag, 4. Oktober 2005 6:57 18