tailgate Seat Altea 2012 User Guide
[x] Cancel search | Manufacturer: SEAT, Model Year: 2012, Model line: Altea, Model: Seat Altea 2012Pages: 313, PDF Size: 4.47 MB
Page 112 of 313
110Unlocking and locking
WARNING
● Always close the tailgate properly. Risk of accident or injury.
● Do not close the tailgate by pushing it down with your hand on the
rear window. The glass could smash. Risk of injury!
● Ensure the tailgate is locked after closing it. If not, it may open unex-
pectedly while driving.
● Never allow children to play in or around the vehicle. A locked vehicle
can be subjected to extremely high and low temperatures, depending on
the time of year, thus causing serious injuries/illness. It could even have
fatal consequences. Close and lock both the tailgate and all the other
doors when you are not using the vehicle.
● Closing the tailgate without observing and ensuring it is clear could
cause serious injury to you and to third parties. Make sure that no one is
in the path of the tailgate.
● Never drive with the tailgate open or half-closed, exhaust gases may
penetrate into the interior of the vehicle. Danger of poisoning!
● If you only open the tailgate, do not leave the key inside. The vehicle
will not be opened if the key is left inside.
Emergency opening
This allows the vehicle to be opened if the central locking
does not operate (for example, if the battery is flat)
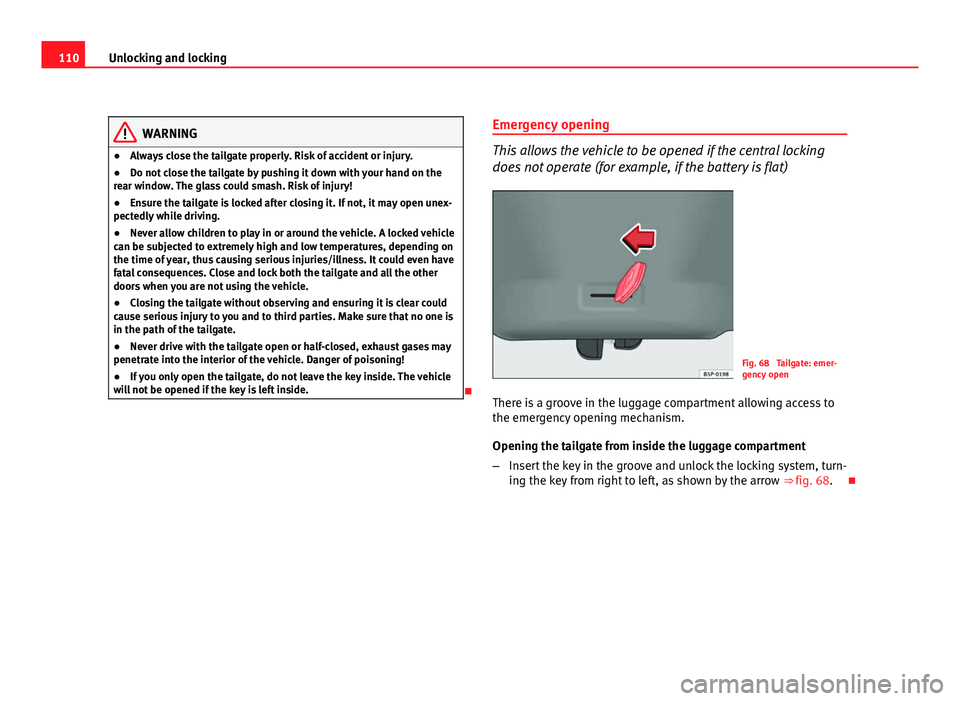
Fig. 68 Tailgate: emer-
gency open
There is a groove in the luggage compartment allowing access to
the emergency opening mechanism.
Opening the tailgate from inside the luggage compartment
– Insert the key in the groove and unlock the locking system, turn-
ing the key from right to left, as shown by the arrow ⇒ fig. 68.
Page 113 of 313
111
Unlocking and locking
Windows Opening or closing the electric windows
The front and rear electric windows can be operated by us-
ing the controls on the driver door.
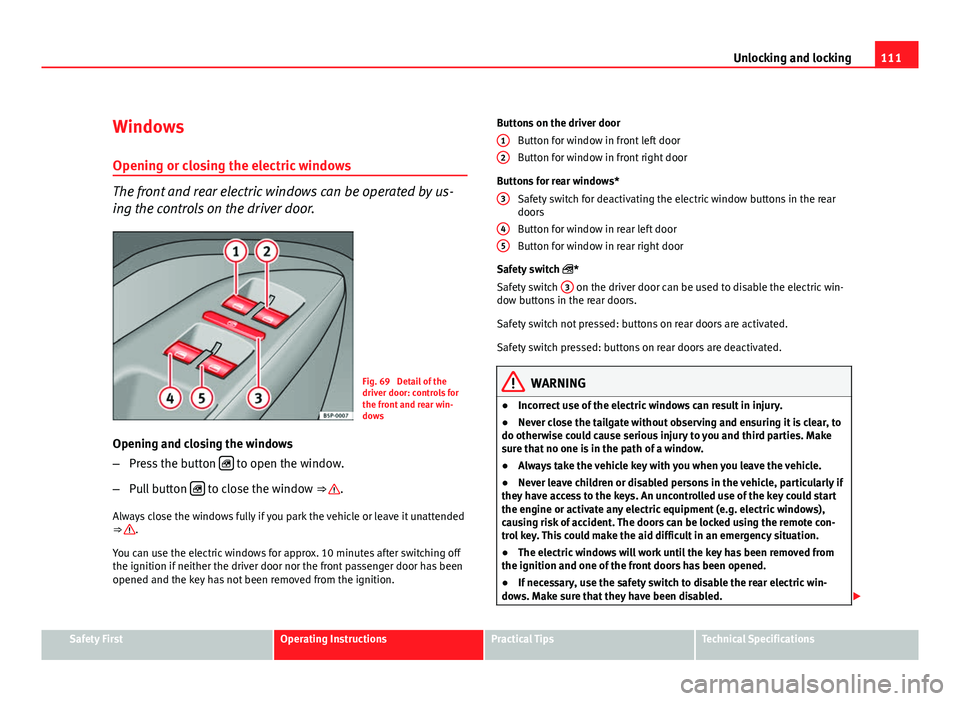
Fig. 69 Detail of the
driver door: controls for
the front and rear win-
dows
Opening and closing the windows
– Press the button
to open the window.
– Pull button
to close the window ⇒ .
Always close the windows fully if you park the vehicle or leave it unattended
⇒
.
You can use the electric windows for approx. 10 minutes after switching off
the ignition if neither the driver door nor the front passenger door has been
opened and the key has not been removed from the ignition. Buttons on the driver door
Button for window in front left door
Button for window in front right door
Buttons for rear windows* Safety switch for deactivating the electric window buttons in the rear
doors
Button for window in rear left door
Button for window in rear right door
Safety switch *
Safety switch 3
on the driver door can be used to disable the electric win-
dow buttons in the rear doors.
Safety switch not pressed: buttons on rear doors are activated.
Safety switch pressed: buttons on rear doors are deactivated.
WARNING
● Incorrect use of the electric windows can result in injury.
● Never close the tailgate without observing and ensuring it is clear, to
do otherwise could cause serious injury to you and third parties. Make
sure that no one is in the path of a window.
● Always take the vehicle key with you when you leave the vehicle.
● Never leave children or disabled persons in the vehicle, particularly if
they have access to the keys. An uncontrolled use of the key could start
the engine or activate any electric equipment (e.g. electric windows),
causing risk of accident. The doors can be locked using the remote con-
trol key. This could make the aid difficult in an emergency situation.
● The electric windows will work until the key has been removed from
the ignition and one of the front doors has been opened.
● If necessary, use the safety switch to disable the rear electric win-
dows. Make sure that they have been disabled.
12
3
45
Safety FirstOperating InstructionsPractical TipsTechnical Specifications
Page 115 of 313
113
Unlocking and locking
WARNING
● Incorrect use of the electric windows can result in injury.
● Always take the key with you when leaving the vehicle, even if you
only intend to be gone for a short time. Please ensure that children are
never left alone inside the vehicle.
● The electric windows will work until the key has been removed from
the ignition and one of the front doors has been opened.
● Never close the tailgate without observing and ensuring it is clear, to
do otherwise could cause serious injury to you and third parties. Make
sure that no one is in the path of a window.
● Never allow people to remain in the vehicle when you close the vehi-
cle from the outside. The windows cannot be opened even in an emergen-
cy.
Note
The roll-back function is deactivated if the windows are closed from the out-
side of the vehicle using the ignition key for convenience closing
⇒ page 113.
Convenience opening and closing*
Using the door lock
– Hold the key in the door lock of the driver door in either the
locking or the unlocking position until all windows are either
opened or closed.
– Release the key to interrupt this function. Using the remote control
–
Push the lock or unlock button on the remote control for about 3
seconds. All windows which function electrically will be either
opened or closed.
– Release the unlock button to interrupt the function.
– Once the windows are completely closed, the turn signals will
flash.
Sliding/tilting sunroof* Opening and closing the sliding/tilting roof
The sliding/tilting sunroof is opened and closed using the
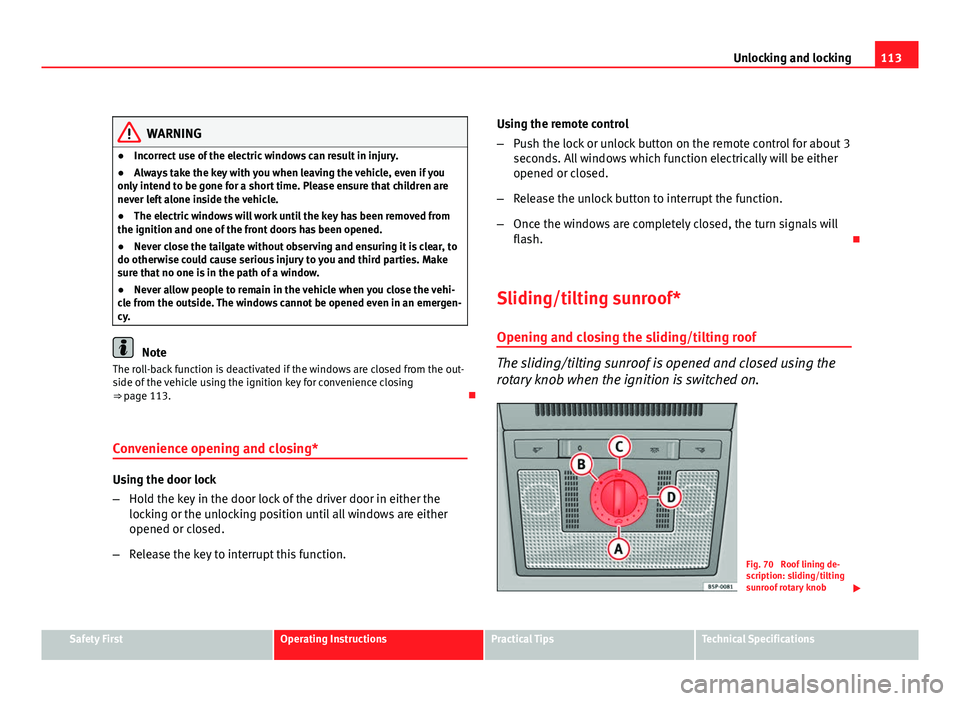
rotary knob when the ignition is switched on.
Fig. 70 Roof lining de-
scription: sliding/tilting
sunroof rotary knob
Safety FirstOperating InstructionsPractical TipsTechnical Specifications
Page 119 of 313
117
Lights and visibility
● If you are towing a trailer equipped with a rear fog light on a vehicle with
a factory-fitted towing bracket, the rear fog light on the vehicle will automat-
ically be switched off.
● The use of the lighting described here is subject to the relevant statutory
requirements.
● Depending on weather conditions (very cold or wet), the front and rear
lights and the indicators may be temporarily misted. This has no influence
on the useful life of the lighting system. The lights will soon demist when
they are switched on.
Automatic lighting*
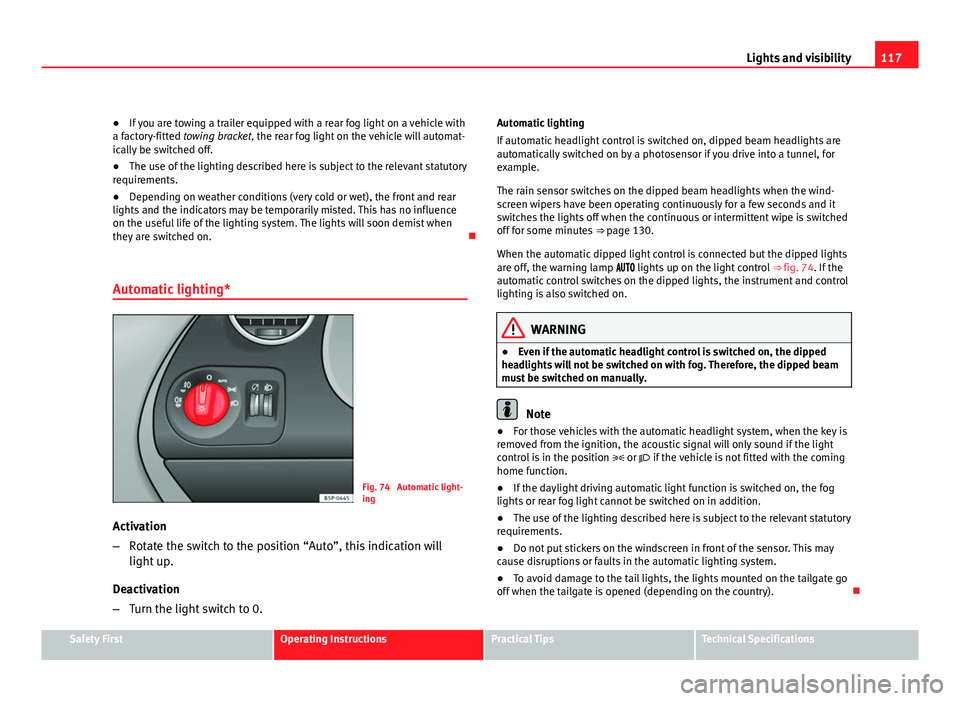
Fig. 74 Automatic light-
ing
Activation
– Rotate the switch to the position “Auto”, this indication will
light up.
Deactivation
– Turn the light switch to 0. Automatic lighting
If automatic headlight control is switched on, dipped beam headlights are
automatically switched on by a photosensor if you drive into a tunnel, for
example.
The rain sensor switches on the dipped beam headlights when the wind-
screen wipers have been operating continuously for a few seconds and it
switches the lights off when the continuous or intermittent wipe is switched
off for some minutes
⇒ page 130.
When the automatic dipped light control is connected but the dipped lights
are off, the warning lamp lights up on the light control ⇒ fig. 74. If the
automatic control switches on the dipped lights, the instrument and control
lighting is also switched on.
WARNING
● Even if the automatic headlight control is switched on, the dipped
headlights will not be switched on with fog. Therefore, the dipped beam
must be switched on manually.
Note
● For those vehicles with the automatic headlight system, when the key is
removed from the ignition, the acoustic signal will only sound if the light
control is in the position or if the vehicle is not fitted with the coming
home function.
● If the daylight driving automatic light function is switched on, the fog
lights or rear fog light cannot be switched on in addition.
● The use of the lighting described here is subject to the relevant statutory
requirements.
● Do not put stickers on the windscreen in front of the sensor. This may
cause disruptions or faults in the automatic lighting system.
● To avoid damage to the tail lights, the lights mounted on the tailgate go
off when the tailgate is opened (depending on the country).
Safety FirstOperating InstructionsPractical TipsTechnical Specifications
Page 121 of 313
119
Lights and visibility
Note
Please observe any relevant legal requirements which may apply in your
country.
Coming home / leaving home function*
The Coming Home function is controlled manually. The Leav-
ing Home function is controlled with a photosensor.
If the Coming Home or Leaving Home function is connected, the front side
and dipped lights, the tail lights and the number plate light will light up to
provide assistance.
Coming home function
The Coming Home function is activated by switching off the ignition and
briefly flashing the lights. When the driver door is opened, the Coming
Home lighting comes on. If the driver door is already open when the lights
are flashed briefly, the Coming Home lighting comes on immediately.
When the last door of the vehicle or the tailgate is closed, the Coming Home
function starts and the switching off the headlights is delayed.
The Coming Home lighting switches off in the following cases:
● On completion of the time period established for the delay in switching
off the lights after all the vehicle doors and the tailgate have been closed.
● If, 30 seconds after being connected, any doors or the tailgate remain
open.
● If the light switch is turned to position .
● If the ignition is switched on.
Leaving home function
The Leaving Home function is activated when the vehicle is unlocked if: ●
the light control is in position and
● the photosensor detects “darkness”.
The Leaving Home lighting switches off in the following cases:
● If the time period for the delay in switching off the headlights has ended
● If the vehicle is locked again.
● If the light switch is turned to position .
● If the ignition is switched on.
Note
The setting for the delay in switching off the headlights in the Coming Home
and Leaving Home function can be changed or the function can be connec-
ted or disconnected in the menu Lights and visibility ⇒ page 76.
● If the ignition key is removed while the lights are on, and the lights are
flashed briefly and the driver door opened, no acoustic signal is heard, as
when the Coming Home function is on, the lights are automatically switched
off after a period of time (except when the light switch is in position or
.
Safety FirstOperating InstructionsPractical TipsTechnical Specifications
Page 133 of 313
131
Lights and visibility
Rear window wiper
The windscreen wiper lever operates the windscreen wiper
and the wash and wipe system for the rear window.
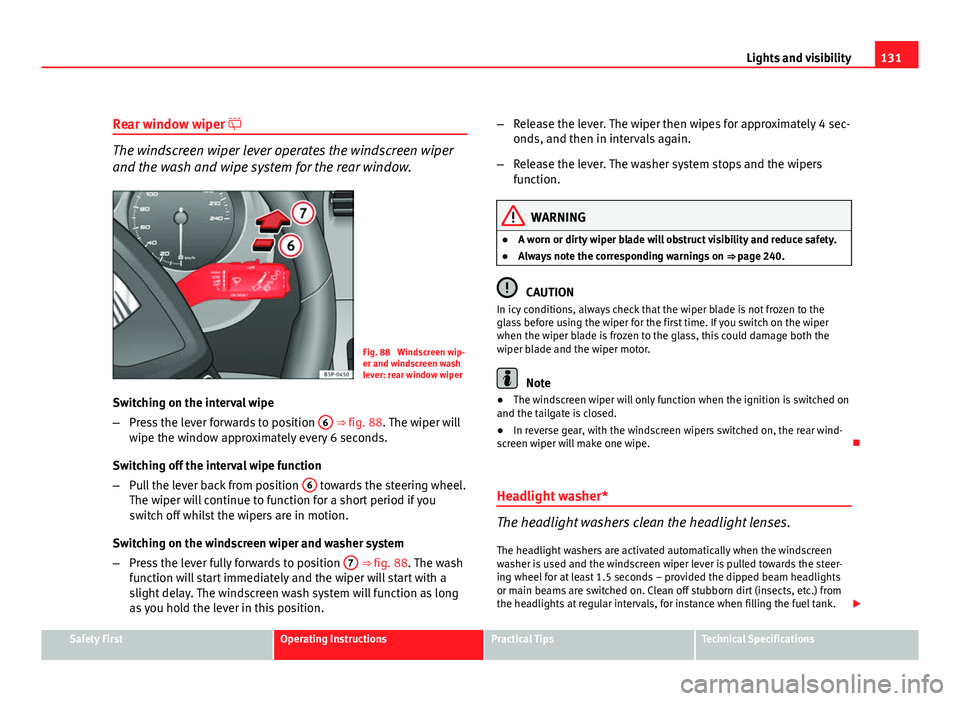
Fig. 88 Windscreen wip-
er and windscreen wash
lever: rear window wiper
Switching on the interval wipe
– Press the lever forwards to position 6
⇒ fig. 88. The wiper will
wipe the window approximately every 6 seconds.
Switching off the interval wipe function
– Pull the lever back from position 6
towards the steering wheel.
The wiper will continue to function for a short period if you
switch off whilst the wipers are in motion.
Switching on the windscreen wiper and washer system
– Press the lever fully forwards to position 7
⇒ fig. 88. The wash
function will start immediately and the wiper will start with a
slight delay. The windscreen wash system will function as long
as you hold the lever in this position. –
Release the lever. The wiper then wipes for approximately 4 sec-
onds, and then in intervals again.
– Release the lever. The washer system stops and the wipers
function.
WARNING
● A worn or dirty wiper blade will obstruct visibility and reduce safety.
● Always note the corresponding warnings on ⇒ page 240.
CAUTION
In icy conditions, always check that the wiper blade is not frozen to the
glass before using the wiper for the first time. If you switch on the wiper
when the wiper blade is frozen to the glass, this could damage both the
wiper blade and the wiper motor.
Note
● The windscreen wiper will only function when the ignition is switched on
and the tailgate is closed.
● In reverse gear, with the windscreen wipers switched on, the rear wind-
screen wiper will make one wipe.
Headlight washer*
The headlight washers clean the headlight lenses. The headlight washers are activated automatically when the windscreen
washer is used and the windscreen wiper lever is pulled towards the steer-
ing wheel for at least 1.5 seconds – provided the dipped beam headlights
or main beams are switched on. Clean off stubborn dirt (insects, etc.) from
the headlights at regular intervals, for instance when filling the fuel tank.
Safety FirstOperating InstructionsPractical TipsTechnical Specifications
Page 157 of 313
155
Seats and storage compartments
Rear shelf
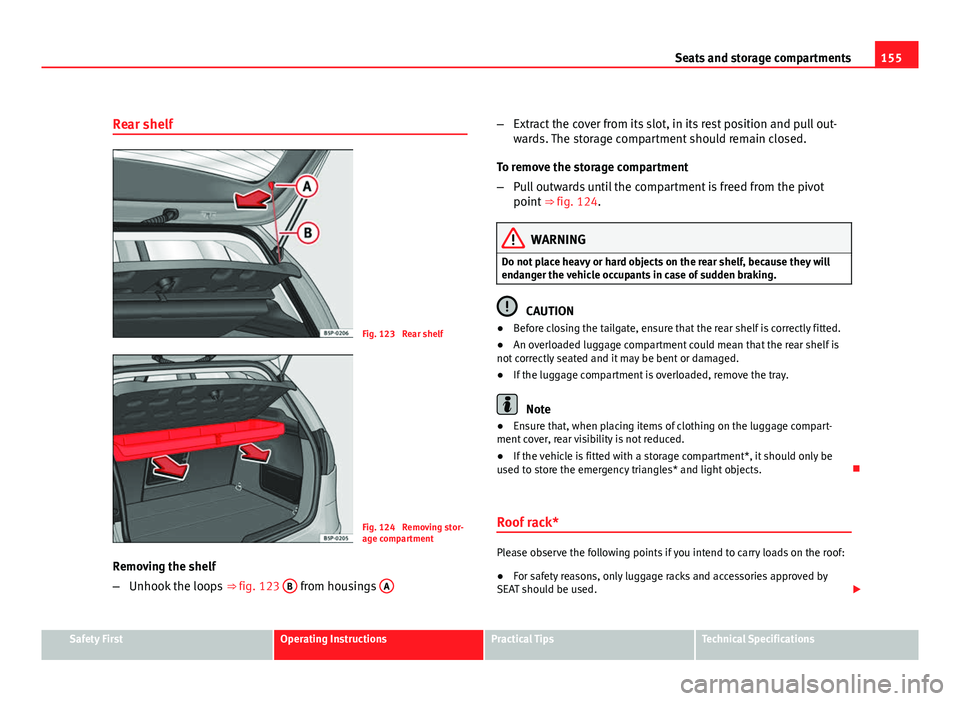
Fig. 123 Rear shelf
Fig. 124 Removing stor-
age compartment
Removing the shelf
– Unhook the loops ⇒ fig. 123 B
from housings A
–
Extract the cover from its slot, in its rest position and pull out-
wards. The storage compartment should remain closed.
To remove the storage compartment
– Pull outwards until the compartment is freed from the pivot
point ⇒ fig. 124.
WARNING
Do not place heavy or hard objects on the rear shelf, because they will
endanger the vehicle occupants in case of sudden braking.
CAUTION
● Before closing the tailgate, ensure that the rear shelf is correctly fitted.
● An overloaded luggage compartment could mean that the rear shelf is
not correctly seated and it may be bent or damaged.
● If the luggage compartment is overloaded, remove the tray.
Note
● Ensure that, when placing items of clothing on the luggage compart-
ment cover, rear visibility is not reduced.
● If the vehicle is fitted with a storage compartment*, it should only be
used to store the emergency triangles* and light objects.
Roof rack*
Please observe the following points if you intend to carry loads on the roof:
● For safety reasons, only luggage racks and accessories approved by
SEAT should be used.
Safety FirstOperating InstructionsPractical TipsTechnical Specifications
Page 216 of 313
214Vehicle maintenance and cleaning
WARNING
● Wash your vehicle with the ignition switched off.
● Protect your hands and arms from cuts on sharp metal edges when
cleaning the underbody, the inside of the wheel housings etc. Risk of in-
jury.
● Water, ice and salt on the brakes can reduce braking efficiency. Risk
of accident.
CAUTION
● Never remove dirt, mud or dust if the vehicle surface is dry. Never use a
dry cloth or sponge for cleaning purposes. This could scratch the paintwork
or glass on your vehicle.
● Washing the vehicle in low temperatures: when washing the vehicle
with a hose, do not direct water into the lock cylinders or the gaps around
the doors, tailgate, or sunroof. Risk of freezing.
For the sake of the environment
To protect environment, the vehicle should be washed only in specially pro-
vided wash bays. This prevents toxic, oil-laden waste water entering the
sewerage system. In some places, washing vehicles outside wash bays is
prohibited.
Note
Do not wash the vehicle in direct sunlight. Washing the vehicle with a high pressure cleaner
Be particularly careful when using a high pressure cleaner!
– Always observe the instructions for the high-pressure cleaner,
particularly those concerning the pressure and the spraying
distance.
– Increase the spraying distance for soft materials and painted
bumpers.
– Do not use a high pressure cleaner to remove ice or snow from
windows ⇒ page 215.
– Never use concentrated jet nozzles (“rotating jets”) ⇒
.
– After washing, avoid sudden and sharp braking. “Dry” the
brakes by braking several times ⇒ page 202.
WARNING
● Never wash tyres with a concentrated jet (“rotating nozzle”). Even at
large spraying distances and short cleaning times, visible and invisible
damage can occur to the tyres. This may cause an accident.
● Water, ice and salt on the brakes can reduce braking efficiency. Risk
of accident.
CAUTION
● Do not use water hotter than 60 °C. This could damage the vehicle.
● To avoid damage to the vehicle, keep a sufficient distance from sensitive
materials such as flexible hoses, plastic, soundproofing material, etc. This
is also important for bumpers painted in the colour of the bodywork. The
closer the nozzle is to the surface, the greater the wear on the material.
Page 218 of 313
216Vehicle maintenance and cleaning
If possible, use a de-icing spray to remove ice. If you use an ice scraper,
push it in one direction only without swinging it.
Use window cleaner or a silicone remover to clean rubber, oil, grease and
silicone deposits off.
Wax deposits can be removed with a special cleaner available in your Au-
thorised Service Centre. Wax deposits on the windscreen could cause the
wiper blades to judder. Adding a window cleaner that dissolves wax to the
windscreen washer fluid prevents wiper blades from juddering, but wax de-
posits are not removed.
CAUTION
● Never use warm or hot water to remove snow and ice from windows and
mirrors. This could cause the glass to crack!
● The heating element for the rear window is located on the inner side of
the window. To prevent damage, do not put stickers over the heating ele-
ments on the inside of the window.
Cleaning windscreen wiper blades
Clean wiper blades improve visibility.
1. Use a soft cloth to remove dust and dirt from the windscreen wiper blades.
2. Use window cleaner to clean the windscreen wiper blades. Use a sponge or a cloth to remove stubborn dirt. Rubber seals maintenance
If rubber seals are well looked after, they will not freeze so
quickly.
1. Use a soft cloth to remove dust and dirt from the rubber seals.
2. Apply a specialist care product to the rubber seals.
The rubber strips on the doors, windows, bonnet and tailgate will remain
pliable and last longer if they are treated with a suitable care product (for
example silicone spray).
Caring for rubber seals will also prevent premature ageing and leaks. The
doors will be easier to open. If rubber seals are well looked after, they will
not freeze so quickly in winter.
Door lock cylinders
The door lock cylinders can freeze up in winter.
To de-ice the lock cylinders you should only use spray with lubricating and
anti-corrosive properties.
Cleaning chrome parts
1. Clean chrome parts with a damp cloth.
2. Polish chrome parts with a soft, dry cloth. If this does not provide satisfying results, use a specialist chrome cleaning
product. Chrome cleaning products will remove stains from the surface.
Page 275 of 313
273
If and when
Side lights/ brake lights
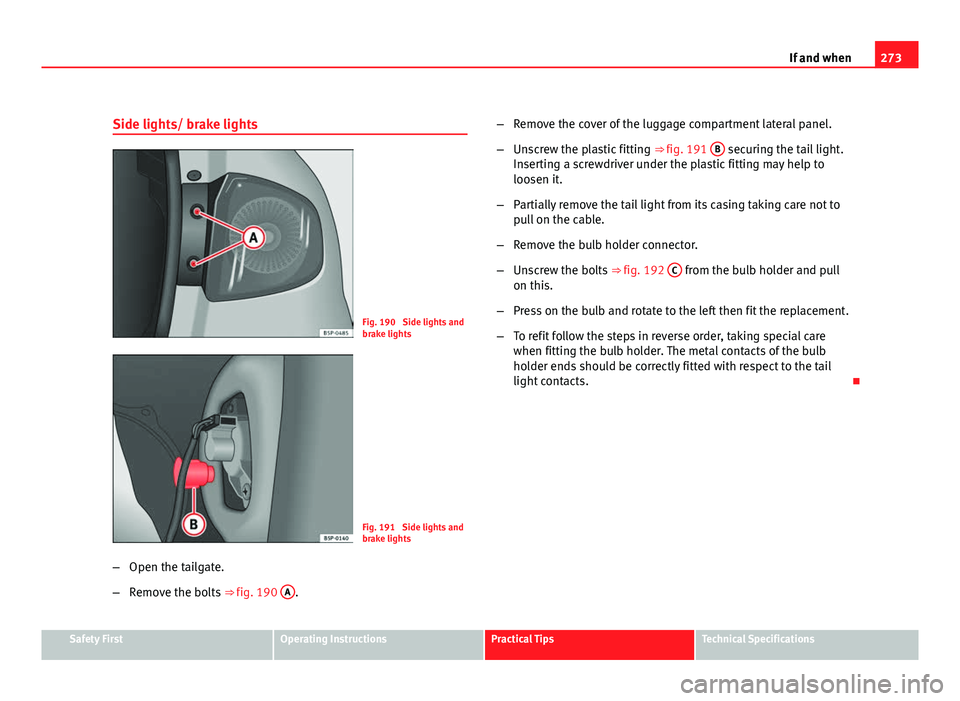
Fig. 190 Side lights and
brake lights
Fig. 191 Side lights and
brake lights
– Open the tailgate.
– Remove the bolts ⇒ fig. 190 A
. –
Remove the cover of the luggage compartment lateral panel.
– Unscrew the plastic fitting ⇒ fig. 191 B
securing the tail light.
Inserting a screwdriver under the plastic fitting may help to
loosen it.
– Partially remove the tail light from its casing taking care not to
pull on the cable.
– Remove the bulb holder connector.
– Unscrew the bolts ⇒ fig. 192 C
from the bulb holder and pull
on this.
– Press on the bulb and rotate to the left then fit the replacement.
– To refit follow the steps in reverse order, taking special care
when fitting the bulb holder. The metal contacts of the bulb
holder ends should be correctly fitted with respect to the tail
light contacts.
Safety FirstOperating InstructionsPractical TipsTechnical Specifications