four wheel drive Seat Altea Freetrack 2007 Owner's Manual
[x] Cancel search | Manufacturer: SEAT, Model Year: 2007, Model line: Altea Freetrack, Model: Seat Altea Freetrack 2007Pages: 312, PDF Size: 9.14 MB
Page 59 of 312
Cockpit57
Safety First
Operating instructions
Tips and Maintenance
Te c h n i c a l D a t a
Fuel gauge
and reserve indicator
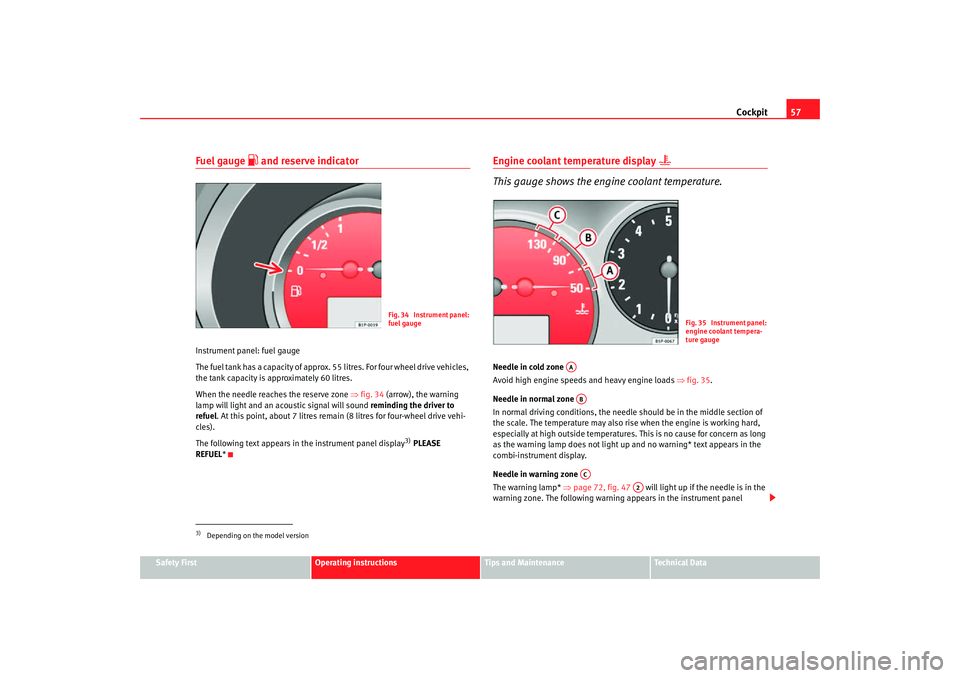
Instrument panel: fuel gauge
The fuel tank has a capacity of approx. 55 litres. For four wheel drive vehicles,
the tank capacity is approximately 60 litres.
When the needle reaches the reserve zone ⇒fig. 34 (arrow), the warning
lamp will light and an acoustic signal will sound reminding the driver to
refuel . At this point, about 7 litres remain (8 litres for four-wheel drive vehi-
cles).
The following text appears in the instrument panel display
3) PLEASE
REFUEL *
Engine coolant temperature display
This gauge shows the engine coolant temperature.
Needle in cold zone
Avoid high engine speeds and heavy engine loads ⇒fig. 35.
Needle in normal zone
In normal driving conditions, the needle should be in the middle section of
the scale. The temperature may also rise when the engine is working hard,
especially at high outside temperatures. This is no cause for concern as long
as the warning lamp does not light up and no warning* text appears in the
combi-instrument display.
Needle in warning zone
The warning lamp* ⇒page 72, fig. 47 will light up if the needle is in the
warning zone. The following warning ap pears in the instrument panel
3)Depending on the model version
Fig. 34 Instrument panel:
fuel gauge
Fig. 35 Instrument panel:
engine coolant tempera-
ture gauge
AAABAC
A2
altea_xl ingles.book Seite 57 Donnerstag, 12. April 2007 12:56 12
Page 77 of 312
Cockpit75
Safety First
Operating instructions
Tips and Maintenance
Te c h n i c a l D a t a
WARNING
•
Failure to observe warning lamps and warning messages can result in
serious personal injury or damage to your vehicle.
•
The risk of an accident increases if your vehicle breaks down. Use a
warning triangle to draw the attention of other road users to your
stationary vehicle so that it does not represent a danger.
•
The engine compartment of any motor vehicle is a dangerous area!
Before you open the bonnet to work on the engine or in the engine compart-
ment, you must switch off the engine and allow it to cool to reduce the risk
of scalding or other injuries. Read and observe the relevant warnings
⇒ page 211.Note
•
The appropriate warning lamp for a fault will light up in vehicles without
warning or information texts in the display.
•
In vehicles with warning or information texts in the display, the appro-
priate warning lamp for a fault will ligh t up and a warning or information text
will also appear in the display.
Fuel level / reserve
This symbol lights up to indicate that the fuel tank is down to
the reserve level.This lights when only 7 litres of fuel re main in the tank (8 litres for four-wheel
drive vehicles). Also, an audible warning is given. This serves as a reminder
to fill up with fuel at the earliest opportunity ⇒page 208. The following information text is
displayed in the instrument panel
9): PLEASE
REFUEL! .
Coolant Level* / temperature
The warning lamp lights up if the coolant temperature is too
high or if the coolant level is too low.There is a fault if:•
The warning symbol does not go out again after a few seconds.
•
The warning lamp lights up or flashes while the vehicle is moving, while
three acoustic warning signals ⇒ are emitted.
This means that either the coolant level is too low or the coolant temperature
is too high.
Coolant temperature too high
The following information text is displayed in the instrument panel
10): CHECK
COOLANT INSTRUCTIONS MANUAL .
First look at the coolant temperature gauge. The coolant temperature is too
high if the needle is over the warning area on the dial. Stop the vehicle,
switch off the engine and wait for it to cool down. Check the coolant level.
If the coolant level is correct, the over heating may be caused by a malfunction
of the radiator fan. Check the radiator fan fuse and have it replaced if neces-
sary ⇒page 247.
If the warning lamp lights up again after driving on for a short distance, stop
the vehicle and switch off the engine . Contact an Authorised Service Centre
or a qualified workshop.
9)Depending on the model version10)Depending on the model version
altea_xl ingles.book Seite 75 Donnerstag, 12. April 2007 12:56 12
Page 185 of 312
Intelligent technology183
Safety First
Operating instructions
Tips and Maintenance
Te c h n i c a l D a t a
The TCS should be switched on again afterwards as soon as possible.
WARNING
•
It must be remembered that TCS cann
ot defy the laws of physics. This
should be kept in mind, particular ly on slippery and wet roads and when
towing a trailer.
•
Always adapt your driving style to suit the condition of the roads and
the traffic situation. Do not let the extra safety afforded by TCS tempt you
into taking any risks when driving, this can cause accidents.Caution
•
In order to ensure that TCS function correctly, all four wheels must be
fitted with the same tyres. Any differences in the rolling radius of the tyres can
cause the system to reduce engine power when this is not desired.
•
Modifications to the vehicle (e.g. to the engine, the brake system, running
gear or any components affecting the wh eels and tyres) could affect the effi-
ciency of the ABS and TCS.
Electronic stabilisation program (ESP)*General notes
The electronic stabilisation program increases the vehicle’s
stability on the road.The electronic stabilisation program helps to reduce the danger of skidding.
The electronic stabilisation programme (ESP) consists of ABS, EDL, TCS and
Steering manoeuvre recommendations. Electronic Stabilising Program (ESP)*
ESP reduces the danger of skidding by braking the wheels individually.
The system uses the steering wheel angle and road speed to calculate the
changes of direction desired by the driver, and constantly compares them
with the actual behaviour of the vehi
cle. If the desired course is not being
maintained (for instance, if the car is starting to skid), then the ESP compen-
sates automatically by braking the appropriate wheel.
The forces acting on the braked wheel bring the vehicle back to a stable
condition. If the vehicle tends to oversteer, the system will act on the front
wheel on the outside of the turn.
Steering manoeuvre recommendations
This is a complementary safety function included in the ESP This function aids
the driver to better stabilize the vehicle in a critical situation. For example, in
case of sudden braking surface with varied adherence, the vehicle will tend
to destabilize its trajectory to the right to or to the left. In this case the ESP
recognizes the situation and helps the driver with a counter steering
manoeuvre from the power steering.
This function simply provides the dr iver with a recommended manoeuvre in
critical situations.
The vehicle doesn't steer itself with this function, the driver has full control of
the vehicle at all times.
WARNING
•
It must be remembered that ESP cann ot defy the laws of physics. This
should be kept in mind, particularly on slippery and wet roads and when
towing a trailer.
•
Always adapt your driving style to suit the condition of the roads and
the traffic situation. Do not let the extra safety afforded by ESP tempt you
into taking any risks when driving, this can cause accidents.
altea_xl ingles.book Seite 183 Donnerstag, 12. April 2007 12:56 12
Page 186 of 312
Intelligent technology
184
Caution•
In order to ensure that ESP functions correctly, all four wheels must be
fitted with the same tyres. Any differences in the rolling radius of the tyres can
cause the system to reduce engine power when this is not desired.
•
Modifications to the vehicle (e.g. to the engine, the brake system, running
gear or any components affecting the wheels and tyres) could affect the effi-
ciency of the ABS, EDL, ESP and TCS.Note
To disconnect using the ESP button ⇒page 162.Anti-lock brake system (ABS)The anti-lock brake system prevents the wheels locking during braking
⇒page 182Electronic differential lock (EDL)*
The electronic differential lock helps prevent the loss of trac-
tion caused if one of the driven wheels starts spinning.EDL helps the vehicle to start moving, accelerate and climb a gradient in slip-
pery conditions where this may otherwise be difficult or even impossible.
The system will control the revolutions of the drive wheels using the ABS
sensors (in case of an EDL fault the warning lamp for ABS lights up)
⇒page 78.
At speeds of up to approximately 80 km/h, it is able to balance out differ-
ences in the speed of the driven wheel s of approximately 100 rpm caused by a slippery road surface on
one side of the vehicle. It does this by braking the
wheel which has lost traction and distributing more driving force to the other
driven wheel via the differential.
To prevent the disc brake of the braked wheel from overheating, the EDL cuts
out automatically if subjected to excessive loads. The vehicle will continue to
function normally without EDL. For this reason, the driver is not informed that
the EDL has been switched off.
The EDL will switch on again automatically when the brake has cooled down.
WARNING
•
When accelerating on a slippery surface, for example on ice and snow,
press the accelerator carefully. Despite EDL, the driven wheels may start to
spin. This could impair the vehicle’s stability.
•
Always adapt your driving style to su it road conditions and the traffic
situation. Do not let the extra safety afforded by EDL tempt you into taking
any risks when driving, this can cause accidents.Caution
Modifications to the vehi cle (e.g. to the engine, the brake system, running
gear or any components affecting the wheels and tyres) could affect the effi-
ciency of the EDL ⇒page 204.The traction control system (TCS)The traction control system prevents the drive wheels from spinning when the
car is accelerating ⇒page 182.
altea_xl ingles.book Seite 184 Donnerstag, 12. April 2007 12:56 12
Page 187 of 312
Intelligent technology185
Safety First
Operating instructions
Tips and Maintenance
Te c h n i c a l D a t a
Four-wheel drive (quattro
®)
On quattro models the engine power is distributed to all four
wheels
General notes
The four-wheel-drive system operates completely automatically. The propul-
sion force is distributed among the four wheels and adapted to the driving
style and the road conditions.
The four-wheel drive is specially designe d to complement the superior engine
power of your Audi. This combination gives the car exceptional handling and
performance capabilities – both on normal roads and in more difficult condi-
tions, such as snow and ice.
Winter tyres
Thanks to its four-wheel drive, your car will have plenty of traction in winter
conditions, even with the standard tyres. Nevertheless, we still recommend
that winter tyres or all-season tyres should be fitted on all four wheels when
winter road conditions are expected, mainly because this will give a better
braking response.
Snow chains
On roads where snow chains are mandatory, this also applies to cars with
four-wheel drive.
Changing tyres
On vehicles with four-wheel drive, all four tyres must have the same rolling
circumference ⇒page 232.
WARNING
•
Even with four-wheel drive, you should always adjust your speed to suit
the conditions. Do not let the extra safety features tempt you into taking
any risks when driving. Failure to do so could result in an accident.
•
The braking capability of your vehicle is limited by the tyres' grip.
Vehicle behaviour is no different from a vehicle without four-wheel drive.
So do not be tempted to drive too fast on icy or slippery roads just because
the car still has good acceleration in these conditions. Failure to do so
could result in an accident.
•
On wet roads bear in mind that the front wheels may start to “aqua-
plane” and lose contact with the road if the car is driven too fast. If this
should happen, there will be no su dden increase in engine speed when
“aquaplaning” begins to warn the driver, as with a front-wheel drive car.
For this reason and for that mentio ned above, always choose a driving
speed suitable for the road conditions. Failure to do so could result in an
accident.WARNING (continued)
altea_xl ingles.book Seite 185 Donnerstag, 12. April 2007 12:56 12
Page 210 of 312
Checking and refilling levels
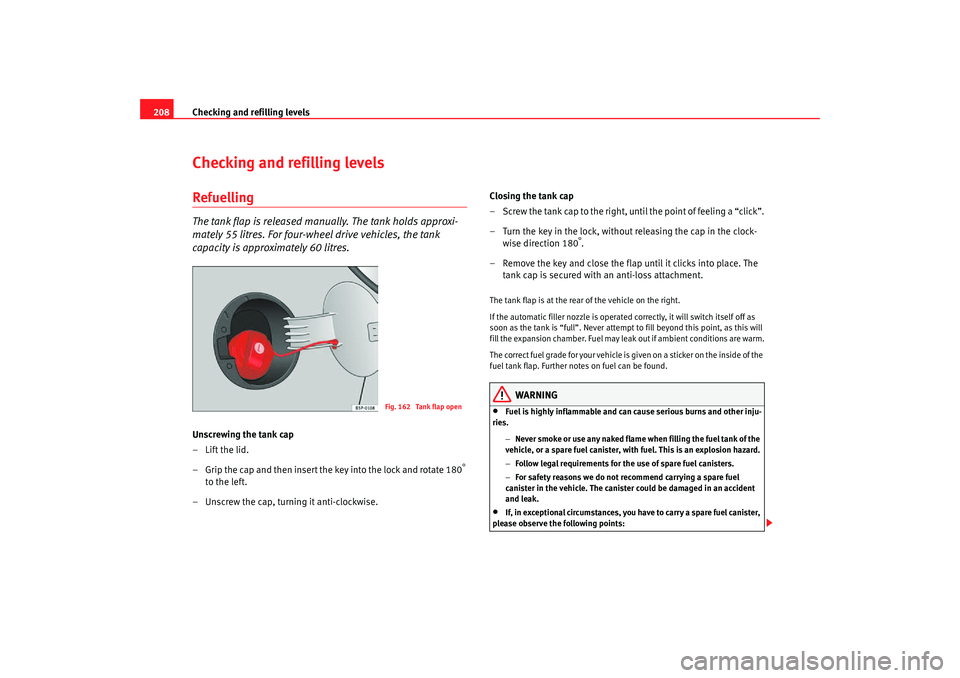
208Checking and refilling levelsRefuellingThe tank flap is released manually. The tank holds approxi-
mately 55 litres. For four-wheel drive vehicles, the tank
capacity is approximately 60 litres.Unscrewing the tank cap
–Lift the lid.
– Grip the cap and then insert the key into the lock and rotate 180
°
to the left.
– Unscrew the cap, turning it anti-clockwise. Closing the tank cap
– Screw the tank cap to the right, until the point of feeling a “click”.
– Turn the key in the lock, without releasing the cap in the clock-
wise direction 180
°.
– Remove the key and close the flap until it clicks into place. The tank cap is secured with an anti-loss attachment.
The tank flap is at the rear of the vehicle on the right.
If the automatic filler nozzle is operated correctly, it will switch itself off as
soon as the tank is “full”. Never attempt to fill beyond this point, as this will
fill the expansion chamber. Fuel may leak out if ambient conditions are warm.
The correct fuel grade for your vehicle is given on a sticker on the inside of the
fuel tank flap. Further notes on fuel can be found.
WARNING
•
Fuel is highly inflammable and can cause serious burns and other inju-
ries.
−Never smoke or use any naked flame when filling the fuel tank of the
vehicle, or a spare fuel canister, with fuel. This is an explosion hazard.
− Follow legal requirements for the use of spare fuel canisters.
− For safety reasons we do not recommend carrying a spare fuel
canister in the vehicle. The canister could be damaged in an accident
and leak.
•
If, in exceptional circumstances, you have to carry a spare fuel canister,
please observe the following points:
Fig. 162 Tank flap open
altea_xl ingles.book Seite 208 Donnerstag, 12. April 2007 12:56 12
Page 235 of 312

Wheels and tyres233
Safety First
Operating instructions
Tips and Maintenance
Te c h n i c a l D a t a
This contains the following information:
195 Tyre width in mm
65 Height/width ratio in %
R Tyre construction:
Radial
15 Rim diameter in cm
91 Load rating code
T Speed rating
The tyres could also have the following information:
•
A direction of rotation symbol
•
“Reinforced” denotes heavy-duty tyres.
The manufacturing date is also indicated on the tyre sidewall (possibly only
on the inner side of the wheel).
“DOT... 1103...” means, for example, that the tyre was produced in the 11th
week of 2003.
We recommend that work on tyres and wheels is carried out by an Authorised
Service Centre. They are familiar with the procedure and have the necessary
special tools and spare parts as well as the proper facilities for disposing of
the old tyres.
Any Authorised Service Centre has full information on the technical require-
ments when installing or changing tyres, wheels or wheel trims.
On vehicles with four-wheel drive, all four tyres must always be fitted with
tyres of the same type, make and tread pattern, as otherwise the driveline can
be damaged by continuous differences in the wheel speeds. For the same
reason, only use a spare wheel with the same tyre dimensions as the normal
road wheels. You may also use the factory-supplied compact temporary spare
wheel.
WARNING
•
We recommend that you use only wh eels and tyres which have been
approved by SEAT for your model. Failure to do so could impair vehicle
handling. Risk of accident.
•
Avoid running the vehicle on tyres th at are more than six years old. If
you have no alternative, you should drive slowly and with extra care at all
times.
•
Never use old tyres or those with an unknown “history of use”.
•
If wheel trims are retrofitted, you must ensure that the flow of air to the
brakes is not restricted. This could cause them to overheat.
•
All four wheels must be fitted with radial tyres of the same type, size
(rolling circumference) and the same tread pattern.For the sake of the environment
Old tyres must be disposed of accordi ng to the laws in the country concerned.
Note
•
For technical reasons, it is not generally possible to use the wheels from
other vehicles. This can also apply to wheels of the same model. The use of
wheels or tyres which have not been approved by SEAT for use with your
model may invalidate the vehicle's type approval for use on public roads.
•
If the spare tyre is not the same as the tyres that are mounted on the
vehicle - for example with winter tyres - you should only use the spare tyre for
a short period of time and drive with extra care. Refit the normal road wheel
as soon as possible.
altea_xl ingles.book Seite 233 Donnerstag, 12. April 2007 12:56 12
Page 236 of 312
Wheels and tyres
234Wheel bolts
Wheel bolts must be tightened to the correct torque.The design of wheel bolts is matched to the rims. If different wheel rims are
fitted, the correct wheel bolts with the right length and correctly shaped bolt
heads must be used. This ensures that wheels are fitted securely and that the
brake system functions correctly.
In certain circumstances, you may not use wheel bolts from a different car -
even if it is the same model ⇒page 204.
After the wheels have been changed, the tightening torque of the wheel bolts
should be checked as soon as possible with a torque wrench. ⇒ The tight-
ening torque for steel and alloy wheels is 120 Nm.
WARNING
If the wheel bolts are not tightened correctly, the wheel could become
loose while driving. Risk of accident.•
The wheel bolts must be clean and turn easily. Never apply grease or oil
to them.
•
Use only wheel bolts which belong to the wheel.
•
If the torque of the wheel bolts is to o low, they could loosen whilst the
vehicle is in motion. Risk of accident! If the tightening torque is too high,
the wheel bolts and threads could be damaged.Caution
The prescribed torque for wheel bolts for steel and alloy wheels is 120 Nm.
Winter tyres
Winter tyres will improve the vehicles handling on snow and
ice.In winter conditions winter tyres will considerably improve the vehicles
handling. The design of summer tyres (width, rubber compound, tread
pattern) gives less grip on ice and snow.
Winter tyres must be inflated to a pressure 0.2 bar higher than the pressures
specified for summer tyres (see sticker on tank flap).
Winter tyres must be fitted on all four wheels.
Information on permitted winter tyre sizes can be found in the vehicle's regis-
tration documents. Use only radial winter tyres. All tyre sizes listed in the
vehicle documentation also apply to winter tyres.
Winter tyres lose their effectiveness when the tread is worn down to a depth
of 4 mm.
The speed rating code ⇒page 232, “New tyres and wheels” determines the
following speed limits : ⇒ ⇒
Q max. 160 km/h
S max. 180 km/h
T max. 190 km/h
H max. 210 km/h
In some countries, vehicles which can exceed the speed rating of the fitted
tyre must have an appropriate sticker in the driver's field of view. These
stickers are available from your Authorised Service Centre. The legal require-
ments of each country must be followed.
Do not have winter tyres fitted for unnecessarily long periods. Vehicles with
summer tyres handle better when the roads are free of snow and ice.
If you have a flat tyre, please refer to the notes on the spare wheel
⇒ page 232, “New tyres and wheels”.
altea_xl ingles.book Seite 234 Donnerstag, 12. April 2007 12:56 12
Page 237 of 312

Wheels and tyres235
Safety First
Operating instructions
Tips and Maintenance
Te c h n i c a l D a t a
WARNING
The maximum speed for the winter tyre s must not be exceeded. Otherwise,
this could lead to tyre damage and thus, an accident risk.
For the sake of the environment
Fit your summer tyres in good time. They are quieter, do not wear so quickly
and reduce fuel consumption.Snow chainsSnow chains may be fitted only to the front wheels, and only to certain tyre
sizes ⇒page 232.
Snow chains must have fine-pitch link s which do not protrude more that 9
mm, including tension device.
Remove wheel hub covers and trim rings before fitting snow chains. For safety
reasons cover caps, available in any Authorised Service Centre, must then be
fitted over the wheel bolts.
Four-wheel drive : where snow chains are compulsory on certain roads, this
normally also applies to cars with four-wheel drive. Snow chains may only be
fitted to the front wheels (also on vehicles with four-wheel drive).
WARNING
Observe the fitting instructions provided by the snow chain manufacturer.
Caution
You must remove the snow chains to drive on roads which are free of snow.
Otherwise they will impair handling, damage the tyres and wear out very
quickly.
Note
•
In some countries, the speed limit for using snow chains is 50 km/h. The
legal requirements of the country should be followed.
•
We recommend that you ask your Appr oved Service Centre for information
about appropriate wheel, tyre and snow chain size.
altea_xl ingles.book Seite 235 Donnerstag, 12. April 2007 12:56 12
Page 253 of 312

If and when251
Safety First
Operating instructions
Tips and Maintenance
Te c h n i c a l D a t a
Some of the electrical items listed in
the table are only fitted on certain
models or are optional extras.
Please note that the above list, while correct at the time of printing, is subject
to alterations. If discrepancies should occur, please refer to the sticker on the
inside of the fuse cover for the co rrect information for your model.
44
Rear window heater 25
45 Electric windows (front) 30
46 Rear electric windows 30
47 Engine (Fuel control unit, petrol relay) 15
48 Convenience controls 20
49 Heating controls 40
50 Heated seats 30
51 Sunroof 20
52 Headlight washer system 20
53 Towing hook kit (assisted solution) 20
54 Taxi (taximeter power supply) 5
55 Towing hook kit (assisted solution) 20
56 Taxi (taximeter power supply) 15
57 Vacant
58 Central locking control unit 30
a)For vehicles with four-wheel drive.
NumberElectrical equipment Amperes
altea_xl ingles.book Seite 251 Donnerstag, 12. April 2007 12:56 12