warning lights Seat Altea Freetrack 2010 Owner's Guide
[x] Cancel search | Manufacturer: SEAT, Model Year: 2010, Model line: Altea Freetrack, Model: Seat Altea Freetrack 2010Pages: 294, PDF Size: 7.71 MB
Page 120 of 294

Lights and visibility
118
Switching main beam on and off
– Turn the light switch to position
.
–Press the lever forward ⇒page 117, fig. 77 to switch on the
main beams.
– Pull the lever back towards you to switch the main beam head- lights off again.
Headlight flashers
– Pull the lever towards the steering wheel to operate the flasher.
Switching on parking lights
– Switch the ignition off and remove the key from the lock.
– Move the lever up or down to turn the right or left-hand parking lights on, respectively.
WARNING
The main beam can dazzle other drivers. Risk of accident! Never use the
main beam headlights or the headlight flasher if they could dazzle other
drivers.
Note
• The turn signals only work when the ignition is switched on. The corre-
sponding warning lamp
or flashes on the dash panel. The warning lamp
flashes when the turn signals are operated, provided a trailer is correctly
attached and connected to the vehicle. If a turn signal bulb is defective, the
warning lamp flashes at double speed. If the trailer turn signal bulbs are
damaged, warning lamp
does not light up. Change the bulb.
•The main beam headlights can only be switched on if the dipped beam
headlights are already on. The warning lamp
then lights up on the dash
panel.
•The headlight flasher comes on for as long as you pull the lever – even if
no other lights are switched on. The warning lamp
then lights up on the
dash panel.
•When the parking lights are switched on, the headlight and the rear light
on the corresponding side of the vehicle light up. The parking lights will only
work if the key is removed from the ignition. If the lights are switched on, a
buzzer gives an audible warning while the driver door is open.•If the turn signal lever is left on after the key has been taken out of the
ignition lock, an acoustic signal sounds when the driver door is opened. This
is a reminder to switch off the turn signal, unless of course you wish to leave
the parking light on.
A3
A4
Freetrack_EN.book Seite 118 Donnerstag, 10. September 2009 10:33 10
Page 125 of 294

Lights and visibility123
Safety First
Controls and equipment
Practical tips
Technical Data
– Move the control to the left or right to set the length of the
intervals. Control to the left: long intervals; control to the right:
short intervals. Four wiper interval stages can be set using switch .
Slow wipe
– Move the lever up to position .
Continuous wipe
– Move the lever up to position .
Brief wipe
– Move the lever down to position to give the windscreen a brief
wipe. The wiper will start to move faster if you keep the lever
pressed down for longer than 2 seconds.
Wash and wipe automatic system
– Pull the lever towards the steering wheel - Position . The wash function will start immediately and the wipers will start with a
slight delay. The wash and wipe r systems will function at the
same time at speeds of over 120 km/h.
– Release the lever. The wipers will keep running for approximately four seconds.Optional heated windscreen in the wiper blade* area (page
In some countries and with some versions, there is the possibility of heating
the windscreen in the area of the windscreen wiper blades in order to aid de-
icing in the zone. The function is switched on by pressing the rear heating
window key
.
WARNING
•Worn and dirty wiper blades obstruct visibility and reduce safety levels.•In cold conditions, you should not use the wash / wipe system unless
you have warmed the windscreen with the heating and ventilation system.
The washer fluid could otherwise freeze on the windscreen and obscure
your view of the road.•Always note the corresponding warnings on ⇒page 223, “Changing
windscreen wiper blades”.Caution
In icy conditions, always check that the wiper blades are not frozen to the
glass before using the wipers for the first time. If you switch on the wipers
when the wiper blades are frozen to the windscreen, you could damage both
the wiper blades and the wiper motor.
Note
•The windscreen wipers will only work when the ignition is switched on.•In certain versions of vehicles with alarms, the windscreen wiper will only
work when the ignition is on and the bonnet closed.•When in use, the wipers do not go as far as the rest position. When the
lever is moved to position 0, they are totally hidden.•T h e n e x t s p e e d d o w n w i ll a u t o m a t i ca ll y b e s e l e c t e d i f s p e e d ⇒page 122,
fig. 85 or is selected when the vehicle stops. The set speed will be
resumed when the vehicle starts again•The windscreen will be wiped again after approximately five seconds once
the “automatic wipe/wash system” has been operated, provided the vehicle
is in transit (drip function). If you activate the wipers less than three seconds
after the drip function, a new wash sequence will begin without the last wipe.
For the “drip” function to work again, you have to turn the ignition off and
then on again.
AA
AA
A2A3A4
A5
A2
A3
Freetrack_EN.book Seite 123 Donnerstag, 10. September 2009 10:33 10
Page 127 of 294

Lights and visibility125
Safety First
Controls and equipment
Practical tips
Technical Data
Rear window wiper
The windscreen wiper lever operates the windscreen wiper
and the wash and wipe system for the rear window.
Switching on the interval wipe
– Press the lever forwards to position ⇒fig. 88 . The wiper will
wipe the window approximately every 6 seconds.
Switching off the interval wipe function
– Pull the lever back from position towards the steering wheel. The wiper will continue to function for a short period if you switch
off whilst the wipers are in motion. Switching on the windscreen wiper and washer system
– Press the lever fully forwards to position
⇒fig. 88 . The wash
function will start immediately and the wiper will start with a
slight delay. The windscreen wash system will function as long as
you hold the lever in this position.
– Release the lever. The wiper then wipes for approximately 4 seconds, and then in intervals again.
– Release the lever. The washer system stops and the wipers func- tion.
WARNING
•Worn and dirty wiper blades obstruct visibility and reduce safety levels.•Always note the corresponding warnings on ⇒page 223, “Changing
windscreen wiper blades”.Caution
In icy conditions, always check that the wiper blade is not frozen to the glass
before using the wiper for the first time. If you switch on the wiper when the
wiper blade is frozen to the glass, this could damage both the wiper blade
and the wiper motor.
Note
•The windscreen wiper will only function when the ignition is switched on
and the tailgate is closed.•In reverse gear, with the windscreen wipers switched on, the rear wind-
screen wiper will make one wipe.
Fig. 88 Windscreen wiper
and windscreen wash
lever: rear window wiper
A6
A6
A7
Freetrack_EN.book Seite 125 Donnerstag, 10. September 2009 10:33 10
Page 128 of 294

Lights and visibility
126Headlight washer system
The headlight washers clean the headlight lenses.The headlight washers are activated automatically when the windscreen
washer is used and the windscreen wiper lever is pulled towards the steering
wheel for at least 1.5 seconds – provided the dipped headlights or main
beams are switched on. Clean off stubborn dirt (insects, etc.) from the head-
lights at regular intervals, for instance when filling the fuel tank.
Note
•To ensure that the headlight washers work properly in winter, keep the
nozzle holders in the bumper free of snow and remove any ice with a de-icer
spray.•To remove water, the windscreen wipers will be activated from time to
time, the headlight wipers will be activated every three cycles.MirrorsInterior mirror
It is dangerous to drive if yo u cannot see clearly through the
rear window.Manual anti-dazzle function for interior mirror
In the basic mirror position, the lever at the bottom edge of the mirror should
be at the front. Pull the lever to the back to select the anti-dazzle function.
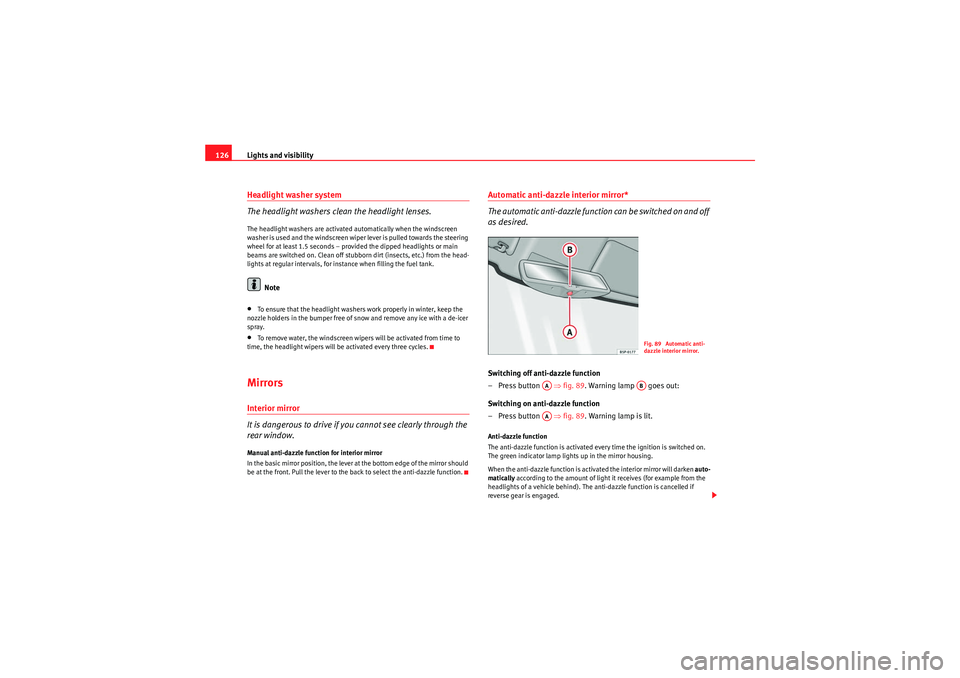
Automatic anti-dazzle interior mirror*
The automatic anti-dazzle function can be switched on and off
as desired.Switching off anti-dazzle function
–Press button ⇒ fig. 89. Warning lamp goes out:
Switching on anti-dazzle function
–Press button ⇒ fig. 89. Warning lamp is lit.Anti-dazzle function
The anti-dazzle function is activated every time the ignition is switched on.
The green indicator lamp lights up in the mirror housing.
When the anti-dazzle function is activated the interior mirror will darken auto-
matically according to the amount of light it receives (for example from the
headlights of a vehicle behind). The anti-dazzle function is cancelled if
reverse gear is engaged.
Fig. 89 Automatic anti-
dazzle interior mirror.
AA
AB
AA
Freetrack_EN.book Seite 126 Donnerstag, 10. September 2009 10:33 10
Page 130 of 294

Lights and visibility
128
Synchronised mirror adjustment
1. Turn the control to the position L ( left exterior mirror ).
2. Turn the rotary knob to position the mirror so that you have a good view to the rear of the vehicle. The right exterior mirror will
be adjusted at the same time (synchronised).
WARNING
•The rear view convex or aspheric mirror increase the field of vision
however the objects appear smaller and further away in the mirrors. If you
use these mirrors to estimate the distance to vehicles behind you when
changing lane, you could make a mistake. Risk of accident.•If possible, use the interior mirror to estimate distances to vehicles
behind you.•Make sure that you do not get your finger trapped between the mirror
and the mirror base when folding back the mirrors. Risk of injury!For the sake of the environment
The exterior mirror heating should be switched off when it is no longer
needed. Otherwise, it is an unnecessary fuel waste.
Note
•If the electrical adjustment ever fails to operate, the mirrors can be
adjusted by hand by lightly pressing the edge of the mirror glass.•In vehicles with electric wing mirrors, the following points should be
observed: if, due to an external force (e.g. a knock while manoeuvring), the
adjustment of the mirror housing is altered, the mirror will have to be
completely folded electrically . Do not readjust the mirror housing by hand, as
this will interfere with the mirror adjuster function.
•The rear view mirrors can be adjusted separately or simultaneously, as
described before.•The fold-in function on the wing mirrors is not activated at speeds of
above 40 km/h.
Freetrack_EN.book Seite 128 Donnerstag, 10. September 2009 10:33 10
Page 161 of 294

Heating, Ventilation and Air conditioning159
Safety First
Controls and equipment
Practical tips
Technical Data
Button – Manual air recirculation mode.
Button – Rear window heating. The heating will be switched off auto-
matically approximately
20 minutes after switching on. However, it may
be turned off by pushing the button. The button lights up yellow and the
symbol appears in the display.
Button – Automatic temperature, ventilation and air distribution
control ⇒page 160
button - Dual zone synchroniser
Button – Switches the 2C-Climatronic on and off ⇒page 161
Blower control ⇒page 161
button – Switches heating, ventilation and air-conditioning system
on
WARNING
For road safety all windows must be clear of ice, snow, and condensation.
This is essential to ensure good visibility. Please familiarise yourself with
the correct operation of the heating and ventilation system, including the
anti-fog/defrost functions for the windscreens.
Note
Please observe the general notes ⇒page 162.
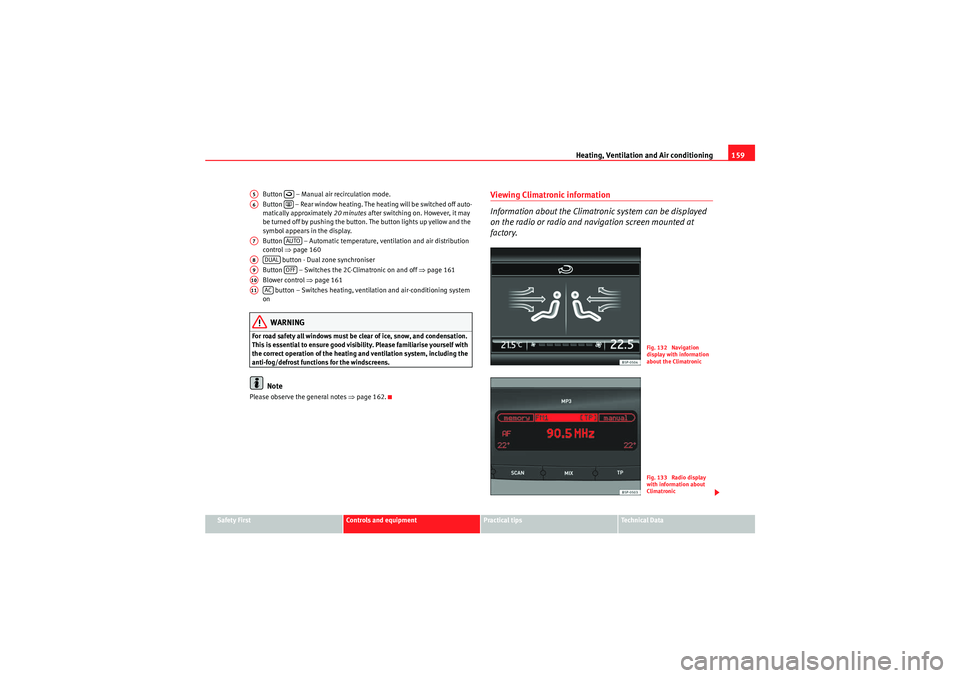
Viewing Climatronic information
Information about the Climatronic system can be displayed
on the radio or radio and navigation screen mounted at
factory.
A5
A6
A7
AUTO
A8
DUAL
A9
OFF
A10A11
AC
Fig. 132 Navigation
display with information
about the ClimatronicFig. 133 Radio display
with information about
Climatronic
Freetrack_EN.book Seite 159 Donnerstag, 10. September 2009 10:33 10
Page 168 of 294

Driving
166•when driving in deep snow or on loose surfaces,•when rocking the vehicle backwards and forwards to free it from mud, for
example.
Next, the button should be pressed to reactivate the TCS.
When does the warning light switch on or flash ?•On switching the ignition on, it lights up for about two seconds to carry
out a function control.•The warning lamp will start flashing when the vehicle is moving if the ESP
or the TCS is activated. The warning lamp will light up slowly if the TCS is
switched off.•It will light up continuously if there is a malfunction in the ESP.WARNING
•The electronic stabilisation programme (ESP) cannot defy the laws of
physics. This should be kept in mi nd, particularly on slippery and wet
roads and when towing a trailer.•Always adapt your driving style to suit the condition of the roads and
the traffic situation. Do not let the extra safety afforded by ESP tempt you
into taking any risks when driving, this can cause accidents.•Please refer to the corresponding warning notes on ESP in ⇒page 183,
“Intelligent technology”.
Ignition lockPosition of the ignition keyIgnition switched off, steering lock
In this position ⇒fig. 138 the ignition and the engine are OFF and the
steering may be locked.
For the Steering lock to operate without the ignition key, turn the steering
wheel until it locks with an audible sound. You should always lock the
steering wheel when you leave your vehicle. This will help prevent vehicle
theft ⇒ .
Switching the ignition or the glow plug system on
Turn the ignition key to this position and release it. If the key cannot be turned
or it is difficult to turn from position to position , move the steering
wheel back and forth until it loosens up.
Fig. 138 Ignition key
positions
A0
A1
A0
A12
Freetrack_EN.book Seite 166 Donnerstag, 10. September 2009 10:33 10
Page 172 of 294

Driving
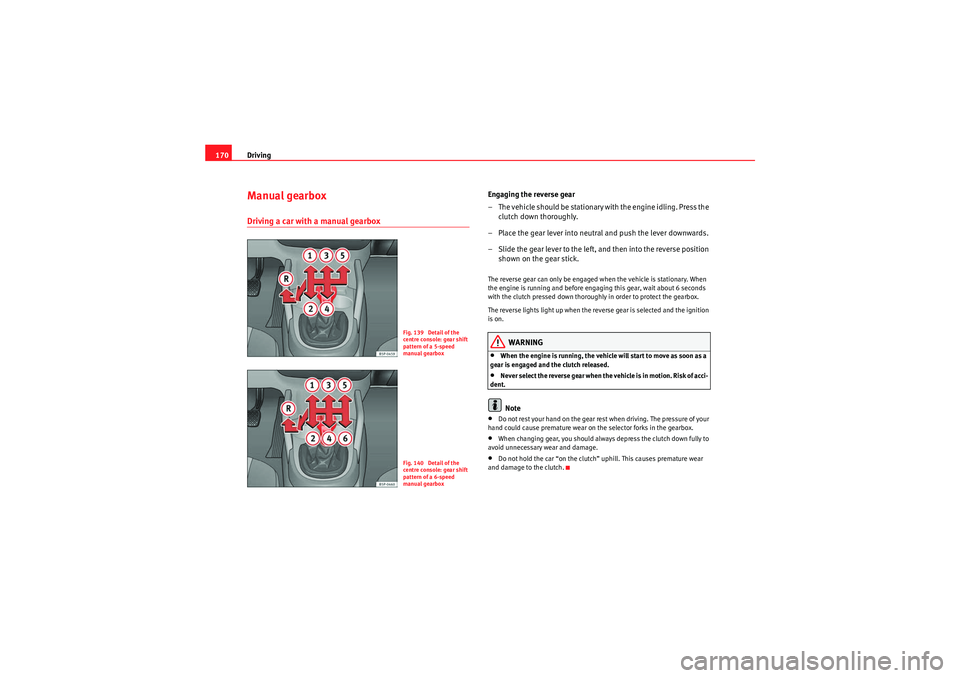
170Manual gearboxDriving a car with a manual gearbox
Engaging the reverse gear
– The vehicle should be stationary with the engine idling. Press the
clutch down thoroughly.
– Place the gear lever into neutral and push the lever downwards.
– Slide the gear lever to the left, and then into the reverse position shown on the gear stick.The reverse gear can only be engaged when the vehicle is stationary. When
the engine is running and before engaging this gear, wait about 6 seconds
with the clutch pressed down thoroughly in order to protect the gearbox.
The reverse lights light up when the reverse gear is selected and the ignition
is on.
WARNING
•When the engine is running, the vehicl e will start to move as soon as a
gear is engaged and the clutch released.•Never select the reverse gear when the vehicle is in motion. Risk of acci-
dent.Note
•Do not rest your hand on the gear rest when driving. The pressure of your
hand could cause premature wear on the selector forks in the gearbox.•When changing gear, you should always depress the clutch down fully to
avoid unnecessary wear and damage.•Do not hold the car “on the clutch” uphill. This causes premature wear
and damage to the clutch.
Fig. 139 Detail of the
centre console: gear shift
pattern of a 5-speed
manual gearboxFig. 140 Detail of the
centre console: gear shift
pattern of a 6-speed
manual gearbox
Freetrack_EN.book Seite 170 Donnerstag, 10. September 2009 10:33 10
Page 175 of 294

Driving173
Safety First
Controls and equipment
Practical tips
Technical Data
Driving
– Press and hold the foot brake.
– Press on the button on the selector lever knob (on the left
⇒page 172, fig. 144 .
– Select a gear for driving ( R, D or S).
– Release the button and wait a few seconds for the gear to engage, a light jerk will be felt.
– Release the brake and accelerate.
Short stop
– Hold the vehicle stationary with the brake pressed down (for example at traffic lights). The selector lever does not need to be
put into the positions P or N for this.
– Do not press the accelerator.
Parking the vehicle
– Press the foot brake and hold to bring the vehicle to a stop.
– Apply the handbrake firmly.
– Press in the button on the selector lever knob, move the lever to the position P and release the button.
Driving slowly
– Move the selector lever to the position D and press to the right to
put the lever into Tiptronic mode.
– Press the gear lever towards (-) to select a lower gear. Hill stop
– Hold the vehicle, in all cases, using the foot brake to prevent
rolling back.
– Do not try to slow the vehicle using another forward gear (engine braking).
Descending gradients
– With the gear engaged, release the brake and accelerate.
The steeper the gradient the lower the gear must be for effective engine
braking. For example, if 3rd gear is us ed on a very steep gradient, the engine
braking is insufficient and vehicle accelerates. So that the engine speed does
not become excessive, the gearbox changes to the next highest gear. Depress
the brake pedal and move the selector lever to the Tiptronic gate to return to
3rd gear.
WARNING
•The driver should never leave the vehicle while the engine is running or
with any gear selected. If for any reason you must leave the vehicle with the
engine running, apply the handbrake and move the selector lever to posi-
tion P.•When the engine is running and the positions D, S or R are selected, it
is necessary to hold the vehicle with the foot brake because the vehicle will
creep at a low speed.•Never accelerate while changing the position of the selector lever (risk
of an accident).•The selector lever must never be moved into the positions R or P while
moving (risk of an accident).•Before descending a steep gradient, reduce speed and use the Tiptronic
programme to select a lower gear.
Freetrack_EN.book Seite 173 Donnerstag, 10. September 2009 10:33 10
Page 178 of 294

Driving
176•You should use the kickdown feature only when traffic and weather
conditions allow it to be used safely.
HandbrakeUsing the handbrake
The handbrake should be applied firmly to prevent the
vehicle from accidentally rolling away.Always apply the handbrake when you leave your vehicle and when
you park. Applying the handbrake
– Pull the handbrake lever up firmly
⇒fig. 147 .
Releasing the handbrake
– Pull the lever up slightly and press the release knob in the direc- tion of the arrow ⇒fig. 147 and guide the handbrake lever down
fully ⇒ .
Always apply the handbrake firmly . This prevents you driving with the hand-
brake applied ⇒ .
The handbrake warning lamp
lights up when the handbrake is applied
and the ignition switched on. The warning turns off when the handbrake is
released.
If you drive faster than 6 km/h with the handbrake on, the following
message* will appear on the instrument panel display: HANDBRAKE ON. Also,
an audible warning is given.
WARNING
•Never use the handbrake to stop the vehicle when it is in motion. The
braking distance is considerably longer, because braking is only applied to
the rear wheels. Risk of accident!•If it is only partially released, this will cause rear brakes overheating,
which can impair the function of the brake system and could lead to an acci-
dent. This also causes premature wear on the rear brake pads.Caution
Always apply the handbrake before you leave the vehicle. The first gear
should also be selected.
WARNING (continued)
Fig. 147 Handbrake
between the front seats
Freetrack_EN.book Seite 176 Donnerstag, 10. September 2009 10:33 10