headlights Seat Altea Freetrack 2012 User Guide
[x] Cancel search | Manufacturer: SEAT, Model Year: 2012, Model line: Altea Freetrack, Model: Seat Altea Freetrack 2012Pages: 297, PDF Size: 4.31 MB
Page 130 of 297

128Lights and visibility
or main beams are switched on. Clean off stubborn dirt (insects, etc.) from
the headlights at regular intervals, for instance when filling the fuel tank.
Note
● To ensure that the headlight washers work properly in winter, keep the
nozzle holders in the bumper free of snow and remove any ice with a de-icer
spray.
● To remove water, the windscreen wipers will be activated from time to
time, the headlight wipers will be activated every three cycles.
Rear-view mirrors Interior mirror
It is dangerous to drive if you cannot see clearly through the
rear window.Manual anti-dazzle function for interior mirror
In the basic mirror position, the lever at the bottom edge of the mirror
should be at the front. Pull the lever to the back to select the anti-dazzle
function. Automatic anti-dazzle interior mirror*
The automatic anti-dazzle function can be switched on and
off as desired.
Fig. 88 Automatic anti-
dazzle interior mirror.
Switching off the anti-dazzle function
– Press button A
⇒ fig. 88. Indicator lamp B goes off.
Switching on the anti-dazzle function
– Press button A
⇒ fig. 88. Warning lamp is lit.
Anti-dazzle function
The anti-dazzle function is activated every time the ignition is switched on.
The green indicator lamp lights up in the mirror housing.
When the anti-dazzle function is enabled, the interior mirror will darken au-
tomatically according to the amount of light it receives. The anti-dazzle
function is cancelled if reverse gear is engaged.
Page 202 of 297

200Driving and the environment
Driving abroad
Observations
To drive abroad, the following must be taken into consideration:
● For vehicles fitted with a catalytic converter ensure that unleaded petrol
is available for the journey. See the chapter “Refuelling”. Automobile organ-
isations will have information about service station networks selling unlea-
ded fuel.
● In some countries, it is possible that your vehicle model is not sold, and
therefore spare parts are not available or the Authorised Services can only
carry out limited repairs.
SEAT importers and distributors will gladly provide information about the
technical preparations that you vehicle requires and also about necessary
maintenance and repair possibilities.
Adhesive strips for headlights
If you have to drive a right-hand drive vehicle in a left-hand drive country, or
vice versa, the asymmetric dipped beam headlights will dazzle oncoming
traffic.
To prevent dazzling, you must apply stickers to certain parts of the head-
light lenses. Further information is available at your Authorised Service Cen-
tre.
In vehicles with adaptive headlights, the rotation system must previously be
disconnected. To do this, please go to a specialised workshop.
Page 230 of 297

228Checking and refilling levels
Washer fluid and windscreen wiper blades
Topping up washer fluid
The water for cleaning the windscreen should always be
mixed with washer fluid.
Fig. 162 In the engine
compartment: Cap of
windscreen washer fluid
reservoir.
The windscreen washer and the headlight washers are supplied with fluid
from the windscreen washer fluid container in the engine compartment.
The reservoir is located on the right-hand side of the engine compartment.
Plain water is not enough to clean the windscreen and headlights. We rec-
ommend that you always add a product to the windscreen washer fluid. Ap-
proved windscreen cleaning products exist on the market with high deter-
gent and anti-freeze properties, these may be added all-year-round. Please
follow the dilution instructions on the packaging.
WARNING
Any work carried out in the engine compartment or on the engine must
be carried out cautiously.
● When working in the engine compartment, always observe the safety
warnings ⇒ page 219.
CAUTION
● Never put radiator anti-freeze or other additives into the windscreen
washer fluid.
● Always use approved windscreen cleansing products diluted as per in-
structions. If you use other washer fluids or soap solutions, the tiny holes in
the fan-shaped nozzles could become blocked.
Page 259 of 297

257
If and when
Fuses on left side of dash panel
Fuses
NumberConsumerAmps1Vacant 2Vacant 3Vacant 4Vacant 5Vacant 6Vacant 7Vacant 8Vacant 9Airbag510RSE input (roof screen)1011Vacant 12Left xenon headlight10
13Instrument panel (oil level)/Cable control unit
(BCM)/Heater/ABS, ESC (ESP)/Park Pilot/Gate-
way/Flow meter5
14Gearbox/Power steering/Brake light sensor/Trail-
er/ABS, ESC (ESP)/Haldex/Light switch10
15Heated windscreen / Instrument lighting / Diag-
nosis switchboard/Engine management/Addi-
tional heating/AFS headlights/Park Pilot10
16Right xenon headlight1017Engine management1018Vacant 19Vacant
20Park Pilot (parking aid)/Gear lever/ESC (ESP) con-
trol unit10
21Vacant
NumberConsumerAmps22Volumetric alarm sensor/ Alarm horn523Diagnosis / Rain sensor / Light switch1024Trailer hook pre-installation assistant1525Vacant 26Vacuum pump2027RSE input (roof screen)1028Rear window wiper motor2029Vacant 30Cigarette lighter / socket2031Vacant 32Vacant 33Heater4034Vacant 35Vacant 36Vacant 37Vacant 38Vacant 39Trailer control unit (coupling)15
40Trailer control unit (turn signals, brakes and left
side)20
41Trailer control unit (fog light, reverse light and
right side)20
42BCM wiring switchboard2043Trailer pre-installation4044Heated rear window2545Electric windows (front)3046Rear electric windows3047Engine (Fuel control unit, petrol relay)1548Convenience controls20
Safety FirstOperating InstructionsPractical TipsTechnical Specifications
Page 261 of 297

259
If and when
NumberConsumerAmps
29 a)Electric windows (front and back)50Electric windows (front)3030Ignition key50a)
Ampere rating according to motorisation
Bulb change General notes
Before changing any bulb, first turn off the failed component.
Do not touch the bulb glass. Fingerprints vaporise in the heat, causing a re-
duction in the bulb life and condensation on the mirror surface, thus reduc-
ing efficiency.
A bulb should only be replaced by one of the same type. The type is inscri-
bed on the bulb, either on the glass part or on the base.
It is highly recommended to keep a box of spare bulbs in the vehicle. At the
very least, the following spare bulbs, which are essential for road safety,
should be kept in the vehicle. Main headlights
- H7
- H1
- W5W - PY21W
Xenon 1)
/adaptive headlights
- D1S2)
- P21W SLL
- W5W - PY21W
Fog lights - H3
Fixed tail light - P21W3)
- P21W
Mobile tailgate light - P21W- P21W
- W5W
Dipped beam
Main beam
Position
Turn signal
Dipped and full beam
Daylight
Position
Turn signals
Fog lights
Stop/Position
Turn signal
Fog light (driver side)
Reverse (passenger side)
Position
1)
On this type of headlight, the bulb changes must be made by the SEAT dealer, given that
complex elements must be removed from the vehicle and a reset must be made on the
automatic control system incorporated.
2) The Xenon bulbs discharge 2.5 times the light flux and have an average lifespan of 5 times
more than that of halogen bulbs, this means that, except due to unusual circumstances,
there is no need to change the bulbs for the whole life of the vehicle.
3) Electronically controlled single filament bulb for Stop/side bulbs. If the bulb blows it will
not work in either position or Stop.
Safety FirstOperating InstructionsPractical TipsTechnical Specifications
Page 262 of 297
260If and when
Side turn signal - W5W
Number plate light - C5W
Note
● Depending on weather conditions (cold or wet), the front lights, the fog
lights, the tail lights and the turn signals may be temporarily misted. This
has no influence on the useful life of the lighting system. By switching on
the lights, the area through which the beam of light is projected will quickly
be demisted. However, the edges may continue to be misted.
● Please check at regular intervals that all lighting (especially the exterior
lighting) on your vehicle is functioning properly. This is not only in the inter-
est of your own safety, but also that of all other road users.
● Due to the difficulty in accessing some of the bulbs, any replacement
work should be done by a SEAT dealer. However, the following is a descrip-
tion of how to change the lamps except for the fog lights* and interior
lamps.
Side turn signal
Number plate light
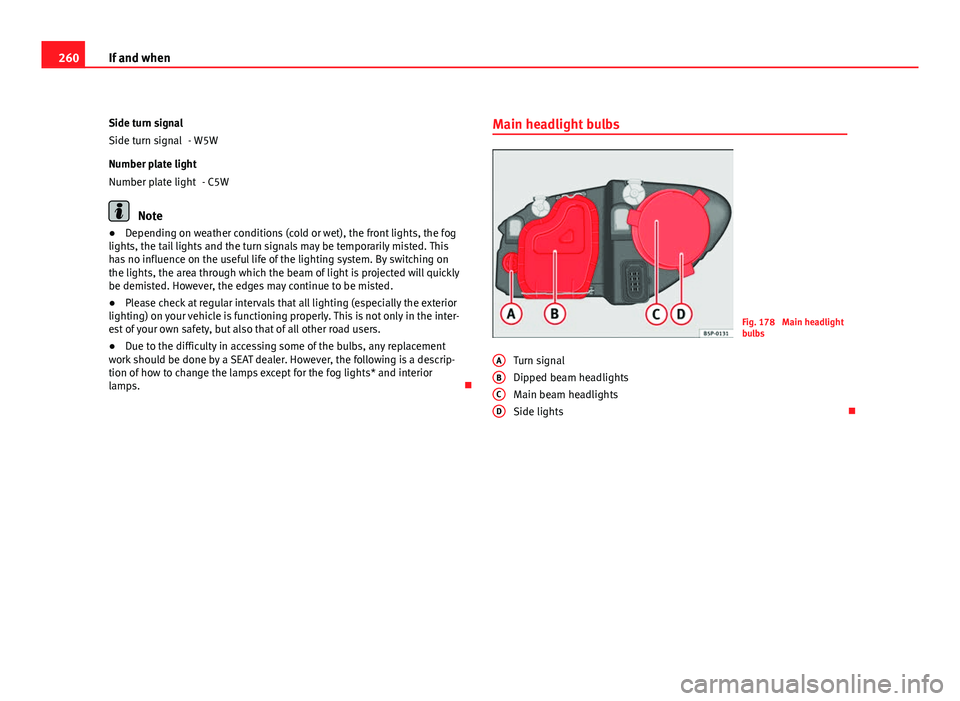
Main headlight bulbs
Fig. 178 Main headlight
bulbs
Turn signal
Dipped beam headlights
Main beam headlights
Side lights
A
BCD
Page 263 of 297

261
If and when
Turn signal bulbs
Fig. 179 Turn signal
– Raise the bonnet.
– Rotate the bulb holder ⇒ fig. 179 A
to the left and pull.
– Remove the bulb by pressing on the bulb holder and rotating at
the same time to the left.
– Installation is done in the reverse order. Dipped lights
Fig. 180 Dipped beam
headlights
Fig. 181 Dipped beam
headlights
– Raise the bonnet.
– Remove the loops ⇒ fig. 180 1
in the direction of the arrow
and remove the cover.
Safety FirstOperating InstructionsPractical TipsTechnical Specifications
Page 264 of 297
262If and when
–Remove the connector ⇒ fig. 181 2
from the bulb.
– Unclip the retainer spring ⇒ fig. 181 3
pressing inwards to the
right.
– Extract the bulb and fit the replacement so that the rim of the
attachment plate is on the reflector cut-out.
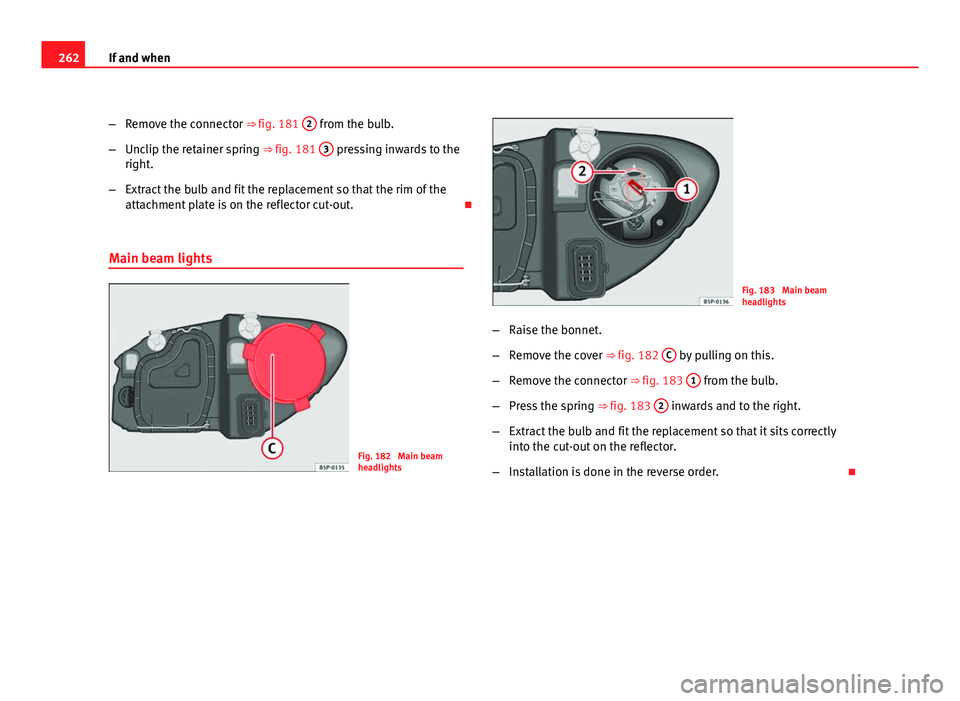
Main beam lights
Fig. 182 Main beam
headlights
Fig. 183 Main beam
headlights
– Raise the bonnet.
– Remove the cover ⇒ fig. 182 C
by pulling on this.
– Remove the connector ⇒ fig. 183 1
from the bulb.
– Press the spring ⇒ fig. 183 2
inwards and to the right.
– Extract the bulb and fit the replacement so that it sits correctly
into the cut-out on the reflector.
– Installation is done in the reverse order.
Page 271 of 297

269
If and when
How to jump start: description
Fig. 197 Diagram for
connecting jump leads if
the vehicle providing as-
sistance the current is
not fitted with the Start-
Stop system: flat battery A
and battery providing
current B.
Fig. 198 Diagram for
connecting jump leads if
the vehicle providing as-
sistance is fitted with the
Start-Stop system: flat
battery A
and battery
providing current B.
Jump lead terminal connections
1. Switch off the ignition of both vehicles ⇒
.2. Connect one end of the
red jump lead to the positive terminal
⇒ fig. 197 +
or ⇒
fig. 198 + of the vehicle with the flat bat-
tery A.
3. Connect the other end of the red jump lead to the positive ter-
minal +
in the vehicle providing assistance B.
4. On vehicles with no Start-Stop system , connect one end of the
black jump lead to the negative terminal -
in the vehicle pro-
viding assistance B ⇒ fig. 197.
5. On vehicles with the Start-Stop system , connect one end of the
black jump lead X
to a suitable ground terminal, to a solid
metal part bolted to the engine block or to the engine block it-
self ⇒ fig. 198.
6. Connect the other end of the black jump lead X
to a solid met-
al component bolted to the engine block or to the engine block
itself of the vehicle with the flat battery. Do not connect it to a
point near the battery A
.
7. Position the leads in such a way that they cannot come into contact with any moving parts in the engine compartment.
Starting
8. Start the engine of the vehicle with the boosting battery and let it run at idling speed.
9. Start the engine of the vehicle with the flat battery and wait one or two minutes until the engine is running.
Removing the jump leads
10. Before you remove the jump leads, switch off the headlights (if they are switched on).
Safety FirstOperating InstructionsPractical TipsTechnical Specifications
Page 287 of 297
Index
A
ABS . . . . . . . . . . . . . . . . . . . . . . . . . . . . . . . . . . 188Warning lamp . . . . . . . . . . . . . . . . . . . . . . . . 82
Accessories . . . . . . . . . . . . . . . . . . . . . . . . . . . . 214
Acoustic signal . . . . . . . . . . . . . . . . . . . . . . . . . . 20
Acoustic warning . . . . . . . . . . . . . . . . . . . . . . . 168
Adaptive headlights . . . . . . . . . . . . . . . . . . . . . 117
Adjusting the seat belt height . . . . . . . . . . . . . . 28
AFS (cornering lights) . . . . . . . . . . . . . . . . . . . 118
Airbag covers . . . . . . . . . . . . . . . . . . . . . . . . . . . 36
Airbag system . . . . . . . . . . . . . . . . . . . . . . . . . . . 30 Curtain airbags . . . . . . . . . . . . . . . . . . . . . . . 41
Front airbags . . . . . . . . . . . . . . . . . . . . . . . . 34
Side airbags . . . . . . . . . . . . . . . . . . . . . . . . . 38
Warning lamp . . . . . . . . . . . . . . . . . . . . . . . . 32
Air conditioner General notes . . . . . . . . . . . . . . . . . . . . . . . 164
Air conditioner automatic mode 2C-Climatronic . . . . . . . . . . . . . . . . . . . . . . 162
Air conditioner* 2C-Climatronic* . . . . . . . . . . . . . . . . . . . . . 160
Air conditioning* . . . . . . . . . . . . . . . . . . . . . . . 156
Air recirculation mode 2C-Climatronic . . . . . . . . . . . . . . . . . . . . . . 164
Manual air conditioner . . . . . . . . . . . . . . . . 158
Alarm system Switching off . . . . . . . . . . . . . . . . . . . . . . . . 104
All-wheel drive . . . . . . . . . . . . . . . . . . . . . . . . . 191 Alternator
Warning lamp . . . . . . . . . . . . . . . . . . . . . . . . 83
Anti-freeze . . . . . . . . . . . . . . . . . . . . . . . . . . . . 226
Anti-lock brake system . . . . . . . . . . . . . . . . . . . 188 Warning lamp . . . . . . . . . . . . . . . . . . . . . . . . 82
Anti-theft alarm system . . . . . . . . . . . . . . . . . . 104 Switching off . . . . . . . . . . . . . . . . . . . . . . . . 104
Anti-theft wheel bolts . . . . . . . . . . . . . . . . . . . 249
Aquaplaning . . . . . . . . . . . . . . . . . . . . . . . . . . . 239
Ashtray* . . . . . . . . . . . . . . . . . . . . . . . . . . . . . . 146
Aspects to note before setting off . . . . . . . . . . . . 8
ASR . . . . . . . . . . . . . . . . . . . . . . . . . . . . . . . . . . 188 Control lamp . . . . . . . . . . . . . . . . . . . . . . . . . 87
Automatic anti-dazzle interior mirror* Activating the anti-dazzle function . . . . . . 128
Deactivating anti-dazzle function . . . . . . . 128
Automatic car wash tunnel . . . . . . . . . . . . . . . 206
Automatic gearbox Kick-down feature . . . . . . . . . . . . . . . . . . . . 179
Automatic gearbox / DSG automatic gearbox 175
Automatic lighting . . . . . . . . . . . . . . . . . . . . . . 114
Automatic windscreeen wiper/washer . . . . . . 124
Auxiliary audio connection: AUX-IN . . . . . . . . 148
B
Ball coupling . . . . . . . . . . . . . . . . . . . . . . . . . . . 202 Battery
Changing . . . . . . . . . . . . . . . . . . . . . . . . . . 234
Charging . . . . . . . . . . . . . . . . . . . . . . . . . . . 234
Winter conditions . . . . . . . . . . . . . . . . . . . . 232
Before setting off . . . . . . . . . . . . . . . . . . . . . . . . . 8
Biodiesel . . . . . . . . . . . . . . . . . . . . . . . . . . . . . . 218
Biodiesel fuel . . . . . . . . . . . . . . . . . . . . . . . . . . 218
Bonnet . . . . . . . . . . . . . . . . . . . . . . . . . . . . . . . 221
Brake fluid . . . . . . . . . . . . . . . . . . . . . . . . . . . . 231 Changing . . . . . . . . . . . . . . . . . . . . . . . . . . 232
Warning lamp . . . . . . . . . . . . . . . . . . . . . . . . 65
Brake pads . . . . . . . . . . . . . . . . . . . . . . . . . . . . 195
Brake pedal warning lamp . . . . . . . . . . . . . . . . . . . . . . . . 88
Brakes . . . . . . . . . . . . . . . . . . . . . . . . . . . . . . . . 195 Worn brake pads . . . . . . . . . . . . . . . . . . . . . 83
Brake servo . . . . . . . . . . . . . . . . . . . . . . . . 187, 195
Brake system . . . . . . . . . . . . . . . . . . . . . . . . . . 231 Brakes . . . . . . . . . . . . . . . . . . . . . . . . . . . . . 192
Brake servo . . . . . . . . . . . . . . . . . . . . . . . . . 192
Warning lamp . . . . . . . . . . . . . . . . . . . . . . . . 84
Braking distance . . . . . . . . . . . . . . . . . . . . . . . 195
Bulb changes General notes . . . . . . . . . . . . . . . . . . . . . . . 259
Bulb defect warning lamp . . . . . . . . . . . . . . . . . . . . . . . . 84
Buzzer . . . . . . . . . . . . . . . . . . . . . . . . . . . . 120, 168
285
Index