light Seat Altea Freetrack 2012 User Guide
[x] Cancel search | Manufacturer: SEAT, Model Year: 2012, Model line: Altea Freetrack, Model: Seat Altea Freetrack 2012Pages: 297, PDF Size: 4.31 MB
Page 45 of 297
43
Airbag system
WARNING (Continued)
not been expressly approved for use in your vehicle may not be attached
to the side windows ⇒ page 214, Accessories, parts replacement and
modifications.
● The built-in coat hooks should be used only for lightweight clothing.
Do not leave any heavy or sharp-edged objects in the pockets. Please, do
not hang the clothes on coat hangers.
● The airbags provide protection for just one accident; replace them
once they have deployed.
● Any work on the curtain airbag system or removal and installation of
the airbag components for other repairs (such as removal of the roof lin-
ing) should only be performed by a specialised workshop. Otherwise,
faults may occur during the airbag system operation.
● Do not attempt to modify components of the airbag system in any
way.
● The side and head airbags are managed through sensors located in
the interior of the front doors. To ensure the correct functioning of the
side and head airbags neither the doors nor the door panels should be
modified in any way (e.g. fitting loudspeakers). If the front door is dam-
aged, the airbag system may not work correctly. All work carried out on
the front door must be made in a specialised workshop.
Safety FirstOperating InstructionsPractical TipsTechnical Specifications
Page 46 of 297

44Airbag system
Deactivating airbags*
Front passenger airbag deactivation
If you fit a rear-facing child seat to the front passenger seat,
the front passenger airbag must be de-activated.
Fig. 26 In the glove com-
partment: switch for acti-
vating and deactivating
the front passenger air-
bag
Fig. 27 Warning lamp for
deactivated passenger
airbag in centre console
When the passenger airbag is deactivated, only the front airbag is
deactivated. All the other airbags in the vehicle remain activated.
Deactivating the front passenger airbag
– Switch the ignition off.
– Turn the ignition switch in the key operated switch in the glove
compartment to the position OFF ⇒ fig. 26.
– Check that the warning lamp “OFF” on the instrument panel
⇒ fig. 27 remains lit when the ignition is switched on ⇒
.
Activating the front passenger airbag
– Switch the ignition off.
– Turn the ignition key in the key-operated switch in the glove
compartment to the position ON ⇒ fig. 26.
– Check that the warning lamp on the instrument panel ⇒ fig. 27
does not light up when the ignition is switched on ⇒
.
Page 57 of 297

55
Cockpit
Operating Instructions Cockpit
Overview Overview of the dash panel
This overview will help you to familiarise yourself with the
controls and displays. Door release lever
Light switch . . . . . . . . . . . . . . . . . . . . . . . . . . . . . . . . . . . . . . . . . . . . . . . 113
Lighting control for instrument and control lighting . . . . . . . . .117
Headlight range control . . . . . . . . . . . . . . . . . . . . . . . . . . . . . . . . . . . 117
Air vents
Turn signal and main beam lever and cruise control system* 119, 183
Controls on the steering wheel . . . . . . . . . . . . . . . . . . . . . . . . . . . . . 89
Instrument panel:
– Instruments . . . . . . . . . . . . . . . . . . . . . . . . . . . . . . . . . . . . . . . . . . . . 57
– Display . . . . . . . . . . . . . . . . . . . . . . . . . . . . . . . . . . . . . . . . . . . . . . . . 60
– Indicator lamps . . . . . . . . . . . . . . . . . . . . . . . . . . . . . . . . . . . . . . . . . 76
Horn (works only when the ignition is on)/ Driver front airbag . .30
Windscreen wiper and washer lever and operation of the
multifunction display* . . . . . . . . . . . . . . . . . . . . . . . . . . . . . . . . . . . . . 124, 62
Left seat heating button . . . . . . . . . . . . . . . . . . . . . . . . . . . . . . . . . . . 135
1
2345678
910
11
Controls for
–
Heating* and ventilation . . . . . . . . . . . . . . . . . . . . . . . . . . . . . . . . 154
– Climatic* . . . . . . . . . . . . . . . . . . . . . . . . . . . . . . . . . . . . . . . . . . . . . . . 156
– Climatronic* . . . . . . . . . . . . . . . . . . . . . . . . . . . . . . . . . . . . . . . . . . . . 160
Radio/Navigator*
Right seat heating button . . . . . . . . . . . . . . . . . . . . . . . . . . . . . . . . . . 135
Warning lamp for deactivated front passenger airbag . . . . . . .44
Front passenger airbag . . . . . . . . . . . . . . . . . . . . . . . . . . . . . . . . . . . . 30
Glove compartment lever . . . . . . . . . . . . . . . . . . . . . . . . . . . . . . . . . . 138
Selector lever . . . . . . . . . . . . . . . . . . . . . . . . . . . . . . . . . . . . . . . . . . . . . 175
Cup holder compartment . . . . . . . . . . . . . . . . . . . . . . . . . . . . . . . . . . 142
Controls on the centre console:
– Central locking . . . . . . . . . . . . . . . . . . . . . . . . . . . . . . . . . . . . . . . . . 95
– ESC (ESP)* . . . . . . . . . . . . . . . . . . . . . . . . . . . . . . . . . . . . . . . . . . . . . 189
– Tyre pressure monitoring
– Cigarette lighter / Power socket . . . . . . . . . . . . . . . . . . . . . . . . . 146
– Exterior mirror adjustment . . . . . . . . . . . . . . . . . . . . . . . . . . . . . . 129
– Start-Stop* . . . . . . . . . . . . . . . . . . . . . . . . . . . . . . . . . . . . . . . . . . . . . 171
Handbrake . . . . . . . . . . . . . . . . . . . . . . . . . . . . . . . . . . . . . . . . . . . . . . . . 180
Hazard warning light switch . . . . . . . . . . . . . . . . . . . . . . . . . . . . . . . 118
Pedals
Ignition lock . . . . . . . . . . . . . . . . . . . . . . . . . . . . . . . . . . . . . . . . . . . . . . 168
Steering column control lever* . . . . . . . . . . . . . . . . . . . . . . . . . . . . . 166
Handle for releasing the bonnet . . . . . . . . . . . . . . . . . . . . . . . . . . . . 219
12
1314151617181920
212223242526
Safety FirstOperating InstructionsPractical TipsTechnical Specifications
Page 60 of 297
58Cockpit
Fuel gauge and reserve indicator
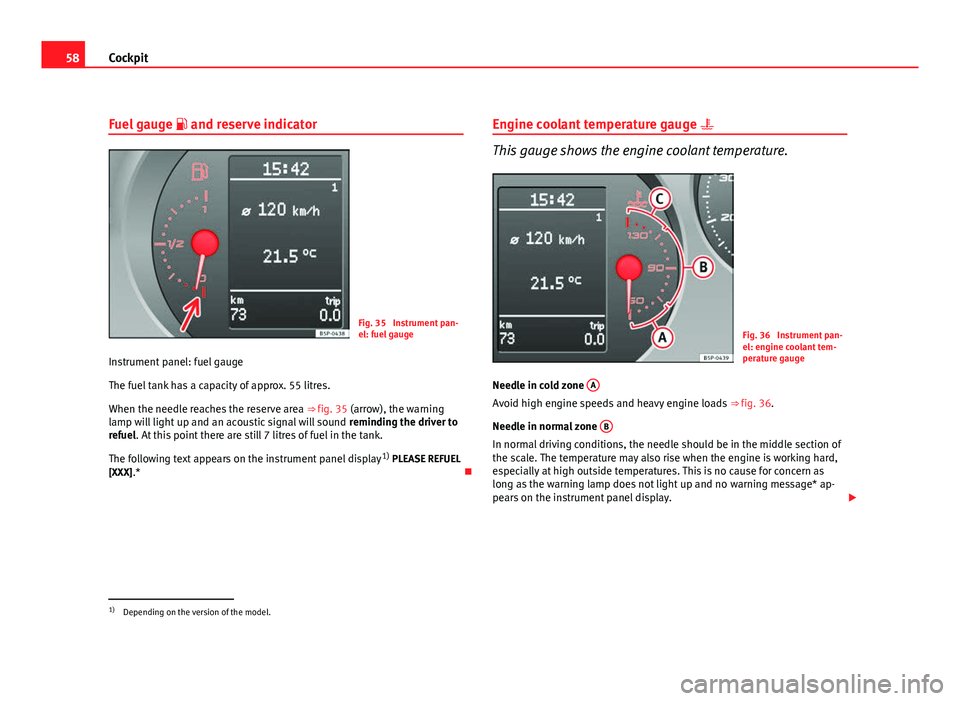
Fig. 35 Instrument pan-
el: fuel gauge
Instrument panel: fuel gauge
The fuel tank has a capacity of approx. 55 litres.
When the needle reaches the reserve area ⇒ fig. 35 (arrow), the warning
lamp will light up and an acoustic signal will sound reminding the driver to
refuel. At this point there are still 7 litres of fuel in the tank.
The following text appears on the instrument panel display 1)
PLEASE REFUEL
[XXX].* Engine coolant temperature gauge
This gauge shows the engine coolant temperature.
Fig. 36 Instrument pan-
el: engine coolant tem-
perature gauge
Needle in cold zone A
Avoid high engine speeds and heavy engine loads
⇒ fig. 36.
Needle in normal zone B
In normal driving conditions, the needle should be in the middle section of
the scale. The temperature may also rise when the engine is working hard,
especially at high outside temperatures. This is no cause for concern as
long as the warning lamp does not light up and no warning message* ap-
pears on the instrument panel display.
1)
Depending on the version of the model.
Page 61 of 297
59
Cockpit
Needle in warning zone C
The warning lamp* ⇒ fig. 49 2 will light up if the needle is in the warning
zone. The following warning message appears on the instrument panel dis-
play 1)
. Stop the vehicle and switch off the engine. Check the coolant level
⇒ page 226 ⇒
.
Even if the coolant level is correct do not continue driving. You should seek
specialised technical assistance.
WARNING
When working in the engine compartment, always observe the safety
warnings ⇒ page 219.
CAUTION
Accessories in front of the air inlet reduce the cooling effect of the coolant.
At high outside temperatures and high engine loads, there is a risk of the
engine overheating.
Rev counter
The rev counter displays the engine speed in revolutions per
minute. The start of the red zone ⇒ fig. 34 4
indicates the maximum engine speed
operating at service temperature. However, it is advisable to change up a in-
to a higher gear, move the selector lever to D or lift your foot off the acceler-
ator before the needle reaches the red zone.
CAUTION
The rev counter needle must never enter the red zone on the scale. Risk of
engine damage.
For the sake of the environment
Changing up into higher gears sooner, following the recommended gear in-
dications ⇒ fig. 39 will help you to reduce fuel consumption, emissions and
also engine noise.
Speedometer
The speedometer is equipped with a digital odometer and a trip recorder, in
addition to a service intervals display.
During the running-in period, the instructions shown on ⇒ page 195
should be followed.
Setting the digital clock*
The digital clock is located in the instrument panel display.
– Turn the setting knob ⇒ fig. 34 5
clockwise until the first
“click” to set the hour. The hour will flash. To change the hour,
press the button.
– Turn the setting knob clockwise to the second “click” to set the
minutes. The minutes will flash. To change the minutes, press
the button.
1)
Depending on the version of the model.
Safety FirstOperating InstructionsPractical TipsTechnical Specifications
Page 62 of 297
60Cockpit
Digital instrument panel display
Display (without warning or information texts)
The display in the instrument panel shows, amongst other
things, the mileage and trip recorder as well as the selector
lever position.
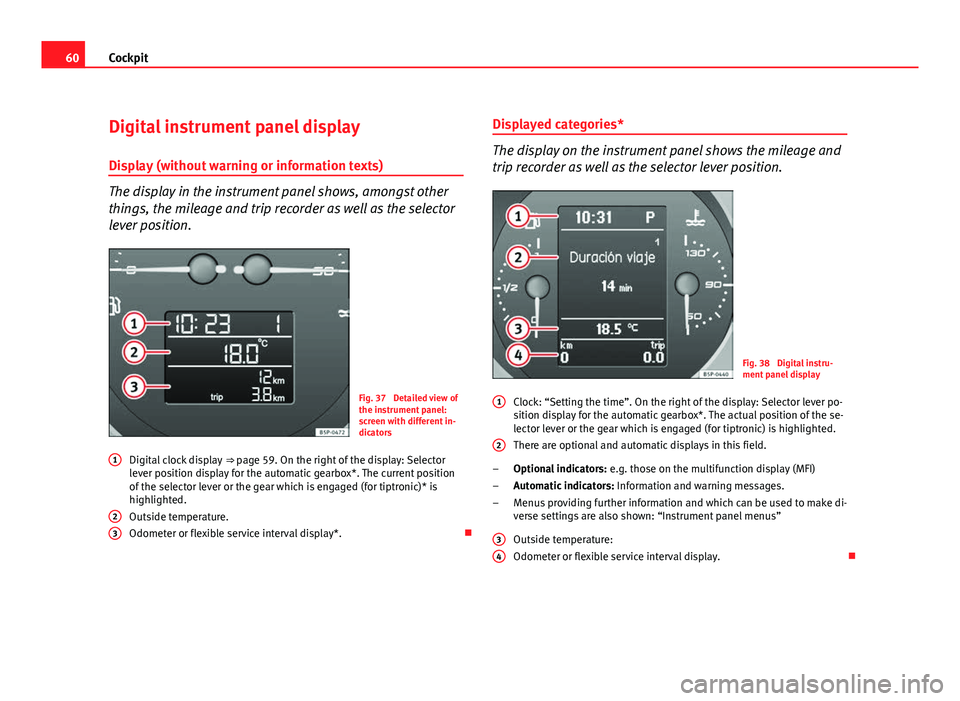
Fig. 37 Detailed view of
the instrument panel:
screen with different in-
dicators
Digital clock display ⇒ page 59. On the right of the display: Selector
lever position display for the automatic gearbox*. The current position
of the selector lever or the gear which is engaged (for tiptronic)* is
highlighted.
Outside temperature.
Odometer or flexible service interval display*.
1
23
Displayed categories*
The display on the instrument panel shows the mileage and
trip recorder as well as the selector lever position.
Fig. 38 Digital instru-
ment panel display
Clock: “Setting the time”. On the right of the display: Selector lever po-
sition display for the automatic gearbox*. The actual position of the se-
lector lever or the gear which is engaged (for tiptronic) is highlighted.
There are optional and automatic displays in this field.
Optional indicators: e.g. those on the multifunction display (MFI)
Automatic indicators: Information and warning messages.
Menus providing further information and which can be used to make di-
verse settings are also shown: “Instrument panel menus”
Outside temperature:
Odometer or flexible service interval display.
1
2
–
–
–
3
4
Page 67 of 297
65
Cockpit
This may be deactivated by pressing the button A
(Reset).
The speed may be altered using the rocker switch B
in steps of 5 km/h
within 5 seconds of the initial memory value.
WARNING
There could be black ice on the road surface even if the “snowflake sym-
bol” is not shown. For this reason you should not rely exclusively on this
display - Risk of accident!
Note
When the vehicle is stationary or travelling at very low speeds, the tempera-
ture displayed may be slightly higher than the actual outside temperature
as a result of the heat radiated from the engine.
Warning or information message in the display
Faults are shown in the display with warning lamps and
warning/information reports.
The system runs a check on certain components and functions when the ig-
nition is switched on and while the vehicle is moving. Functional faults are
indicated by symbols with warning or information messages in the display.
An acoustic warning is given in certain cases.
Warning symbols
There are red warning symbols (priority 1) and yellow warning symbols (pri-
ority 2)
Information text
In addition to warning messages given on a fault, you will receive informa-
tion in the display on procedures or will be asked to carry out certain tasks.
Note
In the case of screens without warning or information texts, faults are indi-
cated exclusively by the warning lamps.
Warning reports, Priority 1 (red)
If one of these faults occurs, the warning lamp will flash or light up and will
be accompanied by three audible warnings. This is a danger warning. Stop
the vehicle and switch off the engine. Check the fault and correct it. Obtain
professional assistance if necessary.
If several priority 1 faults are detected at the same time, the symbols will be
displayed one after the other for about 2 seconds at a time and will contin-
ue until the fault is corrected.
No menus will be shown in the display for the duration of a priority 1 warn-
ing message.
Examples of priority 1 warning messages (red)
● Brake system symbol with warning message STOP BRAKE FLUID IN-
STRUCTION MANUAL or STOP BRAKE FAULT INSTRUCTION MANUAL
● Coolant symbol with the warning message STOP SEE COOLANT IN-
STRUCTION MANUAL.
● Engine oil pressure symbol with the warning message STOP ENGINE
OIL PRESSURE LOW! INSTRUCTION MANUAL .
Warning reports, Priority 2 (yellow)
If one of these faults occurs, the warning lamp lights up, and is accompa-
nied by one audible warning. The function should be checked as soon as
possible.
Safety FirstOperating InstructionsPractical TipsTechnical Specifications
Page 68 of 297

66Cockpit
If several priority 2 warning messages are detected at the same time, the
symbols are displayed one after the other for about 2 seconds at a time. Af-
ter a set time, the information text will disappear and the symbol will be
shown as a reminder at the side of the display.
Priority 2 warning messages will not be shown until all Priority 1 warning
messages have been dealt with!
Examples of priority 2 warning messages (yellow): 1)
● Fuel warning light with the information text PLEASE REFUEL.
● Windscreen washer fluid symbol with the information text REFILL
WINDSCREEN WASHER FLUID . Refill the windscreen washer tank ⇒ page 228.
1)
Depending on the version of the model.
Page 72 of 297

70Cockpit
TelephoneThis menu is only available in vehicles with radio
unit if the vehicle is fitted with the telephone func-
tion. In vehicles fitted with a radio navigation sys-
tem, this menu is available in the central unit (navi-
gator) ⇒ Booklet SEAT Media System 2.1.
Vehicle conditionThis menu displays current warning or information
texts: “Vehicle status menu”
This option flashes when one of these texts is dis-
played.
ConfigurationThis option allows the time, the speed warning when
using winter tyres, units, language, independent
heating, the Light and visibility menu and the Con-
venience menu to be reset.
a)
Only in vehicles fitted with a radio navigation system.
Note
For electronic and vehicle equipment one or more of these menus will be
displayed. Multifunction display menu (MFI)
The multifunction display (MFI) shows you information on
the journey and fuel consumption.
Fig. 48 Multifunction
display (MFI) instrument
panel display.
The multifunction display (MFI) has two automatic memories: 1 - Trip memo-
ry and 2 - Total memory . The selected memory is shown on the upper right
hand section of the display ⇒ fig. 48 at all times.
Open the multifunction display menu Select the Multifunction display menu from the main menu ⇒ page 69
and press the OK
button on the windscreen wiper lever or the multi-
function lever*.
Selecting a memory To change from one memory to another, briefly press button A
⇒ fig. 44 ⇒ page 67 on the windscreen wiper lever or the OK button on
the multifunction lever ⇒ fig. 45 ⇒ page 67 while the ignition is switch-
ed on.
–
–
Page 74 of 297

72Cockpit
Fuel range in km
The fuel range is calculated using the figures for tank content and current
fuel consumption. It shows how far the vehicle can travel using the same
conditions as a reference.
Distance travelled in km The display shows the distance travelled since the ignition was switched on.
The maximum display value in both memories is 1999 km. The memory will
automatically be deleted once this value has been reached.
Average speed in km/hThe average speed will be shown after a distance of approximately 100 me-
tres has been travelled. Until then dashes will appear in the display. The
display will be updated every five seconds while the vehicle is in motion.
Alternative speed display (mph or km/h)
The speed is also displayed in a second unit of measurement other than
that used on the speedometer.
● Select the menu Configuration using the rocker switch on the windscreen
wiper lever or the buttons on the multifunction steering wheel* ⇒ page 67.
● Select the option Auxiliary speed and press OK
on the windscreen wiper
lever or the multifunction steering wheel*.
Digital display of speed
The instrument panel display gives the speed in digital format 1)
.
Speed warning at --- km/h
This function may help you to keep within the speed limits. Press the OK
button on the windscreen wiper lever
A or the multifunction steering
wheel* to select the current speed. The instrument panel display gives the
selected speed, for example, Speed warning 120 km/h. You have five sec-
onds to reset the speed between 30 km/h and 250 km/h using rocker switch
B
or buttons or on the multifunction steering wheel*. Press
the OK button or wait five seconds until the speed is stored and the warn-
ing is activated. If the set speed is exceeded, an acoustic signal is heard
and a warning message is displayed until the speed is reduced to at least 4
km/h below the stored speed. The function is switched off by pressing the OK
button again. Speed warning --- km/h is now displayed on the instru-
ment panel.
Outside temperature display
The measurement margin ranges from -40 °C (-40 °F) to +50 °C (+125 °F). At
outside temperatures below +4 °C (+39.2 °F), the snowflake symbol (ice
danger warning) appears in addition to the outside temperature display.
This symbol flashes for a few seconds and remains lit until the outside tem-
perature rises above +6 °C (+42.8 °F).
WARNING
There could be black ice on the road surface even if the “snowflake sym-
bol” is not shown. For this reason you should not rely exclusively on this
display - Risk of accident!
Note
● There are different instrument panels; therefore the multifunction dis-
play may vary.
● When the vehicle is stationary or travelling at very low speeds, the tem-
perature displayed may be slightly higher than the actual outside tempera-
ture as a result of the heat radiated from the engine.
● Vehicles with a multifunction steering wheel* do not have buttons on
the windscreen wiper lever. The multifunction display can only be controlled
from the buttons on the multifunction steering wheel*.
1)
It is not possible to see whether the alternative speed display is activated.