technical specifications Seat Altea Freetrack 2012 Service Manual
[x] Cancel search | Manufacturer: SEAT, Model Year: 2012, Model line: Altea Freetrack, Model: Seat Altea Freetrack 2012Pages: 297, PDF Size: 4.31 MB
Page 85 of 297

83
Cockpit
Alternator
This warning lamp signals a fault in the alternator.
The warning lamp lights up when the ignition is switched on. It should
go out when the engine has started running.
If the warning lamp lights up while driving, the alternator is no longer
charging the battery. You should immediately drive to the nearest special-
ised workshop.
You should avoid using electrical equipment that is not absolutely necessa-
ry because this will drain the battery.
Worn brake pads
If the symbol lights up, have the front brake pads (and, for safety rea-
sons, the rear pads as well) inspected by a specialised workshop. Tyre pressure
The tyre pressure control system controls the tyre speed and
the frequency spectrum of each tyre.
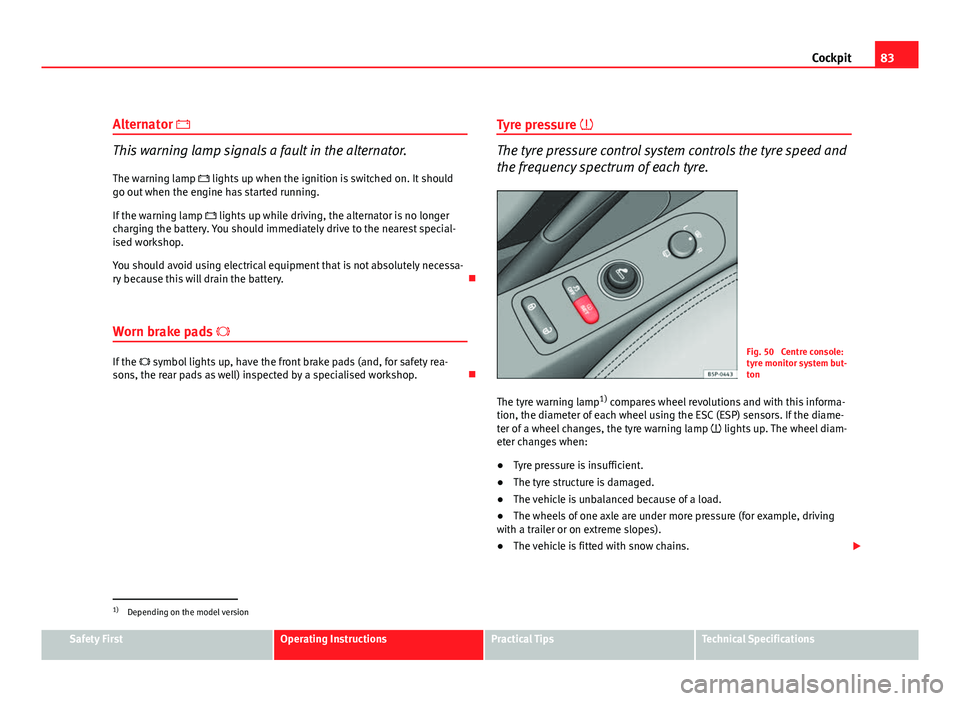
Fig. 50 Centre console:
tyre monitor system but-
ton
The tyre warning lamp 1)
compares wheel revolutions and with this informa-
tion, the diameter of each wheel using the ESC (ESP) sensors. If the diame-
ter of a wheel changes, the tyre warning lamp lights up. The wheel diam-
eter changes when:
● Tyre pressure is insufficient.
● The tyre structure is damaged.
● The vehicle is unbalanced because of a load.
● The wheels of one axle are under more pressure (for example, driving
with a trailer or on extreme slopes).
● The vehicle is fitted with snow chains.
1)
Depending on the model version
Safety FirstOperating InstructionsPractical TipsTechnical Specifications
Page 87 of 297

85
Cockpit
This warning lamp can light up together with the ABS system warning lamp.
WARNING
● Before opening the bonnet, read and observe the warnings on
⇒ page 219.
● If the brake warning lamp does not go out, or if it lights up when driv-
ing, the brake fluid level ⇒ page 231, Brake fluid in the reservoir is too
low. Risk of accident. Stop the vehicle and do not drive on. Obtain techni-
cal assistance.
● If the brake warning lamp lights up together with the ABS warning
lamp , the control function of the ABS could be out of action. This could
cause the rear wheels to lock quickly when you brake. This could cause
the rear to break away. Risk of skidding. Stop the vehicle and seek tech-
nical assistance.
Handbrake
This lamp lights up when the handbrake is applied. If you drive faster than 6 km/h with the handbrake on, the following mes-
sage will appear on the instrument panel display 1)
: HANDBRAKE ON. You will
also hear an acoustic warning signal ⇒ page 180. Engine oil pressure
If this warning lamp is red it indicates that the engine oil
pressure is too low.
If this warning symbol starts to flash, and is accompanied by three audible
warnings, switch off the engine and check the oil level. If necessary, add
more oil ⇒ page 222.
The instrument panel displays the following message 1)
: STOP ENGINE OIL
PRESSURE INSTRUCTION MANUAL .
If the symbol flashes although the oil level is correct, do not drive on. The
engine must not even run at idle speed. Obtain technical assistance.
Checking the oil level
If the warning lamp is yellow the engine oil level should be checked as
soon as possible. Top up the oil ⇒ page 224 at the next opportunity.
Oil level sensor faulty*
If the yellow warning lamp flashes, take the vehicle to a specialised
workshop to have the oil level sensor checked. Until then it is advisable to
check the oil level every time you refuel.
Cruise speed (Cruise control)*
The warning lamp comes on when the cruise control system
is switched on.
The warning lamp lights up when the cruise control system is switched
on. For further information on the cruise control system, see ⇒ page 183.
1)
Depending on the version of the model.
Safety FirstOperating InstructionsPractical TipsTechnical Specifications
Page 89 of 297

87
Cockpit
Electronic Stability Control ESC (ESP) * /
There are two control lamps for the electronic stability con-
trol. The lamp provides information concerning the func-
tion and the provides information on the disconnection
status
Both lamps come on together when the ignition is switched on and should
go out after approx. 2 seconds, which is how long the function check lasts.
This programme includes the ABS, EDL and ASR (TCS). This also includes
the brake assist system (BAS), automatic cleaning of the brake discs and
the trailer stability programme (TSP).
The warning lamp has the following functions: ● It flashes when the ASR (TCS)/ESC (ESP) is activated when driving.
● It will light up continuously if there is a malfunction in the ESC (ESP).
● The ESC (ESP) lamp will also come on if a fault should occur in the ABS
because the ESC (ESP) operates in conjunction with the ABS.
If the ESP warning lamp lights up and stays on after the engine is started,
this may mean that the control system has temporarily switched off the ESP.
In this case the ESC (ESP) can be reactivated by switching the ignition off
and then on again. If the warning lamp goes out, this means the system is
fully functional.
The lamp provides information about the disconnection status of the
system:
● It stays lit when the ASR (TCS) is disconnected after pressing the
switch. Differential lock fault (EDL)*EDL operates along with the ABS in vehicles equipped with
the Electronic Stability Control ESC* (ESP)
A malfunction in the EDL is indicated by the ABS warning lamp . Take the
vehicle to a specialised workshop as soon as possible. For further informa-
tion on the EDL see ⇒ page 190, Electronic differential lock (EDL)*.
Traction control system ASR (TCS)* /
The traction control system prevents the driven wheels from
spinning when the vehicle is accelerating
There are two warning lamps for the traction control system: and . Both
lamps come on together when the ignition is switched on and should go out
after approx. 2 seconds, which is how long the function check lasts.
The lamp has the following function:
● It flashes when the ASR (TCS) is activated while driving.
If the system is deactivated or if it has any fault, the warning lamp will re-
main lit. The ASR (TCS) lamp will also come on if a fault should occur in the
ABS because the ASR (TCS) operates in conjunction with the ABS. For fur-
ther information, see ⇒ page 187, Brakes
The lamp provides information about the disconnection status of the
system:
● It stays lit when the ASR (TCS) is disconnected after pressing the OFF
switch.
By pressing again, the ASR (TCS) function is reactivated and the warning
lamp switched off.
Safety FirstOperating InstructionsPractical TipsTechnical Specifications
Page 91 of 297

89
Steering wheel controls
Steering wheel controls
General information
The steering wheel includes a multifunction module from where it is possi-
ble to control the audio, telephone and radio navigation functions, and the
automatic gearbox*, without needing to distract the driver.
There are two versions of the multifunction module:
● Audio version, to control the available audio functions from the steering
wheel.
● Audio + Telephone version, to control the available audio functions and
the telephone system from the steering wheel.
Both versions may be used to control the Audio system (Radio, Audio CD,
mp3 CD, iPod 1)
/USB 1)
/SD 1)
) and the Radio navigation system, in which
case they also control the Navigation system.
● Version for automatic gearbox* ⇒ page 178.
1)
If fitted in the vehicle.
Safety FirstOperating InstructionsPractical TipsTechnical Specifications
Page 93 of 297

91
Steering wheel controls
Ib)Next presetChange folderNo function specifiedChange menu on instrument panelChange menu on instrument panelChange menu on instrument panel
Jb)Previous presetChange folderNo function specifiedChange menu on instrument panelChange menu on instrument panelChange menu on instrument panelKOperates on instrument panelOperates on instrument panelOperates on instrument panel
Lb)Change sourceChange sourceChange sourceOperates on instrument panelOperates on instrument panelOperates on instrument panela)
Only if the panel is in Audio menu.
b) Depending on the model version
Steering wheel Audio + Telephone version controls
Fig. 53 Controls on the
steering wheelFig. 54 Steering wheel
controls (depending on
version of model)
ButtonRadioCD/MP3/USB*/iPod*AUXTELEPHONEAVolume upVolume upVolume upVolume upBVolume downVolume downVolume downVolume down
Safety FirstOperating InstructionsPractical TipsTechnical Specifications
Page 95 of 297

93
Steering wheel controls
Radio navigation system Steering wheel Audio + Telephone controls
Fig. 55 Controls on the
steering wheelFig. 56 Steering wheel
controls (depending on
version of model)
ButtonRadioCD/MP3/USB*/iPod*AUXNAVIGATORTELEPHONEAVolume upVolume upVolume upVolume upVolume upBVolume downVolume downVolume downVolume downVolume down
CSearch for next stationNext track
Hold down: Fast forwardNo function specifiedNo function specifiedNo function specified
DSearch for last stationPrevious track
Hold down: RewindNo function specifiedNo function specifiedNo function specified
Safety FirstOperating InstructionsPractical TipsTechnical Specifications
Page 97 of 297

95
Unlocking and locking
Unlocking and locking
Central locking Basic functions
The central locking system enables you to lock and unlock
all doors by just pushing the button.Description
Central locking can be activated by using any of the following options:
● the key, by inserting it into the driver door cylinder and rotating it man-
ually,
● the central lock button in the vehicle interior ⇒ page 97.
● the radio frequency remote control , using the buttons on the key,
⇒ page 102
Various functions are available to improve the vehicle safety: “Safe” locking system
Selective unlocking system*
Automatic speed-dependent locking and unlocking system*
Self-locking system to prevent involuntary unlocking
Emergency unlocking system
Unlocking the vehicle* Press button
⇒ fig. 62 on remote control to unlock all the doors and
tailgate.
–
–
–
–
–
– Locking the vehicle*
Press button
⇒
fig. 62 on the remote control to lock all doors and the
tailgate or turn the key in the door to lock all doors and the tailgate.
WARNING
● Never leave children or disabled persons in the vehicle. In case of
emergency, they may not be able to leave the vehicle or manage on their
own.
● Never allow children to play in or around the vehicle. A locked vehicle
can be subjected to extremely high and low temperatures, depending on
the time of year, thus causing serious injuries/illness. It could even have
fatal consequences. Close and lock both the tailgate and all the other
doors when you are not using the vehicle.
● Always take you car keys with you when you leave the vehicle. Misuse
of the keys, for example, by children, may result in serious damage and
accident.
–The engine may accidentally be started and be out of control.
– If the ignition is switched on, the electric equipment could be acti-
vated with risk of injury, for example, in the electric windows.
– The doors can be locked using the remote control key. This could
make the aid difficult in an emergency situation.
– Always take the key with you when you leave the vehicle.
● Never remove the key from the ignition if the vehicle is in motion. The
steering lock could suddenly engage, and you would not be able to steer
the vehicle.
–
Safety FirstOperating InstructionsPractical TipsTechnical Specifications
Page 99 of 297

97
Unlocking and locking
Automatic speed dependent locking and unlocking system*
This is a safety system which prevent the access to the vehi-
cle from the outside when it is running (for example, when
stopped at a traffic light).
Locking
The doors and the tailgate are automatically locked when vehicle speed ex-
ceeds 15 km/h.
If the vehicle is stopped and one of the doors is opened, when the vehicle
moves off again and exceeds a speed of 15 km/h, the unlocked door(s) will
be locked once more.
Unlocking
The driver door automatically unlocks when the key is removed from the ig-
nition.
Each door can be unlocked and opened independently from the inside (for
example, when a passenger gets out of it). To do it, simply operate the lever
inside the door.
WARNING
The door handles must not be operated when the vehicle is running: the
door would open.
Automatic locking system for involuntary unlocking*
It is an anti-theft system and prevents the unintentional un-
locking of the vehicle. If the vehicle is unlocked and any of the doors (including the tailgate) are
opened within 30 seconds, it gets re-locked automatically. This function prevents the vehicle from remaining unlocked if the unlock button is press-
ed by mistake.
Emergency unlocking system
If the airbags are triggered during an accident, the vehicle is unlocked, ex-
cept for the luggage compartment. It is possible to lock the vehicle from in-
side with the central locking, after turning the ignition off and back on
again.
If the doors must be locked from the outside, see “Emergency locking of the
doors”
Central lock button
The central lock button allows you to lock and unlock the ve-
hicle from the inside.
Fig. 57 Detailed view of
the centre console: cen-
tral locking button
Safety FirstOperating InstructionsPractical TipsTechnical Specifications
Page 101 of 297

99
Unlocking and locking
Emergency manual locking
This permits mechanical locking of the doors in case of cen-
tral locking system failure.
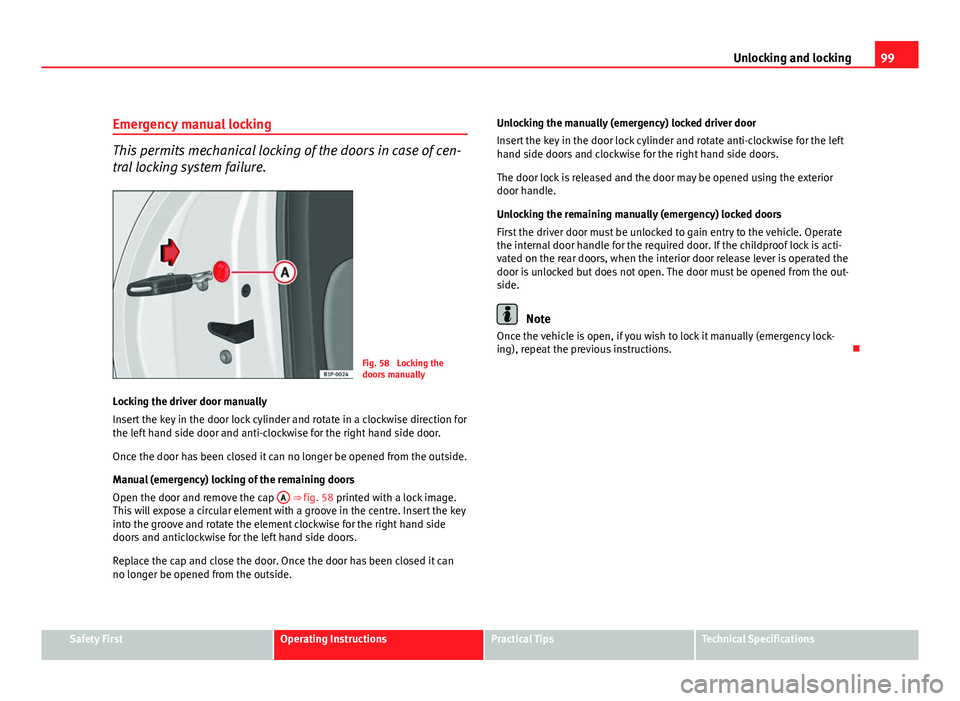
Fig. 58 Locking the
doors manually
Locking the driver door manually
Insert the key in the door lock cylinder and rotate in a clockwise direction for
the left hand side door and anti-clockwise for the right hand side door.
Once the door has been closed it can no longer be opened from the outside.
Manual (emergency) locking of the remaining doors
Open the door and remove the cap A
⇒ fig. 58 printed with a lock image.
This will expose a circular element with a groove in the centre. Insert the key
into the groove and rotate the element clockwise for the right hand side
doors and anticlockwise for the left hand side doors.
Replace the cap and close the door. Once the door has been closed it can
no longer be opened from the outside. Unlocking the manually (emergency) locked driver door
Insert the key in the door lock cylinder and rotate anti-clockwise for the left
hand side doors and clockwise for the right hand side doors.
The door lock is released and the door may be opened using the exterior
door handle.
Unlocking the remaining manually (emergency) locked doors
First the driver door must be unlocked to gain entry to the vehicle. Operate
the internal door handle for the required door. If the childproof lock is acti-
vated on the rear doors, when the interior door release lever is operated the
door is unlocked but does not open. The door must be opened from the out-
side.
Note
Once the vehicle is open, if you wish to lock it manually (emergency lock-
ing), repeat the previous instructions.
Safety FirstOperating InstructionsPractical TipsTechnical Specifications
Page 103 of 297

101
Unlocking and locking
Keys
Set of keys
The set of keys includes a remote control, a key without a re-
mote control and a plastic key tab*
Fig. 61 Set of keys
The set of keys belonging to your vehicle consists of the following items:
● one remote control key ⇒ fig. 61 A
with folding key bit,
● one key without remote control B,
● a plastic key tab* C.
Duplicate keys
If you need a replacement key, go to an Authorised Service Centre with your
vehicle identification number.
WARNING
● An incorrect use of the keys can cause serious injuries.
● Never leave children or disabled persons in the vehicle. In case of
emergency, they may not be able to leave the vehicle or manage on their
own.
● An uncontrolled use of the key could start the engine or activate any
electric equipment (e.g. electric windows), causing risk of accident. The
doors can be locked using the remote control key. This could make the
aid difficult in an emergency situation.
● Never forget the keys inside the vehicle. An unauthorised use of your
vehicle could result in injury, damage or theft. Always take the key with
you when you leave the vehicle.
● Never remove the key from the ignition if the vehicle is in motion.
Otherwise, the steering could suddenly block and it would be impossible
to steer the vehicle.
CAUTION
There are electronic components in the remote control key. Avoid wetting
and hitting the keys
Safety FirstOperating InstructionsPractical TipsTechnical Specifications