fuel cap Seat Altea Freetrack 2012 Owner's Manual
[x] Cancel search | Manufacturer: SEAT, Model Year: 2012, Model line: Altea Freetrack, Model: Seat Altea Freetrack 2012Pages: 297, PDF Size: 4.31 MB
Page 6 of 297
Trailer towing . . . . . . . . . . . . . . . . . . . . . . . . . . . . . . 201
Instructions to follow . . . . . . . . . . . . . . . . . . . . . . 201
Ball coupling of towing bracket* . . . . . . . . . . . . . 202
Driving tips . . . . . . . . . . . . . . . . . . . . . . . . . . . . . . 202
Fitting a towing bracket* . . . . . . . . . . . . . . . . . . . 202
Vehicle maintenance and cleaning . . . . . . . . . 205
General notes . . . . . . . . . . . . . . . . . . . . . . . . . . . . 205
Care of the vehicle exterior . . . . . . . . . . . . . . . . . . 206
Vehicle interior maintenance . . . . . . . . . . . . . . . . 211
Accessories, parts replacement and
modifications . . . . . . . . . . . . . . . . . . . . . . . . . . . . . 214
Accessories and spare parts . . . . . . . . . . . . . . . . 214
Technical modifications . . . . . . . . . . . . . . . . . . . . 214
Roof aerial* . . . . . . . . . . . . . . . . . . . . . . . . . . . . . . 215
Mobile phones and two-way radios . . . . . . . . . . . 215
Checking and refilling levels . . . . . . . . . . . . . . . 216
Refuelling . . . . . . . . . . . . . . . . . . . . . . . . . . . . . . . 216
Petrol . . . . . . . . . . . . . . . . . . . . . . . . . . . . . . . . . . . 217
Diesel . . . . . . . . . . . . . . . . . . . . . . . . . . . . . . . . . . . 218
Working in the engine compartment . . . . . . . . . . 219
Engine oil . . . . . . . . . . . . . . . . . . . . . . . . . . . . . . . . 222
Coolant . . . . . . . . . . . . . . . . . . . . . . . . . . . . . . . . . 226
Washer fluid and windscreen wiper blades . . . . 228
Brake fluid . . . . . . . . . . . . . . . . . . . . . . . . . . . . . . . 231
Vehicle battery . . . . . . . . . . . . . . . . . . . . . . . . . . . 232
Wheels and tyres . . . . . . . . . . . . . . . . . . . . . . . . . . 236
Wheels . . . . . . . . . . . . . . . . . . . . . . . . . . . . . . . . . . 236
If and when . . . . . . . . . . . . . . . . . . . . . . . . . . . . . . . 245
Tools, tyre repair kit and spare wheel . . . . . . . . . 245
Wheel change . . . . . . . . . . . . . . . . . . . . . . . . . . . . 246
Tyre repair kit (Tyre Mobility System)* . . . . . . . . . 252
Fuses . . . . . . . . . . . . . . . . . . . . . . . . . . . . . . . . . . . 255
Bulb change . . . . . . . . . . . . . . . . . . . . . . . . . . . . . 259
Jump-starting . . . . . . . . . . . . . . . . . . . . . . . . . . . . . 268
Towing and tow-starting . . . . . . . . . . . . . . . . . . . . 271 Technical Specifications
. . . . . . . . . . . 274
Description of specifications . . . . . . . . . . . . . . . 274
Important information . . . . . . . . . . . . . . . . . . . . . 274
Information on fuel consumption . . . . . . . . . . . . 276
Towing a trailer . . . . . . . . . . . . . . . . . . . . . . . . . . . 276
Technical specifications . . . . . . . . . . . . . . . . . . . . 278
Checking fluid levels . . . . . . . . . . . . . . . . . . . . . . . 278
Petrol engine 2.0 155 kW (211 PS) Front-wheel
drive . . . . . . . . . . . . . . . . . . . . . . . . . . . . . . . . . . . . 279
Petrol engine 2.0 155 kW (211 PS) All-wheel
drive . . . . . . . . . . . . . . . . . . . . . . . . . . . . . . . . . . . . 280
Diesel engine 1.6 TDI CR 77 kW (105 PS) DPF
with/without Start-Stop . . . . . . . . . . . . . . . . . . . . 281
Diesel engine 2.0 TDI CR 103 kW (140 PS) DPF
All-wheel drive . . . . . . . . . . . . . . . . . . . . . . . . . . . . 282
Diesel engine 2.0 TDI CR 125 kW (170 PS) DPF
All-wheel drive . . . . . . . . . . . . . . . . . . . . . . . . . . . . 283
Dimensions and capacities . . . . . . . . . . . . . . . . . 284
Index . . . . . . . . . . . . . . . . . . . . . . . . . . . . . . . . . . . 285
4Table of Contents
Page 60 of 297
58Cockpit
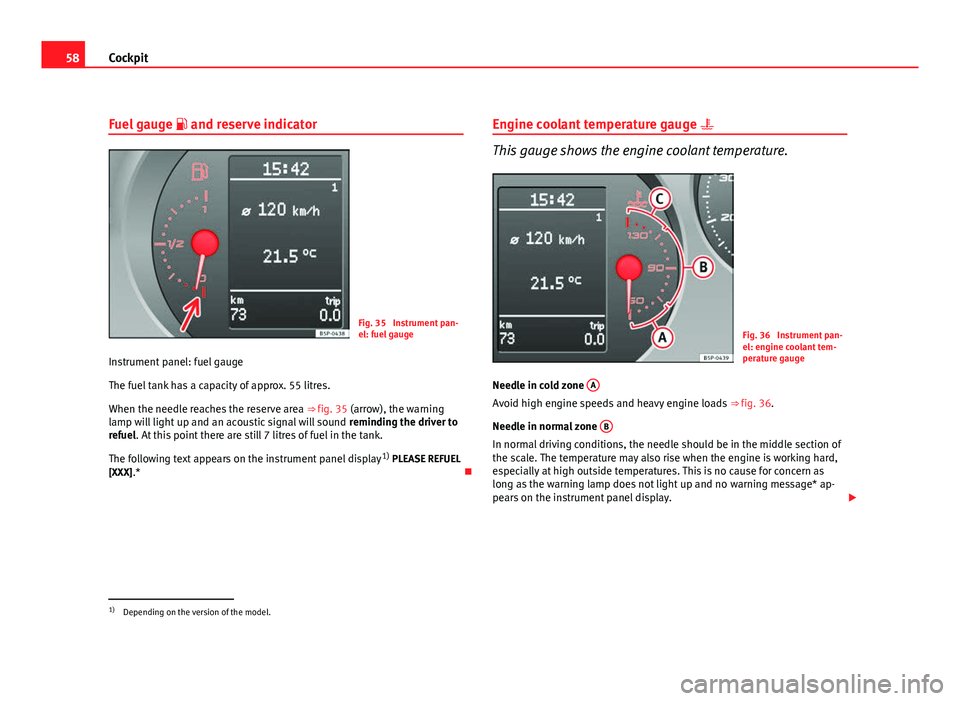
Fuel gauge and reserve indicator
Fig. 35 Instrument pan-
el: fuel gauge
Instrument panel: fuel gauge
The fuel tank has a capacity of approx. 55 litres.
When the needle reaches the reserve area ⇒ fig. 35 (arrow), the warning
lamp will light up and an acoustic signal will sound reminding the driver to
refuel. At this point there are still 7 litres of fuel in the tank.
The following text appears on the instrument panel display 1)
PLEASE REFUEL
[XXX].* Engine coolant temperature gauge
This gauge shows the engine coolant temperature.
Fig. 36 Instrument pan-
el: engine coolant tem-
perature gauge
Needle in cold zone A
Avoid high engine speeds and heavy engine loads
⇒ fig. 36.
Needle in normal zone B
In normal driving conditions, the needle should be in the middle section of
the scale. The temperature may also rise when the engine is working hard,
especially at high outside temperatures. This is no cause for concern as
long as the warning lamp does not light up and no warning message* ap-
pears on the instrument panel display.
1)
Depending on the version of the model.
Page 198 of 297

196Driving and the environment
WARNING (Continued)
● On steep slopes, if brakes are excessively used, they will overheat.
Before driving down a long steep slope, it is advisable to reduce speed
and change down into a lower gear or range (depending on the type of
transmission). This makes use of engine braking and relieves the brakes.
● Never let the brakes “drag” by applying light pressure. Continuous
braking will cause the brakes to overheat and the braking distance will
increase. Apply and then release the brakes alternately.
● Never let the vehicle run with the engine switched off. The braking
distance is increased considerably when the brake servo is not active.
● If the brake fluid loses its viscosity and is subjected to heavy use, va-
pour bubbles can form in the brake system. This reduces the efficiency of
the brakes.
● Non-standard or damaged front spoilers could restrict the airflow to
the brakes and cause them to overheat. Before purchasing accessories
please observe the relevant instructions ⇒ page 214, Technical modifi-
cations.
● If a brake circuit fails, the braking distance will be increased consider-
ably. Contact a specialised workshop immediately and avoid unnecessa-
ry journeys.
Exhaust gas purification system Catalytic converter*
To maintain the useful life of the catalytic converter
– Use only unleaded petrol with petrol engines, as lead damages
the catalytic converter.
– Do not let the fuel get too low in the tank. –
For engine oil changes, do not replenish with too much engine
oil ⇒ page 224, Topping up engine oil .
– Never tow the vehicle to start it, use jump leads if necessary
⇒ page 268.
If you notice misfiring, uneven running or loss of power when the vehicle is
moving, reduce speed immediately and have the vehicle inspected at the
nearest specialised workshop. In general, the exhaust gas warning lamp
will light up when any of the described symptoms occur ⇒ page 76. If this
happens, unburnt fuel can enter the exhaust system and escape into the en-
vironment. The catalytic converter can also be damaged by overheating.
WARNING
The catalytic converter reaches very high temperatures! There is a risk of
fire.
● Never park where the catalytic converter could come into contact with
dry grass or flammable materials under the vehicle.
● Do not apply additional underseal or anti-corrosion coatings to the
exhaust pipes, catalytic converter or the heat shields on the exhaust sys-
tem. These materials could catch fire when the vehicle is being driven.
CAUTION
Never run the fuel tank completely dry because the irregularity of the fuel
supply may cause ignition problems. This allows unburnt fuel to enter the
exhaust system, which could cause overheating and damage the catalytic
converter.
For the sake of the environment
Even when the emission control system is working perfectly, there may be a
smell of sulphur from the exhaust gas under some conditions. This depends
on the sulphur content of the fuel used. Quite often the problem can be
solved by changing to another brand of fuel.
Page 218 of 297
216Checking and refilling levels
Checking and refilling levels
Refuelling
The tank flap is released manually. The tank holds approxi-
mately 55 litres. For all-wheel drive vehicles, the tank ca-
pacity is approximately 60 litres.
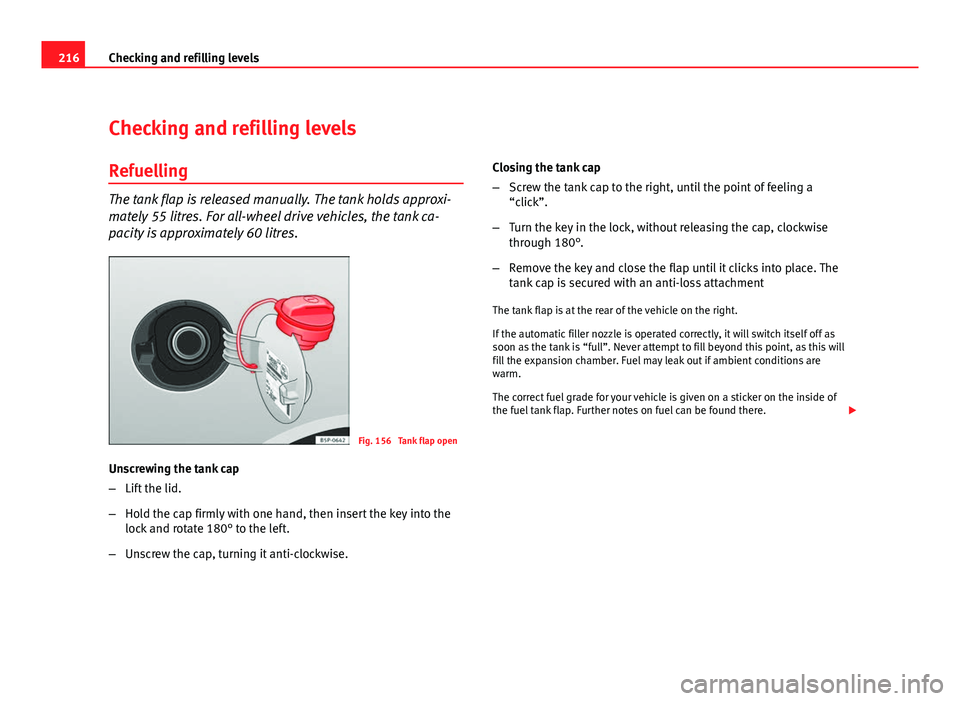
Fig. 156 Tank flap open
Unscrewing the tank cap
– Lift the lid.
– Hold the cap firmly with one hand, then insert the key into the
lock and rotate 180° to the left.
– Unscrew the cap, turning it anti-clockwise. Closing the tank cap
–
Screw the tank cap to the right, until the point of feeling a
“click”.
– Turn the key in the lock, without releasing the cap, clockwise
through 180°.
– Remove the key and close the flap until it clicks into place. The
tank cap is secured with an anti-loss attachment
The tank flap is at the rear of the vehicle on the right.
If the automatic filler nozzle is operated correctly, it will switch itself off as
soon as the tank is “full”. Never attempt to fill beyond this point, as this will
fill the expansion chamber. Fuel may leak out if ambient conditions are
warm.
The correct fuel grade for your vehicle is given on a sticker on the inside of
the fuel tank flap. Further notes on fuel can be found there.
Page 221 of 297

219
Checking and refilling levels
operational to approx. -24 °C, provided you use winter-grade diesel which is
safe to -15 °C.
However, if the fuel has waxed to such an extent that the engine will not
start at temperatures of under -24 °C, simply place the vehicle in a warm
place for a while.
CAUTION
Do not mix fuel additives (thinners or similar products) with diesel fuel.
Working in the engine compartment Safety instructions on working in the engine compartment
Any work carried out in the engine compartment or on the
engine must be carried out cautiously.
Before starting any work on the engine or in the engine compart-
ment:
1. Switch off the engine and remove the key from the ignition.
2. Apply the handbrake.
3. Move the gear lever to neutral or the selector lever to position P.
4. Wait for the engine to cool down.
5. Keep children away from the vehicle.
6. Raise the bonnet ⇒ page 221. You should not do any work in the engine compartment unless you know ex-
actly how to carry out the jobs and have the correct tools! Have the work car-
ried out by a specialised workshop if you are uncertain.
All service fluids and consumables, e.g. coolant, engine oil, spark plugs
and batteries, are under constant development. SEAT provides a constant
flow of information to the Authorised Service Centres concerning modifica-
tions. For this reason, we recommend you to have service fluids and con-
sumables replaced by an Authorised Service Centre. Please observe the rel-
evant instructions
⇒ page 214. The engine compartment of the vehicle is a
hazardous area ⇒
.
WARNING
All work on the engine or in the engine compartment, e.g. checking and
refilling fluids, involves the danger of injury and scalding as well as the
risk of accident or fire.
● Never open the bonnet if you see steam, smoke or coolant escaping
from the engine compartment. Otherwise, there is a risk of sustaining
burns. Wait until no more steam or coolant is emitted, then allow the en-
gine to cool before carefully opening the bonnet.
● Switch off the engine and remove the key from the ignition.
● Apply the handbrake and move the gear lever to neutral or selector
lever to position P.
● Keep children away from the vehicle.
● Never touch hot engine parts. There is a risk of burns.
● Never spill liquids on a hot engine or on a hot exhaust gas system.
This is a fire hazard.
● Avoid causing short-circuits in the electrical system, particularly at
the points where the jump leads are attached ⇒ page 269. The battery
could explode.
Safety FirstOperating InstructionsPractical TipsTechnical Specifications
Page 222 of 297

220Checking and refilling levels
WARNING (Continued)
● Never touch the radiator fan. It is temperature controlled and could
start automatically, even when the engine has been switched off and the
key removed from the ignition!
● Do not unscrew the cap on the expansion tank when the engine is
hot. If the coolant is hot, the cooling system will be pressurised!
● Protect face, hands and arms by covering the cap with a large, thick
cloth to protect against escaping coolant and steam.
● Always make sure you have not left any objects, such as cleaning
cloths and tools, in the engine compartment.
● If you have to work underneath the vehicle, you must use suitable
stands additionally to support the vehicle, there is a risk of accident!. A
hydraulic jack is insufficient for securing the vehicle and there is a risk of
injury.
● If any work has to be performed when the engine is started or with
the engine running, there is an additional, potentially fatal, safety risk
from the rotating parts, such as the drive belts, alternator, radiator fan,
etc., and from the high-voltage ignition system. You should also observe
the following points:
–Never touch the electrical wiring of the ignition system.
– Ensure that jewellery, loose clothing and long hair do not get trap-
ped in rotating engine parts. Danger of death. Before starting any
work remove jewellery, tie back and cover hair, and wear tight-fitting
clothes.
– Never accelerate with a gear engaged without taking the necessary
precautions. The vehicle could move, even if the handbrake is ap-
plied. Danger of death.
● If work has to be carried out on the fuel system or on electrical com-
ponents, you must observe the following safety notes in addition to the
above warnings:
–Always disconnect the battery. The vehicle must be unlocked when
this is done, otherwise the alarm will be triggered.
– Do not smoke.WARNING (Continued)
– Never work near naked flames.
– Always have a fire extinguisher on hand.
CAUTION
When topping up service fluids, make sure not to mistake them. Using the
wrong fluids could cause serious malfunctions and engine damage!
For the sake of the environment
Service fluids leaks are harmful to the environment. For this reason you
should make regular checks on the ground underneath your vehicle. If you
find spots of oil or other fluids, have your vehicle inspected in a specialised
workshop.
Page 233 of 297

231
Checking and refilling levels
WARNING
Do not drive unless you have good visibility through all windows!
● Clean the windscreen wiper blades and all windows regularly.
● The wiper blades should be changed once or twice a year.
CAUTION
● A damaged or dirty window wiper could scratch the rear window.
● Never use fuel, nail varnish remover, paint thinner or similar products to
clean the window.
● Never move the windscreen wiper by hand. This could cause damage. Brake fluid
Checking the brake fluid level
The brake fluid is checked at the intervals given in the serv-
ice schedule.
Fig. 166 In the engine
compartment: Brake fluid
reservoir cover
– Read off the fluid level at the transparent brake fluid reservoir. It
should always be between the “MIN” and “MAX” marks.
The position of the brake fluid reservoir is shown in the corresponding en-
gine compartment illustration ⇒ page 278. The brake fluid reservoir has a
black and yellow cap.
The brake fluid level drops slightly when the vehicle is being used as the
brake pads are automatically adjusted as they wear.
However, if the level goes down noticeably in a short time, or drops below
the “MIN” mark, there may be a leak in the brake system. A display on the
instrument panel will warn you if the brake fluid level is too low ⇒ page 76.
Safety FirstOperating InstructionsPractical TipsTechnical Specifications
Page 245 of 297
243
Wheels and tyres
Winter tyres
Winter tyres will improve the vehicles handling on snow and
ice.
In winter conditions winter tyres will considerably improve the vehicle's han-
dling. The design of summer tyres (width, rubber compound, tread pattern)
gives less grip on ice and snow.
Winter tyres must be inflated to a pressure 0.2 bar higher than the pres-
sures specified for summer tyres (see sticker on tank flap).
Winter tyres must be fitted on all four wheels.
Information on permitted winter tyre sizes can be found in the vehicle's reg-
istration documents. Use only radial winter tyres. All tyre sizes listed in the
vehicle documentation also apply to winter tyres.
Winter tyres lose their effectiveness when the tread is worn down to a depth
of 4 mm.
The speed rating code ⇒ page 241, New tyres and wheels determines the
following speed limits for winter tyres: ⇒
max. 160 km/h
max. 180 km/h
max. 190 km/h
max. 210 km/h
In some countries, vehicles which can exceed the speed rating of the fitted
tyre must have an appropriate sticker in the driver's field of view. These
stickers are available from your Authorised Service Centre. The legal require-
ments of each country must be followed.
Do not have winter tyres fitted for unnecessarily long periods. Vehicles with
summer tyres handle better when the roads are free of snow and ice. Q
S
T
H If you have a flat tyre, please refer to the notes on the spare wheel
⇒ page 241, New tyres and wheels.
WARNING
The maximum speed for the winter tyres must not be exceeded. Other-
wise, this could lead to tyre damage and risk of accident.
For the sake of the environment
Fit your summer tyres again as soon as possible. They are quieter, do not
wear so quickly and reduce fuel consumption.
Snow chains
Snow chains may be fitted only to the front wheels, and only for 205/55R16
tyres. These tyres may only be fitted with fine-pitch link chains which do not
protrude more than 15 mm ⇒ page 241. For 225/50R17 tyres, the use of
snow chains is not permitted.
Remove wheel hub covers and trim rings before fitting snow chains. For
safety reasons cover caps, available in any Authorised Service Centre, must
then be fitted over the wheel bolts.
All-wheel drive : Where snow chains are compulsory on certain roads, this
normally also applies to cars with all-wheel drive. Snow chains may only be
fitted to the front wheels (also on vehicles with all-wheel drive).
WARNING
Snow chains should be correctly tightened in accordance with the manu-
facturer's instructions. This will prevent the chains coming into contact
with the wheel housing.
Safety FirstOperating InstructionsPractical TipsTechnical Specifications
Page 248 of 297

246If and when
How to use the temporary spare wheel
Should you ever have a punctured tyre, the temporary spare wheel is only
intended for temporary use until you can reach a workshop. The standard-
size road wheel should be replaced as soon as possible.
Please note the following restrictions when using the temporary spare
wheel. This spare wheel has been specially designed for your vehicle, thus,
it cannot be changed with the spare wheel from another vehicle.
No other type of tyre (normal summer or winter tyre) may be fitted on the
compact temporary spare wheel rim.
Snow chains
For technical reasons, snow chains must not be used on the compact tem-
porary spare wheel.
If you have a puncture on one of the front wheels when using snow chains,
fit the compact temporary spare in place of one of the rear wheels. You can
then attach the snow chains to the wheel taken from the rear and use this
wheel to replace the punctured front wheel.
WARNING
● The tyre pressures must be checked and corrected as soon as possi-
ble. The emergency tyre pressure for dimensions 125/70R16 125/70R18
135/90R16 is 4.2 bar; for all other tyre dimensions please refer to the la-
bel on the fuel cap. Failure to do so could result in an accident.
● Do not drive faster than 80 km/h. Higher speeds can cause an acci-
dent.
● Avoid heavy acceleration, hard braking and fast cornering. Risk of ac-
cident.
● Never use two or more compact spare tyres at the same time, risk of
accident.
● No other type of tyre (normal summer or winter tyre) may be fitted on
the compact temporary spare wheel rim.
Tyre repair kit
The tyre repair kit (for vehicles not including a spare wheel)
is stored under the floor panel in the luggage compartment.
In the event of a punctured tyre, your vehicle is equipped with the Tyre Mo-
bility System.
The tyre repair kit consists of a container with sealing compound to repair
the puncture and a compressor to generate the required tyre pressure. The
kit will reliably seal punctures up to a size of about 4 mm caused by the
penetration of a foreign body into the tyre.
Note
● Seek professional assistance if the repair of a tyre puncture is not possi-
ble with the sealing compound.
Wheel change Preparation work
What you must do before changing a wheel.
– If you have a flat tyre or puncture, park the vehicle as far away
from the flow of traffic as possible. Choose a location that is as
level as possible.
– All passengers should leave the vehicle. They should wait in a
safe area (for instance behind the roadside crash barrier).
– Switch off the engine. Switch on the hazard warning lights.
– Apply the handbrake firmly.
Page 272 of 297
270If and when
11. Turn on the heater blower and heated rear window in the vehi-
cle with the flat battery. This helps minimise voltage peaks
which are generated when the leads are disconnected.
12. When the engine is running, disconnect the leads in reverse order to the details given above.
Connect the battery clamps so they have good metal-to-metal contact with
the battery terminals.
If the engine fails to start, switch off the starter after about 10 seconds and
try again after about half a minute.
WARNING
● Please note the safety warnings referring to working in the engine
compartment ⇒ page 219, Working in the engine compartment.
● The battery providing assistance must have the same voltage as the
flat battery (12V) and approximately the same capacity (see imprint on
battery). Failure to comply could result in an explosion.
● Never use jump leads when one of the batteries is frozen. Danger of
explosion! Even after the battery has thawed, battery acid could leak and
cause chemical burns. If a battery freezes, it should be replaced.
● Keep sparks, flames and lighted cigarettes away from batteries, dan-
ger of explosion. Failure to comply could result in an explosion.
● Observe the instructions provided by the manufacturer of the jump
leads.
● Do not connect the negative cable from the other vehicle directly to
the negative terminal of the flat battery. The gas emitted from the battery
could be ignited by sparks. Danger of explosion.
● Do not attach the negative cable from the other vehicle to parts of the
fuel system or to the brake line.
WARNING (Continued)
● The non-insulated parts of the battery clamps must not be allowed to
touch. The jump lead attached to the positive battery terminal must not
touch metal parts of the vehicle, this can cause a short circuit.
● Position the leads in such a way that they cannot come into contact
with any moving parts in the engine compartment.
● Do not bend over the batteries. This could result in chemical burns.
Note
The vehicles must not touch each other, otherwise electricity could flow as
soon as the positive terminals are connected.