technical specifications Seat Altea Freetrack 2013 Owner's Manual
[x] Cancel search | Manufacturer: SEAT, Model Year: 2013, Model line: Altea Freetrack, Model: Seat Altea Freetrack 2013Pages: 301, PDF Size: 4.45 MB
Page 245 of 301
243
Wheels and tyres
Run-flat tyres
Run-flat tyres allow you to continue driving even with a
punctured tyre, in the majority of cases.
In vehicles that are factory-fitted with run-flat tyres 1)
the loss of tyre
pressure is indicated on the instrument panel.
Driving with run-flat tyres (emergency running)
– Leave the ESC/ASR on (Electronic Stability Control), or switch it
on ⇒ page 189.
– Continue driving carefully and slowly (80 km/h (50 mph) maxi-
mum).
– Avoid sudden manoeuvres and sharp turns.
– Avoid driving over obstacles (for example kerbs) or potholes.
– Pay attention if the ESC/ASR activates often, if smoke comes
from the tyres or there is a smell of rubber, the vehicle vibrates
or there are clattering noises. If any of these occur, stop the ve-
hicle.
The run-flat tyres have a tag on the side of the tyre, with the description:
“DSST”, “Eufonia”, “RFT”, “ROF”, “RSC”, “SSR” or “ZP”.
The sides of this type of tyre are reinforced. When the tyres lose air they are
supported on the sides (emergency driving).
The loss of pressure in the tyre is shown on the instrument panel. You can
then drive a maximum of 80 km (50 miles) and if the circumstances are fa-
vourable (for example, low load), even more. The damaged tyre should be changed as soon as possible. The rim should
be checked in a specialised workshop to detect possible damage and re-
place it if necessary. We recommend you contact Technical Service. If more
than one tyre is being used under emergency conditions, this reduces the
distance which can be travelled.
Starting driving in emergency conditions
When loss in tyre pressure is displayed on the instrument panel, this means
that at least one tyre is being driven in emergency conditions
⇒
.
End of emergency operation
Do not drive on if:
● smoke is coming from one of the tyres,
● there is a smell of rubber,
● the vehicle vibrates,
● there is a rattling noise.
When is it no longer possible to continue driving even using run-flat tyres?
● If one of the tyres has been severely damaged in an accident, etc. If a
tyre has been badly damaged there is a risk that parts of the tread can be
thrown off and cause damage to the fuel lines, brake pipes or fuel filler.
● It is also advisable to stop driving if severe vibrations occur, or if the
wheel starts overheating and gives off smoke.
1)
Depending upon version and country.
Safety FirstOperating InstructionsPractical TipsTechnical Specifications
Page 247 of 301

245
Wheels and tyres
WARNING
● We recommend that you use only wheels and tyres which have been
approved by SEAT for your model. Failure to do so could impair vehicle
handling. Risk of accident.
● Avoid running the vehicle on tyres that are more than 6 years old. If
you have no alternative, you should drive slowly and with extra care at all
times.
● Never use old tyres or those with an unknown history of use.
● If wheel trims are retrofitted, you must ensure that the flow of air to
the brakes is not restricted. This could cause the brake system to over-
heat.
● All four wheels must be fitted with radial tyres of the same type, size
(rolling circumference) and the same tread pattern.
For the sake of the environment
Old tyres must be disposed of according to the laws in the country con-
cerned.
Note
● For technical reasons, it is not generally possible to use the wheels from
other vehicles. This can also apply to wheels of the same model. The use of
wheels or tyres which have not been approved by SEAT for use with your
model may invalidate the vehicle's type approval for use on public roads.
● If the spare tyre is not the same as the tyres that are mounted on the
vehicle (e.g. winter tyres) you should only use the spare tyre for a short peri-
od of time and drive with extra care. Refit the normal road wheel as soon as
possible. Wheel bolts
Wheel bolts must be tightened to the correct torque.
The design of wheel bolts is matched to the rims. If different wheel rims are
fitted, the correct wheel bolts with the right length and correctly shaped
bolt heads must be used. This ensures that wheels are fitted securely and
that the brake system functions correctly.
In certain circumstances, you should not use wheel bolts from a different
vehicle, even if it is the same model ⇒ page 217.
After the wheels have been changed, the tightening torque of the wheel
bolts should be checked as soon as possible with a torque wrench ⇒
.
The tightening torque for steel and alloy wheels is 120 Nm.
WARNING
If the wheel bolts are not tightened correctly, the wheel could become
loose while driving. Risk of accident.
● The wheel bolts must be clean and turn easily. Never apply grease or
oil to them.
● Use only wheel bolts which belong to the wheel.
● If the tightening torque of the wheel bolts is too low, they could loos-
en whilst the vehicle is in motion. Risk of accident! If the tightening tor-
que is too high, the wheel bolts and threads can be damaged.
CAUTION
The prescribed tightening torque for wheel bolts for steel and alloy wheels
is 120 Nm.
Safety FirstOperating InstructionsPractical TipsTechnical Specifications
Page 249 of 301
247
Wheels and tyres
CAUTION
Remove the snow chains to drive on roads without snow. Otherwise they
will impair handling, damage the tyres and wear out very quickly.
Note
● In some countries, the speed limit for using snow chains is 50 km/h
(30 mph). The legal requirements of the country should be followed.
● We recommend that you ask your Technical Service for information
about appropriate wheel, tyre and snow chain size.
Safety FirstOperating InstructionsPractical TipsTechnical Specifications
Page 251 of 301
249
If and when
How to use the temporary spare wheel
Should you ever have a punctured tyre, the temporary spare wheel is only
intended for temporary use until you can reach a workshop. The standard-
size road wheel should be replaced as soon as possible.
Please note the following restrictions when using the temporary spare
wheel. This temporary spare wheel has been specially designed for your ve-
hicle, thus, it cannot be changed with the temporary spare wheel from an-
other vehicle.
No other type of tyre (normal summer or winter tyre) may be fitted on the
compact temporary spare wheel rim.
Snow chains
For technical reasons, snow chains must not be used on the compact tem-
porary spare wheel.
If you have a puncture on one of the front wheels when using snow chains,
fit the compact temporary spare wheel in place of one of the rear wheels.
You can then attach the snow chains to the wheel taken from the rear and
use this wheel to replace the punctured front wheel.
WARNING
● The tyre pressures must be checked and corrected as soon as possi-
ble after fitting the temporary spare wheel. The temporary spare wheel
pressure for dimensions 125/70R16 125/70R18 135/90R16 is 4.2 bar;
for all other tyre dimensions please refer to the label on the fuel cap. Fail-
ure to do so could result in an accident.
● Do not drive faster than 80 km/h (50 mph). Higher speeds can cause
an accident.
● Avoid heavy acceleration, hard braking and fast cornering. Risk of ac-
cident.
WARNING (Continued)
● Never use more than one temporary spare wheel at the same time,
risk of accident.
● No other type of tyre (normal summer or winter tyre) may be fitted on
the compact temporary spare wheel rim.
Tyre repair kit
The tyre repair kit (for vehicles not including a temporary
spare wheel) is stored under the floor panel in the luggage
compartment. In the event of a punctured tyre, your vehicle is equipped with the Tyre Mo-
bility System tyre repair kit.
The tyre repair kit consists of a container with sealing product to repair the
puncture and a compressor to generate the required tyre pressure. The kit
will reliably seal punctures up to a size of about 4 mm caused by the pene-
tration of a foreign body into the tyre.
Note
● Seek professional assistance if the repair of a tyre puncture is not possi-
ble with the sealing product.
Safety FirstOperating InstructionsPractical TipsTechnical Specifications
Page 253 of 301
251
If and when
– Place the wheel with the defective tyre in the luggage compart-
ment and secure it.
– Check the tyre pressure of the newly fitted tyre as soon as pos-
sible.
– Have the tightening torque of the wheel bolts checked as soon
as possible with a torque wrench. The prescribed torque must
be 120 Nm.
Note
● If you notice that the wheel bolts are corroded and difficult to turn when
changing a wheel, they must be replaced before having the wheel bolt tight-
ening torque checked.
● For safety reasons, drive at moderate speeds until the wheel bolt tight-
ening torque has been checked. Wheel trims
The wheel trims must be removed to gain access to the
wheel bolts.
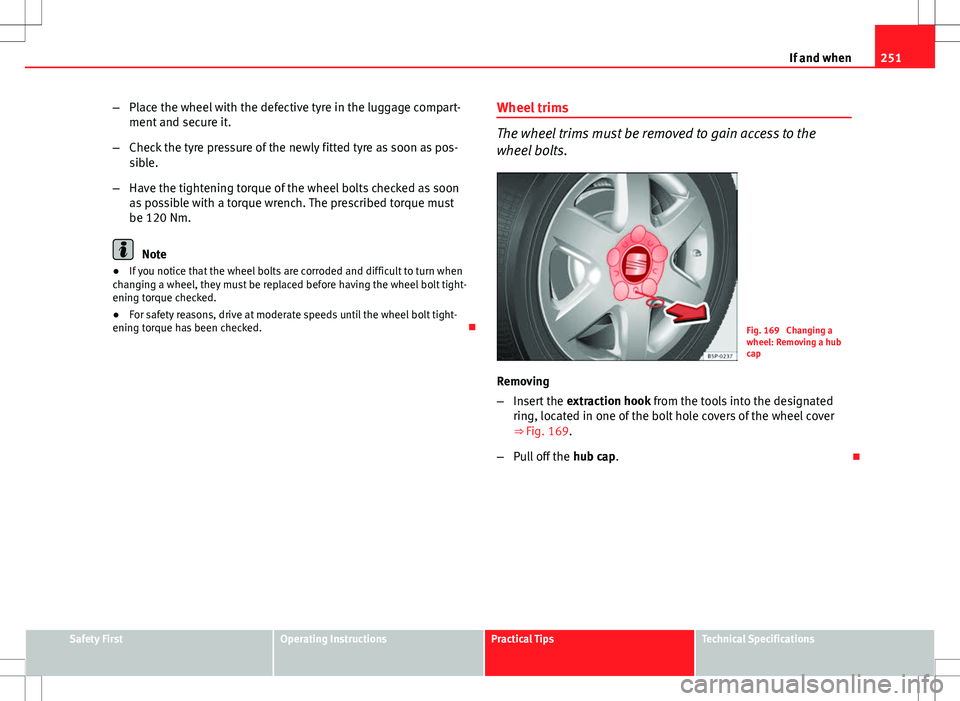
Fig. 169 Changing a
wheel: Removing a hub
cap
Removing
– Insert the extraction hook from the tools into the designated
ring, located in one of the bolt hole covers of the wheel cover
⇒ Fig. 169.
– Pull off the hub cap.
Safety FirstOperating InstructionsPractical TipsTechnical Specifications
Page 255 of 301
253
If and when
WARNING
Loosen the wheel bolts only about one turn before raising the vehicle
with the jack, otherwise there is a risk of accident.
Note
● If the wheel bolt is very tight, you may be able to loosen it by pushing
down the end of the spanner carefully with your foot. Hold on to the vehicle
for support and take care not to slip.
Raising the vehicle
In order to remove the wheel, the vehicle must be raised
with a jack.
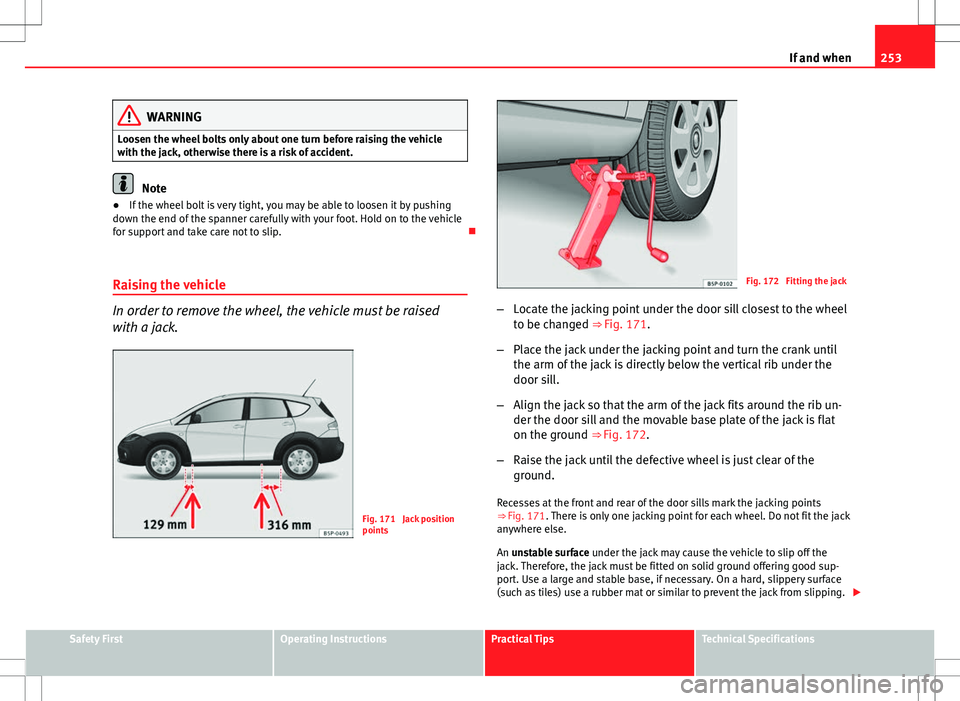
Fig. 171 Jack position
points
Fig. 172 Fitting the jack
– Locate the jacking point under the door sill closest to the wheel
to be changed ⇒ Fig. 171.
– Place the jack under the jacking point and turn the crank until
the arm of the jack is directly below the vertical rib under the
door sill.
– Align the jack so that the arm of the jack fits around the rib un-
der the door sill and the movable base plate of the jack is flat
on the ground ⇒ Fig. 172.
– Raise the jack until the defective wheel is just clear of the
ground.
Recesses at the front and rear of the door sills mark the jacking points
⇒ Fig. 171. There is only one jacking point for each wheel. Do not fit the jack
anywhere else.
An unstable surface under the jack may cause the vehicle to slip off the
jack. Therefore, the jack must be fitted on solid ground offering good sup-
port. Use a large and stable base, if necessary. On a hard, slippery surface
(such as tiles) use a rubber mat or similar to prevent the jack from slipping.
Safety FirstOperating InstructionsPractical TipsTechnical Specifications
Page 257 of 301

255
If and when
Anti-theft wheel bolts*
A special adapter is required to turn the anti-theft wheel
bolts.
Fig. 174 Anti-theft
wheel bolt
– Insert the adapter onto the wheel bolt and push it on as far as it
will go ⇒ Fig. 174.
– Fit the box spanner as far as it will go over the adapter.
– Loosen or tighten the wheel bolt as appropriate.
Code
The code number of the anti-theft wheel bolt is stamped onto the front part
of the adaptor.
The code number should be noted and kept in a safe place, as it is only by
using the code number that a duplicate adaptor can be obtained from the
SEAT Official Services. Tyres with directional tread pattern
Tyres with directional tread pattern must be fitted so that
they rotate in the correct direction.
A directional tread pattern can be identified by arrows on the sidewall that
point in the direction of rotation. Always note the direction of rotation indi-
cated when fitting the wheel. This is important so that these tyres can give
maximum grip and avoid excessive noise, tread wear and aquaplaning.
If, in an emergency, you have to fit the spare wheel so it rotates in the wrong
direction, you must drive extremely carefully. The tyre will not give optimum
performance. This is particularly important when driving on wet roads.
To benefit from the advantages of tyres with this type of tread pattern, the
defective tyre should be replaced as soon as possible so that all tyres again
rotate in the correct direction.
Tyre repair kit (Tyre Mobility System)* General information and safety notes
Your vehicle is equipped with a tyre repair kit: the Tyre Mobility System.
In the event of a tyre puncture, a sealing product and an air compressor are
located in the luggage compartment under the floor panel.
The Tyre Mobility System will reliably seal punctures caused by the penetra-
tion of a foreign body of up to about 4 mm in diameter.
It is not necessary to remove the foreign body from the tyre.
Instructions for the sealing product are located on the sealing compound
container.
Safety FirstOperating InstructionsPractical TipsTechnical Specifications
Page 259 of 301
257
If and when
Tyre repair
The following sections describe the procedures for repairing
a tyre.
Using the sealing product
– The instructions on the container give detailed information on
how to use the sealing product.
Inflating the tyre.
– Remove the air compressor and hose from the container.
– Screw the retaining nut onto the valve.
– Plug the compressor cable into a 12 volt power socket.
– Turn on compressor and monitor the pressure shown on the
pressure gauge.
Completing the repair
– Remove the compressor hose from the valve.
– Fit the valve cap.
– Unplug the compressor from the socket.
– Return all tools to their proper storing location.
Note
● If the vehicle is equipped with tyre pressure control, enter the new tyre
pressures using the SET button on the centre console.
● The compressor should never be allowed to run for longer than 6 mi-
nutes.
Safety FirstOperating InstructionsPractical TipsTechnical Specifications
Page 261 of 301
259
If and when
The electric windows are protected by circuit breakers. These reset automat-
ically after a few seconds when the overload (caused for example by frozen
windows) has been corrected.
Fuses colour code
ColourAmpsLight brown5Red10Blue15Yellow20Natural (white)25Green30Orange40Red50White80Blue100Grey150Violet200
WARNING
Never “repair” damaged fuses and never replace them with fuses with a
higher rating. Failure to comply could result in fire. This could also cause
damage to other parts of the electrical system.
Note
● If a newly replaced fuse blows again after a short time, the electrical sys-
tem must be checked by a specialised workshop as soon as possible.
● If you replace a fuse with higher-rating fuse, you could cause damage to
another location in the electrical system. ●
Always keep some spare fuses in the vehicle. These are available from
SEAT Official Services.
● In addition to the fuses listed in the following tables, there are other
fuses which must be replaced by the Technical Service Workshop.
Safety FirstOperating InstructionsPractical TipsTechnical Specifications
Page 263 of 301

261
If and when
NumberConsumerAmps49Heating controls4050Heated seats3051Sunroof2052Headlight washer system2053Trailer hook pre-installation assistant2054Taxi (taximeter power supply)555Trailer hook pre-installation assistant2056Taxi (transmitter power supply)1557 58Central locking control unit30
Some of the electrical items listed in the table are only fitted on certain
models or are optional extras.
Please note that the above list, while correct at the time of printing, is sub-
ject to alterations. If discrepancies should occur, please refer to the sticker
on the inside of the fuse cover for the correct information for your model.
Fuses layout, engine compartment, left part
Fuses
NumberConsumerAmps1Windscreen wipers202DQ200 gearbox303Cable control unit54ABS205AQ gearbox156Instrument panel/Steering column57Ignition key40
NumberConsumerAmps8Radio159Telephone/TomTom Navigator5
10Engine management5Engine management1011Vacant 12Electronic control unit5
13Petrol injection module supply15Diesel injection module supply3014Coil20
15Engine management5Pump relay1016Right lighting3017Horn1518Vacant 19Clean30
20Water pump10Pressure sensor pump for 1.8 engine2021 a)Lambda probe1522Brake pedal, speed sensor5
23a)Engine management5Engine management10Engine management1524AKF, gearbox valve1025a)ABS pump4026Left lighting30
27a)Engine management40Engine management5028Vacant
Safety FirstOperating InstructionsPractical TipsTechnical Specifications