technical specifications Seat Altea Freetrack 2013 Manual PDF
[x] Cancel search | Manufacturer: SEAT, Model Year: 2013, Model line: Altea Freetrack, Model: Seat Altea Freetrack 2013Pages: 301, PDF Size: 4.45 MB
Page 145 of 301
143
Seats and storage
Rear drink holder*/ Armrest*
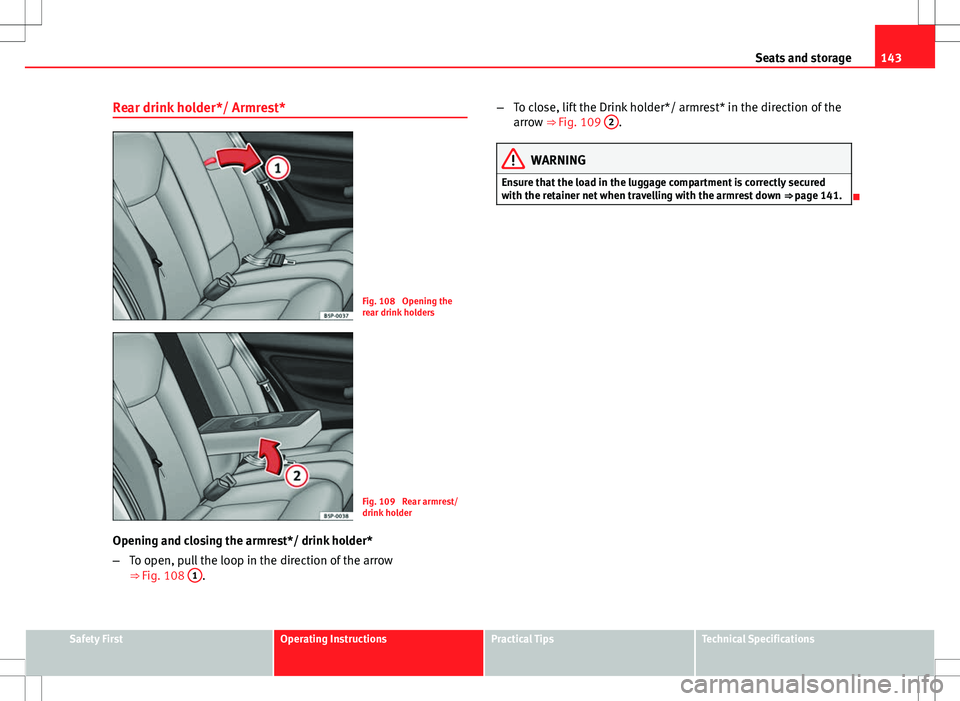
Fig. 108 Opening the
rear drink holders
Fig. 109 Rear armrest/
drink holder
Opening and closing the armrest*/ drink holder*
– To open, pull the loop in the direction of the arrow
⇒ Fig. 108 1
. –
To close, lift the Drink holder*/ armrest* in the direction of the
arrow ⇒ Fig. 109 2
.
WARNING
Ensure that the load in the luggage compartment is correctly secured
with the retainer net when travelling with the armrest down ⇒ page 141.
Safety FirstOperating InstructionsPractical TipsTechnical Specifications
Page 147 of 301
145
Seats and storage
Multi-purpose mobile storage compartment* - General
information
This storage compartment may only be placed in the central
area of the rear seat
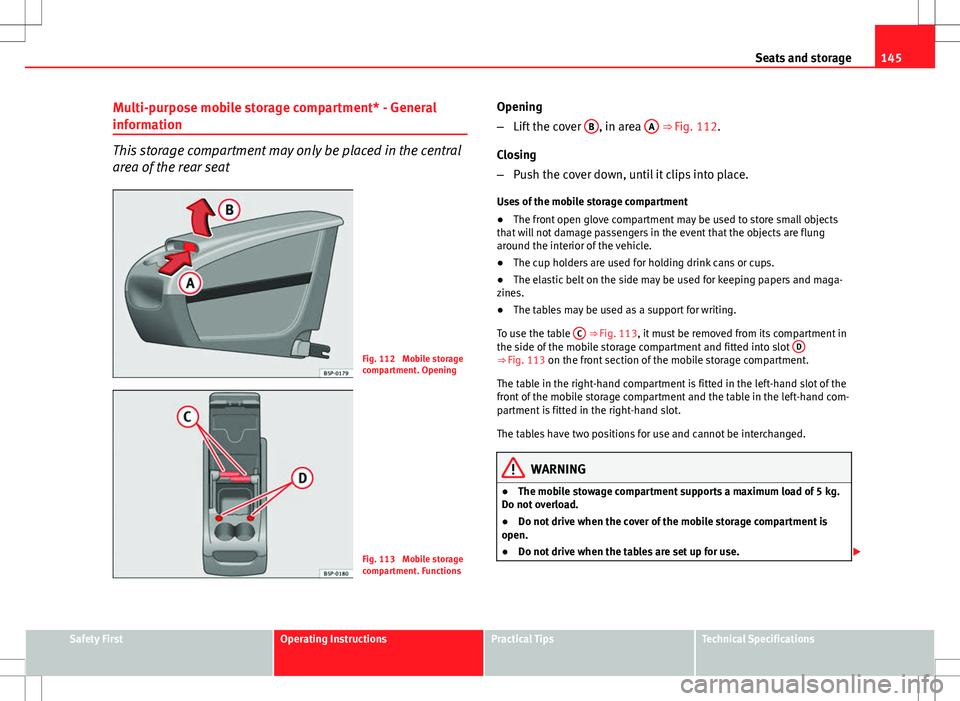
Fig. 112 Mobile storage
compartment. Opening
Fig. 113 Mobile storage
compartment. Functions Opening
–
Lift the cover B
, in area A ⇒ Fig. 112.
Closing
– Push the cover down, until it clips into place.
Uses of the mobile storage compartment
● The front open glove compartment may be used to store small objects
that will not damage passengers in the event that the objects are flung
around the interior of the vehicle.
● The cup holders are used for holding drink cans or cups.
● The elastic belt on the side may be used for keeping papers and maga-
zines.
● The tables may be used as a support for writing.
To use the table C
⇒ Fig. 113, it must be removed from its compartment in
the side of the mobile storage compartment and fitted into slot D
⇒ Fig. 113 on the front section of the mobile storage compartment.
The table in the right-hand compartment is fitted in the left-hand slot of the
front of the mobile storage compartment and the table in the left-hand com-
partment is fitted in the right-hand slot.
The tables have two positions for use and cannot be interchanged.
WARNING
● The mobile stowage compartment supports a maximum load of 5 kg.
Do not overload.
● Do not drive when the cover of the mobile storage compartment is
open.
● Do not drive when the tables are set up for use.
Safety FirstOperating InstructionsPractical TipsTechnical Specifications
Page 149 of 301
147
Seats and storage
Cigarette lighter*
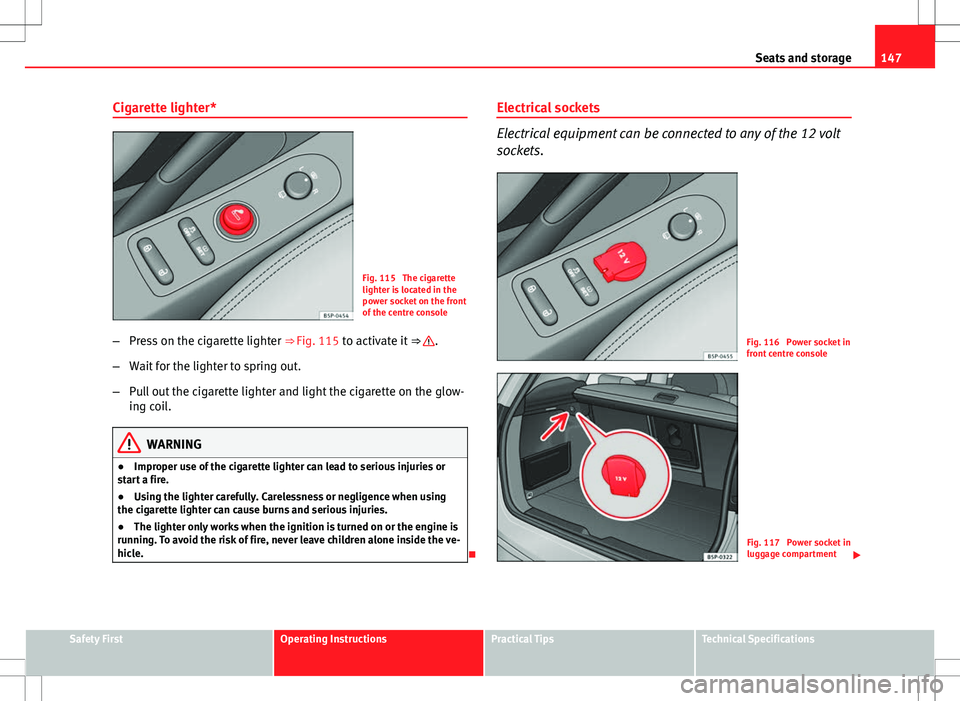
Fig. 115 The cigarette
lighter is located in the
power socket on the front
of the centre console
– Press on the cigarette lighter ⇒ Fig. 115 to activate it ⇒
.
– Wait for the lighter to spring out.
– Pull out the cigarette lighter and light the cigarette on the glow-
ing coil.
WARNING
● Improper use of the cigarette lighter can lead to serious injuries or
start a fire.
● Using the lighter carefully. Carelessness or negligence when using
the cigarette lighter can cause burns and serious injuries.
● The lighter only works when the ignition is turned on or the engine is
running. To avoid the risk of fire, never leave children alone inside the ve-
hicle.
Electrical sockets
Electrical equipment can be connected to any of the 12 volt
sockets.
Fig. 116 Power socket in
front centre console
Fig. 117 Power socket in
luggage compartment
Safety FirstOperating InstructionsPractical TipsTechnical Specifications
Page 151 of 301
149
Seats and storage
AUX RSE connection*
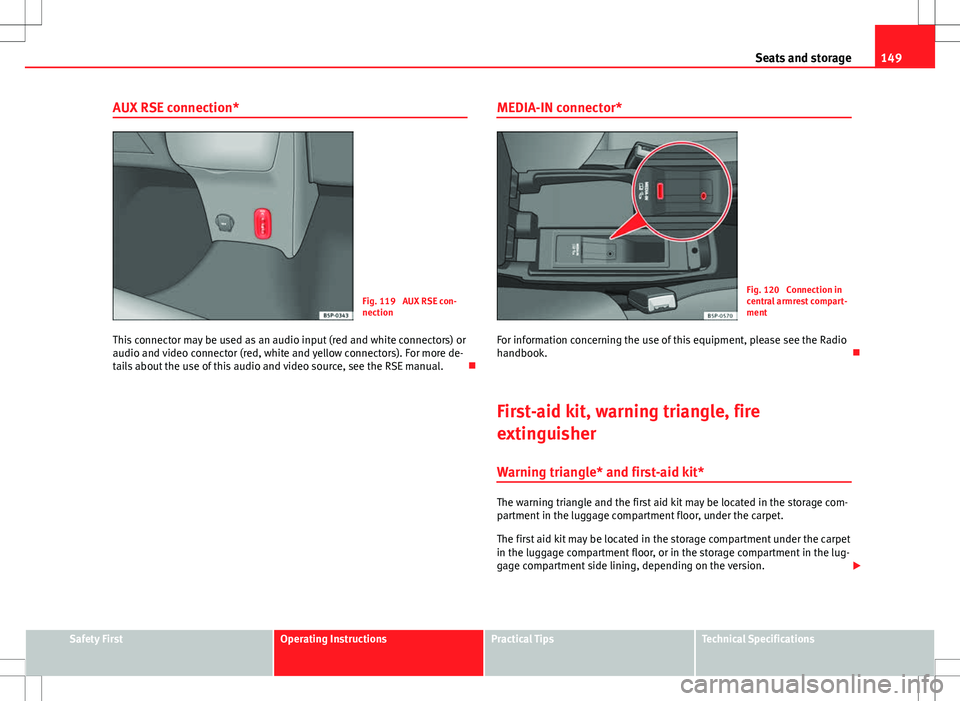
Fig. 119 AUX RSE con-
nection
This connector may be used as an audio input (red and white connectors) or
audio and video connector (red, white and yellow connectors). For more de-
tails about the use of this audio and video source, see the RSE manual. MEDIA-IN connector*Fig. 120 Connection in
central armrest compart-
ment
For information concerning the use of this equipment, please see the Radio
handbook.
First-aid kit, warning triangle, fire
extinguisher Warning triangle* and first-aid kit*
The warning triangle and the first aid kit may be located in the storage com-
partment in the luggage compartment floor, under the carpet.
The first aid kit may be located in the storage compartment under the carpet
in the luggage compartment floor, or in the storage compartment in the lug-
gage compartment side lining, depending on the version.
Safety FirstOperating InstructionsPractical TipsTechnical Specifications
Page 153 of 301
151
Seats and storage
CAUTION
Hard objects on the shelf could chafe against the wires of the heating ele-
ment in the rear window and cause damage.
Note
The ventilation slots in front of the rear side windows must not be covered
as this would prevent stale air being extracted from the vehicle.
Retractable rear shelf
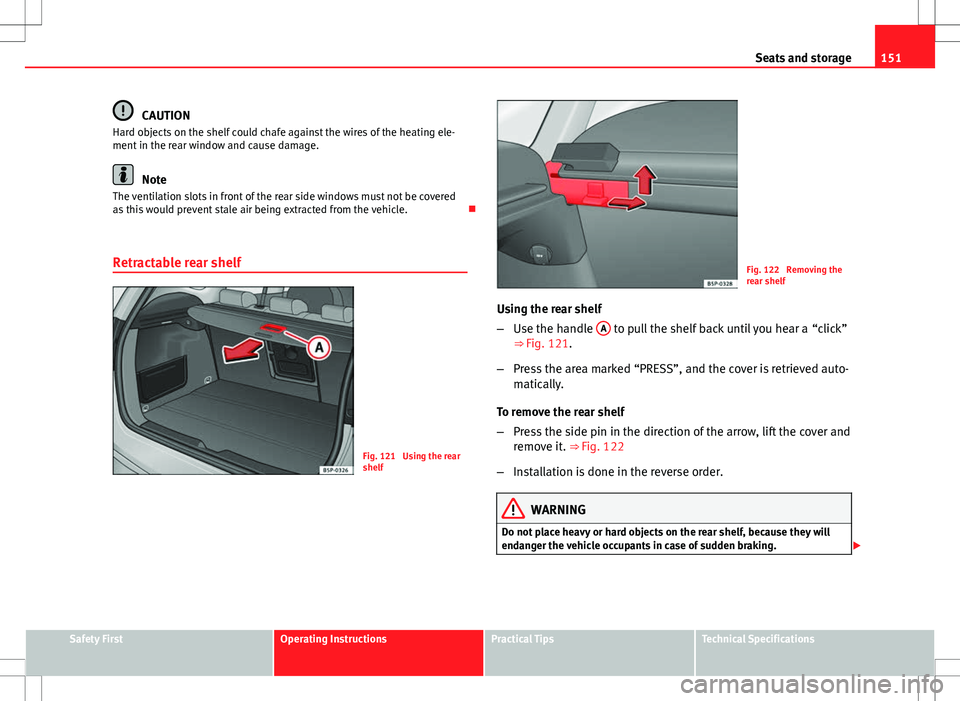
Fig. 121 Using the rear
shelf
Fig. 122 Removing the
rear shelf
Using the rear shelf
– Use the handle A
to pull the shelf back until you hear a “click”
⇒ Fig. 121.
– Press the area marked “PRESS”, and the cover is retrieved auto-
matically.
To remove the rear shelf
– Press the side pin in the direction of the arrow, lift the cover and
remove it. ⇒ Fig. 122
– Installation is done in the reverse order.
WARNING
Do not place heavy or hard objects on the rear shelf, because they will
endanger the vehicle occupants in case of sudden braking.
Safety FirstOperating InstructionsPractical TipsTechnical Specifications
Page 155 of 301
153
Seats and storage
● Distribute the load evenly. A maximum load of 40 kg only is permitted
for each roof rack system support bar, the load must be distributed evenly
along the entire length. However, the maximum load permitted for the en-
tire roof (including the support system) of 75 kg must not be exceeded nor
should the total weight of the vehicle be exceeded. See the Technical Data
section.
● When transporting heavy or large objects on the roof, any change in the
normal vehicle behaviour due to a change in the centre of gravity or an in-
creased wind resistance must be taken into account. For this reason, a suit-
able speed and driving style must be used.
● For those vehicles fitted with a sunroof*, ensure that it does not interfere
with the load on the roof rack system when opened.
Safety FirstOperating InstructionsPractical TipsTechnical Specifications
Page 157 of 301
155
Air conditioning
Air distribution
Control 4
for setting the flow of air in the required direction.
– Air distribution towards the windscreen. If the windscreen air output is
on and the air recirculation mode is pressed, this remains active. When the
recirculation mode is on, if the air distribution towards the windscreen
mode is selected, the recirculation mode is deactivated. For safety reasons,
the air recirculation mode should not be connected.
– Air distribution to the upper body
– Air distribution to footwell
– Air distribution to the windscreen and the footwell
Blower
The air flow can be set at four speeds with the control 5
. The air flow
should always be set at the lowest speed when driving slowly.
WARNING
● For road safety all windows must be clear of ice, snow, and condensa-
tion. This is essential to ensure good visibility. Please familiarise your-
self with the correct operation of the heating and ventilation system, in-
cluding the anti-fog/defrost functions for the windscreens.
● In air recirculation mode, no cold air from the outside enters the vehi-
cle interior. The windows can quickly fog over if the heating is switched
off. Therefore, never leave the air recirculation mode switched on for a
long time (risk of accident).
Note
Please observe the general notes ⇒ page 164.
Safety FirstOperating InstructionsPractical TipsTechnical Specifications
Page 159 of 301
157
Air conditioning
Heating and cooling the interior
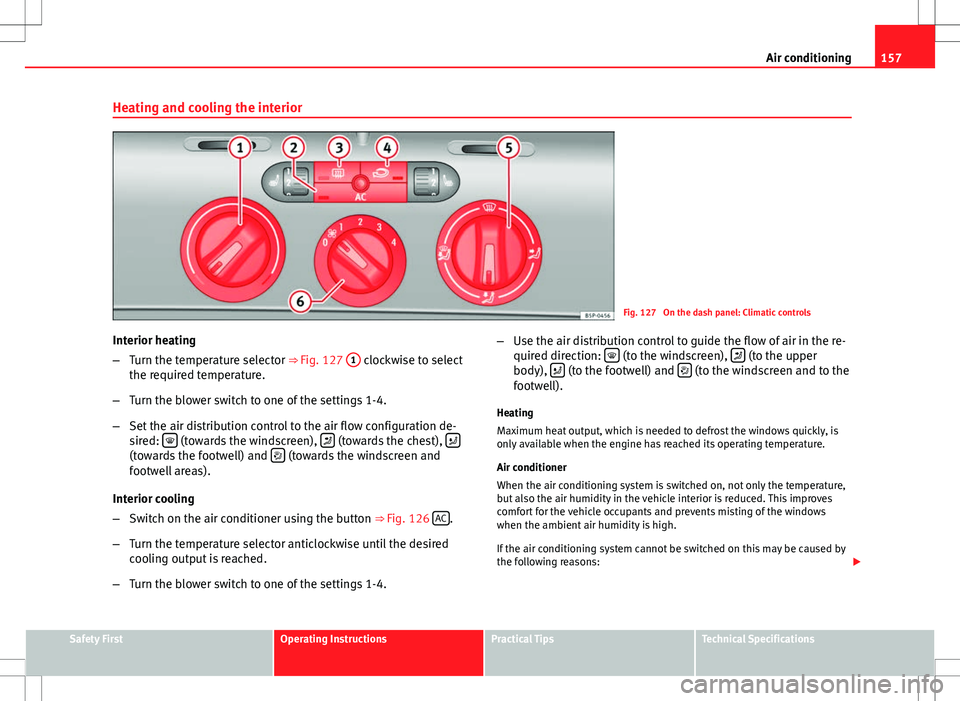
Fig. 127 On the dash panel: Climatic controls
Interior heating
– Turn the temperature selector ⇒ Fig. 127 1
clockwise to select
the required temperature.
– Turn the blower switch to one of the settings 1-4.
– Set the air distribution control to the air flow configuration de-
sired:
(towards the windscreen), (towards the chest), (towards the footwell) and (towards the windscreen and
footwell areas).
Interior cooling
– Switch on the air conditioner using the button ⇒ Fig. 126 AC
.
– Turn the temperature selector anticlockwise until the desired
cooling output is reached.
– Turn the blower switch to one of the settings 1-4. –
Use the air distribution control to guide the flow of air in the re-
quired direction:
(to the windscreen), (to the upper
body), (to the footwell) and (to the windscreen and to the
footwell).
Heating
Maximum heat output, which is needed to defrost the windows quickly, is
only available when the engine has reached its operating temperature.
Air conditioner
When the air conditioning system is switched on, not only the temperature,
but also the air humidity in the vehicle interior is reduced. This improves
comfort for the vehicle occupants and prevents misting of the windows
when the ambient air humidity is high.
If the air conditioning system cannot be switched on this may be caused by
the following reasons:
Safety FirstOperating InstructionsPractical TipsTechnical Specifications
Page 161 of 301
159
Air conditioning
WARNING
In air recirculation mode, no cold air from the outside enters the vehicle
interior. If the air conditioning system is switched off, the windows can
quickly mist over. Therefore, never leave the air recirculation mode
switched on for a long time (risk of accident).
2C-Climatronic* Controls
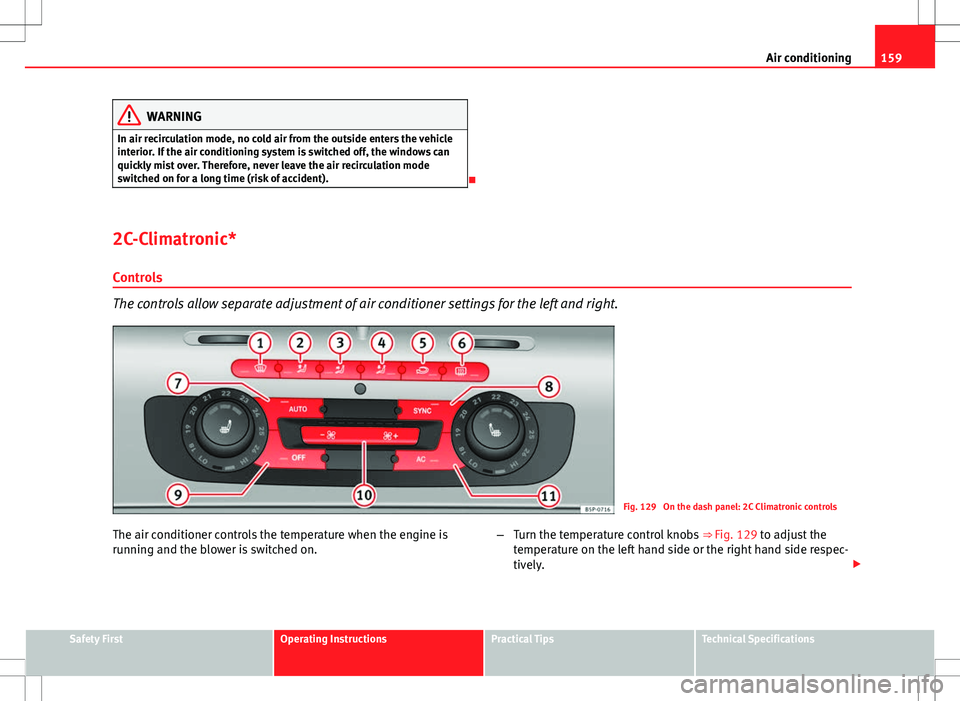
The controls allow separate adjustment of air conditioner settings for the left and right.
Fig. 129 On the dash panel: 2C Climatronic controls
The air conditioner controls the temperature when the engine is
running and the blower is switched on. –
Turn the temperature control knobs ⇒ Fig. 129 to adjust the
temperature on the left hand side or the right hand side respec-
tively.
Safety FirstOperating InstructionsPractical TipsTechnical Specifications
Page 163 of 301
161
Air conditioning
Viewing Climatronic information
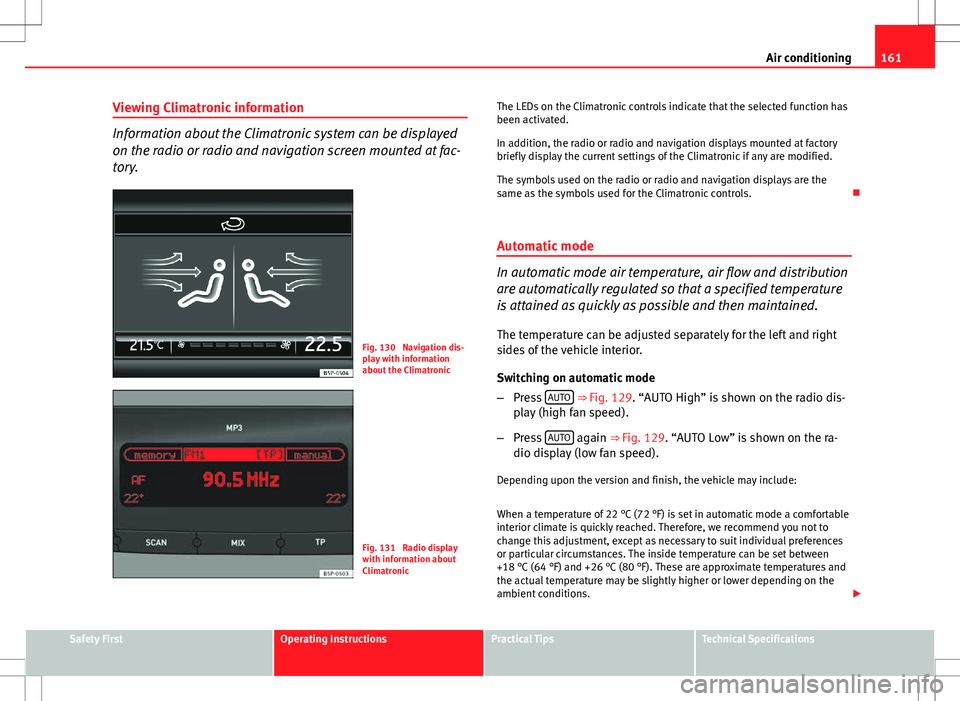
Information about the Climatronic system can be displayed
on the radio or radio and navigation screen mounted at fac-
tory.
Fig. 130 Navigation dis-
play with information
about the Climatronic
Fig. 131 Radio display
with information about
Climatronic The LEDs on the Climatronic controls indicate that the selected function has
been activated.
In addition, the radio or radio and navigation displays mounted at factory
briefly display the current settings of the Climatronic if any are modified.
The symbols used on the radio or radio and navigation displays are the
same as the symbols used for the Climatronic controls.
Automatic mode
In automatic mode air temperature, air flow and distribution
are automatically regulated so that a specified temperature
is attained as quickly as possible and then maintained. The temperature can be adjusted separately for the left and right
sides of the vehicle interior.
Switching on automatic mode
– Press AUTO
⇒
Fig. 129. “AUTO High” is shown on the radio dis-
play (high fan speed).
– Press AUTO
again ⇒
Fig. 129. “AUTO Low” is shown on the ra-
dio display (low fan speed).
Depending upon the version and finish, the vehicle may include:
When a temperature of 22 °C (72 °F) is set in automatic mode a comfortable
interior climate is quickly reached. Therefore, we recommend you not to
change this adjustment, except as necessary to suit individual preferences
or particular circumstances. The inside temperature can be set between
+18 °C (64 °F) and +26 °C (80 °F). These are approximate temperatures and
the actual temperature may be slightly higher or lower depending on the
ambient conditions.
Safety FirstOperating InstructionsPractical TipsTechnical Specifications