automatic select Seat Altea XL 2009 Owner's Guide
[x] Cancel search | Manufacturer: SEAT, Model Year: 2009, Model line: Altea XL, Model: Seat Altea XL 2009Pages: 297, PDF Size: 9.36 MB
Page 175 of 297
Driving
174
General information about driving in Tiptronic mode
Changing gear with the gear stick
– Put the lever in position D and press towards the right to enter
the Tiptronic gate ⇒page 173, fig. 145 .
– Press the gear lever forwards (+) to select a higher gear.
– Press the gear lever back (-) to select a lower gear.
Changing gear with the steering wheel levers
– Press the right paddle towards the steering wheel to change up ⇒page 173, fig. 146 .
– Press the left paddle towards the steering wheel to change down ⇒page 173, fig. 146 .Using the levers on the steering wheel, you can access manual driving mode
regardless of the driv ing mode pre-selected.
General information about driving in Tiptronic mode
When accelerating, the automatic gearbox / direct shift gearbox goes into a
higher gear a little before it reac hes the maximum permitted revolutions.
If a lower gear is selected, the automatic gearbox / direct shift gearbox does
not change down until the point is reached where the engine could no longer
overrev.
If the “Tiptronic” is selected whilst the vehicle is in motion and the automatic
gearbox / direct shift gearbox is in 3rd gear in selector lever position D, the
“Tiptronic” will then also be in 3rd gear.
Note
•
The gearbox controls on the steering wheel can operate with the gear stick
in any position and with the vehicle in motion.
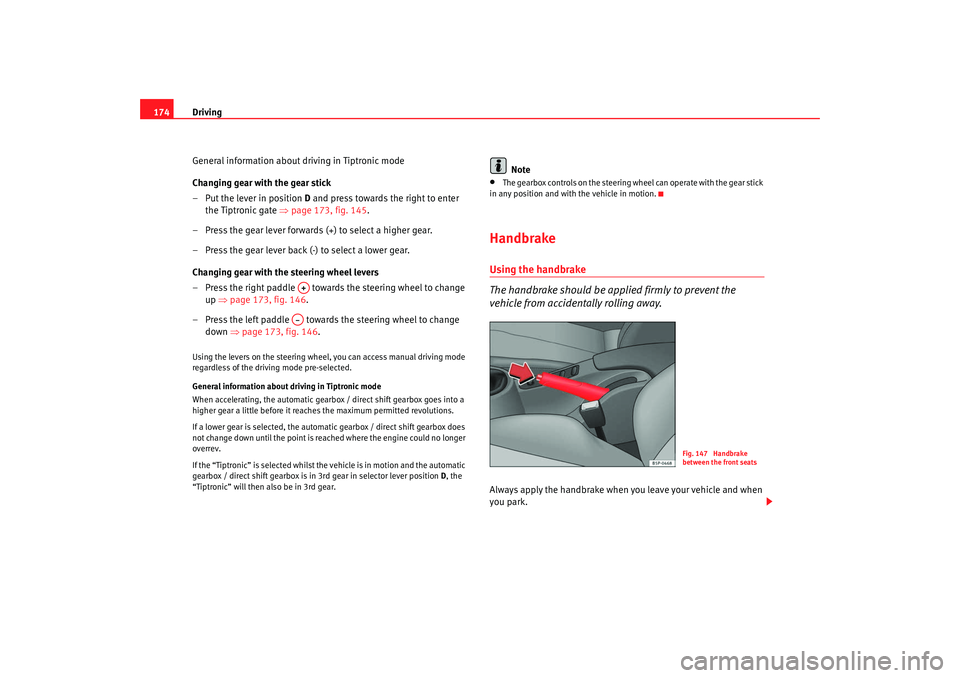
HandbrakeUsing the handbrake
The handbrake should be applied firmly to prevent the
vehicle from accidentally rolling away.Always apply the handbrake when you leave your vehicle and when
you park.
A+A–
Fig. 147 Handbrake
between the front seats
AlteaXL_EN.book Seite 174 M ontag, 2. Februar 2009 12:26 12
Page 183 of 297
Driving
182•
if the clutch pedal is depressed,
•
if the vehicle is accelerated to over 180 km/h,
•
when the lever is moved to the position “CANCEL” without reaching
the “OFF” position. Once the “CANCEL” operation is completed, the lever is
released and returns to its initial position.
To resume the cruise control, release the brake or clutch pedal or reduce the
vehicle speed to less than 180 km/h and press once on the upper part of the
rocker switch RES/+ ⇒ page 181, fig. 152 .
WARNING
It is dangerous to use a set speed which is too high for the current road,
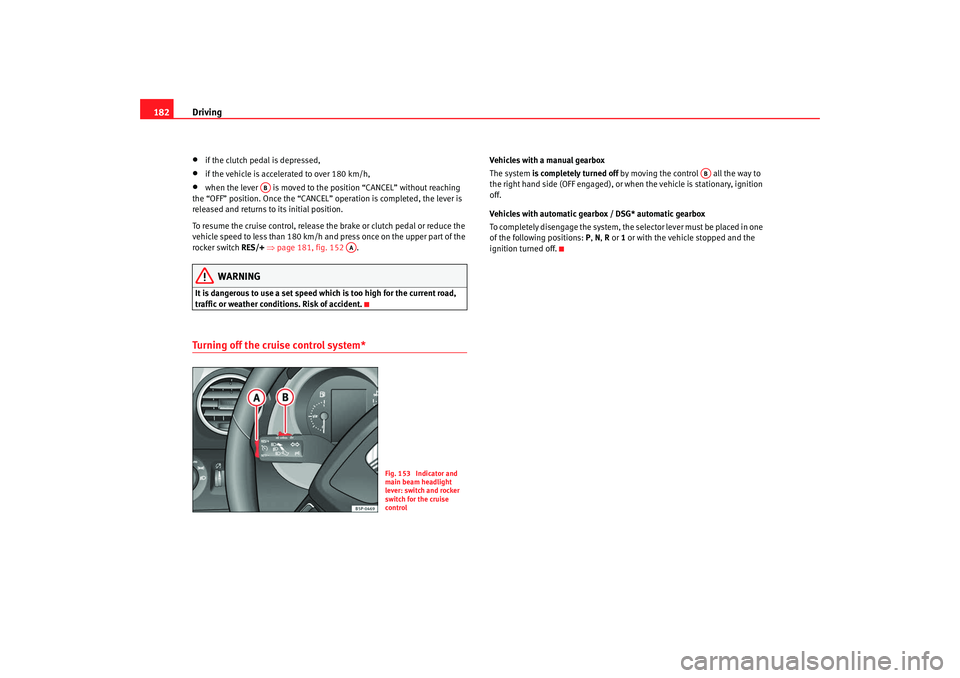
traffic or weather conditions. Risk of accident.Turning off the cruise control system*
Vehicles with a manual gearbox
The system is completely turned off by moving the control all the way to
the right hand side (OFF engaged), or when the vehicle is stationary, ignition
off.
Vehicles with automatic gearbox / DSG* automatic gearbox
To completely disengage the system, the selector lever must be placed in one
of the following positions: P, N , R or 1 or with the vehicle stopped and the
ignition turned off.
AB
AA
Fig. 153 Indicator and
main beam headlight
lever: switch and rocker
switch for the cruise
control
AB
AlteaXL_EN.book Seite 182 M ontag, 2. Februar 2009 12:26 12
Page 190 of 297
Intelligent technology189
Safety First
Operating instructions
Practical tips
Te c h n i c a l D a t a
Caution
•
Never let the brakes “drag” by leaving your foot on the pedal when you do
not really intend to brake. This overhe ats the brakes, resulting in longer stop-
ping distances and greater wear.
•
Before driving down a long, steep gradient, it is advisable to reduce speed
and change to a lower gear (or move the selector lever to a lower gear position
if your car has automatic transmission). This makes use of engine braking
and prolongs the service life of the brakes. If you still have to use the brakes,
it is better to brake firmly at intervals than to apply the brakes continuously.Note
•
If the brake servo is not functioning due to a malfunction, or if the vehicle
has to be towed, you will have to press the brake pedal considerably harder
to make up for the lack of servo assistance.
•
If you wish to equip the car with accessories such as a front spoiler or
wheel covers, it is important that the flow of air to the front wheels is not
obstructed, otherwise the brakes can overheat.
Power steering (servotronic*)
The power steering assists the driver when turning the
steering wheel (with the engine running).The power steering assists the driver by reducing the force needed to turn the
steering wheel. In cars equipped with servotronic* power steering the degree
of power assistance is regulated electronically according to road speed.
The power steering will keep on working even if the servotronic* device fails.
The degree of power assistance will, however, no longer adapt to different
speeds. If the electronic regulating system is not working properly, this is
most noticeable when turning the steering wheel at low speeds (for instance when parking) – more effort will be requ
ired than usual. The fault should be
corrected by a qualified work shop as soon as possible.
The power steering does not work if the engine is off. In this case the steering
wheel is very hard to turn.
If the steering is held at its turning limit when the car is stationary, this will
place an excessive load on the power steering system. Turning the steering
wheel to its limit places a load on the sy stem, which causes noise. It will also
reduce the idling speed of the engine.
Caution
When the engine is running, do not tu rn the steering wheel to its limit for
more than 15 seconds. Otherwise, there is a risk of damaging the power
steering.
Note
•
If the power steering should fail at any time or the engine is switched off
(for instance when being towed), the car can still be steered. However, more
effort will be required to turn the steering wheel.
•
If the system is leaking or malfunctioning, please take the car to a quali-
fied workshop as soon as possible.
•
The power steering requires a special hydraulic fluid. The container is
located in the engine compartment (front left). The correct fluid level in the
reservoir is important for the power steering to function properly. The
hydraulic fluid level is checked at the Inspection Service.
AlteaXL_EN.book Seite 189 M ontag, 2. Februar 2009 12:26 12
Page 208 of 297
Cleaning and caring for your vehicle207
Safety First
Operating instructions
Practical tips
Te c h n i c a l D a t a
– Apply these products very sparingly.
– Then wipe off with a soft, dry cloth.SEAT does everything possible to preserve the genuine qualities of this
natural product. Due to the natural properties of the specially selected hides
employed, the finished leather has a certain sensitivity to grease and dirt, etc.
so a degree of care is required in everyday use and when looking after the
leather.
Dust and grit in the pores and seams can scratch and damage the surface. If
the vehicle is under solar radiation for long periods, the leather should be
protected to prevent it from fading. However, slight colour variations in high-
quality natural leather are normal.
Caution
•
Do not use solvents, wax polish, shoe cream, spot removers or similar
products on leather.
•
To avoid damage, stubborn stains should be removed by a qualified
workshop.
Seat belts cleaning
A dirty belt may not work properly.Check all seat belts regularly and keep them clean.
Seat belts cleaning
– Pull the dirty seat belt right out and unroll it.
– Clean the dirty seat belts with a gentle soap solution.
– Allow it to dry. – Do not roll the seat belt up until it is dry.
If large stains form on the belts, it wil
l not retract correctly into the automatic
belt retractor.
WARNING
•
Do not use chemical cleaning agents on the seat belts, as this can
impair the strength of the webbing. Ensure that belts do not come into
contact with corrosive fluids.
•
Check all seat belts condition at regula r intervals. If you notice that the
belt webbing, fittings, retractor mechanism or buckle of any of the belts is
damaged, the belt must be repl aced by a specialist workshop.
•
Do not attempt to repair a damaged se at belt yourself. The seat belts
must not be removed or modified in any way.Caution
After cleaning, allow seat belts to dr y completely before rolling them up.
Otherwise, the belt retractors could become damaged.
AlteaXL_EN.book Seite 207 M ontag, 2. Februar 2009 12:26 12
Page 215 of 297
Checking and refilling levels
214
WARNING
All work on the engine or in the engine compartment, e.g. checking and
refilling fluids, involves the danger of injury and scalding as well as the risk
of accident or fire.•
Never open the bonnet if you see steam, smoke or coolant escaping
from the engine compartment. Otherwise, there is a risk of sustaining
burns. Wait until no more steam or coolant is emitted, then allow the
engine to cool before carefully opening the bonnet.
•
Switch off the engine and remove the key from the ignition.
•
Apply the handbrake and move the gea r stick to neutral or selector
lever to position P.
•
Keep children away from the vehicle.
•
Never touch hot engine parts. There is a risk of burns.
•
Never spill liquids on a hot engine or on a hot exhaust gas system. This
is a fire hazard.
•
Avoid causing short-circuits in the electrical system, particularly at the
points where the jump leads are attached ⇒page 263. The battery could
explode.
•
Never touch the radiator fan. It is temperature controlled and could
start automatically, even when the engine has been switched off and the
key removed from the ignition!
•
Do not unscrew the cap on the expansion tank when the engine is hot.
If the coolant is hot, the cooling system will be pressurised!
•
Protect face, hands and arms by covering the cap with a large, thick
cloth to protect against escaping coolant and steam.
•
Always make sure you have not left any objects, such as cleaning cloths
and tools, in the engine compartment.
•
If you have to work underneath the vehicle, you must use suitable
stands additionally to support the vehicle, there is a risk of accident!. A
hydraulic jack is insufficient for securing the vehicle and there is a risk of
injury.
•
If any work has to be performed when the engine is started or with the
engine running, there is an additional, potentially fatal, safety risk from the
rotating parts, such as the drive belt s, alternator, radiator fan, etc., and
from the high-voltage ignition system. You should also observe the
following points:
−Never touch the electrical wiring of the ignition system.
− Ensure that jewellery, loose clothing and long hair do not get
trapped in rotating engine parts. Danger of death. Before starting any
work remove jewellery, tie back and cover hair, and wear tight-fitting
clothes.
− Always think carefully about pressing the accelerator if a gear is
engaged in either an automatic or manual gearbox. The vehicle could
move, even if the handbrake is applied. Danger of death.
•
If work has to be carried out on the fuel system or on electrical compo-
nents, you must observe the following safety notes in addition to the above
warnings:
−Always disconnect the battery. The vehicle must be unlocked when
this is done, otherwise the alarm will be triggered.
− Do not smoke.
− Never work near naked flames.
− Always have a fire extinguisher on hand.Caution
When changing or topping up service fluids, make absolutely certain that you
fill the fluids into the correct reservoirs. Failure to observe this point will result
in serious malfunctions and engine damage!
WARNING (continued)
AlteaXL_EN.book Seite 214 M ontag, 2. Februar 2009 12:26 12
Page 241 of 297
If and when
240reliably seal punctures up to a size of about 4 mm caused by the penetration
of a foreign body into the tyre.
Note
•
Seek professional assistance if the repair of a tyre puncture is not
possible with the sealing compound.
Wheel changePreparation work
What you must do before changing a wheel.– If you have a flat tyre or puncture, park the vehicle as far away from the flow of traffic as possible. Choose a location that is as
level as possible.
– All passengers should leave the ve hicle. They should wait in a
safe area (for instance behind the roadside crash barrier).
– Switch off the engine. Switch on the hazard warning lights.
–Apply the handbrake firmly.
– Engage the first gear, or put the selector lever to position P for
those vehicles with an automatic gearbox.
– If you are towing a trailer, unhitch it from your vehicle.
– Take the vehicle tools and the spare wheel out of the luggage
compartment.
WARNING
Put the hazard warning lights on and place the warning triangle in position.
This is for your own safety and also warns other road users.
Caution
If you have to change the tyre on a gradient, block the wheel opposite the
wheel being changed by placing a stone or similar object under it to prevent
the vehicle from rolling away.
Note
Please observe legal requirements when doing so.Changing a wheelChange the wheel as described below
–Pull off the hub cap. Also see ⇒page 241.
– Slacken the wheel bolts.
– Raise the car with the jack in the corresponding zone.
– Remove the wheel and then mount the spare wheel
– Lower the vehicle.
– Tighten the wheel bolts firmly with the box spanner.
–Replace the hub cap.
AlteaXL_EN.book Seite 240 M ontag, 2. Februar 2009 12:26 12
Page 267 of 297
If and when
266Do not pull too hard with the towing vehicle and take care to avoid jerking the
tow-rope. When towing on an unpaved ro ad, there is always a risk of over-
loading and damaging the anchorage points.
The ignition of the vehicle being towed must be switched on to prevent the
steering wheel from locking and also to allow the use of the turn signals,
horn, windscreen wipers and washers.
As the brake servo does not work if the engine is not running, you must apply
considerably more pressure to the br ake pedal than you normally would.
As the power assisted steering does not wo rk if the engine is not running, you
will need more strength to steer than you normally would.•
The vehicle must not be towed faster than 50 km/h.
•
The vehicle must not be towed faster than 50 km/h.
Towing vehicles with an automatic gearbox
•
Put the selector lever into position “N”.
•
Do not drive faster than 50 km/h when towing a vehicle.
•
Do not tow further than 50 km.
•
If a breakdown vehicle is used, the vehicle must be towed with the front
wheels raised.Note
•
Observe legal requirements when towing or tow-starting.
•
Switch on the hazard warning lights of both vehicles. However, observe
any regulations to the contrary.
•
For technical reasons, vehicles with an automatic gearbox must not be
tow-started.
•
If damage to your vehicle means that there is no lubricant in the gearbox,
you must raise the drive wheels while the vehicle is being towed.
•
If the vehicle has to be towed more than 50 km, the front wheels must be
raised during towing, and towing should be carried out by a qualified person.
•
The steering wheel is locked when the vehicle has no electrical power. The
vehicle must then be towed with the front wheels raised. Towing should be
carried out by a qualified person.
•
The towing eye should always be kept in the vehicle..
AlteaXL_EN.book Seite 266 M ontag, 2. Februar 2009 12:26 12
Page 289 of 297
Index
288CCatalytic converter . . . . . . . . . . . . . . . . . . . . . . 191
CD changer . . . . . . . . . . . . . . . . . . . . . . . . . . . . 135
Central locking . . . . . . . . . . . . . . . . . . . . . . . . . . 91
Automatic speed dependent locking and un-locking system* . . . . . . . . . . . . . . . . . . . . . 93
Emergency unlocking system . . . . . . . . . . . . 93
Locking system for invo luntary unlocking . . 93
Selective unlocking system* . . . . . . . . . . . . 92
Unlocking system* . . . . . . . . . . . . . . . . . . . . 93
Central locking button Central locking . . . . . . . . . . . . . . . . . . . . . . . 94
unlocking . . . . . . . . . . . . . . . . . . . . . . . . . . . . 94
Centre arm rest . . . . . . . . . . . . . . . . . . . . . . . . . 135
Cetane number . . . . . . . . . . . . . . . . . . . . . . . . . 212
Changing gear See Manual gearbox . . . . . . . . . . . . . . . . . . 169
Changing the lamps Main headlight lamps . . . . . . . . . . . . . . . . . 254
rear lights . . . . . . . . . . . . . . . . . . . . . . . . . . . 257
Changing the main headlight lamps
dipped beam lights . . . . . . . . . . . . . . . . . . . 255
main beam lights . . . . . . . . . . . . . . . . . . . . 256
Side lights . . . . . . . . . . . . . . . . . . . . . . . . . . 257
turn signal lamps . . . . . . . . . . . . . . . . . . . . 255
Changing the r ear light lamps
Position light, fog light and rear light on the tailgate . . . . . . . . . . . . . . . . . . . . . . . . . . . 259 Changing the rear lights
Indicator, side and brake lights on the bodywork . . . . . . . . . . . . . . . . . . . . . . . . . 258
luggage compartment lights . . . . . . . . . . . 260
Changing windscreen wiper blades . . . . . . . . . 223
Chassis number . . . . . . . . . . . . . . . . . . . . . . . . 270
Checking . . . . . . . . . . . . . . . . . . . . . . . . . . . . . . 228
Checking battery electrolyte level . . . . . . . . . . 228
Checking engine oil level . . . . . . . . . . . . . . . . . 217
Child safety . . . . . . . . . . . . . . . . . . . . . . . . . . . . . 45
Child seat . . . . . . . . . . . . . . . . . . . . . . . . . . . . . . . 47 Categorisation in groups . . . . . . . . . . . . . . . 47
Group 1 . . . . . . . . . . . . . . . . . . . . . . . . . . . . . 48
Group 2 . . . . . . . . . . . . . . . . . . . . . . . . . . . . . 48
Group 3 . . . . . . . . . . . . . . . . . . . . . . . . . . . . . 48
Groups 0 and 0+ . . . . . . . . . . . . . . . . . . . . . . 47
ISOFIX system . . . . . . . . . . . . . . . . . . . . . . . . 50
Safety notes . . . . . . . . . . . . . . . . . . . . . . . . . . 46
Securing . . . . . . . . . . . . . . . . . . . . . . . . . . . . . 49
Child seats on the front passenger seat . . . . . . . . . . . . . 30
Cigarette lighter* . . . . . . . . . . . . . . . . . . . . . . . . 144
Cleaning alloy wheel rims . . . . . . . . . . . . . . . . 204
Cleaning and caring for your vehicle . . . . . . . . 199
Cleaning chrome . . . . . . . . . . . . . . . . . . . . . . . . 203
Cleaning engine compartment . . . . . . . . . . . . . 205
Cleaning steel wheel rims . . . . . . . . . . . . . . . . 204
Cleaning windows . . . . . . . . . . . . . . . . . . . . . . . 202
Climatic* . . . . . . . . . . . . . . . . . . . . . . . . . . . . . . 153
Climatronic General notes . . . . . . . . . . . . . . . . . . . . . . . 161 Clock . . . . . . . . . . . . . . . . . . . . . . . . . . . . . . . . . . 57
Cloth seat covers cleaning . . . . . . . . . . . . . . . . 206
Clothes hook . . . . . . . . . . . . . . . . . . . . . . . . . . . 139
Cockpit . . . . . . . . . . . . . . . . . . . . . . . . . . . . . . . . . 53
Control lamps . . . . . . . . . . . . . . . . . . . . . . . . . . . 73
Control lighting . . . . . . . . . . . . . . . . . . . . . . . . . . 53
Controls
Electric windows . . . . . . . . . . . . . . . . . . . . . 104
Light switches . . . . . . . . . . . . . . . . . . . . . . . 109
Convenience closing Sliding/tilting roof . . . . . . . . . . . . . . . . . . . 107
Windows . . . . . . . . . . . . . . . . . . . . . . . . . . . 106
Convenience opening Windows . . . . . . . . . . . . . . . . . . . . . . . . . . . 106
Coolant . . . . . . . . . . . . . . . . . . . . . . . . . . . 220, 221 Coolant . . . . . . . . . . . . . . . . . . . . . . . . . . . . . 63
Coolant Level . . . . . . . . . . . . . . . . . . . . . . . . . . . 221
Coolant level warning light . . . . . . . . . . . . . . . . . . . . . . . . . 75
Coolant Loss . . . . . . . . . . . . . . . . . . . . . . . . . . . 221
Coolant temperature Display . . . . . . . . . . . . . . . . . . . . . . . . . . . . . . 56
Safety instructions . . . . . . . . . . . . . . . . . . . . 76
Cruise control system . . . . . . . . . . . . . . . . . . . . 179 Warning lamp . . . . . . . . . . . . . . . . . . . . . . . . 80
Cruise control* Turning off the cruise control system . . . . 182
Curtain airbags . . . . . . . . . . . . . . . . . . . . . . . . . . 40 Description . . . . . . . . . . . . . . . . . . . . . . . . . . 40
Function . . . . . . . . . . . . . . . . . . . . . . . . . . . . . 41
Safety notes . . . . . . . . . . . . . . . . . . . . . . . . . . 41
AlteaXL_EN.book Seite 288 M ontag, 2. Februar 2009 12:26 12