146 Seat Altea XL 2009 Owner's Manual
[x] Cancel search | Manufacturer: SEAT, Model Year: 2009, Model line: Altea XL, Model: Seat Altea XL 2009Pages: 297, PDF Size: 9.36 MB
Page 147 of 297
Seats and stowage
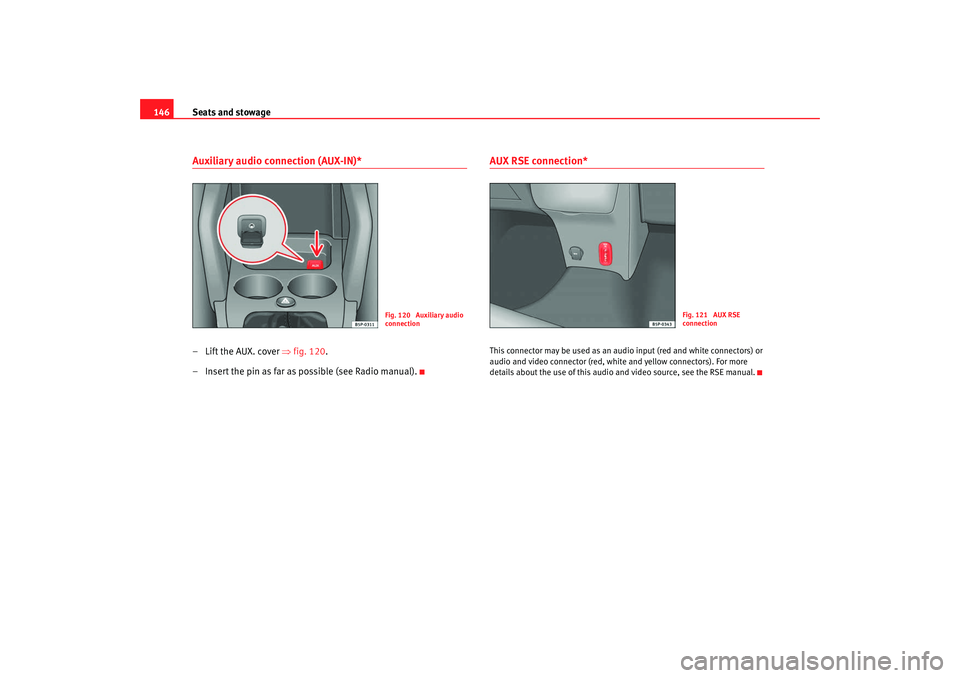
146Auxiliary audio connection (AUX-IN)*–Lift the AUX. cover ⇒ fig. 120.
– Insert the pin as far as possible (see Radio manual).
AUX RSE connection*This connector may be used as an audio input (red and white connectors) or
audio and video connector (red, white and yellow connectors). For more
details about the use of this audio and video source, see the RSE manual.
Fig. 120 Auxiliary audio
connection
Fig. 121 AUX RSE
connection
AlteaXL_EN.book Seite 146 Montag, 2. Februar 2009 12:26 12
Page 174 of 297
Driving173
Safety First
Operating instructions
Practical tips
Te c h n i c a l D a t a
•
If you must stop on a hill, always hold the vehicle using the footbrake
to avoid rolling back.
•
The footbrake must not be held fo r a long period of time, not even
lightly; continuous braking will cause overheating of the brakes and a
reduction or even a loss of braking power and a significant increase in
braking distances.
•
Never allow the vehicle to coast down a gradient with the selector lever
in positions N or D, even when the engine is not running. For descents, the
use of the Tiptronic programme is recommended to keep the speed
reduced.Caution
•
Never use the automatic gearbox to hold the vehicle stationary on a hill,
even for short periods, as this may overheat the gearbox and cause damage.
Apply the handbrake or depress the foot brake to hold the vehicle in position.
•
If the vehicle is allowed to roll with the engine stopped but the selector in
position N then the gearbox may be damaged because it will not be
lubricated.
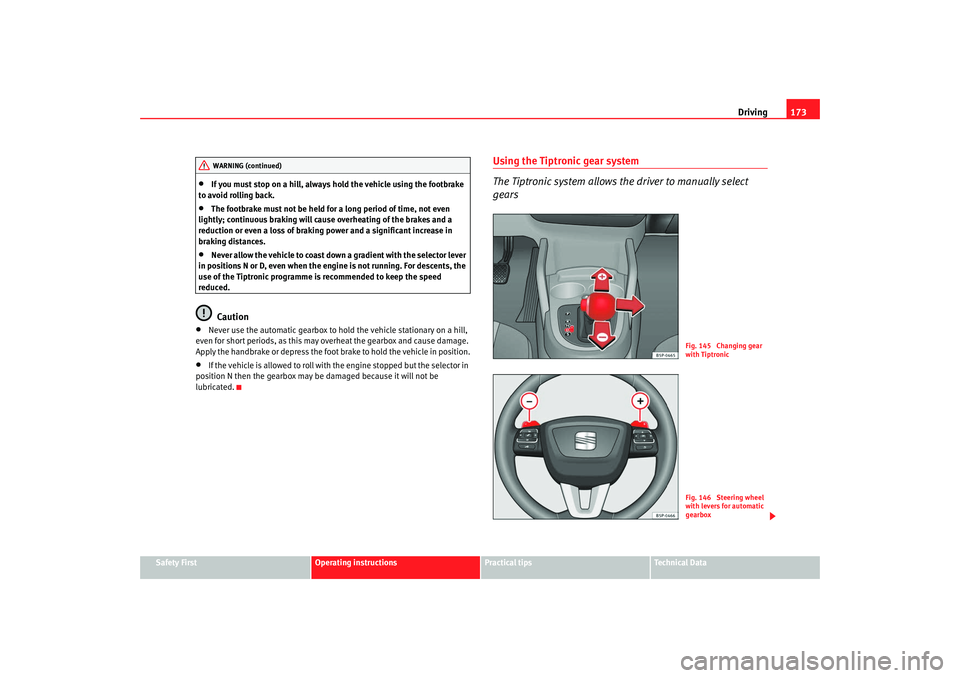
Using the Tiptronic gear system
The Tiptronic system allows the driver to manually select
gears
WARNING (continued)
Fig. 145 Changing gear
with TiptronicFig. 146 Steering wheel
with levers for automatic
gearbox
AlteaXL_EN.book Seite 173 M ontag, 2. Februar 2009 12:26 12
Page 175 of 297
Driving
174
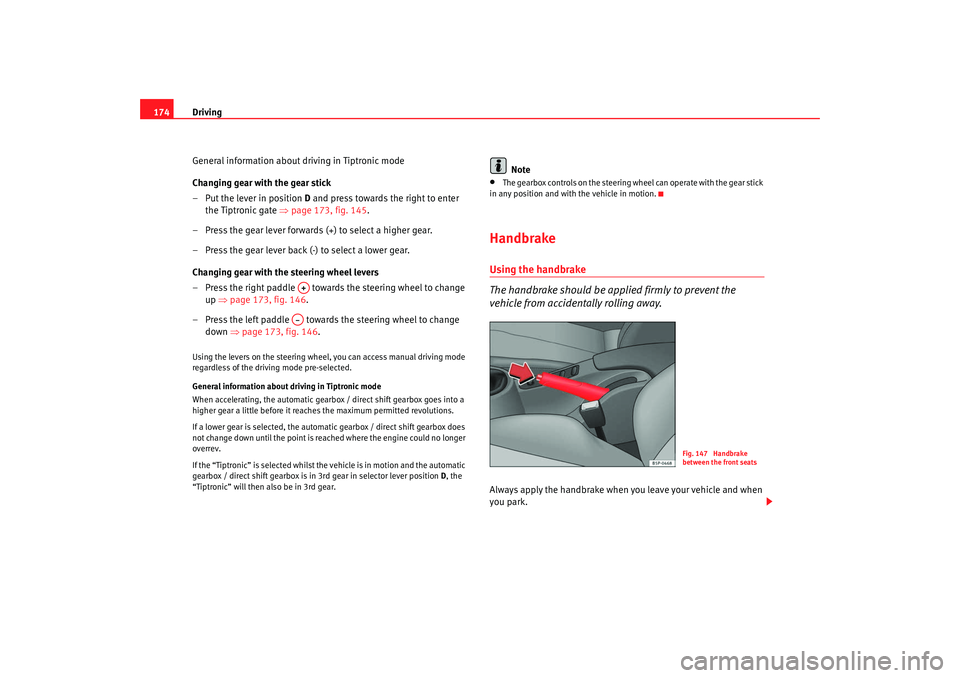
General information about driving in Tiptronic mode
Changing gear with the gear stick
– Put the lever in position D and press towards the right to enter
the Tiptronic gate ⇒page 173, fig. 145 .
– Press the gear lever forwards (+) to select a higher gear.
– Press the gear lever back (-) to select a lower gear.
Changing gear with the steering wheel levers
– Press the right paddle towards the steering wheel to change up ⇒page 173, fig. 146 .
– Press the left paddle towards the steering wheel to change down ⇒page 173, fig. 146 .Using the levers on the steering wheel, you can access manual driving mode
regardless of the driv ing mode pre-selected.
General information about driving in Tiptronic mode
When accelerating, the automatic gearbox / direct shift gearbox goes into a
higher gear a little before it reac hes the maximum permitted revolutions.
If a lower gear is selected, the automatic gearbox / direct shift gearbox does
not change down until the point is reached where the engine could no longer
overrev.
If the “Tiptronic” is selected whilst the vehicle is in motion and the automatic
gearbox / direct shift gearbox is in 3rd gear in selector lever position D, the
“Tiptronic” will then also be in 3rd gear.
Note
•
The gearbox controls on the steering wheel can operate with the gear stick
in any position and with the vehicle in motion.
HandbrakeUsing the handbrake
The handbrake should be applied firmly to prevent the
vehicle from accidentally rolling away.Always apply the handbrake when you leave your vehicle and when
you park.
A+A–
Fig. 147 Handbrake
between the front seats
AlteaXL_EN.book Seite 174 M ontag, 2. Februar 2009 12:26 12
Page 194 of 297
Driving and the environment193
Safety First
Operating instructions
Practical tips
Te c h n i c a l D a t a
during this initial warm-up phase. It is therefore best to drive off immediately
after starting the engine. Avoid running the engine at high speed.
Periodic maintenance
Periodic maintenance work guarantees
that, before beginning a journey, you
will not waste fuel. A well-serviced engine gives you the benefit of improved
fuel efficiency as well as maximum reliability and an enhanced resale value.
A badly serviced engine can consume up to 10% more fuel than necessary.
Avoid short journeys
To reduce the consumption and emission of polluting gases, the engine and
the exhaust filtration systems should reach the optimum service tempera-
ture .
With the engine cold, fuel consumption is proportionally higher. The engine
does not warm up and fuel consumption does not regularise until having
driven some four kilometres. This is the reason why we recommend avoiding
short trips wherever possible.
Maintain the correct tyre pressures
Bear in mind that keeping the tyres at an adequate pressure saves fuel. If the
tyre pressures are just 1 bar too low, this can put the fuel consumption up by
as much as 5%. Due to the greater roll ing resistance, under-inflation also
increases tyre wear and impairs handling.
The tyre pressures should always be checked when the tyres are cold.
Do not use winter tyres all through the year: they will increase fuel consump-
tion by up to 10%.
Avoid unnecessary weight
Every kilo of extra weight will put up the fuel consumption, so it is worth
checking the luggage compartment occasionally to make sure that no unnec-
essary loads are being transported.
A roof carrier is often left in place for the sake of convenience, even when it is
no longer needed. At a speed of 100-120 km/h your car will use about 12% more fuel as a result of the extra wind resistance caused by the roof carrier
even when it is empty.
Save electrical energy
The engine activates the alternator, whic
h produces electricity. With the need
for electricity, fuel consumption is also increased. Because of this, always
turn off electrical equipme nt when you do not need them. Examples of equip-
ment that use a lot of electricity are: the fan at high speeds, the rear window
heating or the seat heaters*.
Environmental friendlinessEnvironmental protection is a top priori ty in the design, choice of materials
and production of your new Seat.
Design measures for economical recycling•
Joints and connections designed for ease of dismantling
•
Modular construction to facilitate dismantling
•
Increased use of single-grade materials
•
Plastic parts and elastomers are labelled in accordance with ISO 1043,
ISO 11469 and ISO 1629
Choice of materials
•
Nearly all materials used can be recycled
•
Similar types of plastics grouped together for easy recycling
•
Recycled materials used in manufacture
•
Reduction of the plastic volatile components
•
CFC-free refrigerant in air conditioning
Compliance with prohibited materials laws : cadmium, asbestos, lead,
mercury, chrome VI.
AlteaXL_EN.book Seite 193 M ontag, 2. Februar 2009 12:26 12
Page 288 of 297
Index287
Index
AABS . . . . . . . . . . . . . . . . . . . . . . . . . . . . . . . . . . . 184
Warning lamp . . . . . . . . . . . . . . . . . . . . . . . . . 77
Accessories . . . . . . . . . . . . . . . . . . . . . . . . . . . . 208
Acoustic signal . . . . . . . . . . . . . . . . . . . . . . . . . . 19
Acoustic warning . . . . . . . . . . . . . . . . . . . . . . . . 165
Adjusting the seat belt height . . . . . . . . . . . . . . 26
AFS (curve lights) . . . . . . . . . . . . . . . . . . . . . . . . 113
Air conditioner* 2C-Climatronic* . . . . . . . . . . . . . . . . . . . . . . 157
Air conditioning system General notes . . . . . . . . . . . . . . . . . . . . . . . . 161
Air conditioning* . . . . . . . . . . . . . . . . . . . . . . . . 153
Air recirculation mode 2C-Climatronic . . . . . . . . . . . . . . . . . . . . . . . 161
Manual air conditioning . . . . . . . . . . . . . . . 155
Airbag covers . . . . . . . . . . . . . . . . . . . . . . . . . . . . 35
Airbag system . . . . . . . . . . . . . . . . . . . . . . . . . . . 29 Curtain airbags . . . . . . . . . . . . . . . . . . . . . . . 40
Front airbags . . . . . . . . . . . . . . . . . . . . . . . . . 33
Side airbags . . . . . . . . . . . . . . . . . . . . . . . . . . 36
Warning lamp . . . . . . . . . . . . . . . . . . . . . . . . . 30
Alarm system Switching off . . . . . . . . . . . . . . . . . . . . . . . . 100
Alternator Warning lamp . . . . . . . . . . . . . . . . . . . . . . . . . 78
Ambient temperature display . . . . . . . . . . . . 62, 69 Anti-freeze . . . . . . . . . . . . . . . . . . . . . . . . . . . . . 220
Anti-lock brake system . . . . . . . . . . . . . . . . . . . 184
Warning lamp . . . . . . . . . . . . . . . . . . . . . . . . . 77
Anti-puncture tyres . . . . . . . . . . . . . . . . . . . . . . 233
Anti-theft alarm system . . . . . . . . . . . . . . . . . . . 100 Switching off . . . . . . . . . . . . . . . . . . . . . . . . 100
Anti-theft wheel bolts . . . . . . . . . . . . . . . . . . . . 242
Aquaplaning . . . . . . . . . . . . . . . . . . . . . . . . . . . 233
Ashtray* . . . . . . . . . . . . . . . . . . . . . . . . . . . . . . . 144
Automatic anti-dazzle interior mirror* Activating the anti-dazzle function . . . . . . 125
Deactivating anti-dazzle function . . . . . . . . 125
Automatic car wash tunnel . . . . . . . . . . . . . . . . 200
Automatic gearbox / DS G automatic gearbox . 170
Automatic lighting . . . . . . . . . . . . . . . . . . . . . . . 110
Automatic mode 2C-Climatronic . . . . . . . . . . . . . . . . . . . . . . . 159
Automatic wiper/wash function for the rear window 124
Auxiliary audio connection: AUX-IN . . . . . . . . . 146
BBall coupling . . . . . . . . . . . . . . . . . . . . . . . . . . . 196
BAS . . . . . . . . . . . . . . . . . . . . . . . . . . . . . . . . . . . 183 Battery
Changing . . . . . . . . . . . . . . . . . . . . . . . . . . . 229
Charging . . . . . . . . . . . . . . . . . . . . . . . . . . . . 229
Winter conditions . . . . . . . . . . . . . . . . . . . . 227
Belt tension device Disposal . . . . . . . . . . . . . . . . . . . . . . . . . . . . . 27
Warning lamp . . . . . . . . . . . . . . . . . . . . . . . . 30
Belt tension devices . . . . . . . . . . . . . . . . . . . . . . 27
Biodiesel . . . . . . . . . . . . . . . . . . . . . . . . . . . . . . 212
Biodiesel fuel . . . . . . . . . . . . . . . . . . . . . . . . . . . 212
Bonnet . . . . . . . . . . . . . . . . . . . . . . . . . . . . . . . . 215
Brake assist system . . . . . . . . . . . . . . . . . . . . . 183
Brake fluid . . . . . . . . . . . . . . . . . . . . . . . . . . . . . 226 Brake fluid . . . . . . . . . . . . . . . . . . . . . . . . . . . 63
Changing . . . . . . . . . . . . . . . . . . . . . . . . . . . 226
Brake pads . . . . . . . . . . . . . . . . . . . . . . . . . . . . . 190
Brake servo . . . . . . . . . . . . . . . . . . . . . . . 183, 190
Brake system . . . . . . . . . . . . . . . . . . . . . . . . . . . 226 Brake servo . . . . . . . . . . . . . . . . . . . . . . . . . 188
Brakes . . . . . . . . . . . . . . . . . . . . . . . . . . . . . 188
Warning lamp . . . . . . . . . . . . . . . . . . . . . . . . 79
Brakes . . . . . . . . . . . . . . . . . . . . . . . . . . . . . . . . 190
Braking distance . . . . . . . . . . . . . . . . . . . . . . . . 190
Bulb changes general notes . . . . . . . . . . . . . . . . . . . . . . . . 253
Bulb defect warning lamp . . . . . . . . . . . . . . . . . . . . . . . . . 79
Buzzer . . . . . . . . . . . . . . . . . . . . . . . . . . . . 116, 165
AlteaXL_EN.book Seite 287 M ontag, 2. Februar 2009 12:26 12