Volume Seat Altea XL 2010 Owner's Manual
[x] Cancel search | Manufacturer: SEAT, Model Year: 2010, Model line: Altea XL, Model: Seat Altea XL 2010Pages: 312, PDF Size: 8.41 MB
Page 90 of 312
Steering wheel controls
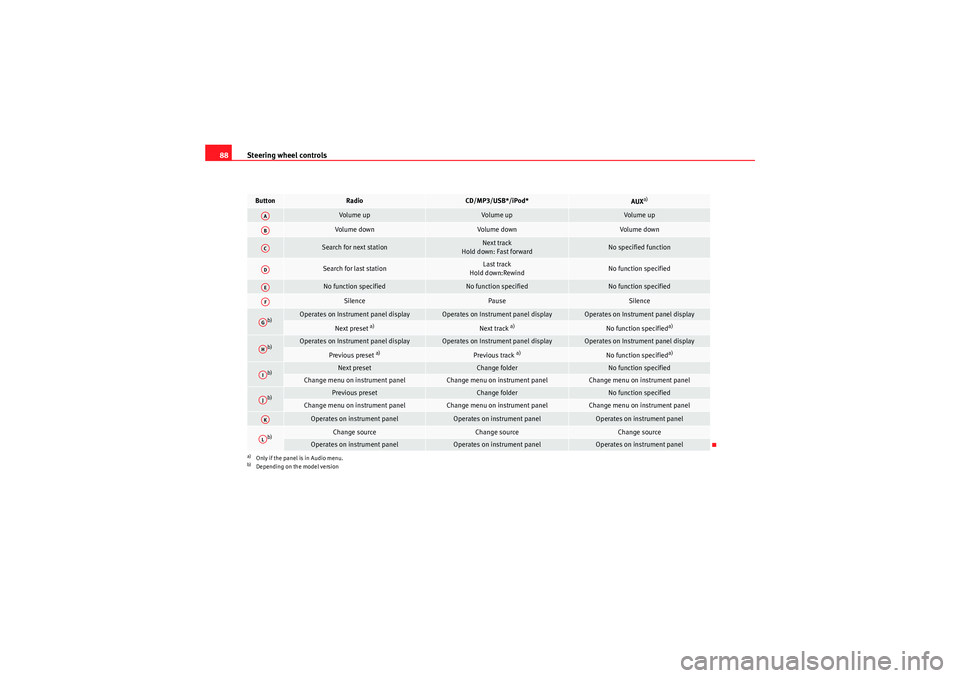
88Button
Radio
CD/MP3/USB*/iPod*
AUX
a)
a)Only if the panel is in Audio menu.
Vol u m e up
Vol um e up
Vol um e up
Volume down
Volume down
Volume down
Search for next station
Next track
Hold down: Fast forward
No specified function
Search for last station
Last track
Hold down:Rewind
No function specified
No function specified
No function specified
No function specified
Silence
Pause
Silence
b)
b)Depending on the model version
Operates on Instrument panel display
Operates on Instrument panel display
Operates on Instrument panel display
Next preset
a)
Next track
a)
No function specified
a)
b)
Operates on Instrument panel display
Operates on Instrument panel display
Operates on Instrument panel display
Previous preset
a)
Previous track
a)
No function specified
a)
b)
Next preset
Change folder
No function specified
Change menu on instrument panel
Change menu on instrument panel
Change menu on instrument panel
b)
Previous preset
Change folder
No function specified
Change menu on instrument panel
Change menu on instrument panel
Change menu on instrument panel
Operates on instrument panel
Operates on instrument panel
Operates on instrument panel
b)
Change source
Change source
Change source
Operates on instrument panel
Operates on instrument panel
Operates on instrument panel
AAABACADAEAFAGAHAIAJAKAL
AlteaXL_EN.book Seite 88 Dienstag, 1. September 2009 10:37 10
Page 91 of 312
Steering wheel controls89
Safety First
Operating instructions
Practical tips
Technical Data
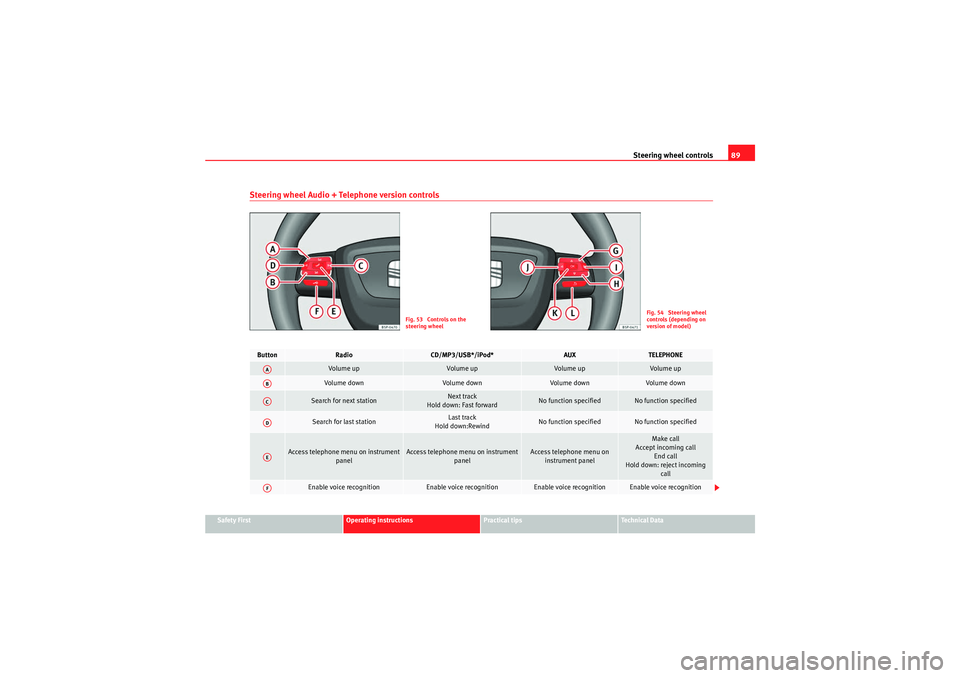
Steering wheel Audio + Telephone version controls
Fig. 53 Controls on the
steering wheel
Fig. 54 Steering wheel
controls (depending on
version of model)
Button
Radio
CD/MP3/USB*/iPod*
AUX
TELEPHONE
Vol um e up
Volume up
Vol u m e up
Vol um e u p
Volu m e d own
Volum e dow n
Vol um e d own
Vol u m e d own
Search for next station
Next track
Hold down: Fast forward
No function specified
No function specified
Search for last station
Last track
Hold down:Rewind
No function specified
No function specified
Access telephone menu on instrument panel
Access telephone menu on instrument panel
Access telephone menu on instrument panel
Make call
Accept incoming call End call
Hold down: reject incoming call
Enable voice recognition
Enable voice recognition
Enable voice recognition
Enable voice recognition
AAABACADAEAF
AlteaXL_EN.book Seite 89 Dienstag, 1. September 2009 10:37 10
Page 93 of 312
Steering wheel controls91
Safety First
Operating instructions
Practical tips
Technical Data
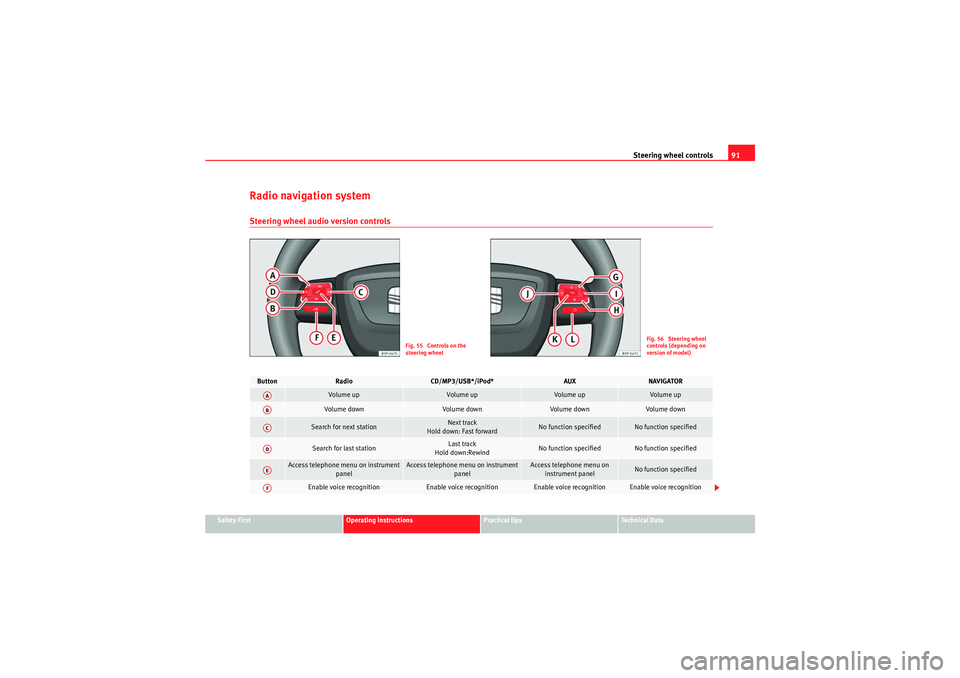
Radio navigation systemSteering wheel audio version controls
Fig. 55 Controls on the
steering wheel
Fig. 56 Steering wheel
controls (depending on
version of model)
Button
Radio
CD/MP3/USB*/iPod*
AUX
NAVIGATOR
Vol um e up
Volume up
Vol u m e up
Vol um e u p
Volu m e d own
Volum e dow n
Vol um e d own
Vol u m e d own
Search for next station
Next track
Hold down: Fast forward
No function specified
No function specified
Search for last station
Last track
Hold down:Rewind
No function specified
No function specified
Access telephone menu on instrument panel
Access telephone menu on instrument panel
Access telephone menu on instrument panel
No function specified
Enable voice recognition
Enable voice recognition
Enable voice recognition
Enable voice recognition
AAABACADAEAF
AlteaXL_EN.book Seite 91 Dienstag, 1. September 2009 10:37 10
Page 95 of 312
Steering wheel controls93
Safety First
Operating instructions
Practical tips
Technical Data
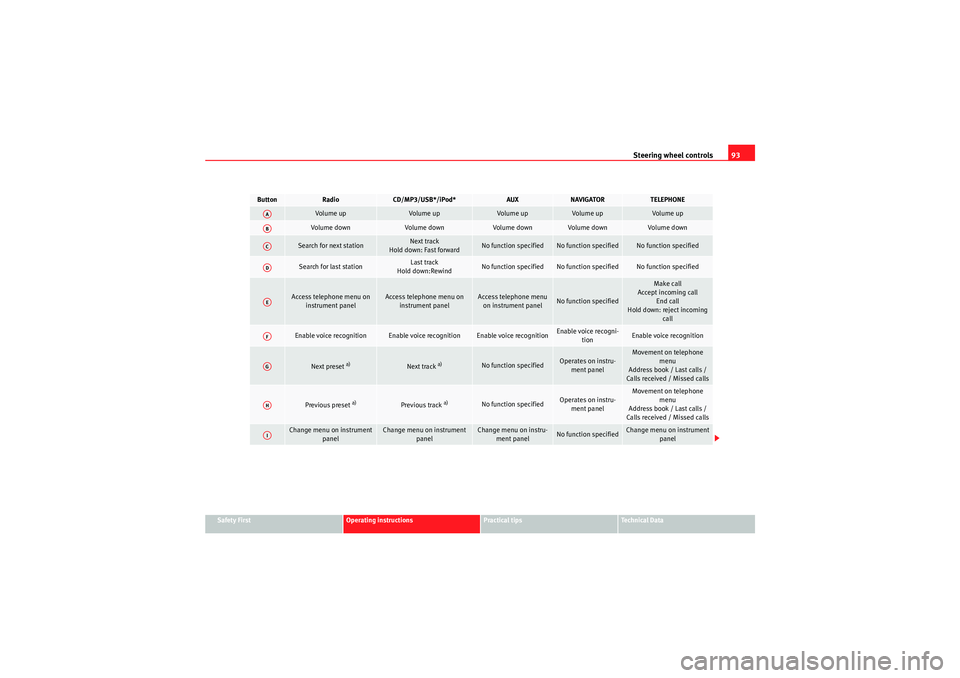
Button
Radio
CD/MP3/USB*/iPod*
AUX
NAVIGATOR
TELEPHONE
Vol u m e up
Vol um e up
Vol u m e up
Volu m e up
Volu m e up
Vol um e d own
Volume down
Vol u m e d own
Volume down
Vol um e d own
Search for next station
Next track
Hold down: Fast forward
No function specified
No function specified
No function specified
Search for last station
Last track
Hold down:Rewind
No function specified
No function specified
No function specified
Access telephone menu on instrument panel
Access telephone menu on instrument panel
Access telephone menu on instrument panel
No function specified
Make call
Accept incoming call End call
Hold down: reject incoming call
Enable voice recognition
Enable voice recognition
Enable voice recognition
Enable voice recogni-tion
Enable voice recognition
Next preset
a)
Next track
a)
No function specified
Operates on instru-ment panel
Movement on telephone menu
Address book / Last calls /
Calls received / Missed calls
Previous preset
a)
Previous track
a)
No function specified
Operates on instru- ment panel
Movement on telephone menu
Address book / Last calls /
Calls received / Missed calls
Change menu on instrument panel
Change menu on instrument panel
Change menu on instru-ment panel
No function specified
Change menu on instrument panel
AAABACADAEAFAGAHAI
AlteaXL_EN.book Seite 93 Dienstag, 1. September 2009 10:37 10
Page 106 of 312
Unlocking and locking
104Anti-theft alarm system*Description of anti-theft alarm system*
The anti-theft alarm triggers if unauthorised movements are
detected around the vehicle.The anti-theft alarm makes it more difficult to break into the vehicle or steal
it. Audible and visible alarms are triggered if the car is opened using the key,
or if unauthorised access to the vehicle is forced.
The anti-theft alarm system is automatically connected on locking the
vehicle. The system is then primed.
When does the system trigger an alarm?
The system triggers an alarm if the following unauthorised actions are carried
out when the car is locked:•Mechanical opening of the vehicle with the vehicle key•Opening a door•Opening the bonnet•Opening the tailgate•Switching on the ignition•Movements in the vehicle•Undue manipulation of the alarm•Battery handling
The acoustic signals sound and the indicators flash for approx. 30 seconds.
This may be repeated up to 10 times depending on the country.
Opening the doors mechanically (emergency opening)
If the remote control function fails, you will have to use the key to unlock the
car. This is done as follows:
•Unfold the key by pressing the button shown by the (arrow).•Use the lock on the driver door to unlock the vehicle. The anti-theft alarm
system remains active, but an alarm is not triggered immediately.•Switch on the ignition within 15 seconds. When the ignition is switched
on, the electronic immobiliser recognises a valid vehicle key and deactivates
the anti-theft alarm system. If you do not switch on the ignition within 15
seconds, the alarm is triggered.
How to switch the alarm off
When the vehicle is unlocked via the unlocking button of the remote control
or when the key is inserted in the ignition lock.Note
•If, after the alarm goes off, access is gained to a second secured zone
(e.g. the tailgate is opened after a door has been opened), the warning signal
is triggered again.•Vehicle monitoring remains active even if the battery is disconnected or
not working for any reason.•The alarm is triggered immediately if one of the battery cables is discon-
nected while the alarm system is active.Volumetric sensor*
Monitoring or control function incorporated in the anti-theft
alarm* which detects unauthorized vehicle entry by means of
ultrasound.The system consists of 3 sensors, 2 emitters and a receptor.
AlteaXL_EN.book Seite 104 Dienstag, 1. September 2009 10:37 10
Page 107 of 312
Unlocking and locking105
Safety First
Operating instructions
Practical tips
Technical Data
Activation
– It is automatically turned on with the anti-theft alarm, when the
vehicle is locked mechanically with the key and when the button
on the remote control is used.
Deactivation
– Press the button on the remote control twice. Only the volu- metric sensor is deactivated. The alarm system remains acti-
vated.
WARNING
•The “safe” security system remains deactivated if the volumetric
sensor is deactivated.•For those vehicles in which a separate sunblind is fitted in the
passenger compartment, the alarm will not function correctly due to inter-
ference with the sensor.Note
•If the alarm has been triggered by the volumetric sensor, this will be indi-
cated by a flashing of the indicator on the driver's door. This flashing will be
different to that for an activated alarm.
AlteaXL_EN.book Seite 105 Dienstag, 1. September 2009 10:37 10
Page 187 of 312
Driving185
Safety First
Operating instructions
Practical tips
Technical Data
WARNING
•If you do not start the vehicle immediately after taking your foot off the
brake pedal, the vehicle may start to roll back under certain conditions.
Depress the brake pedal or use the hand brake immediately.•If the engine stalls, depress the brake pedal or use the hand brake
immediately.•When following a line of traffic uphill, if you want to prevent the vehicle
from rolling back accidentally when starting off, hold the brake pedal down
for a few seconds before starting off.Note
The Official Service or a specialist workshop can tell you if your vehicle is
equipped with this system.Acoustic parking aid system*General notesVarious systems are available to help you when parking or manoeuvring in
tight spaces, depending on the equipment fitted on your vehicle.
The SEAT parking system* gives an acoustic warning if there are any obsta-
cles behind your car.
When you are parking, the SEAT Parking System plus* warns you acoustically
and optically
20) about obstacles “in front of” and “behind” the vehicle.
Note
To ensure the acoustic parking aid works properly, the sensors must be kept
clean and free of snow and ice.SEAT Parking System: Description
The parking system is an acoustic parking aid.Sensors are located in the rear bumper. When the sensors detect an obstacle,
you are alerted by acoustic signals (beeps). The measuring range of the
sensors starts at about:
The acoustic signals sound with increasing frequency as you approach the
obstacle. When the vehicle is less than approx. 0.30 m away from the
obstacle, the warning tone will sound continuously. Do not drive on!
The volume of the warning beeps will be gradually reduced after about 4
seconds if the vehicle remains at a constant distance from a detected
obstacle (it does not affect the permanent acoustic signal).
The parking aid is switched on automatically when reverse gear is engaged.
You will hear a brief acknowledgement tone.
WARNING
•The parking aid is not a replacement for driver awareness. The driver is
personally responsible for safe parking and other manoeuvres.•The sensors have blind spots in which obstacles are not registered.
Always look out for small children and animals because the system will not
20)Vehicles with a navigation system.
Rear
Side
0,60
Centre
1,60
AlteaXL_EN.book Seite 185 Dienstag, 1. September 2009 10:37 10
Page 188 of 312
Driving
186always detect them. Always pay attention when reversing to avoid acci-
dents.•Always keep a close eye on the area around the vehicle and make full
use of the rear-view mirrors.Caution
Please note that low obstacles detected by the system may no longer be
registered by the sensors as the car moves closer, so the system will not give
any further warning. Certain kinds of obstacles (such as wire fences, chains,
thin painted posts or trailer draw bars, etc) may not always be detected by the
system, so take care not to damage the vehicle in such cases.
Note
Please refer to the notes on towing ⇒page 187.SEAT Parking System Plus*: Description
The parking system plus is an acoustic and optical parking
aid.Sensors are located in the front and rear bumpers. When the sensors detect
an obstacle, you are alerted by acoustic and optical signals. The measuring
range of the sensors starts at about: The acoustic signals sound with increasing frequency as you approach the
obstacle. When the vehicle is less than approx. 0.30 m away from the
obstacle, the warning tone will sound continuously. Stop moving immedi-
ately!
The volume of the warning beeps will be gradually reduced after about 4
seconds if the vehicle remains at a constant distance from a detected
obstacle (it does not affect the permanent acoustic signal).
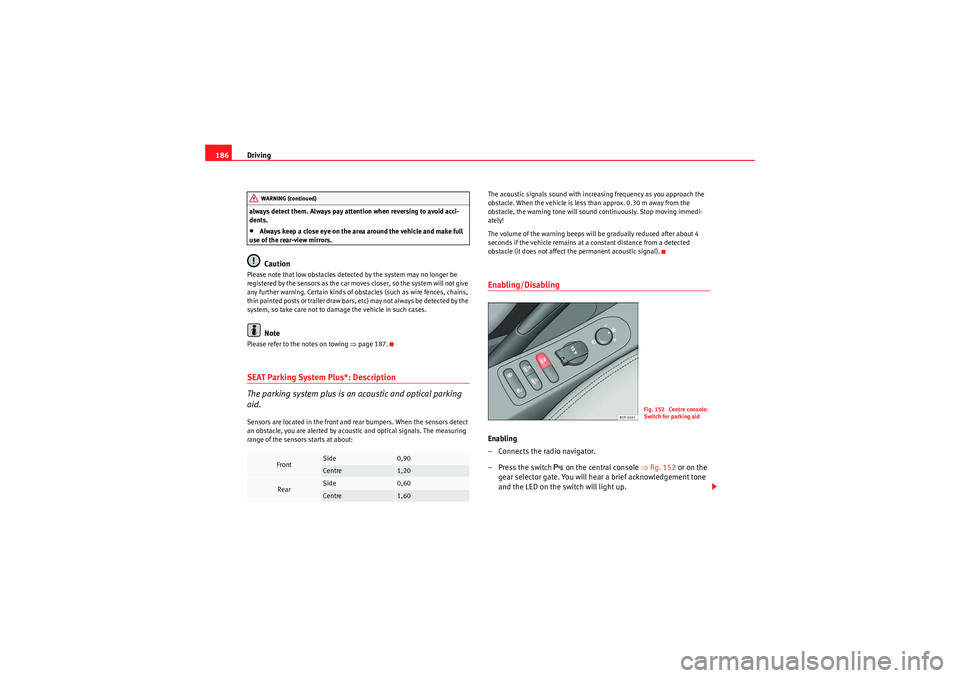
Enabling/DisablingEnabling
– Connects the radio navigator.
–Press the switch
on the central console ⇒
fig. 152 or on the
gear selector gate. You will hear a brief acknowledgement tone
and the LED on the switch will light up.
Front
Side
0,90
Centre
1,20
Rear
Side
0,60
Centre
1,60
WARNING (continued)
Fig. 152 Centre console:
Switch for parking aid
AlteaXL_EN.book Seite 186 Dienstag, 1. September 2009 10:37 10
Page 267 of 312
If and when265
Safety First
Operating instructions
Practical tips
Technical Data
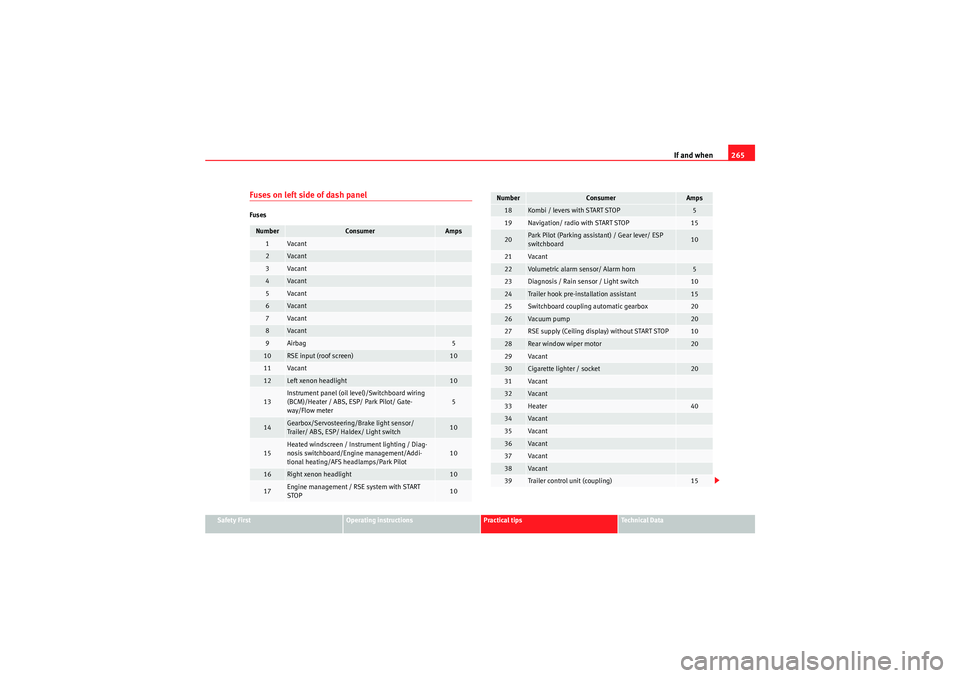
Fuses on left side of dash panelFusesNumber
Consumer
Amps
1
Va can t
2
Va can t
3
Va can t
4
Va can t
5
Va can t
6
Va can t
7
Va can t
8
Va can t
9
Airbag
5
10
RSE input (roof screen)
10
11
Va can t
12
Left xenon headlight
10
13
Instrument panel (oil level)/Switchboard wiring
(BCM)/Heater / ABS, ESP/ Park Pilot/ Gate-
way/Flow meter
5
14
Gearbox/Servosteering/Brake light sensor/
Trailer/ ABS, ESP/ Haldex/ Light switch
10
15
Heated windscreen / Instrument lighting / Diag-
nosis switchboard/Engine management/Addi-
tional heating/AFS headlamps/Park Pilot
10
16
Right xenon headlight
10
17
Engine management / RSE system with START
STOP
10
18
Kombi / levers with START STOP
5
19
Navigation/ radio with START STOP
15
20
Park Pilot (Parking assistant) / Gear lever/ ESP
switchboard
10
21
Va can t
22
Volumetric alarm sensor/ Alarm horn
5
23
Diagnosis / Rain sensor / Light switch
10
24
Trailer hook pre-installation assistant
15
25
Switchboard coupling automatic gearbox
20
26
Vacuum pump
20
27
RSE supply (Ceiling display) without START STOP
10
28
Rear window wiper motor
20
29
Va can t
30
Cigarette lighter / socket
20
31
Va can t
32
Va can t
33
Heater
40
34
Va can t
35
Va can t
36
Va can t
37
Va can t
38
Va can t
39
Trailer control unit (coupling)
15
Number
Consumer
Amps
AlteaXL_EN.book Seite 265 Dienstag, 1. September 2009 10:37 10
Page 310 of 312
Index
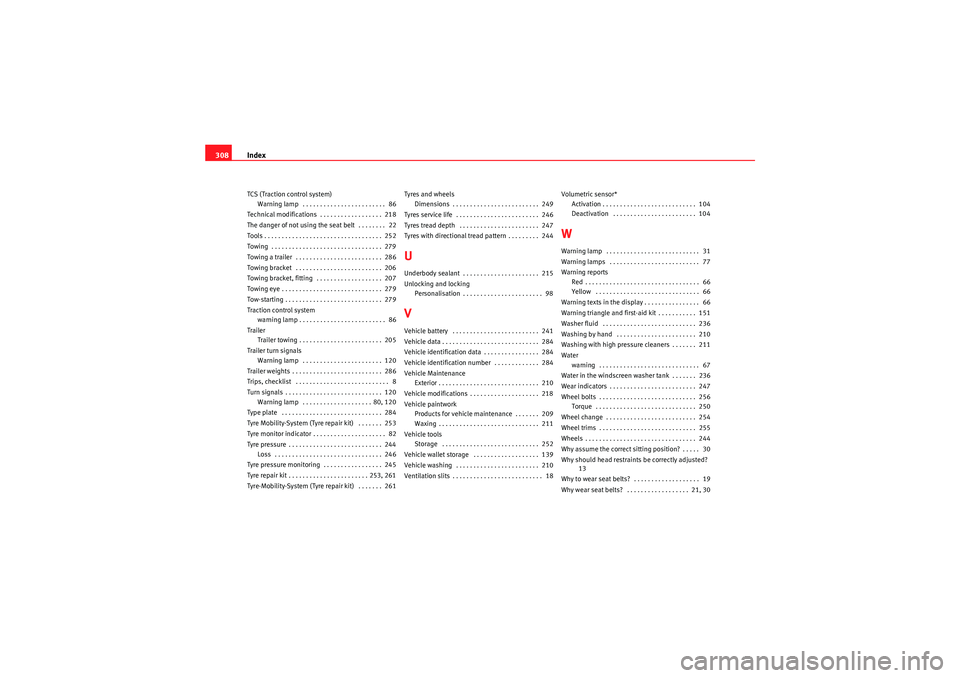
308TCS (Traction control system)
Warning lamp . . . . . . . . . . . . . . . . . . . . . . . . 86
Technical modifications . . . . . . . . . . . . . . . . . . 218
The danger of not using the seat belt . . . . . . . . 22
Tools . . . . . . . . . . . . . . . . . . . . . . . . . . . . . . . . . . 252
Towing . . . . . . . . . . . . . . . . . . . . . . . . . . . . . . . . 279
Towing a trailer . . . . . . . . . . . . . . . . . . . . . . . . . 286
Towing bracket . . . . . . . . . . . . . . . . . . . . . . . . . 206
Towing bracket, fitting . . . . . . . . . . . . . . . . . . . 207
Towing eye . . . . . . . . . . . . . . . . . . . . . . . . . . . . . 279
Tow-starting . . . . . . . . . . . . . . . . . . . . . . . . . . . . 279
Traction control system warning lamp . . . . . . . . . . . . . . . . . . . . . . . . . 86
Trailer Trailer towing . . . . . . . . . . . . . . . . . . . . . . . . 205
Trailer turn signals Warning lamp . . . . . . . . . . . . . . . . . . . . . . . 120
Trailer weights . . . . . . . . . . . . . . . . . . . . . . . . . . 286
Trips, checklist . . . . . . . . . . . . . . . . . . . . . . . . . . . 8
Turn signals . . . . . . . . . . . . . . . . . . . . . . . . . . . . 120 Warning lamp . . . . . . . . . . . . . . . . . . . . 80, 120
Type plate . . . . . . . . . . . . . . . . . . . . . . . . . . . . . 284
Tyre Mobility-System (Tyre repair kit) . . . . . . . 253
Tyre monitor indicator . . . . . . . . . . . . . . . . . . . . . 82
Tyre pressure . . . . . . . . . . . . . . . . . . . . . . . . . . . 244 Loss . . . . . . . . . . . . . . . . . . . . . . . . . . . . . . . 246
Tyre pressure monitoring . . . . . . . . . . . . . . . . . 245
Tyre repair kit . . . . . . . . . . . . . . . . . . . . . . . 253, 261
Tyre-Mobility-System (Tyre repair kit) . . . . . . . 261 Tyres and wheels
Dimensions . . . . . . . . . . . . . . . . . . . . . . . . . 249
Tyres service life . . . . . . . . . . . . . . . . . . . . . . . . 246
Tyres tread depth . . . . . . . . . . . . . . . . . . . . . . . 247
Tyres with directional tread pattern . . . . . . . . . 244
UUnderbody sealant . . . . . . . . . . . . . . . . . . . . . . 215
Unlocking and locking Personalisation . . . . . . . . . . . . . . . . . . . . . . . 98VVehicle battery . . . . . . . . . . . . . . . . . . . . . . . . . 241
Vehicle data . . . . . . . . . . . . . . . . . . . . . . . . . . . . 284
Vehicle identification data . . . . . . . . . . . . . . . . 284
Vehicle identification number . . . . . . . . . . . . . 284
Vehicle MaintenanceExterior . . . . . . . . . . . . . . . . . . . . . . . . . . . . . 210
Vehicle modifications . . . . . . . . . . . . . . . . . . . . 218
Vehicle paintwork Products for vehicle maintenance . . . . . . . 209
Waxing . . . . . . . . . . . . . . . . . . . . . . . . . . . . . 211
Vehicle tools Storage . . . . . . . . . . . . . . . . . . . . . . . . . . . . 252
Vehicle wallet storage . . . . . . . . . . . . . . . . . . . 139
Vehicle washing . . . . . . . . . . . . . . . . . . . . . . . . 210
Ventilation slits . . . . . . . . . . . . . . . . . . . . . . . . . . 18 Volumetric sensor*
Activation . . . . . . . . . . . . . . . . . . . . . . . . . . . 104
Deactivation . . . . . . . . . . . . . . . . . . . . . . . . 104
WWarning lamp . . . . . . . . . . . . . . . . . . . . . . . . . . . 31
Warning lamps . . . . . . . . . . . . . . . . . . . . . . . . . . 77
Warning reportsRed . . . . . . . . . . . . . . . . . . . . . . . . . . . . . . . . . 66
Yellow . . . . . . . . . . . . . . . . . . . . . . . . . . . . . . 66
Warning texts in the display . . . . . . . . . . . . . . . . 66
Warning triangle and first-aid kit . . . . . . . . . . . 151
Washer fluid . . . . . . . . . . . . . . . . . . . . . . . . . . . 236
Washing by hand . . . . . . . . . . . . . . . . . . . . . . . 210
Washing with high pressure cleaners . . . . . . . 211
Water warning . . . . . . . . . . . . . . . . . . . . . . . . . . . . . 67
Water in the windscreen washer tank . . . . . . . 236
Wear indicators . . . . . . . . . . . . . . . . . . . . . . . . . 247
Wheel bolts . . . . . . . . . . . . . . . . . . . . . . . . . . . . 256 Torque . . . . . . . . . . . . . . . . . . . . . . . . . . . . . 250
Wheel change . . . . . . . . . . . . . . . . . . . . . . . . . . 254
Wheel trims . . . . . . . . . . . . . . . . . . . . . . . . . . . . 255
Wheels . . . . . . . . . . . . . . . . . . . . . . . . . . . . . . . . 244
Why assume the correct sitting position? . . . . . 30
Why should head restraints be correctly adjusted? 13
Why to wear seat belts? . . . . . . . . . . . . . . . . . . . 19
Why wear seat belts? . . . . . . . . . . . . . . . . . . 21, 30
AlteaXL_EN.book Seite 308 Dienstag, 1. September 2009 10:37 10